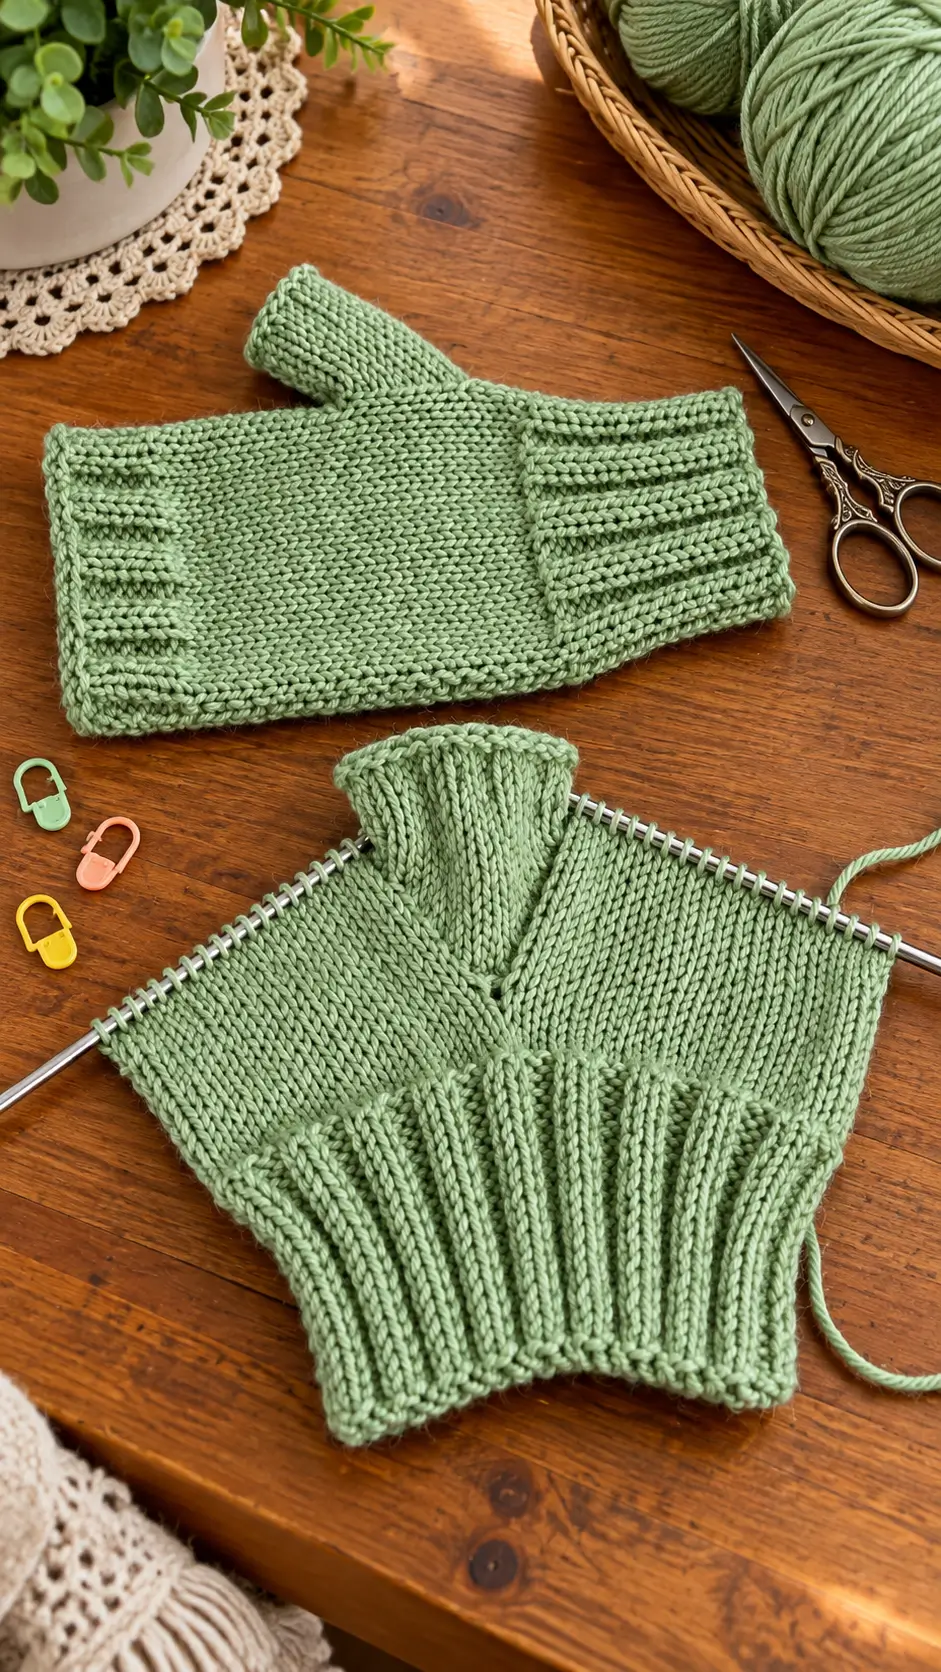
The narrow projection and sharply angled ribbing in the photographed sage-green fabric suggest shaping that cannot be identified from color or texture alone. This sage green ribbed knitting pattern translates the visible techniques into an original flat panel using worsted-weight yarn, 5 mm needles, and paired increases. The project suits knitters familiar with basic knit and purl stitches who want a measured practice piece for garment construction.
The Design: What Makes This Knitted Panel Different
The photographed fabric combines three important elements: elastic ribbing, smooth stockinette, and changes in fabric width. Each element serves a different construction purpose.
Ribbing produces vertical columns that contract laterally. It is commonly used where fabric needs to recover after stretching, including cuffs and garment hems. Stockinette creates a smoother central surface and makes shaping lines easier to inspect.
This original design begins with a 2×2 ribbed base, changes to stockinette, and widens symmetrically through paired increases. The gradual transition provides a practical introduction to shaping without requiring a full sweater pattern.
One frequent error is treating the apparent width of relaxed ribbing as the finished width of the stockinette section. The two fabrics behave differently. Measure each after washing and drying a swatch.
The photographed item may contain additional construction details, including seams or separately attached pieces. Those features are not copied here because their positions and stitch counts cannot be confirmed.
Project Information at a Glance
| Specification | Original Pattern |
|---|---|
| Skill level | Confident beginner to intermediate |
| Working time | Approximately 3–5 hours |
| Construction | Flat, worked in rows |
| Target width | 31 cm at widest point |
| Target height | 24 cm |
| Needle size | 5 mm (US 8) |
| Yarn | Worsted weight |
| Target gauge | 18 sts × 26 rows = 10 cm |
| Maximum stitches | 56 |
| Finishing | Bind off, weave ends, block |
| Best for | Shaping practice or garment sampling |
Time and dimensions are estimates. Finished measurements depend on individual gauge, yarn composition, and blocking.
Materials and Tools
Yarn
- Sage-green worsted-weight yarn — 60–90 g estimated: Choose a smooth wool, acrylic, or blended yarn with clear stitch definition.
- Optional matching yarn — 5–10 g: Reserve extra yarn for testing finishing methods or sewing the panel into a sample.
A yarn with a relatively even twist makes the transition between ribbing and stockinette easier to inspect. Highly textured or fuzzy yarn can obscure increase lines.
The photograph does not establish the fiber composition or commercial yarn brand. Select yarn based on the label’s weight category and the measured gauge rather than trying to identify a brand visually.
Tools
- 5 mm knitting needles: Straight or circular needles suitable for flat knitting.
- Stitch markers: Two removable markers for shaping references.
- Tapestry needle: For weaving yarn ends.
- Scissors: For cutting yarn.
- Measuring tape: For checking gauge and panel dimensions.
- Blocking mat and pins: Optional, depending on fiber content.
Gauge
The target gauge is 18 stitches and 26 rows = 10 × 10 cm in stockinette stitch after blocking.
Cast on at least 26 stitches and work a swatch approximately 15 cm long. Measure the central 10 cm, avoiding the edges.
If your swatch contains more than 18 stitches across 10 cm, the fabric is tighter than the target gauge. Try a larger needle. If it contains fewer than 18 stitches, try a smaller needle.
Standard yarn-weight recommendations provide a starting point, but a knitted swatch is needed to confirm the actual gauge.
Knitting Abbreviations
| Abbreviation | Meaning |
|---|---|
| CO | Cast on |
| K | Knit |
| P | Purl |
| St(s) | Stitch(es) |
| RS | Right side |
| WS | Wrong side |
| K2tog | Knit two stitches together |
| SSK | Slip, slip, knit |
| M1L | Make one left |
| M1R | Make one right |
| BO | Bind off |
| Rep | Repeat |
M1L is made by lifting the strand between stitches from front to back and knitting it through the back loop. M1R lifts the strand from back to front and knits through the front loop. Both create a new stitch without a deliberate eyelet.
Free Sage Green Ribbed Knitting Pattern — Step by Step
This is an original demonstration panel, not a fitted garment. Work back and forth in rows, turning after every row. The right side is the side on which the stockinette knit stitches form visible V-shaped columns.
Part 1: Cast On and Ribbed Base
Using the long-tail cast-on method, CO 40 stitches. The cast-on count is divisible by four, making it suitable for a consistent 2×2 rib.
- Row 1 (RS): *K2, P2*; repeat to end. (40 sts)
- Row 2 (WS): *K2, P2*; repeat to end. (40 sts)
- Rows 3–16: Repeat Rows 1–2 seven more times. (40 sts each row)
At the end of Row 16, the panel contains 40 stitches. The ribbed section is approximately 6 cm deep at the proposed row gauge, although actual ribbing height may differ from stockinette gauge.
Inspect the knit columns. Every raised knit pair should align with the corresponding pair in the preceding row. If a column changes direction unexpectedly, a knit or purl stitch may have been worked incorrectly.
Part 2: Stockinette Transition
The next section changes the fabric from ribbing to stockinette without changing the stitch count.
- Row 17 (RS): Knit all stitches. (40 sts)
- Row 18 (WS): Purl all stitches. (40 sts)
- Row 19 (RS): Knit all stitches. (40 sts)
- Row 20 (WS): Purl all stitches. (40 sts)
The transition creates a visible change in fabric texture. Stockinette lies flatter across its central area but may curl along unsupported edges.
Do not add increases during these four rows. They provide a consistent foundation for the shaping section.
Part 3: Symmetrical Shaping
This section widens the panel from 40 to 56 stitches. On each increase row, add one stitch near each side. Work the increases two stitches in from the edges so the shaping does not interrupt the outermost stitch columns.
Increase row: K2, M1L, knit to the last 2 stitches, M1R, K2.
Plain RS row: Knit all stitches.
WS row: Purl all stitches.
| Row | Instructions | Stitches |
|---|---|---|
| 21 | Increase row | 42 |
| 22 | Purl | 42 |
| 23 | Knit | 42 |
| 24 | Purl | 42 |
| 25 | Increase row | 44 |
| 26 | Purl | 44 |
| 27 | Knit | 44 |
| 28 | Purl | 44 |
| 29 | Increase row | 46 |
| 30 | Purl | 46 |
| 31 | Knit | 46 |
| 32 | Purl | 46 |
| 33 | Increase row | 48 |
| 34 | Purl | 48 |
| 35 | Knit | 48 |
| 36 | Purl | 48 |
| 37 | Increase row | 50 |
| 38 | Purl | 50 |
| 39 | Knit | 50 |
| 40 | Purl | 50 |
| 41 | Increase row | 52 |
| 42 | Purl | 52 |
| 43 | Knit | 52 |
| 44 | Purl | 52 |
| 45 | Increase row | 54 |
| 46 | Purl | 54 |
| 47 | Knit | 54 |
| 48 | Purl | 54 |
| 49 | Increase row | 56 |
| 50 | Purl | 56 |
| 51 | Knit | 56 |
| 52 | Purl | 56 |
The arithmetic is fixed: eight increase rows add two stitches each, producing 16 new stitches. The initial 40 stitches therefore become 56.
Place removable markers near the shaping lines if needed. Do not leave a marker between stitches when working a make-one increase unless you first reposition it so the correct connecting strand remains accessible.
Part 4: Upper Stockinette Section
- Row 53 (RS): Knit. (56 sts)
- Row 54 (WS): Purl. (56 sts)
- Rows 55–62: Repeat Rows 53–54 four times. (56 sts each row)
This section adds ten rows of constant-width stockinette after the final increase.
At the target gauge, 62 rows of stockinette-equivalent height would measure approximately 23.8 cm. The actual panel may be slightly shorter or taller because ribbing has a different vertical gauge.
Part 5: Bind Off
After Row 62, turn the work so the right side faces you. Bind off knitwise across all 56 stitches using a relaxed tension. Leave a yarn tail approximately 15 cm long.
A very tight bind-off may contract the upper edge and distort the shaped sides. Compare the finished upper edge with the width of the stockinette immediately below it.
For a panel intended to be sewn into another item, a provisional cast-on or alternative bind-off may be preferable. Those methods would require changes to the finishing plan.
Understanding the Shaping
The main construction principle is controlled widening. A pair of increases adds two stitches to the width without changing the number of rows. Spacing these increases across repeated four-row intervals creates a gradual taper rather than an abrupt step.
At the target gauge, 40 stitches correspond to approximately 22.2 cm of stockinette width. The final 56 stitches correspond to approximately 31.1 cm. This is a calculated increase of approximately 8.9 cm.
Those measurements describe the stockinette fabric at the stated gauge. The ribbed cast-on section may pull inward considerably when relaxed.
Directional increases are useful because they create recognizable shaping lines.
Finishing and Blocking
Finishing changes the appearance and measured dimensions of knitted fabric. Treat it as part of the construction process rather than a decorative final step.
- Inspect all 56 bound-off stitches for dropped loops or accidental yarn overs.
- Thread the cast-on yarn tail onto a tapestry needle.
- Weave the tail into the wrong side of the ribbing, following the stitch columns.
- Weave the upper yarn tail into the wrong side of the stockinette.
- Check that the shaping edges have the same number of increases.
- Wash or dampen the panel according to the yarn manufacturer’s care instructions.
- Place the panel on a flat blocking surface.
- Arrange the sides symmetrically without stretching the ribbing beyond its natural recovery.
- Allow the fabric to dry fully before removing any pins.
- Measure the width, height, and ribbing depth, then record the actual results.
The finished object is a shaped knitted panel suitable for technique sampling, adaptation, or incorporation into a separately designed project.
7 Technical Tips for Better Ribbing and Shaping
- Prevent ribbing from spreading unevenly. Measure the relaxed ribbing and the stockinette separately over 10 cm; do not assume both fabrics have identical widths.
- Avoid twisted knit columns. Inspect every fourth ribbing row for stitches whose legs cross, particularly after changing from purl to knit.
- Control increase placement. Work both make-one increases exactly two stitches from the respective edges; moving one increase inward creates an uneven shaping line.
- Prevent accidental eyelets. Twist the lifted strand correctly when working M1L or M1R, because knitting an untwisted strand can leave a visible hole.
- Check stitch totals at each shaping interval. The count must rise from 40 to 42 on Row 21 and reach 56 on Row 49; a different total indicates a missed or extra increase.
- Avoid an overly tight bind-off. Check that the upper edge lies flat against the 56-stitch stockinette section rather than pulling inward.
- Prevent distortion during blocking. Measure the panel before pinning and avoid stretching the ribbed base to the full stockinette width, which can reduce its recovery.
Common Problems and Corrections
Why Does the Ribbed Section Look Narrower?
Ribbing contains alternating knit and purl columns that draw together when the fabric is relaxed. This is expected behavior. A narrow ribbed base does not automatically mean the stitch count is incorrect.
If the difference is extreme, compare the gauge of the ribbing and stockinette. Yarn choice and knitting tension can produce substantial changes in contraction.
Why Are Holes Appearing Beside the Increases?
The connecting strand may not have been twisted when creating the new stitch. For M1L, knit the lifted strand through its back loop. For M1R, lift it from behind and knit through the front loop. Both methods twist the strand to close the opening.
Why Is One Side Longer Than the Other?
An uneven edge can result from extra rows, inconsistent tension, or accidental increases. Count the rows along both sides and compare the eight planned increase positions.
Blocking may correct minor tension differences. It cannot reliably correct missing or extra stitches.
Can This Panel Become a Sweater?
Not without additional pattern development. A wearable sweater requires body measurements, neckline shaping, armhole construction, sleeve dimensions, and an assembly plan.
This panel can help test stitch patterns and shaping techniques before those dimensions are calculated. It should not be treated as a ready-to-wear sweater pattern.
Conclusion
This sage green ribbed knitting pattern provides a calculated example of how ribbing, stockinette, and symmetrical increases can be combined in one flat piece. The 40-stitch cast-on expands to 56 stitches through eight paired increase rows, followed by a constant-width section and bind-off. The dimensions are based on a proposed gauge rather than measurements taken from the photograph.
Before adapting the panel into clothing, block a gauge swatch and record the actual stitch and row measurements. Save the project to Pinterest or share your finished sample on Instagram using #SageGreenRibbedKnitting.
Which part of the photographed construction would you most like to reproduce: the narrow upper projection or the angled ribbed transition?