Introduction
A cornucopia only reads correctly when its wide harvest opening narrows into a curved, upward-turning tail. This crochet cornucopia pattern builds that structure first, then surrounds it with maple-style leaves, oak-style leaves, simple oval leaves, berries, and stuffed acorns. Worked mainly in DK or light worsted yarn, the finished arrangement becomes a substantial autumn table centerpiece rather than a small appliqué.
The Design: What Makes This Crochet Cornucopia Different
The horn is the structural center of this design. Its opening needs enough diameter to frame several leaves and acorns, while the opposite end decreases gradually before curling upward. Short shaping sections create the curve without requiring wire inside the entire horn.
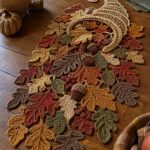
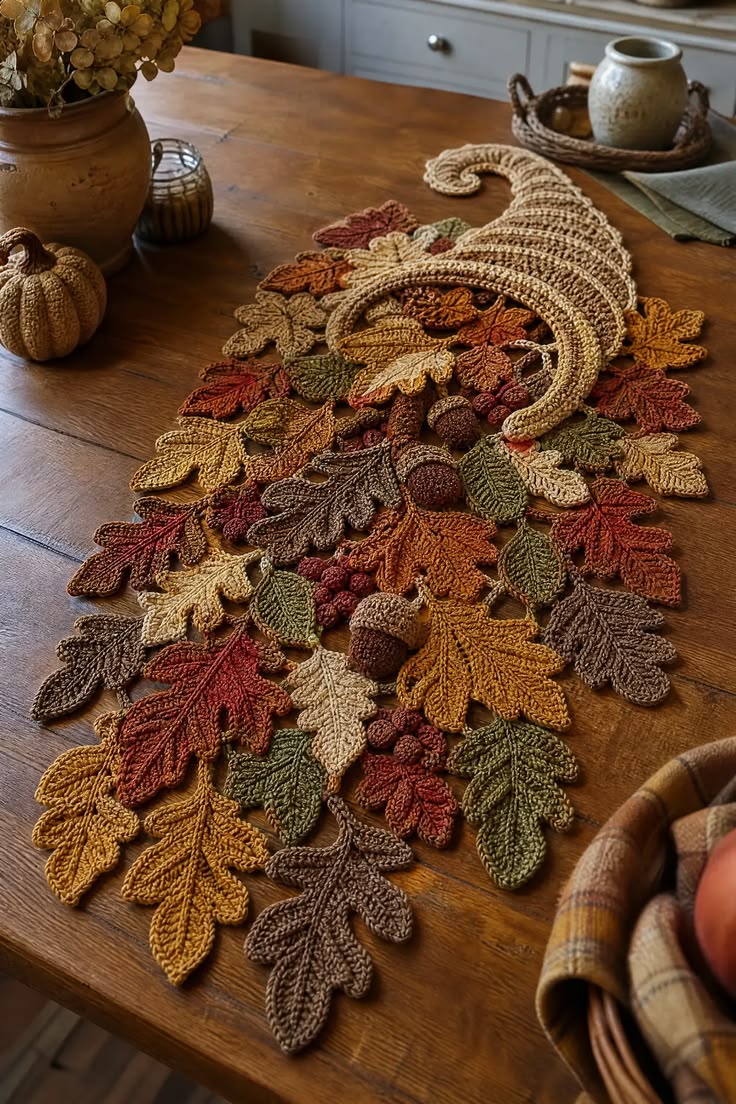
The second design decision is deliberate variation. The photographed arrangement combines broad lobed leaves, narrow oval leaves, acorns, and berry clusters instead of repeating one motif. Rust, mustard, olive, cream, burgundy, and brown divide those shapes visually.
Finally, the pieces overlap instead of being arranged edge to edge. That overlap matters. A common mistake with a crochet fall centerpiece is spacing every motif evenly, which produces a flat garland effect. The horn should remain the highest element while leaves form an irregular runner underneath it.
Project Info at a Glance
| Skill Level | Time | Finished Size | Hook | Best For |
|---|---|---|---|---|
| Intermediate | 8–12 hours | Adjustable, approximately 60–90 cm arrangement | 3.5–4.0 mm | Fall tables, Thanksgiving décor, sideboards |
The overall centerpiece dimensions are adjustable because the photographed design consists of separate motifs rather than one fixed rectangular fabric. As a useful scale reference, published DK autumn-leaf patterns made with a 3.5 mm hook produce oak leaves around 7.4 × 4.2 cm and maple leaves around 8.5 × 8.5 cm.
Materials and Tools
Yarn
- Warm tan — DK or light worsted yarn — approximately 100–150 g for the cornucopia.
- Rust — DK yarn — approximately 25–40 g for leaves.
- Mustard — DK yarn — approximately 25–40 g for leaves.
- Olive green — DK yarn — approximately 20–30 g for leaves.
- Dark brown — DK or worsted yarn — approximately 15–25 g for acorn caps and leaves.
- Medium brown — DK or worsted yarn — approximately 15–25 g for acorn bodies.
- Cream — DK yarn — approximately 15–25 g for pale leaves.
- Burgundy — DK yarn — approximately 10–15 g for berries and accent leaves.
These quantities are estimates for the photo-inspired arrangement rather than measurements from a commercial pattern. Yarn consumption changes according to the number of motifs, fiber, tension, and finished centerpiece length.
Tools
- 3.5 mm crochet hook for leaves and smaller motifs
- 4.0 mm crochet hook for the cornucopia and acorns
- Polyester stuffing
- Tapestry needle
- Locking stitch markers
- Scissors
- Blocking mat and pins
- Optional flexible craft wire for a more pronounced horn curl
Abbreviations
- MR — magic ring
- ch — chain
- sc — single crochet
- hdc — half double crochet
- dc — double crochet
- tr — treble crochet
- inc — increase
- dec — decrease
- sl st — slip stitch
- st/sts — stitch/stitches
- BLO — back loop only
- FO — fasten off
For an invisible decrease, insert the hook through the front loops of the next two stitches, yarn over, pull through both front loops, then complete the single crochet.
Pattern — Step by Step
This is an original photo-inspired construction. The cornucopia is worked in continuous rounds, while the leaves are made flat. Stitch counts appear at the end of each horn and acorn round.
Cornucopia Horn
Yarn: warm tan. Use a 4.0 mm hook.
Begin at the narrow curled end and work toward the large opening.
R1: 6 sc in MR. (6)
R2: Sc around. (6)
R3: Sc around. (6)
R4: (Sc 1, inc) ×3. (9)
R5: Sc around. (9)
R6: Sc around. (9)
R7: (Sc 2, inc) ×3. (12)
R8: Sc around. (12)
R9: Sc around. (12)
R10: (Sc 3, inc) ×3. (15)
R11: Sc around. (15)
R12: Sc around. (15)
R13: (Sc 4, inc) ×3. (18)
R14: Sc around. (18)
R15: Sc around. (18)
R16: (Sc 5, inc) ×3. (21)
R17: Sc around. (21)
R18: Sc around. (21)
R19: (Sc 6, inc) ×3. (24)
R20: Sc around. (24)
R21: Sc around. (24)
R22: (Sc 7, inc) ×3. (27)
R23: Sc around. (27)
R24: Sc around. (27)
R25: (Sc 8, inc) ×3. (30)
R26: Sc around. (30)
R27: Sc around. (30)
R28: (Sc 9, inc) ×3. (33)
R29: Sc around. (33)
R30: Sc around. (33)
R31: (Sc 10, inc) ×3. (36)
R32: Sc around. (36)
R33: Sc around. (36)
R34: (Sc 11, inc) ×3. (39)
R35: Sc around. (39)
R36: (Sc 12, inc) ×3. (42)
Begin adding stuffing lightly from this point. The horn should retain its shape without becoming rigid.
R37–R42: Sc around. (42)
The 42-stitch section creates the broad mouth of the cornucopia. Do not overstuff this section because the opening needs to remain hollow.
Textured Cornucopia Rim
R43: Working BLO, sc around. (42)
R44: Sc around. (42)
R45: (Sl st 1, hdc 1) around. (42)
Join with a sl st and fasten off. Leave a 20 cm tail for shaping if required.
Fold the final three rounds slightly outward to create a thicker rim. The photographed cornucopia has a pronounced rolled edge, so this detail should remain visible after the leaves are positioned.
Shaping the Horn Curve
Place the horn on a flat surface with the opening facing sideways. Bend the narrow end upward and inward until it forms a loose hook.
Use the yarn tail to make two or three hidden anchoring stitches between adjacent sections of the curve. Do not pull the sections tightly together.
For a stronger curl, a covered flexible craft wire can be placed inside before final stuffing. Both ends must be folded and completely enclosed so no sharp end can reach the crochet fabric.
Maple-Style Leaf
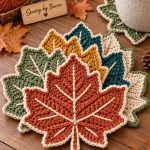
Make 8–12 in rust, mustard, burgundy, brown, olive, and cream. Use a 3.5 mm hook.
Ch 11.
Beginning in the second ch from hook:
Side 1: Sl st, sc, hdc, dc, tr, tr, dc, hdc, sc, sl st.
Work (sc, ch 2, sc) into the end of the foundation chain.
Continue along the opposite side:
Side 2: Sl st, sc, hdc, dc, tr, tr, dc, hdc, sc, sl st.
Do not fasten off.
Maple Leaf Lobes
Work around the leaf edge to create the pointed silhouette.
Lobe 1: Ch 3, sc in next st.
Lobe 2: Ch 5, beginning in second ch from hook work sl st, sc, hdc, dc; sl st into next base st.
Center Lobe: Ch 7, beginning in second ch from hook work sl st, sc, hdc, dc, tr, tr; sl st into next base st.
Lobe 4: Ch 5, beginning in second ch from hook work sl st, sc, hdc, dc; sl st into next base st.
Lobe 5: Ch 3, sc in next st.
Fasten off, leaving approximately 15 cm for attaching the leaf to the arrangement.
Block each maple-style leaf before assembly. The central point should extend beyond the side lobes.
Oak-Style Leaf
Make 8–12 in rust, mustard, brown, cream, and olive.
Ch 15.
Beginning in second ch from hook:
Side 1: Sl st, sc, hdc, dc, dc, hdc, sc, sl st, sc, hdc, dc, hdc, sc, sl st.
Ch 2 and rotate to work along the opposite side of the foundation chain.
Side 2: Sl st, sc, hdc, dc, hdc, sc, sl st, sc, hdc, dc, dc, hdc, sc, sl st.
Join at the base.
Stem: Ch 5, sl st back along all four chains.
Fasten off.
The changes between short and tall stitches create the rounded oak-like lobes. Blocking is more important than adding extra stitches when one side appears slightly uneven.
Simple Oval Leaf
Make 10–16 in olive, cream, mustard, rust, and brown.
Ch 12.
Beginning in second ch from hook:
Side 1: Sl st, sc, hdc, dc 5, hdc, sc, sl st.
Work 3 sc into the final chain.
Continue down the opposite side:
Side 2: Sl st, sc, hdc, dc 5, hdc, sc, sl st.
Join with sl st.
Stem: Ch 4, sl st into second ch and remaining chains.
Fasten off.
Raised Leaf Vein
Hold the contrasting or matching yarn behind the leaf. Insert the hook at the base and pull a loop through to the front.
Surface sl st along the center from the base toward the point.
For larger leaves, add two or three short diagonal branches on each side of the central line.
Keep the surface stitches loose enough that the leaf remains flat. A tight vein causes the motif to cup upward.
Stuffed Acorn Body
Make 5–8. Yarn: medium brown, rust, or dark brown. Use a 3.5–4.0 mm hook.
Published worsted-weight crochet acorns range substantially in scale; one documented version measures about 7 cm high and 3.5 cm wide using a 5 mm hook. The following smaller construction is sized for the table arrangement.
R1: 6 sc in MR. (6)
R2: Inc ×6. (12)
R3: (Sc 1, inc) ×6. (18)
R4: (Sc 2, inc) ×6. (24)
R5–R8: Sc around. (24)
R9: (Sc 2, dec) ×6. (18)
Stuff firmly enough to hold an oval shape but do not stretch the stitches.
R10: (Sc 1, dec) ×6. (12)
R11: Dec ×6. (6)
Fasten off. Thread the tail through the remaining six stitches and close.
Acorn Cap
Make one for each acorn. Yarn: dark brown.
R1: 6 sc in MR. (6)
R2: Inc ×6. (12)
R3: (Sc 1, inc) ×6. (18)
R4: (Sc 2, inc) ×6. (24)
R5: BLO sc around. (24)
R6: Sc around. (24)
Fasten off, leaving a 25 cm sewing tail.
Acorn Stem
Join dark brown yarn at the center of the cap.
Ch 5.
Beginning in second chain from hook, sl st in each chain.
Fasten off and pull both tails to the underside of the cap.
Position the cap over the broad end of the stuffed nut and sew through both layers around the complete circumference.
Autumn Berries
Make 12–20 in burgundy and dark rust.
R1: 6 sc in MR. (6)
R2: Inc ×6. (12)
R3: Sc around. (12)
R4: Dec ×6. (6)
Add a very small amount of stuffing.
Fasten off and close the remaining opening.
Berry Cluster
Arrange three berries into a triangle. Thread approximately 40 cm of matching yarn onto a tapestry needle.
Pass through the center of the first berry, then the second and third. Repeat once to stabilize the group.
Make approximately four to six clusters. Keep several berries separate so they can fill small spaces during final assembly.
How Many Crochet Pieces to Make
| Piece | Suggested Quantity | Colors |
|---|---|---|
| Cornucopia | 1 | Tan |
| Maple-style leaves | 8–12 | Rust, mustard, burgundy, brown |
| Oak-style leaves | 8–12 | Brown, mustard, cream, rust |
| Oval leaves | 10–16 | Olive, cream, mustard, brown |
| Acorns | 5–8 | Medium and dark brown |
| Berry clusters | 4–6 | Burgundy and dark rust |
These quantities produce a dense table arrangement similar to the photographed centerpiece. Reduce each leaf category by roughly half for a compact mantel display.
Assembly
- Block every flat leaf before arranging the centerpiece. Keep the central veins aligned while the pieces dry.
- Stuff and shape the cornucopia, then anchor its narrow end into a visible upward curl.
- Place the horn near one end of the planned table runner rather than directly in its center.
- Position several rust, mustard, and brown leaves inside the cornucopia opening so they appear to spill outward.
- Add the larger maple-style and oak-style leaves along the central path of the runner.
- Fill the spaces between broad leaves with olive and cream oval leaves.
- Place the stuffed acorns close to the horn opening and at two or three points farther down the arrangement.
- Add berry clusters between overlapping leaves instead of positioning them on the outside edge.
- Tack neighboring motifs together with two or three hidden stitches if a permanent runner is required. Leave them unattached for a reconfigurable centerpiece.
- Set the arrangement flat and check that the horn remains the highest component while the leaf edges form an irregular tapered outline.
The completed centerpiece should have a raised cornucopia at one end, a concentrated group of harvest motifs around its opening, and a progressively flatter trail of autumn leaves extending along the table.
7 Technical Tips for a Better Crochet Cornucopia
- Collapsed horn opening: Excess stuffing near the final 42-stitch rounds can close the mouth of the cornucopia. Keep the last 4–6 cm lightly stuffed so the opening remains broad and visibly hollow.
- Weak horn curl: A completely straight narrow section will make the project resemble a cone rather than a cornucopia. Anchor the tip into at least one full upward curve before arranging the leaves.
- Visible stuffing: Gaps between stitches become obvious when the horn is filled too firmly. Move down 0.5 mm in hook size if the stuffing remains visible through the fabric.
- Curling leaves: Tight surface-crochet veins can pull the center of a leaf inward. Work every surface slip stitch loosely and block the finished leaf flat before assembly.
- Flat composition: Giving every motif the same amount of visible space removes the spilling-harvest effect. Overlap neighboring leaves by approximately 1–3 cm around the cornucopia opening.
- Unstable acorns: Loose stuffing allows the cap to distort the nut when sewn in place. Fill each acorn until it holds its oval profile without stretching the 24-stitch body section.
- Visible finishing tails: Short tails can emerge when motifs are moved across a tabletop. Weave each tail through at least 3 cm of same-color stitches and reverse direction once before trimming.
Color Placement for an Autumn Harvest Effect
The photographed arrangement does not distribute colors evenly. Rust and mustard dominate the central area, while olive, brown, cream, and burgundy interrupt those warmer colors. Repeating that imbalance produces a more natural scattered-leaf appearance.
Avoid placing two identical leaf shapes in the same color directly beside each other. Rotate each motif before positioning the next one. Some stems should point toward the cornucopia; others should turn outward or run across neighboring leaves.
Use cream sparingly. A few pale leaves break up the darker rust and brown sections, but too many shift attention away from the tan horn. Burgundy works best in small areas such as berries and isolated leaves.
Making the Centerpiece Longer or Shorter
The modular construction makes the length adjustable without changing the cornucopia itself. For a shorter centerpiece, stop after approximately 20–25 leaves and concentrate the motifs around the horn.
For a dining-table runner, continue alternating maple-style, oak-style, and oval leaves until the arrangement reaches the required length. A 60–90 cm layout provides enough room for visible tapering while remaining practical on many tables.
For a longer runner, do not simply add leaves in a straight line. Widen the arrangement near the horn, narrow it gradually through the middle, then allow a few large leaves to extend sideways near the opposite end.
Permanent Runner or Loose Table Arrangement
There are two practical ways to finish this crochet cornucopia pattern. A permanent runner can be created by sewing overlapping leaves together on the wrong side. Use matching yarn and catch only the back loops so the joining stitches remain hidden from above.
A loose arrangement requires no joining. Each leaf, acorn, and berry cluster remains independent and can be repositioned around dishes, candles, or serving pieces. The disadvantage is movement when the table is used.
A middle option is to join motifs into several separate clusters. Make one large cornucopia cluster and two or three smaller leaf sections. This retains some flexibility while reducing the number of individual pieces that must be positioned.
Finishing the Crochet Cornucopia Centerpiece
Check the centerpiece from above before weaving in the final assembly tails. The horn opening should remain visible rather than disappearing underneath the leaves, and several acorns should sit close enough to the opening to reinforce the harvest arrangement.
Next, inspect the outer edge. Rotate any leaves that create an accidental straight line. A successful crochet cornucopia pattern depends on controlled irregularity: large lobed leaves establish the shape, narrow leaves fill gaps, berries add small points of color, and three-dimensional acorns interrupt the otherwise flat surface.
Make the first test set in tan, rust, mustard, olive, brown, cream, and burgundy, then adjust the number of motifs to the length of your table. Pin the finished centerpiece to a fall-crochet Pinterest board or share the complete arrangement on Instagram with #CrochetCornucopia. For your version, would you place more acorns near the horn opening or spread them through the entire leaf trail? “`0