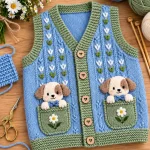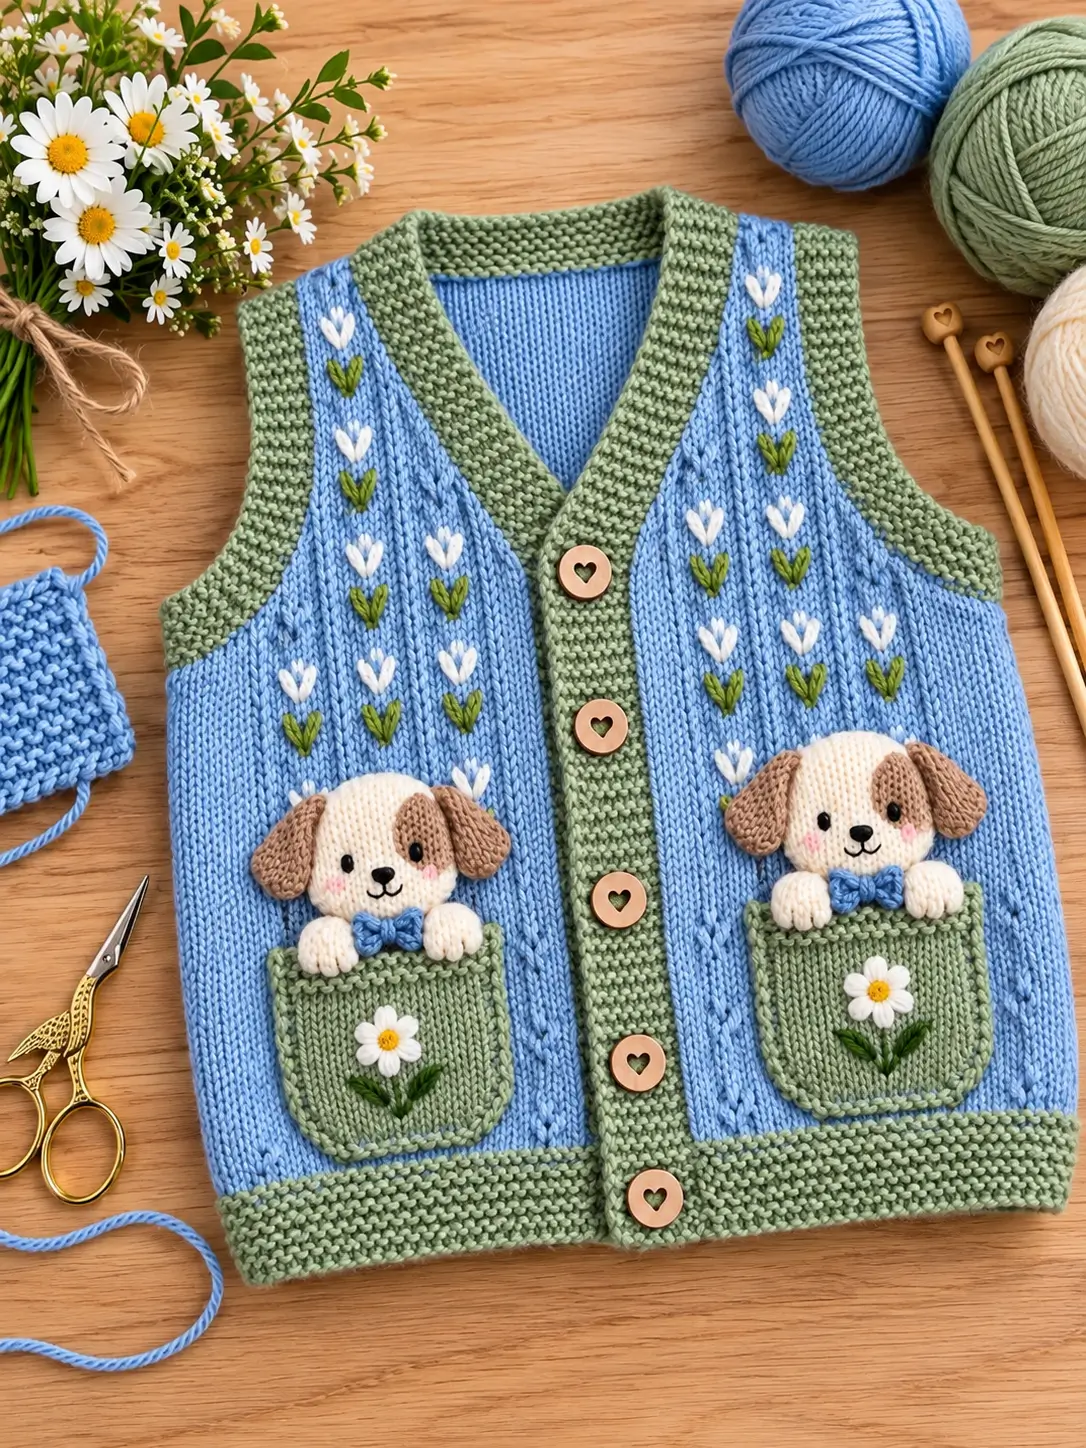
A puppy peeking from a pocket needs paws above the rim and floppy ears wide enough to frame its asymmetrical eye patch. This puppy amigurumi crochet pattern uses DK cotton, a 2.5 mm hook and 8 mm eyes to produce a complete puppy around 15 cm tall, with instructions for mounting the upper section as pictured. It is an intermediate project and works particularly well as a removable garment embellishment.
The Design: What Makes This Pocket Puppy Different
The head uses a 36-stitch plateau rather than an oversized sphere. That keeps the face compact enough to sit above a garment pocket without dominating it. Flattened ears are worked separately because stuffed cylindrical ears would project too far from the knitted surface.
The front paws are deliberately short. In this crochet puppy pattern, they need to appear to grip the pocket rather than hang like conventional amigurumi arms. A separate brown patch supplies the asymmetry visible in the reference image, while the blue bow adds a clear break between head and paws.
One common mistake in pocket puppy crochet is overstuffing the head. The maker sees a freestanding toy while constructing it, but the finished appliqué needs a slightly flattened back. Too much fiberfill pushes the head away from the garment and changes the ear angle.
Project Info at a Glance
| Skill Level | Time | Finished Size | Hook | Best For |
|---|---|---|---|---|
| Intermediate | 4–6 hours | Approx. 15 cm complete puppy | 2.5 mm | Pocket appliqué, nursery décor, small toy |
The 15 cm scale is based on comparable small puppy amigurumi construction. Final dimensions vary with yarn, hook size and individual tension.
Materials and Tools
Yarn
- Cream — DK cotton or cotton-acrylic — approximately 35–40 g — use a smooth, tightly spun amigurumi yarn.
- Warm brown — DK — approximately 8–10 g — for the ears and eye patch.
- Blue — DK — approximately 5 g — for the bow tie.
- Pink — DK or embroidery yarn — less than 1 g — for the cheeks.
- Black — embroidery thread or fine yarn — less than 1 g — for the nose and mouth.
Tools
- 2.5 mm crochet hook
- 8 mm safety eyes
- Polyester stuffing
- Tapestry needle
- Stitch markers
- Pins
- Scissors
For an item intended for a child under three, embroider the eyes instead of installing small plastic components.
Abbreviations
- MR — magic ring
- sc — single crochet
- inc — 2 sc in one stitch
- dec — invisible decrease
- sl st — slip stitch
- ch — chain
- BLO — back loop only
- hdc — half double crochet
For an invisible decrease, insert the hook through the front loops of the next two stitches and complete them as one sc.
Pattern — Step by Step
Work continuous spirals unless a section specifically states that it is worked in rows. This construction is drafted for the compact proportions of the photographed pocket puppy.
Head
Yarn: cream
R1: 6 sc in MR (6)
R2: inc ×6 (12)
R3: (sc, inc) ×6 (18)
R4: (2 sc, inc) ×6 (24)
R5: (3 sc, inc) ×6 (30)
R6: (4 sc, inc) ×6 (36)
R7: sc around (36)
R8: sc around (36)
R9: sc around (36)
R10: sc around (36)
R11: sc around (36)
R12: sc around (36)
Install the 8 mm eyes between R9 and R10, approximately 7 stitches apart. Position the brown eye patch before locking the eye if you want the safety-eye post to pass through the patch.
R13: (4 sc, dec) ×6 (30)
R14: (3 sc, dec) ×6 (24)
Stuff evenly. Keep the back slightly flatter when making the pocket-mounted version.
R15: (2 sc, dec) ×6 (18)
R16: (sc, dec) ×6 (12)
R17: dec ×6 (6)
Fasten off. Close the opening and leave a 20 cm tail if attaching the head to the body.
Body
Yarn: cream
R1: 6 sc in MR (6)
R2: inc ×6 (12)
R3: (sc, inc) ×6 (18)
R4: (2 sc, inc) ×6 (24)
R5: (3 sc, inc) ×6 (30)
R6: (4 sc, inc) ×6 (36)
R7: sc around (36)
R8: sc around (36)
R9: sc around (36)
R10: sc around (36)
R11: sc around (36)
R12: (4 sc, dec) ×6 (30)
R13: sc around (30)
R14: (3 sc, dec) ×6 (24)
R15: sc around (24)
R16: (2 sc, dec) ×6 (18)
Stuff firmly at the base but more lightly around the neck.
Fasten off. Leave a 25 cm sewing tail.
Front Legs / Paws — Make 2
Yarn: cream
R1: 6 sc in MR (6)
R2: inc ×6 (12)
R3: sc around (12)
R4: sc around (12)
R5: (2 sc, dec) ×3 (9)
R6: sc around (9)
R7: sc around (9)
Stuff only the paw end. Leave the upper section flexible so the paw can bend over the pocket.
Flatten the opening and crochet 4 sc through both layers. Fasten off and leave a 20 cm tail.
For the photographed presentation, only the rounded paw section needs to remain visible above the pocket.
Back Legs — Make 2
Yarn: cream
R1: 6 sc in MR (6)
R2: inc ×6 (12)
R3: (sc, inc) ×6 (18)
R4: sc around (18)
R5: sc around (18)
R6: (sc, dec) ×6 (12)
R7: sc around (12)
R8: sc around (12)
R9: dec ×6 (6)
Stuff through R6, leaving the attachment edge softer.
Fasten off and leave a 20 cm tail.
The back legs are needed for the complete freestanding puppy only. Omit them when making the pocket appliqué version.
Floppy Ears — Make 2
Yarn: warm brown
Ch 7.
Row 1: Starting in second ch from hook, 6 sc (6)
Row 2: ch 1, turn, inc, 4 sc, inc (8)
Row 3: ch 1, turn, 8 sc (8)
Row 4: ch 1, turn, inc, 6 sc, inc (10)
Row 5: ch 1, turn, 10 sc (10)
Row 6: ch 1, turn, 10 sc (10)
Row 7: ch 1, turn, dec, 6 sc, dec (8)
Row 8: ch 1, turn, dec, 4 sc, dec (6)
Row 9: ch 1, turn, dec, 2 sc, dec (4)
Work sc evenly around the outer edge if you want a firmer border.
Fasten off and leave a 25 cm tail. Do not stuff the ears.
Pin each ear so its upper edge begins around R6–R7 of the head. Allow the rounded portion to hang naturally beside the cheek.
Muzzle
Yarn: cream
Ch 5.
R1: Starting in second ch, 3 sc, 3 sc in last ch; working along the opposite side, 2 sc, inc (10)
R2: inc, 2 sc, inc ×3, 2 sc, inc ×2 (16)
R3: sc around (16)
Fasten off and leave a 20 cm tail.
Add only a thin layer of stuffing while sewing the muzzle to the face. Embroider a small black triangular nose in the center. Add one short vertical stitch beneath it, followed by two shallow curved stitches for the mouth.
Brown Eye Patch
Yarn: warm brown
R1: 6 sc in MR (6)
R2: inc ×6 (12)
R3: (sc, inc) ×6 (18)
Sl st to finish. Fasten off and leave a 15 cm sewing tail.
Shape the circle into a slight oval while attaching it. The patch should frame one eye without overlapping the muzzle.
Tail
Yarn: cream or warm brown
R1: 6 sc in MR (6)
R2: sc around (6)
R3: sc around (6)
R4: sc around (6)
R5: sc around (6)
R6: sc around (6)
R7: sc around (6)
R8: sc around (6)
Do not stuff the tail, or add only a very small amount of fiberfill. Fasten off and leave a 20 cm tail for sewing.
Cheek Patches — Make 2
Yarn: pale pink
R1: 6 sc in MR (6)
R2: inc ×6 (12)
Sl st and fasten off.
For a flatter result closer to the reference image, replace the crocheted circles with three or four short pink embroidery stitches on each cheek.
Blue Bow Tie
Yarn: blue
Ch 9.
Row 1: Starting in second ch, 8 sc (8)
Row 2: ch 1, turn, 8 sc (8)
Row 3: ch 1, turn, 8 sc (8)
Row 4: ch 1, turn, 8 sc (8)
Fasten off and weave in the working end. Pinch the rectangle in the center and wrap blue yarn around the middle six to eight times. Knot securely on the back and retain a sewing tail.
The bow should measure approximately 4–5 cm across with DK yarn, depending on gauge.
Assembly
- Pin the head to the body with the center of the face aligned to the center front. Sew around the neck twice for a stable connection.
- Attach the body without compressing the upper stuffing. For a pocket appliqué, omit the body and anchor the lower rear section of the head behind the pocket.
- Sew the muzzle across the lower face. Add a small amount of stuffing before closing the final section.
- Secure the eye patch, eyes, nose, mouth and pink cheeks. Check their positions from the front before securing the yarn ends.
- Pin both front paws beneath the head. For the pocket effect, place their lower halves behind the pocket rim and sew the concealed sections in place.
- Attach the back legs around R4–R7 of the complete body’s lower section. Place the puppy on a flat surface before completing both seams.
- Sew the floppy ears to the sides of the head. Position the broadest section toward the front and allow the tapered ends to fall toward the cheeks.
- Attach the tail to the lower rear body and curve it toward one side. Omit the tail for the pocket-mounted version.
- Center the blue bow tie immediately below the muzzle and between the two paws. Sew through its wrapped center.
- Weave every yarn tail through at least 2–3 cm of dense crochet before trimming. The puppy can now be used as a complete amigurumi or mounted at a pocket edge.
7 Technical Tips
- Stitch-marker drift: Move the marker after every completed round. A repeated one-stitch displacement can rotate the muzzle and eye patch away from the intended center line.
- Stuffing distortion: Stop adding fiberfill when the 36-stitch head remains rounded without gaps opening between stitches. Remove approximately 10–15% of the stuffing if white fiber becomes visible.
- Visible decreases: Work decreases through the front loops. Standard sc2tog decreases can leave six visible indentations around the cream head.
- Eye placement: Install the 8 mm eyes before the head decreases below 24 stitches. Access for fitting the safety-eye washers becomes restricted after R15.
- Tension mismatch: Keep the 2.5 mm hook for the stuffed DK sections unless your gauge produces visible holes. A 0.5 mm increase in hook size can noticeably loosen the fabric.
- Ear positioning: Pin both ears before permanently attaching either one. Keep the upper attachment points within approximately one round of each other to prevent an unintended tilted appearance.
- Loose yarn tails: Weave sewing tails through several dense stitches and reverse direction once before trimming. Cutting directly beside the seam increases the chance of the join loosening with handling.
Conclusion
Finish the puppy amigurumi crochet pattern by deciding whether the puppy will remain a complete 15 cm figure or become a pocket-mounted character like the reference design. For the pocket version, leave off the body and back legs, flatten the rear of the head slightly, and position both paws 1–2 cm over the pocket rim before sewing. Pin every component first, then photograph the arrangement from directly above to check alignment. Save your finished puppy to Pinterest or share it on Instagram with #PocketPuppyAmigurumi. For your next version, test one specific variation: would the brown eye patch look better on the left or right side of the puppy’s face?