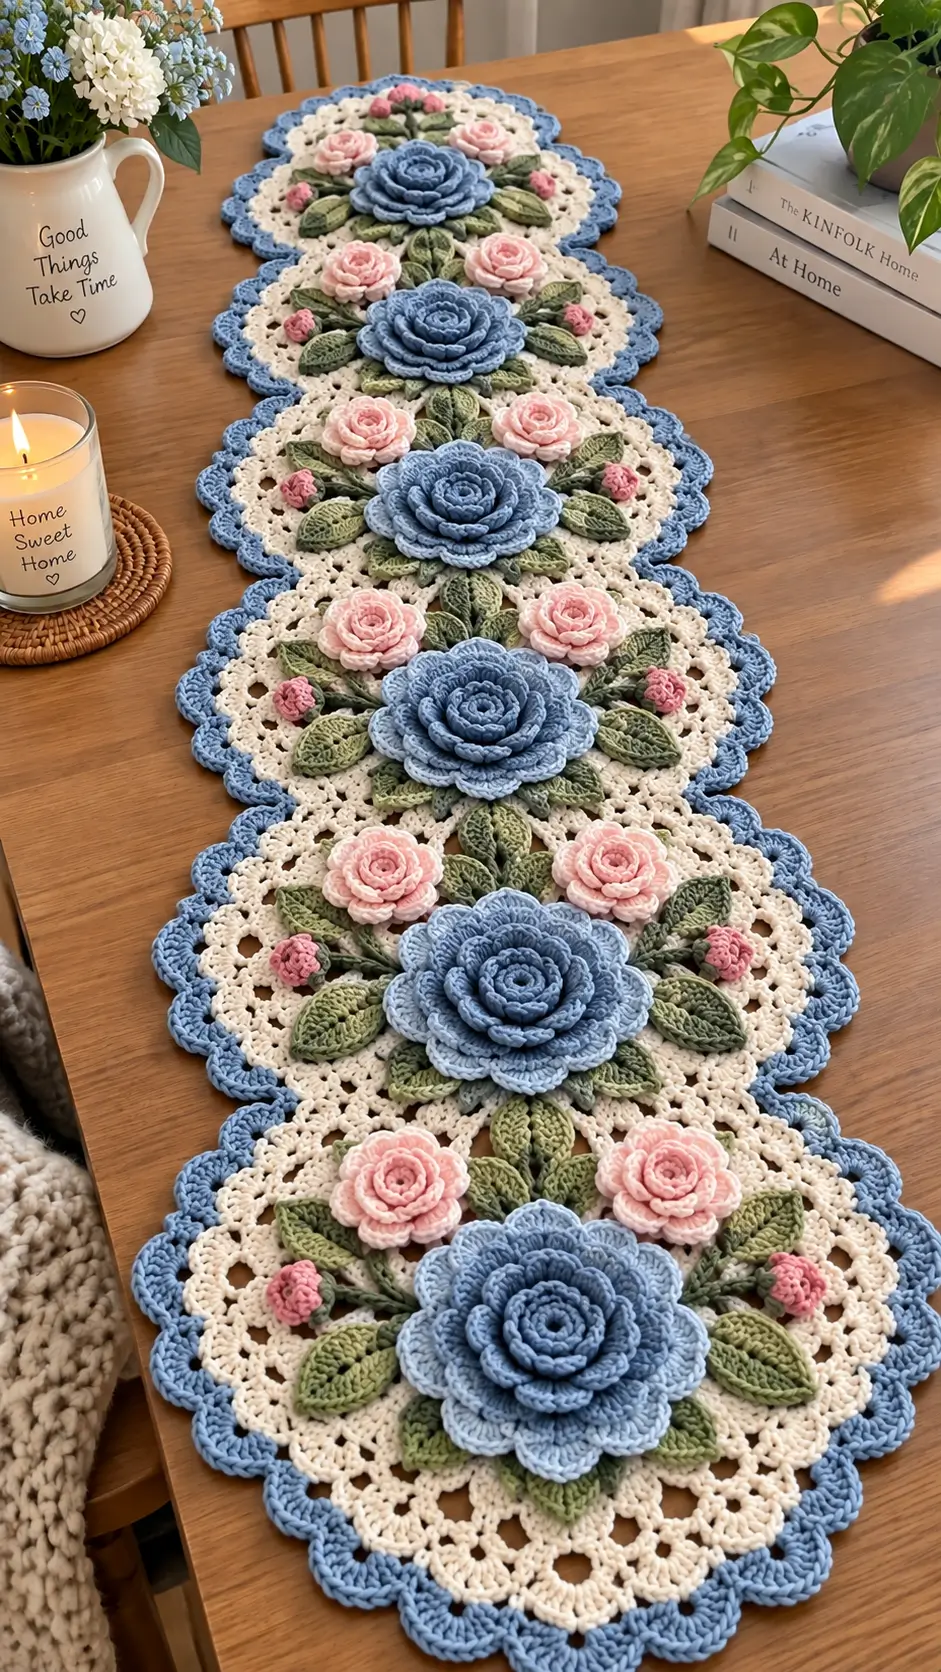
A rose with a tight spiral center and broad outer petals needs several distinct layers or it stops reading as a rose. This crochet rose table runner pattern builds that structure over cream lace medallions using DK cotton, a 3.5 mm hook, and dimensional leaves. The photo-inspired runner targets roughly 38 × 145 cm and suits intermediate crochet skills. Modular sections also make its length easy to change.
The Design: What Makes This Rose Table Runner Different
The runner uses three structural levels: flat cream lace, raised foliage, and heavily layered flowers. Separating them keeps the runner functional because the foundation can lie against the table while the botanical details project upward.
Each large blue rose has progressively wider petal layers. That matters structurally: a uniform stack produces a disk-like flower rather than the cupped center and opening outer petals associated with a rose. Sage leaves extend beyond the flowers to connect neighboring medallions, while the blue scallops establish a continuous perimeter.
This 3D crochet flower table runner is best treated as a modular project rather than one enormous lace panel. A common error in a crochet floral table runner is attaching every rose petal to the ground fabric. Sew only the lowest layers securely; upper petals need to remain free.
Project Info at a Glance
| Skill Level | Time | Finished Size | Hook | Best For |
|---|---|---|---|---|
| Intermediate | 18–25 hours | Approx. 38 × 145 cm | 3.5 mm | Dining table or sideboard |
The finished measurement is a photo-inspired design target. Exact dimensions depend on yarn, tension, motif size, and the number of sections used.
Materials and Tools
Yarn
Use smooth DK cotton or a cotton-rich blend. Cotton gives the leaves and flower petals enough definition to display the layered construction clearly.
- Ivory/cream: DK cotton — approximately 300–350 g
- Dusty blue: DK cotton — approximately 200–250 g
- Blush pink: DK cotton — approximately 80–100 g
- Medium rose pink: DK cotton — approximately 40–50 g
- Sage green: DK cotton — approximately 80–100 g
- Olive green: DK cotton — approximately 40–50 g
Yarn quantities are working estimates for a six-section runner. Actual consumption changes with gauge, yarn thickness, flower density, and finished length.
Tools
- 3.5 mm crochet hook
- Yarn needle
- Sharp scissors
- Stitch markers
- Blocking mats
- Rust-resistant pins
- Measuring tape
No safety eyes or stuffing are required for this project.
Abbreviations
- MR — magic ring
- sc — single crochet
- hdc — half double crochet
- dc — double crochet
- tr — treble crochet
- inc — two single crochet stitches in one stitch
- sl st — slip stitch
- ch — chain
- sp — space
- st/sts — stitch/stitches
- BLO — back loop only
Invisible decrease is not required for the flat components in this pattern. Standard decrease shaping is therefore omitted where it serves no structural purpose.
Pattern — Step by Step
The runner is assembled from individual lace medallions, dimensional flowers, leaves, buds, and a final scalloped border. Complete all six foundation sections before permanently attaching the floral pieces.
Cream Lace Medallion — Make 6
Yarn: ivory DK cotton.
R1: 6 sc in MR. Join with sl st. (6)
R2: Ch 3, dc in same st, 2 dc in each remaining st. Join. (12 dc)
R3: Ch 4, skip 1 st, dc in next st; repeat around. Join. (6 ch-sps)
R4: In each ch-sp work (2 sc, ch 3, 2 sc). (6 groups)
R5: Sl st to first ch-3 sp, ch 3, 4 dc in same sp, ch 2; 5 dc in each remaining ch-3 sp with ch 2 between groups. (30 dc)
R6: Ch 1, sc in each dc; work (sc, ch 3, sc) in every ch-2 sp. Join.
R7: Sl st to ch-3 sp, (ch 3, 3 dc, ch 3, 4 dc) in same sp; ch 2. Repeat in each ch-3 sp.
R8: Sc across each fan, working ch 5 between fans.
R9: In each ch-5 sp work (2 sc, 2 hdc, 3 dc, 2 hdc, 2 sc). Join.
Fasten off. Leave a 20 cm tail if the motifs will be sewn together instead of joined with crochet.
Make six matching sections before proceeding. Block them to equal dimensions because inconsistent medallion sizes can create a visible bend through the finished runner.
Large Blue Rose — Make 6
Yarn: dusty blue.
Rose Center
R1: 6 sc in MR. (6)
R2: inc ×6. (12)
R3: (sc, inc) ×6. (18)
R4: BLO sc around. (18)
Do not fasten off.
Inner Petals
Working in the unused front loops of R3, repeat (sl st, ch 2, 2 hdc, ch 2, sl st) across groups of three front loops to form six small cupped petals.
Middle Petal Layer
Working around R4, repeat sl st, ch 3, 2 dc, tr, 2 dc, ch 3, sl st at evenly spaced positions to create six petals.
Outer Petal Layer
Join blue yarn behind the middle layer. Work six ch-5 loops around the flower base.
In each loop work (sc, hdc, 3 dc, 2 tr, 3 dc, hdc, sc).
Final Petal Layer
Join the blue yarn behind the preceding petals and form eight ch-6 loops.
In each loop work (sc, hdc, 2 dc, 4 tr, 2 dc, hdc, sc).
Fasten off, leaving approximately 30 cm for attachment. Keep the outer petals largely unsewn so the flower maintains its layered profile.
Blush Rose — Make 12
Yarn: blush pink.
R1: 6 sc in MR. (6)
R2: inc ×6. (12)
R3: (sc, inc) ×6. (18)
For the inner petals, work six compact shells over R3: (sl st, ch 2, 3 hdc, ch 2, sl st).
Join yarn behind this layer and make six ch-4 loops. In each loop work (sc, hdc, 4 dc, hdc, sc).
Add a final six-loop layer with ch 5. In each loop work (sc, hdc, 2 dc, 2 tr, 2 dc, hdc, sc).
Fasten off. Leave approximately 25 cm for sewing.
Small Rose Bud — Make 12
Yarn: medium rose pink.
Foundation: Ch 19.
Row 1: Sc in second ch from hook and across. (18)
Row 2: Ch 2, turn. Work 3 hdc in each of the next 6 sts, 3 dc in each of the next 6 sts, then 4 dc in each of the final 6 sts.
Fasten off with a 25 cm tail.
Roll the strip from the narrow hdc end toward the larger dc end. Stitch through the base several times so the spiral cannot unwind.
Sage Leaf — Make 24
Yarn: sage green.
Foundation: Ch 9.
Working from the second ch from hook: sl st, sc, hdc, dc, dc, hdc, sc, then 5 hdc in the final ch.
Continue along the opposite side of the foundation chain: sc, hdc, dc, dc, hdc, sc, sl st.
Ch 2, sl st in the second ch from hook to form the pointed tip. Sl st into the leaf.
For a raised central vein, surface sl st along the foundation chain from the base toward the tip.
Fasten off. Leave approximately 20 cm for sewing.
Olive Accent Leaf — Make 24
Yarn: olive green.
Foundation: Ch 7.
Work sl st in second ch, sc in next, hdc in next, dc in next 2, then 5 hdc in final ch.
Continue along the opposite side: dc in next 2, hdc, sc, sl st.
Ch 2, sl st into the second ch from hook. Join to the leaf tip.
Fasten off with a 15–20 cm sewing tail.
Blue Scalloped Border
Yarn: dusty blue.
Join and block all six cream motifs before adding the border. Attach the blue yarn anywhere along the outer edge.
Round 1: Work sc evenly around the entire runner. At inward joins, use sc2tog if the fabric begins to flare. The final stitch count depends on the joined dimensions.
Round 2: Skip 2 sts, 7 dc in next st, skip 2 sts, sl st in next st. Repeat around.
At each rounded end, adjust the number of skipped stitches where necessary so the shells follow the curve without pulling the foundation.
Round 3: Sl st to the center dc of the first shell. Work (sc, ch 3, sc) in the center dc of the shell, ch 2, sl st between shells, ch 2. Repeat around.
Fasten off. Weave the border tail through at least 5 cm of neighboring stitches.
Assembly
- Block all six cream medallions to matching dimensions before joining them.
- Arrange the sections in one straight line with the long axis centered. Join neighboring motifs through corresponding outer lace points.
- Position one large blue rose in the center of every medallion. Sew through the flower center and lowest petal layer rather than flattening every petal.
- Place two blush roses around each large blue rose, following the balanced floral arrangement.
- Add two small pink buds toward the lateral areas of each medallion.
- Pin the sage leaves beneath the large blue flowers first. Point their tips outward to create a radial arrangement.
- Fill the remaining spaces with olive leaves, allowing selected foliage to overlap the lower edges of the flowers.
- Sew each leaf through its central vein and base. Avoid stitching around the entire perimeter because this removes the raised effect.
- Work the blue scalloped border only after the complete cream foundation has been joined and blocked.
- Wet-block the completed runner without flattening the flowers. Support and reshape each rose while the foundation dries flat.
The completed runner should have a flat lace foundation, a continuous blue scalloped perimeter, and a raised floral centerline.
7 Technical Tips for a Better Crochet Rose Table Runner
- Control marker drift. Mark the beginning and midpoint of every medallion round. A one-space shift in an open lace round can move the next fan far enough to prevent neighboring motifs from aligning correctly.
- Do not stuff the roses. Their volume comes from overlapping crochet layers. Fiberfill creates a hard dome underneath the flower and prevents the runner from lying flat.
- Watch border decreases. Use sc2tog only where a joined edge or curved border visibly flares. Excess decreases can pull the cream foundation upward into a bowl shape.
- Check flower placement before sewing. Pin all six blue roses to the foundation first. Keep every flower center on the runner’s longitudinal centerline; even a 2 cm sideways shift becomes noticeable across repeated motifs.
- Correct loose petal tension. If DK cotton produces loose petals with a 3.5 mm hook, test a 3.0 mm hook for the flowers while keeping the larger hook for the lace. Loose outer petals tend to droop rather than maintain distinct layers.
- Pin leaves at three points. Secure the base, midpoint, and tip before sewing. A leaf attached only at its base can rotate after washing and expose the attachment stitches underneath.
- Secure every sewing tail. Weave flower and leaf tails through at least 5 cm of dense stitches, then reverse direction once. Cutting immediately beside a knot increases the chance of a dimensional component loosening during washing.
Adjusting the Table Runner Length
The modular construction makes the finished length adjustable. For a shorter centerpiece, crochet four cream medallions instead of six. A longer dining-table runner can use seven or eight sections, provided every foundation motif is blocked to the same dimensions before joining.
Calculate yarn requirements from the first completed medallion rather than relying only on the starting estimate. Weigh one finished cream section, one large rose, two blush roses, two buds, and the required leaves. Multiply those weights by the intended number of sections, then add approximately 10 percent for joining, border work, gauge differences, and finishing tails.
Blocking the Finished Runner
Blocking should correct the lace foundation without compressing the dimensional flowers. Place the runner on blocking mats and align its centerline first. Pin the outer cream foundation and blue scallops into position while leaving the roses unsupported by pins.
For wet blocking, reshape the lace to the intended dimensions and allow it to dry completely. Arrange individual petals and leaves while damp so their edges remain separated.
Measure the width at several points along the runner. A difference greater than approximately 1–2 cm between neighboring sections usually indicates that one motif has been stretched more aggressively than another.
How to Arrange the 3D Crochet Flowers
The large dusty-blue roses establish the visual center of each section. Position those flowers first. Blush roses should sit farther from the center so they remain secondary in scale, while the small rose buds occupy narrow gaps where a full flower would cover too much lace.
Leaves work as connectors rather than isolated decorations. Point some toward neighboring flowers and others toward the outer lace. Alternating sage and olive shades prevents the foliage from becoming one solid green mass.
Before sewing, photograph the complete pinned arrangement from directly above. The image makes spacing errors easier to detect, particularly where one medallion carries noticeably more foliage than the others.
Finishing the Crochet Rose Table Runner
Inspect every attachment point from the back before weaving the final tails. The underside should remain relatively flat, with no long strands crossing open lace spaces.
Complete one blue rose, one blush rose, and two leaves before committing yarn to every section. Block those samples first and record their actual dimensions because flower diameter determines how much cream lace remains visible around each arrangement.
Next, make and block the six foundation motifs, join them, and pin every botanical component before sewing. That sequence gives the crochet rose table runner pattern a consistent centerline without forcing the lace out of shape.
Save the finished layout to Pinterest and share the completed runner on Instagram with #BlueRoseTableRunner. Would you keep all six central roses dusty blue, or alternate blue and blush roses along the runner?









