Introduction
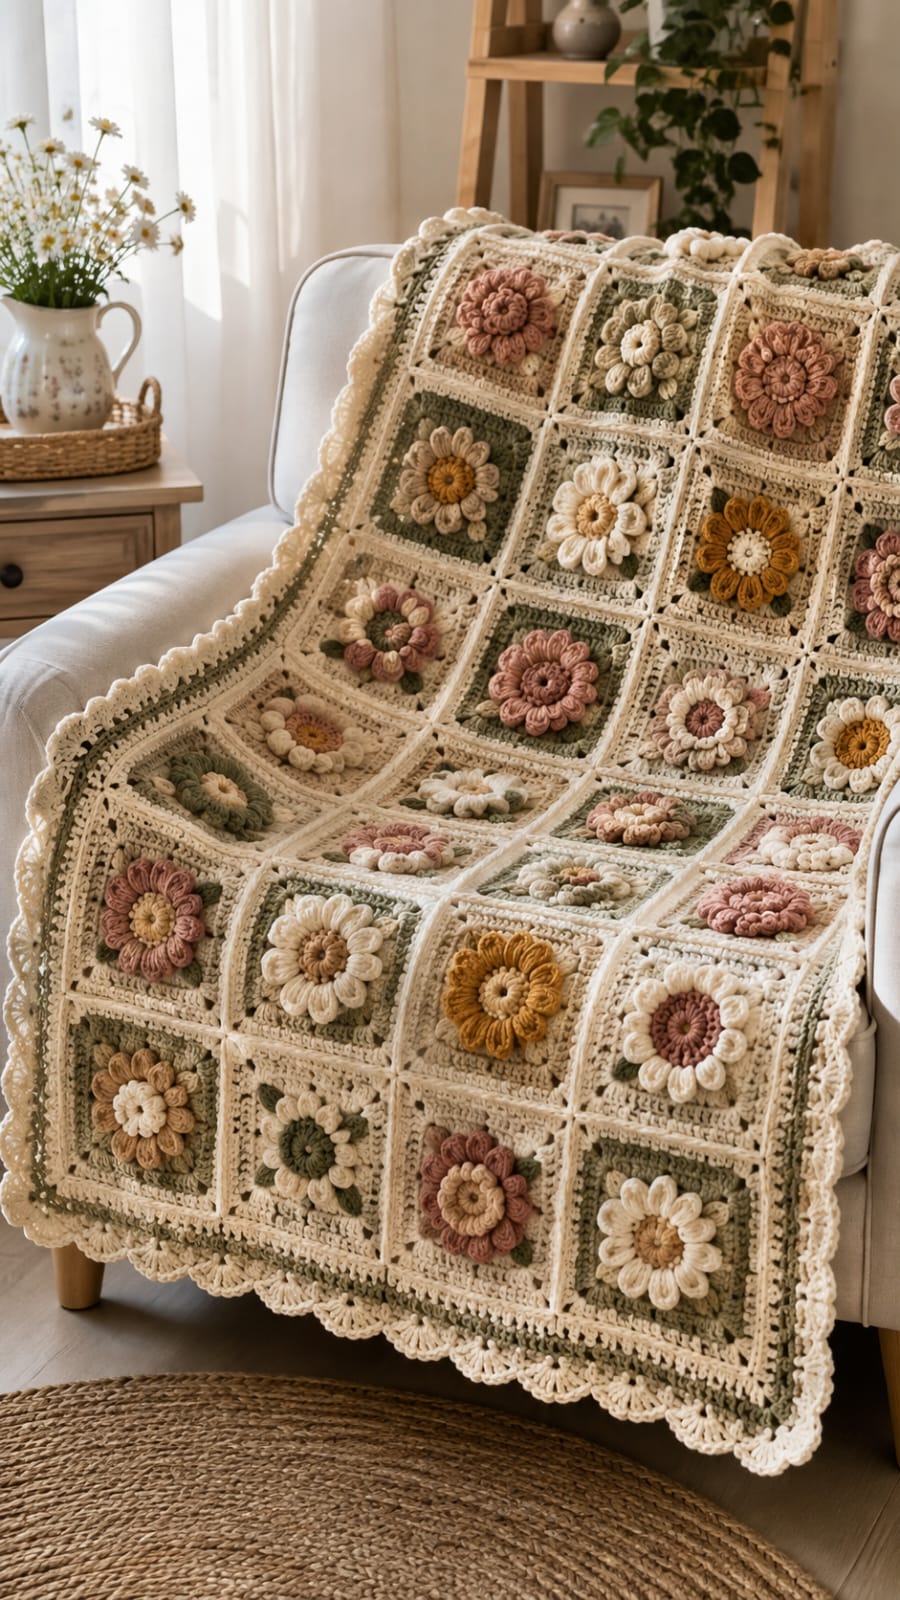
Twenty-eight raised flower centers can be different, but their square corners still have to meet within a few millimeters. This 3D flower granny square blanket pattern uses DK-to-light-worsted yarn with 4 mm and 4.5 mm hooks to make an approximately 92 × 140 cm throw. Cream, sage, dusty rose, beige and mustard build an intermediate modular blanket with three dimensional flower styles.
The Design: What Makes This Floral Blanket Different
The blanket mixes three flower constructions while holding every finished block near 19 cm. Layered eight-petal blooms create the deepest centers, ten-petal daisies provide flatter open shapes, and compact rosettes fill the remaining squares with tighter texture. Sage and cream backgrounds alternate so the flowers do not appear arranged on one continuous color field. A cream joining seam frames each motif and reduces visual competition between neighboring petals. The floral granny square blanket also uses a sage stripe inside the final cream border, connecting the perimeter to the green blocks. One common maker error is blocking each flower style by feel. A raised flower crochet square with heavier petals can finish several millimeters smaller than a daisy square unless the outer rounds, rather than the flower center, control the final measurement.
Project Info at a Glance
| Skill Level | Time | Finished Size | Hooks | Best For |
|---|---|---|---|---|
| Intermediate | 35–45 hours | Approx. 92 × 140 cm | 4.0 mm motifs / 4.5 mm joining and border | Lap throws, cottage-style rooms and dimensional floral blankets |
Materials and Tools
Yarn
- Warm cream / ivory — DK or light worsted — approximately 650–760 g — square backgrounds, joining seams and border.
- Sage green — DK or light worsted — approximately 330–400 g — alternate square backgrounds, leaves and border stripe.
- Dusty rose — DK or light worsted — approximately 170–210 g — layered flowers and rosettes.
- Oatmeal / beige — DK or light worsted — approximately 130–170 g — flower petals and centers.
- Mustard gold — DK or light worsted — approximately 70–90 g — selected flowers and daisy centers.
Keep all five yarn colors within one weight category. Raised petals amplify small thickness differences, particularly when one color is repeatedly used for the outer flower layer.
Tools
- 4.0 mm crochet hook for flower squares
- 4.5 mm crochet hook for relaxed joins and border
- Yarn needle
- Stitch markers
- Blocking mats
- Rust-resistant blocking pins
- Scissors
- Measuring tape
Abbreviations
- MR — magic ring
- ch — chain
- sc — single crochet
- hdc — half double crochet
- dc — double crochet
- tr — treble crochet
- sl st — slip stitch
- sp — space
- cl — cluster
- BLO — back loop only
An invisible decrease is worked through the front loops of two neighboring stitches before completing one single crochet through both loops; this blanket uses it only if a petal requires minor shaping.
Pattern — Step by Step
Make one block of each flower type before starting the full batch. All three completed motifs must block to approximately 19 × 19 cm before the remaining twenty-five squares are worked.
Flower Variant A — Layered Eight-Petal Bloom
Yarn: dusty rose, beige or cream — original reconstruction based on standard layered-flower geometry.
R1: With center color, work 8 sc in MR. Join. (8)
R2: Ch 3, sl st in next stitch; repeat around to create 8 ch-3 loops.
R3: Into each ch-3 loop work: sc, hdc, 3 dc, hdc, sc. Repeat eight times.
Fasten off the first petal color.
Rear Petal Anchor Round
Join the second petal color behind R2.
Work one sl st around the post between two petals.
Ch 5.
Move behind the next petal and sl st around the corresponding post.
Repeat around to create eight rear ch-5 loops.
Outer Petal Round
Into each rear ch-5 loop work:
sc, hdc, 2 dc, 3 tr, 2 dc, hdc, sc.
Repeat for all eight loops.
Fasten off.
Lift the inner petals slightly so both layers remain visible.
Sage Leaf Foundation
Yarn: sage green.
Join behind one outer petal.
Ch 5.
Sl st behind the next petal.
Repeat eight times.
Into every second ch-5 loop work:
sc, hdc, 3 dc, hdc, sc.
This creates four visible leaves at the diagonal positions.
Square Variant A
Yarn: cream or sage background.
Square R1: Join into an unused rear loop between two leaves. Ch 3, 2 dc, ch 2, 3 dc in the same space for the first corner. Ch 2. Work 3 dc in the next rear space, ch 2. Repeat around, forming four corners at evenly spaced quarter points.
Square R2: In every corner work (3 dc, ch 2, 3 dc). Work one 3-dc group in each side space with ch 1 between groups.
Square R3: Repeat the same granny-square structure, adding a 3-dc group to every new side space.
Square R4: Repeat once more.
Fasten off.
Target approximately 17.5–18 cm before the stabilizing round.
Stabilizing Round — All Square Types
Join cream.
Ch 1.
Sc in every dc and every side chain space.
At each corner work (sc, ch 1, sc).
Join and fasten off.
Target blocked measurement: 19 × 19 cm.
Flower Variant B — Ten-Petal Daisy
Yarn: cream petals with mustard, rose or beige center.
R1: Work 10 sc in MR. Join. (10)
R2: Work 2 sc in every stitch. Join. (20)
Change to petal color.
R3: Repeat ten times: sl st in next stitch, ch 5, 3 tr in next stitch, ch 5, sl st in next stitch.
Ten raised petal units are formed.
Fasten off.
Daisy Petal Shaping
Pull the chain sides of each petal slightly forward.
Use the yarn tail to tack the base of every second petal only when one rotates sideways.
The upper half of each petal should remain free.
Daisy Leaf Round
Join sage behind the flower.
Create four ch-5 loops at the diagonal positions and four ch-3 loops between them.
In each diagonal ch-5 loop work:
sc, hdc, 3 dc, hdc, sc.
Sl st across each short ch-3 loop.
Square Variant B
Join cream or sage into the rear framework.
Work four granny-style corner groups around the diagonal leaf positions.
Continue for four square rounds using (3 dc, ch 2, 3 dc) in each corner and one 3-dc group in each side space.
Finish with the cream stabilizing round.
Block to 19 cm.
Flower Variant C — Compact Twelve-Loop Rosette
Yarn: dusty rose, beige, cream or sage.
R1: Work 12 dc in MR. Join. (12)
R2: Repeat six times: ch 5, skip 1 stitch, sl st in next stitch.
Six loops are formed.
R3: In each loop work sc, 5 dc, sc.
Fasten off.
Second Rosette Layer
Join a contrasting petal shade behind R3.
Repeat six times:
Ch 7, sl st around the rear post between the next two petals.
Into each ch-7 loop work:
sc, hdc, 3 dc, 2 tr, 3 dc, hdc, sc.
Fasten off.
Rosette Center Ring
Join a contrasting beige, cream or mustard yarn around the original MR.
Work 12 surface slip stitches around the center.
Fasten off.
Rosette Leaf Layer
With sage, create four broad rear loops at quarter points.
Into each loop work:
sc, hdc, 2 dc, tr, 2 dc, hdc, sc.
Fasten off.
Square Variant C
Join cream or sage behind the leaf layer.
Establish four corners around the quarter points.
Work four granny-square expansion rounds.
Finish with the same cream stabilizing round.
Block to 19 cm.
Suggested 28-Square Distribution
Make ten Variant A layered blooms.
Work ten Variant B daisies.
Finish with eight Variant C rosettes.
Use approximately fourteen sage-background blocks and fourteen cream-background blocks.
Do not put all ten dusty-rose flowers on one background color.
Suggested Flower Color Plan
Use dusty rose as the dominant flower color on approximately nine squares.
Make seven flowers mainly cream.
Work six primarily oatmeal or beige blooms.
Use mustard on approximately four flowers.
Add two muted sage flowers for lower-contrast variation.
Flower centers can rotate among beige, mustard, rose and sage.
Block All 28 Squares
Pin each block to 19 × 19 cm.
Start with the four corners.
Add one pin at the center of every side.
Do not flatten the flower petals under a blocking cloth.
Measure both diagonals.
Keep each diagonal within approximately 5 mm of its partner.
Audit the Square Batch
Stack five blocked squares and compare the corners.
The flower centers may have different heights, but the outer cream edges should align.
Rework a stabilizing round if a square differs by more than approximately 5 mm.
Do not rely on a tight join to correct an oversized block.
Arrange the 4 × 7 Blanket Grid
Place four squares across.
Build seven rows.
Alternate sage and cream backgrounds without creating rigid vertical stripes.
Distribute the dusty-rose flowers through the top, middle and lower sections.
Keep mustard blooms separated by at least one neighboring square where possible.
Suggested Layout
Row 1: Rose layered bloom / Cream daisy / Rose rosette / Beige layered bloom.
Row 2: Cream daisy / Cream layered bloom / Mustard daisy / Rose rosette.
Row 3: Beige rosette / Rose daisy / Cream layered bloom / Rose layered bloom.
Row 4: Sage rosette / Cream daisy / Rose layered bloom / Beige daisy.
Row 5: Rose layered bloom / Cream rosette / Mustard daisy / Cream layered bloom.
Row 6: Beige daisy / Sage layered bloom / Rose rosette / Cream daisy.
Row 7: Beige layered bloom / Cream rosette / Rose layered bloom / Cream daisy.
Join the Squares
Yarn: warm cream.
Place two squares beside each other with right sides facing upward.
Insert the 4.5 mm hook through corresponding outer loops.
Slip stitch across without tightening the seam.
Join four squares into each horizontal row.
Make all seven rows before connecting them vertically.
Check Horizontal Row Length
Each four-square strip should measure approximately 76 cm before the outer border, allowing for the join width.
Keep the seven row lengths within about 8 mm of one another.
Reopen a tight join rather than stretching one complete strip during final blocking.
Join the Seven Rows
Place Row 1 above Row 2.
Pin the three internal vertical intersections first.
Slip stitch the full seam in cream.
Add the remaining rows in the same way.
At every four-square intersection, keep the join flat rather than pulling all four corners into one tight knot.
Border Round 1 — Cream Setup
Join cream at one blanket corner.
Sc evenly around the complete perimeter.
Work (2 sc, ch 2, 2 sc) at each corner.
Skip duplicated loops where joining seams reach the blanket edge.
Border Round 2 — Sage Green
Join sage.
Hdc in every stitch.
At each corner work (2 hdc, ch 2, 2 hdc).
Join.
Border Round 3 — Sage Green
Ch 1.
Sc in every stitch.
Work (sc, ch 2, sc) in each corner.
Join and fasten off.
Border Round 4 — Cream Eyelet
Join cream.
Repeat sc, ch 2, skip 1 stitch along each straight side.
At every corner work (sc, ch 3, sc).
Join.
Border Round 5 — Cream Foundation
Sl st into the first ch-2 space.
Work 2 sc in each ch-2 space and sc in every sc around.
At each corner work (2 sc, ch 2, 2 sc).
Join.
Scalloped Outer Border
Repeat around:
skip 2 stitches, 7 dc in next stitch, skip 2 stitches, sl st in next stitch.
At each corner, place one 9-dc shell into the corner space.
Continue around all four sides.
Fasten off.
Assembly
- Make one test square of each of the three flower variants and adjust only the outer square rounds until every test block reaches 19 cm after blocking.
- Crochet ten layered eight-petal blooms, ten ten-petal daisies and eight compact rosettes using the rose, cream, beige, mustard and sage palette.
- Add the leaf and background rounds to all twenty-eight flowers, then finish every block with the same cream stabilizing round.
- Block all twenty-eight squares to 19 × 19 cm while leaving the dimensional flower centers uncompressed.
- Arrange four squares across and seven rows down, distributing flower types and background colors throughout the complete grid.
- Join four blocks into each horizontal row with relaxed cream slip stitches, then compare all seven row lengths before continuing.
- Join the seven horizontal strips while pinning every internal four-square intersection before working the complete seam.
- Work the cream setup round and two sage border rounds around the assembled blanket.
- Add the cream eyelet and foundation rounds followed by the large cream scalloped outer edge.
- Block the joins and perimeter only, then lift each petal, leaf and flower center by hand after the blanket has dried.
The completed blanket should have a consistent four-by-seven grid with varied flower textures, straight cream joins, a restrained sage stripe and a dimensional cream scalloped frame.
7 Technical Tips
- Layered flower square finishes smaller: Raised petals are tightening the center framework. Judge size from the outer stabilizing round and keep every blocked square within approximately 5 mm of 19 cm.
- Daisy petals fold sideways: The chain sides have rotated during handling. Tack only the base of the affected petal and leave at least the upper 60 percent free.
- Square center becomes bowl-shaped: Rear leaf loops are too short for the flower diameter. Increase each rear loop by one chain if the outer corners lift more than approximately 5 mm before blocking.
- Cream joining seams form ridges: Slip stitches are being pulled shorter than the two square edges. Join with a 4.5 mm hook and keep each 19 cm edge lying flat during the complete seam.
- Four-square intersections form hard knots: Too many loops are being caught at one center point. Join each seam independently and use only one relaxed reinforcing stitch where four corners meet.
- Sage border pulls inward: The hdc round has fewer working positions than the cream setup. Check every 20 cm section and keep the border length matched to the underlying blanket edge.
- Scalloped border flares: Seven-dc shells are spaced too closely. Maintain two skipped stitches on each side of every shell and use the larger nine-dc shell only at the four corners.
Why Three Flower Styles Work Better Than One
The supplied blanket gets much of its character from variation within a controlled grid. Repeating one identical blossom twenty-eight times would create a stronger geometric rhythm, but it would remove the shifting petal shapes visible from square to square.
Three constructions provide enough variation without making the blanket look unrelated.
The outer square dimensions, cream joining seam and restricted palette act as constants. Those repeated elements keep a large rosette, an open daisy and an eight-petal bloom visually connected even though their centers are built differently.
Why the Square Size Matters
Published 3D flower squares range widely in scale. Current references include 10 cm sport-weight blocks, 16 cm worsted blocks and 30.5 cm statement squares.
The photographed blanket falls between those extremes.
A 19 cm block permits four columns to produce a practical lap-throw width while still leaving enough room for petals large enough to be visibly dimensional from across a room.
Smaller squares would require more motifs. Larger blocks would reduce the number of flower variations visible in the final piece.
Managing Raised Petal Depth
Not every flower should project by exactly the same amount.
The layered bloom can stand approximately 20–25 mm above its background.
Daisies can stay closer to 12–18 mm.
Compact rosettes may project around 18–22 mm.
Keep the square framework flat regardless of flower height.
Depth belongs in the petal structure, not in a distorted center round.
Changing the Flower Palette
Dusty rose, cream, oatmeal, sage and mustard reproduce the muted palette in the image.
For a cooler version, replace mustard with faded blue and dusty rose with mauve.
A brighter garden can use coral, yellow and white flowers on fresh green backgrounds.
When adding a new flower shade, repeat it on at least three blocks so it belongs to the blanket rather than appearing as one isolated accent.
Changing the Background Colors
The reconstruction uses roughly equal numbers of sage and cream backgrounds.
More cream produces a lighter overall blanket.
Using sage on two-thirds of the blocks creates a stronger garden effect.
Beige can replace several cream backgrounds, but keep the joining yarn cream so every square still receives a consistent frame.
Scaling the Blanket
A three-by-four arrangement uses twelve squares and makes a compact baby or chair blanket.
Four by six uses twenty-four squares.
The photographed reconstruction uses four by seven for twenty-eight.
Five by seven requires thirty-five squares and produces a wider throw.
Five by eight uses forty blocks and moves toward a full-size sofa blanket.
Keep the 19 cm block measurement constant when changing only the layout.
Making the Blanket Lighter
Dimensional flowers consume more yarn than flat granny squares.
For a lighter blanket, omit the second petal layer on half of Variant A.
You can also use DK cotton-acrylic rather than dense worsted cotton.
Do not reduce the outer square rounds unless every block is scaled together.
The easiest place to remove weight is the raised flower center, not the structural grid.
Controlling the Cream Join
The cream seams are visually important because they create narrow frames around every flower.
A matching-color join would blur adjacent sage and cream blocks.
Work the seam from the front if a visible raised line is wanted.
For a flatter result, use mattress stitch from the wrong side.
Whichever method is selected, use it throughout all horizontal and vertical seams.
Final Blocking
Pin the four blanket corners and the midpoint of every outer edge.
Next pin selected internal seam intersections to keep the grid square.
Avoid putting weight on the flower centers.
Shape the sage border and cream shells while they are damp.
After drying, lift the layered petals individually and rotate any daisy petal that has folded beneath its neighbor.
Inspect the blanket from several feet away; crooked joins are easier to see from that distance than while holding the work.
Conclusion
Standardize the outer square before batching the flowers because petal height can vary while block dimensions cannot. Your next step is to make one layered bloom, one daisy and one rosette, then block all three to 19 cm before choosing the final color distribution. Keep the joins relaxed and leave the raised petals uncompressed. Share the finished 3D flower granny square blanket pattern project on Pinterest with the entire four-by-seven grid visible, then post a flower close-up on Instagram using #DimensionalGardenBlanket. For this blanket specifically, would you keep the mustard flowers as occasional accents or replace them with more dusty rose?









