Introduction
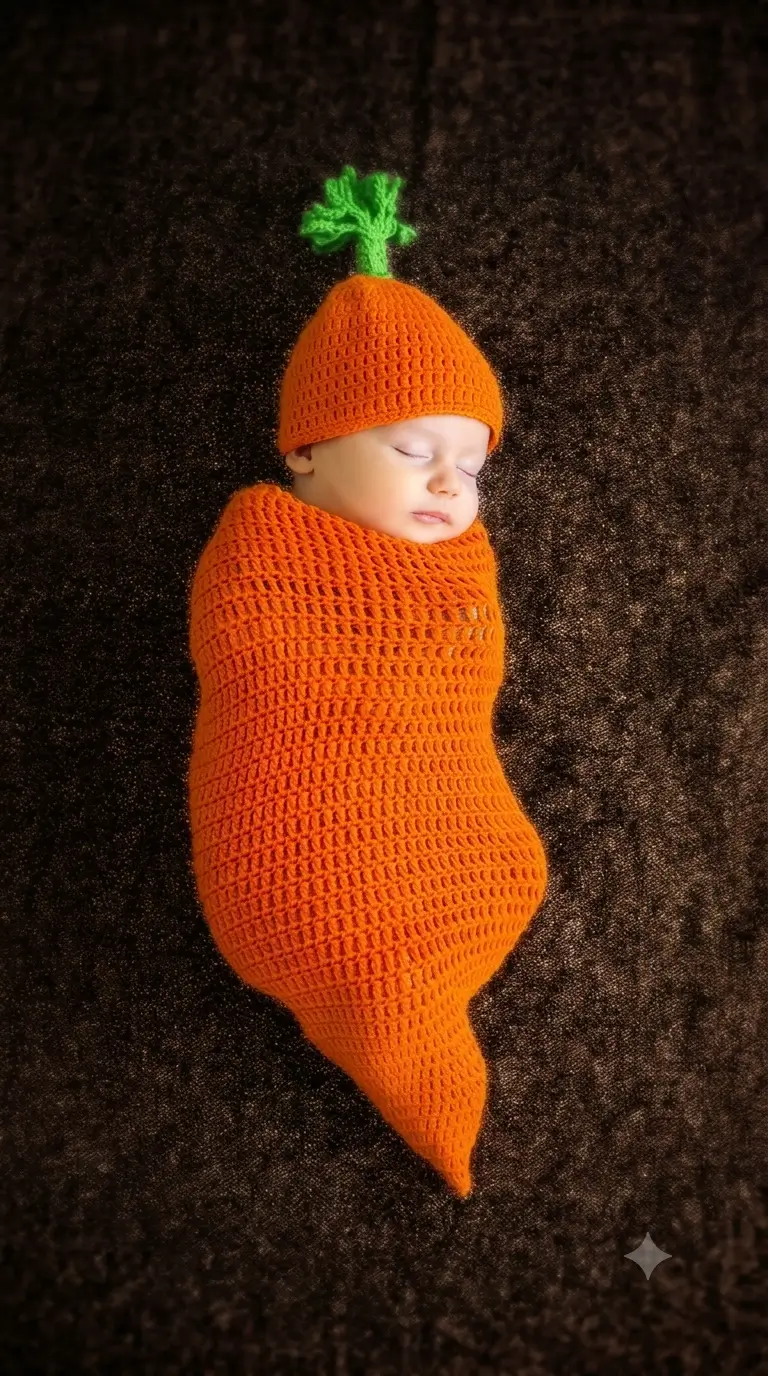
A carrot narrows to a root tip rather than ending in the rounded base used on most baby cocoons. This carrot baby cocoon crochet pattern builds that taper into a newborn photography prop, then pairs it with an orange hat and green crown. Use worsted yarn and a 5.5 mm hook for a piece near 24 × 44.5 cm. The skill level is intermediate because shape control matters. Use the set only for supervised photography.
The Design: What Makes This Carrot Different
Three structural decisions create the carrot profile. First, the lower end starts narrow and expands in stages instead of beginning with the wide circular base common to a generic crochet cocoon. That choice gives the photograph its pointed root silhouette. Second, the widest section stays relatively constant through the torso area so the prop does not compress the baby merely to preserve the vegetable shape. Third, the crochet carrot hat for baby uses a compact crown with a narrow green stem rather than adding bulky leaves around the face.
The major mistake is extending the taper too far upward. A newborn carrot photo prop needs visual taper below the torso, not tight shaping around the upper body. Published carrot-cocoon references use roughly 60 stitches through the main cocoon circumference, which supports that wider middle section.
Project Info at a Glance
| Skill Level | Time | Finished Size | Hook | Best For |
|---|---|---|---|---|
| Intermediate | 3–5 hours | Approx. 24 × 44.5 cm flat | 5.5 mm | Supervised newborn photography |
Important: this is a photography prop, not bedding and not a sleep sack. Remove it after the photography session.
Materials and Tools
Yarn
- Orange — medium #4 / worsted or Aran — allow approximately 180–220 g for test swatching, cocoon and hat.
- Leaf green — medium #4 / worsted or Aran — allow approximately 20–30 g for stem and foliage.
The yarn quantities above are practical planning estimates. Exact consumption changes with yarn brand, gauge and finished dimensions.
Tools
- 5.5 mm crochet hook
- Tapestry needle
- Stitch markers
- Scissors
- Flexible tape measure
- Removable pins or locking markers
No safety eyes, buttons, beads or hard facial pieces are required.
Abbreviations
- MR — magic ring
- sc — single crochet
- hdc — half double crochet
- dc — double crochet
- inc — two stitches worked into one stitch
- dec — decrease
- sl st — slip stitch
- ch — chain
- BLO — back loop only
- st/sts — stitch/stitches
- FO — fasten off
An invisible decrease catches the front loops of the next two stitches before completing one stitch, reducing visible gaps on shaped sections.
Pattern — Step by Step
The instructions below are an original photo-inspired construction. Work joined rounds unless a section says otherwise. Check gauge against measurements rather than forcing the prop onto a baby.
Carrot Cocoon Body
Yarn: orange
R1: 6 sc in MR. (6)
R2: inc ×6. (12)
R3: (1 sc, inc) ×6. (18)
R4: (2 sc, inc) ×6. (24)
R5: sc around. (24)
R6: (3 sc, inc) ×6. (30)
R7: sc around. (30)
R8: (4 sc, inc) ×6. (36)
R9: sc around. (36)
R10: (5 sc, inc) ×6. (42)
R11: sc around. (42)
R12: (6 sc, inc) ×6. (48)
R13: sc around. (48)
R14: (7 sc, inc) ×6. (54)
R15: sc around. (54)
R16: (8 sc, inc) ×6. (60)
Measure the lower tapered section at this point. It should form a long cone rather than a shallow bowl.
R17: dc around. (60)
R18: dc around. (60)
R19: dc around. (60)
R20: dc around. (60)
R21: dc around. (60)
R22: dc around. (60)
R23: dc around. (60)
R24: dc around. (60)
R25: dc around. (60)
R26: dc around. (60)
R27: dc around. (60)
R28: dc around. (60)
R29: dc around. (60)
R30: dc around. (60)
R31: dc around. (60)
R32: dc around. (60)
Continue additional 60-stitch rounds only until the flat length approaches 44–45 cm. Finished length matters more than matching a fixed round number because crochet row height varies.
R33: hdc around. (60)
R34: sc around. (60)
Fasten off. Leave a 15 cm tail and weave it back through several stitches.
Do not add a drawstring or loose cord.
Orange Carrot Hat
Yarn: orange
R1: 6 sc in MR. (6)
R2: inc ×6. (12)
R3: (1 sc, inc) ×6. (18)
R4: (2 sc, inc) ×6. (24)
R5: (3 sc, inc) ×6. (30)
R6: (4 sc, inc) ×6. (36)
R7: (5 sc, inc) ×6. (42)
R8: hdc around. (42)
R9: hdc around. (42)
R10: hdc around. (42)
R11: hdc around. (42)
R12: hdc around. (42)
R13: hdc around. (42)
R14: hdc around. (42)
R15: sc around. (42)
Stop and measure before fastening off. The hat should sit above the eyebrows without a turned brim.
Fasten off and weave in the tail.
Green Stem
Yarn: green
R1: 6 sc in MR. (6)
R2: sc around. (6)
R3: sc around. (6)
R4: sc around. (6)
R5: sc around. (6)
R6: sc around. (6)
Fasten off with a 20 cm tail.
Do not stuff the stem. Flattening it slightly keeps the crown flexible.
Leaf Strand A
Yarn: green
Ch 9.
Starting in the second chain from the hook: sl st in next 2 ch, sc in next 2 ch, hdc in next 2 ch, sc in next ch, sl st in final ch.
Fasten off. Leave a 15 cm tail.
Leaf Strand B
Ch 11.
Starting in the second chain from the hook: sl st in next 3 ch, sc in next 3 ch, hdc in next 2 ch, sc in next ch, sl st in final ch.
Fasten off.
Leaf Strand C
Ch 8.
Starting in the second chain from the hook: sl st in next 2 ch, sc in next 2 ch, hdc in next 2 ch, sl st in final ch.
Fasten off.
Leaf Strand D
Ch 10.
Starting in the second chain from the hook: sl st in next 2 ch, sc in next 3 ch, hdc in next 2 ch, sc in next ch, sl st in final ch.
Fasten off.
Leaf Strand E
Ch 7.
Starting in the second chain from the hook: sl st in next 2 ch, sc in next 2 ch, hdc in next ch, sc in final ch.
Fasten off.
Optional Extra Leaf Strand
Ch 9. Work back with a mixed sequence of slip stitches, single crochet and half double crochet while keeping the strand narrow.
Fasten off. Use the sixth strand only if the crown looks sparse after pinning.
Assembly
- Lay the carrot cocoon flat and check that the lower third forms a continuous point rather than a squared base.
- Measure the cocoon from the upper edge to the tip. Target approximately 44–45 cm.
- Place the orange hat flat and check its depth. The lower edge should remain narrow and unrolled.
- Center the green stem over the starting ring of the hat.
- Sew the stem around its six-stitch base and weave the tail securely through the hat fabric.
- Arrange Leaf Strands A–E around the top of the stem with the longest strands pointing in different directions.
- Sew each leaf securely through multiple crochet stitches and weave every yarn tail completely into the fabric.
- Inspect the cocoon and hat for loose loops, cords, pins, buttons, beads or removable pieces. None should remain.
- Shape the carrot tip by hand and lay the cocoon flat so the stitches settle into the tapered form.
- Use the completed set only during a directly supervised photography session and remove both pieces immediately afterward.
The finished project consists of one tapered orange cocoon and one matching orange-and-green carrot hat.
7 Technical Tips
- Control marker drift. Place a stitch marker at the first stitch of every shaping round. Moving the round start by only two or three stitches can pull the carrot taper sideways.
- Check the widest circumference before adding length. The body should reach approximately 60 stitches before the long straight section. A narrower circumference can make the cocoon too restrictive for photography use.
- Watch for a blunt root tip. If the first 10–12 rounds flare too quickly, the lower end becomes bowl-shaped instead of carrot-shaped. Keep the alternating increase and plain rounds intact.
- Measure the cocoon flat. Target about 44–45 cm from upper edge to point. Adding rounds without measuring can produce a prop that is long enough but badly proportioned.
- Do not overbuild the hat crown. A 42-stitch crown is already broad enough for the reference construction. Extra increase rounds can turn the fitted hat into a loose cap.
- Keep the green stem flexible. Do not stuff it. A rigid stuffed stem creates unnecessary bulk at the top of the baby’s head.
- Secure every leaf tail. Weave each green tail through at least 4–5 cm of crochet fabric before trimming. A short tail can pull free when the hat is repositioned during a photo session.
Safety Notes for Newborn Photography
This carrot set is intended as a supervised photography prop only. It should not be used as a sleep sack, swaddle replacement or unsupervised wearable. Keep the baby’s face completely uncovered, avoid strings or drawcords, and stop using the cocoon if the fit appears restrictive.
The hat should fit without slipping over the eyes or creating pressure marks. Remove the prop if the baby becomes warm or uncomfortable. No loose accessories should be added to the cocoon, and every green leaf must be sewn directly to the hat rather than pinned in place during use.
Conclusion
The defining feature of this carrot baby cocoon crochet pattern is controlled taper rather than decorative surface detail. Build the lower point gradually, hold the middle near its full circumference, and finish the set with a shallow orange hat and irregular green leaves. Before using it, measure the cocoon flat, inspect every yarn tail and confirm that the hat remains clear of the baby’s face. Your next step is to crochet a small gauge sample with the exact orange yarn you plan to use, then compare your stitch width with the target dimensions. Share the finished setup on Pinterest or Instagram with #CarrotBabyCocoon. How long did you make the pointed carrot section before beginning the full-width body?
Sources
- Ambassador Crochet — Spring Carrot Cocoon
- Ravelry — Spring Carrot Cocoon
- Left in Knots — Baby Cocoon Photography Prop Safety Reference









