Introduction
Eight pumpkin seams have to meet beneath one curved stem, so a single oversized panel can twist the entire stalk off center. This patchwork pumpkin crochet pattern uses worsted or Aran yarn with 5 mm and 4 mm hooks to make an approximately 24–27 cm decoration. Orange, cream, sage and mustard panels create an intermediate-to-advanced stuffed pumpkin designed for structured fall display.
The Design: What Makes This Patchwork Pumpkin Different
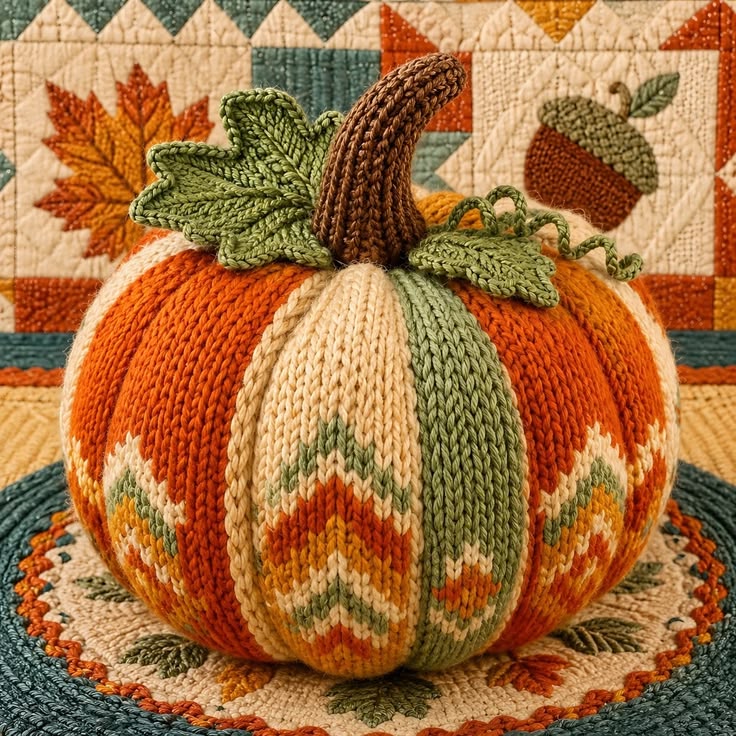
The body is divided into eight separately crocheted panels rather than one continuous rectangle. That construction lets orange, cream and sage sections alternate cleanly while selected panels carry small harvest-inspired colorwork near the lower half. Every wedge uses the same row count, because matching dimensions matter more than matching stitch texture when eight seams meet at the top and bottom. The tall brown stalk is built as a narrow stuffed tube and curved after filling. Two large leaves, one smaller leaf and a spiral vine hide the upper gathering while adding width around the stem. A common mistake in a multicolor crochet pumpkin is correcting a narrow panel by stretching it during assembly. The tension returns after stuffing, pulling the neighboring seams sideways and producing an uneven pumpkin base.
Project Info at a Glance
| Skill Level | Time | Finished Size | Hooks | Best For |
|---|---|---|---|---|
| Intermediate–Advanced | 8–12 hours | Approx. 24–27 cm diameter | 5.0 mm body / 4.0 mm details | Fall table displays, shelf décor and harvest centerpieces |
Materials and Tools
Yarn
- Pumpkin orange — worsted / Aran #4 — approximately 110–135 g — four body panels and selected colorwork.
- Warm cream — worsted / Aran #4 — approximately 55–70 g — two body panels and geometric accents.
- Sage / olive green — worsted / Aran #4 — approximately 55–70 g — two body panels, leaves and tendril.
- Mustard gold — worsted / Aran #4 — approximately 20–30 g — lower-panel harvest colorwork.
- Chocolate brown — worsted / Aran #4 — approximately 25–35 g — tall stem and small color accents.
Use yarns from the same weight category. A softer cream yarn can stretch more under stuffing than a tightly spun orange yarn even when both panels have identical stitch counts.
Tools
- 5.0 mm crochet hook for the pumpkin body
- 4.0 mm crochet hook for the leaves, stem details and tendril
- Polyester fiberfill — approximately 180–230 g
- Long tapestry needle
- Standard yarn needle
- Stitch markers
- Dressmaking pins
- Scissors
- Measuring tape
Abbreviations
- MR — magic ring
- ch — chain
- sc — single crochet
- hdc — half double crochet
- dc — double crochet
- tr — treble crochet
- inc — increase
- dec — decrease
- sl st — slip stitch
- BLO — back loop only
An invisible decrease is worked through the front loops of two adjacent stitches before completing one single crochet through both loops.
Pattern — Step by Step
The pumpkin body is assembled from eight individual panels. Work one test panel, measure it without stretching and use that piece as the dimensional reference for the remaining seven.
Basic Pumpkin Panel
Yarn: assigned panel color — Source: original reconstruction using standard flat crochet shaping.
Foundation: ch 13.
Row 1: starting in the second chain, 12 sc. (12)
Row 2: ch 1, turn, inc, 10 sc, inc. (14)
Row 3: ch 1, turn, inc, 12 sc, inc. (16)
Row 4: ch 1, turn, inc, 14 sc, inc. (18)
Rows 5–28: ch 1, turn, sc across. (18)
Row 29: ch 1, turn, dec, 14 sc, dec. (16)
Row 30: ch 1, turn, dec, 12 sc, dec. (14)
Row 31: ch 1, turn, dec, 10 sc, dec. (12)
Row 32: ch 1, turn, dec, 8 sc, dec. (10)
Fasten off with approximately 40 cm of sewing yarn.
Target relaxed size: approximately 10–11 cm across the widest point and 22–24 cm long.
Panel Color Plan
Make four panels in pumpkin orange.
Work two panels in warm cream.
Make two panels in sage green.
Arrange them in this sequence:
Orange – Cream – Sage – Orange – Cream – Orange – Sage – Orange.
This distribution avoids placing both pale panels beside one another and gives the pumpkin a balanced patchwork rhythm.
Cream Harvest Colorwork Panel — Make 2
Yarn: warm cream with orange, sage and mustard details — Source: original reconstruction.
Work Rows 1–12 of the Basic Pumpkin Panel in cream.
Beginning at Row 13, carry unused colors loosely along the wrong side.
Row 13: cream 6, sage 6, cream 6. (18)
Row 14: cream 5, sage 8, cream 5. (18)
Row 15: cream 4, mustard 2, orange 6, mustard 2, cream 4. (18)
Row 16: cream 3, mustard 3, orange 6, mustard 3, cream 3. (18)
Row 17: cream 4, orange 10, cream 4. (18)
Row 18: cream 5, orange 8, cream 5. (18)
Row 19: cream 6, mustard 6, cream 6. (18)
Row 20: cream 7, sage 4, cream 7. (18)
Return to cream only for Rows 21–28.
Complete Rows 29–32 using the Basic Pumpkin Panel shaping.
Fasten off.
Sage Harvest Accent Panel — Make 2
Yarn: sage with orange, mustard and cream accents.
Work Rows 1–14 in sage.
Row 15: sage 5, orange 3, mustard 2, orange 3, sage 5. (18)
Row 16: sage 4, orange 4, cream 2, orange 4, sage 4. (18)
Row 17: sage 5, orange 8, sage 5. (18)
Row 18: sage 6, mustard 6, sage 6. (18)
Row 19: sage 7, cream 4, sage 7. (18)
Return to sage for Rows 20–28.
Complete Rows 29–32 according to the Basic Pumpkin Panel.
Fasten off.
Check All Eight Panels
Lay the panels beside one another without stretching.
The widest points should differ by no more than approximately 5 mm.
Compare overall lengths from foundation edge to final row.
Rework any panel that differs by more than about 7 mm.
Colorwork tension is the most likely source of a smaller panel.
Join the First Four Panels
Place one orange and one cream panel with right sides together.
Match Row 1 to Row 1 and Row 32 to Row 32.
Use mattress stitch or relaxed whip stitch along the complete side edge.
Add the sage and second orange panel in the same manner.
Open the joined section after every seam and check that no edge has shortened.
Join the Remaining Four Panels
Repeat with the second cream, orange, sage and final orange panels.
You now have two four-panel half shells.
Place them right sides together.
Join one complete long edge.
Leave the final long seam open for stuffing access.
Gather the Pumpkin Base
Thread approximately 100 cm of orange or brown yarn through the row-end loops around the lower opening.
Work through one or two loops per panel at a time rather than making eight large jumps.
Pull gradually.
Pause when the opening reaches about 25 mm and redistribute the folds.
Pull until the hole is approximately 8–10 mm.
Secure firmly on the inside.
Stuff the Pumpkin
Add fiberfill in small handfuls.
Push stuffing toward the outer walls first.
Keep the center slightly softer.
Rotate the pumpkin frequently while filling so one patchwork side does not become flatter than another.
Stop before the panels are stretched enough to expose the carried colorwork strands.
Close the Final Body Seam
Pin the remaining open seam from bottom to top.
Match corresponding rows.
Sew approximately 5 cm at a time.
Add or remove filling through the remaining opening as required.
Finish the seam when the pumpkin is evenly rounded.
Gather the Top
Thread a long strand through the eight panel tips.
Pull in several stages.
Keep all eight seams pointing toward the center.
Close the opening to approximately 10–12 mm.
Do not conceal the gathering completely; the stem and leaves will cover it.
Sculpt the Eight Pumpkin Grooves
Cut eight long strands of matching orange, cream, sage or neutral brown yarn.
Pass each strand from the top center to the bottom center beside one panel seam.
Bring it back to the top on the opposite side.
Pull until the seam sinks approximately 10–15 mm into the body.
Repeat along all eight divisions.
Compare the pumpkin from above before securing the strands.
Tall Curved Stem
Yarn: chocolate brown — Source: standard amigurumi tube math.
R1: 6 sc in MR. (6)
R2: inc ×6. (12)
R3: BLO sc around. (12)
R4: sc around. (12)
R5: sc around. (12)
R6: sc around. (12)
R7: sc around. (12)
R8: sc around. (12)
R9: sc around. (12)
R10: sc around. (12)
R11: sc around. (12)
R12: sc around. (12)
R13: sc around. (12)
R14: sc around. (12)
R15: sc around. (12)
R16: sc around. (12)
R17: sc around. (12)
R18: sc around. (12)
Fasten off with a 45 cm sewing tail.
Stuff the lower two-thirds firmly and the top third lightly.
Curve the Stem
Thread brown yarn from the lower rear of the stem to approximately R13.
Take one concealed shaping stitch covering about 5–6 cm.
Pull until the upper stem bends roughly 20–30 degrees.
Secure inside the stem base.
Large Pumpkin Leaf — Make 2
Yarn: sage green — Source: original pointed-leaf reconstruction.
Ch 19.
Starting in the second chain work:
sl st, sc, hdc, 3 dc, 5 tr, 3 dc, hdc, sc, sl st.
Work 3 sc in the final chain.
Return along the opposite side in mirrored stitch order.
Fasten off with a 30 cm tail.
Target approximately 14–16 cm long.
Large Leaf Vein
Join a darker sage strand at the base.
Surface slip stitch along the center to approximately 10 mm below the tip.
Add three short diagonal veins on each side.
Keep every surface stitch relaxed so the leaf remains flat.
Small Pumpkin Leaf
Yarn: sage green.
Ch 13.
Starting in the second chain work:
sl st, sc, hdc, 2 dc, 3 tr, 2 dc, hdc, sc.
Work 3 sc at the tip.
Return along the opposite edge in mirrored order.
Fasten off.
Curly Vine
Yarn: sage green.
Ch 42.
Starting in the second chain, work 3 sc in each chain for the first 20 chains.
Work 2 sc in each remaining chain.
The cord will form a spiral automatically.
Fasten off with a 20 cm tail.
Attach the Stem
Center the brown stem over the gathered opening.
Insert the lower 10–15 mm into the top depression.
Pin at four points.
Sew twice around the 12-stitch base.
Add two deeper stitches through the pumpkin center if the tall stem rocks sideways.
Arrange the Leaves
Place one large leaf toward the viewer’s left.
Angle the second large leaf toward the rear-right area.
Position the smaller leaf beside the vine.
Overlap the leaf bases around the stem so the top gathering is hidden.
Leave the pointed outer halves unattached.
Attach the Curly Vine
Place the vine beside the smaller leaf.
Tack the starting end near the stem.
Add one small attachment approximately 4–5 cm along the cord.
Leave the remaining spiral free.
Assembly
- Make all eight 32-row pumpkin panels, including four orange, two cream colorwork and two sage colorwork sections.
- Measure every panel at its widest point and rework any piece differing by more than approximately 5 mm from the group.
- Join four panels into each half shell, then connect the two halves while leaving one final seam open for filling.
- Gather the lower opening to approximately 8–10 mm and fill the body evenly, keeping the central stuffing slightly softer than the outer walls.
- Close the final vertical seam and gather the upper opening while keeping all eight panel seams aimed toward the top center.
- Run shaping strands through the top and bottom centers along all eight panel divisions to form grooves approximately 10–15 mm deep.
- Crochet the 12-stitch brown stem, fill it unevenly for flexibility and add one shaping strand to create the visible upper curve.
- Make two large sage leaves, one small leaf and one spiral vine, adding central surface veins to the larger leaves.
- Sew the stem firmly into the top depression, then overlap the three leaf bases around it and tack the curly vine beside the smaller leaf.
- Set the pumpkin on a hard surface, adjust its eight grooves and base contact, then weave all remaining tails through matching seams.
The finished pumpkin should sit level with eight visible vertical sections, a centered curved stem and layered sage foliage covering the upper gathering.
7 Technical Tips
- One panel becomes noticeably narrower: Tapestry colorwork tension is tighter than the solid sections. Keep all eight widest measurements within approximately 5 mm before joining.
- Pumpkin leans after stuffing: One lower panel contains more fiberfill than its opposite section. Set the pumpkin down after every three or four handfuls of stuffing and redistribute material before closing the seam.
- Grooves vary in depth: Shaping strands are being pulled independently without comparison. Target approximately 10–15 mm of indentation on every division and check the pumpkin from directly above after each pair.
- Colorwork develops visible holes: Carried strands are pulling the fabric sideways. Leave the unused yarn loose enough to span the rear stitches without shortening the 18-stitch row.
- Stem falls toward one side: Its 12-stitch base is attached through too small an area. Sew twice around the base and add two deeper anchor stitches through the pumpkin top.
- Large leaves curl into cups: The center vein is shorter than the crocheted leaf. Stop the surface line about 10 mm before the tip and keep the diagonal veins loose.
- Curly vine loses its spiral: Too few increases were worked along the chain. Use 3 sc per chain through roughly the first 20 chains, then 2 sc per chain for a looser outer curl.
Why Separate Panels Suit This Pumpkin
The photographed pumpkin has stronger color boundaries than a typical flat-strip pumpkin. Working eight independent pieces makes those boundaries structural rather than decorative. Each seam becomes one natural groove, so the patchwork layout and pumpkin anatomy reinforce each other.
Separate panels also make colorwork easier to control. You can place a small orange-and-mustard motif on one cream section without carrying several shades around the complete circumference. The tradeoff is accuracy: all eight pieces must match closely before assembly.
Why the Pumpkin Uses Eight Sections
Six sections make a cleaner, simpler pumpkin, but the image shows a fuller segmented form with narrow vertical color panels.
Eight wedges provide enough positions for four orange areas, two cream areas and two green areas without placing identical pale sections side by side.
The added seams also create stronger sculpted ribs.
More than eight panels would make each wedge narrow enough that the lower geometric colorwork becomes difficult to read.
Controlling the Colorwork
Carry unused strands only across short distances.
For longer gaps, cut the accent color and rejoin it rather than dragging a loose strand across most of the panel.
Check the panel width every two colorwork rows.
If the width contracts, stretch the carried strand gently before working the next stitch.
The objective is a flat panel whose colorwork section has the same width as the solid crochet above and below it.
Changing the Patchwork Palette
Pumpkin orange, cream and sage reproduce the supplied image closely.
A darker harvest version can replace sage with forest green and cream with camel.
For a neutral pumpkin, use ivory, oatmeal, taupe and brown while keeping a green leaf crown.
A brighter quilt-inspired version can introduce rust red and mustard as complete panels rather than small colorwork accents.
Keep at least one dominant color across three or four sections so the object still reads as one pumpkin rather than eight unrelated swatches.
Changing the Pumpkin Size
For a smaller decoration, work 14 stitches at the widest point and reduce the straight center section to approximately 20 rows.
For a larger pumpkin, expand to 22 stitches and work 36–40 rows per panel.
Make one complete wedge before multiplying the instructions.
Changing eight panels after they are finished takes considerably longer than correcting one test piece.
Changing the Stem
A short straight stem can stop after approximately R10.
The reference uses a tall curved stalk, so eighteen rounds give more visible height above the leaves.
For a stronger bend, place the internal shaping strand on the rear side and shorten it gradually.
Do not overfill the final five rounds; dense stuffing prevents the upper tube from curving smoothly.
Controlling the Pumpkin Base
A decorative pumpkin needs enough flat contact to stay upright beneath the tall stalk.
Before closing the top, press the lower gathered center inward by approximately 15–20 mm.
Move stuffing away from that depression toward the eight outer lobes.
Set the pumpkin on a hard table rather than fabric while judging the result.
If it rocks, redistribute stuffing before tightening any additional shaping strands.
Making the Leaves More Dimensional
Sew only the lower third of each leaf to the pumpkin.
The central vein can be attached at one additional point about halfway toward the tip.
Leave the outer side edges free.
This method gives the leaf enough support to stay positioned without flattening the pointed shape against the pumpkin surface.
Using the Pumpkin as Seasonal Décor
The reconstructed size is large enough to function as a single tabletop centerpiece rather than a small shelf ornament.
For a grouped display, reduce the same eight-panel structure to two additional sizes and vary which panels are cream or sage.
Keep the stem and leaf proportions tied to each body size rather than reusing one stem measurement across the complete set.
Final Shaping
Rotate the completed pumpkin slowly on a level surface.
Check that every panel is visible and that neither cream section disappears around the rear.
Adjust all eight shaping strands before burying their tails.
Lift the leaf points and rearrange the spiral vine.
View the stem from the front and side; its curved tip should remain above the body center rather than extending far enough to shift the visual balance.
Conclusion
Standardize the eight body panels before joining because stuffing cannot correct a patchwork section that is already several millimeters too narrow. Your next step is to crochet one 18-stitch, 32-row test panel and measure it before making the colorwork versions. Keep the center stuffing moderate and sculpt each seam to a similar depth. Share the finished patchwork pumpkin crochet pattern project on Pinterest with all visible panel colors facing forward, then post the leaf-and-stem detail on Instagram using #QuiltPatchworkPumpkin. For this pumpkin specifically, would you keep the cream-and-sage panels or replace one section with mustard gold?









