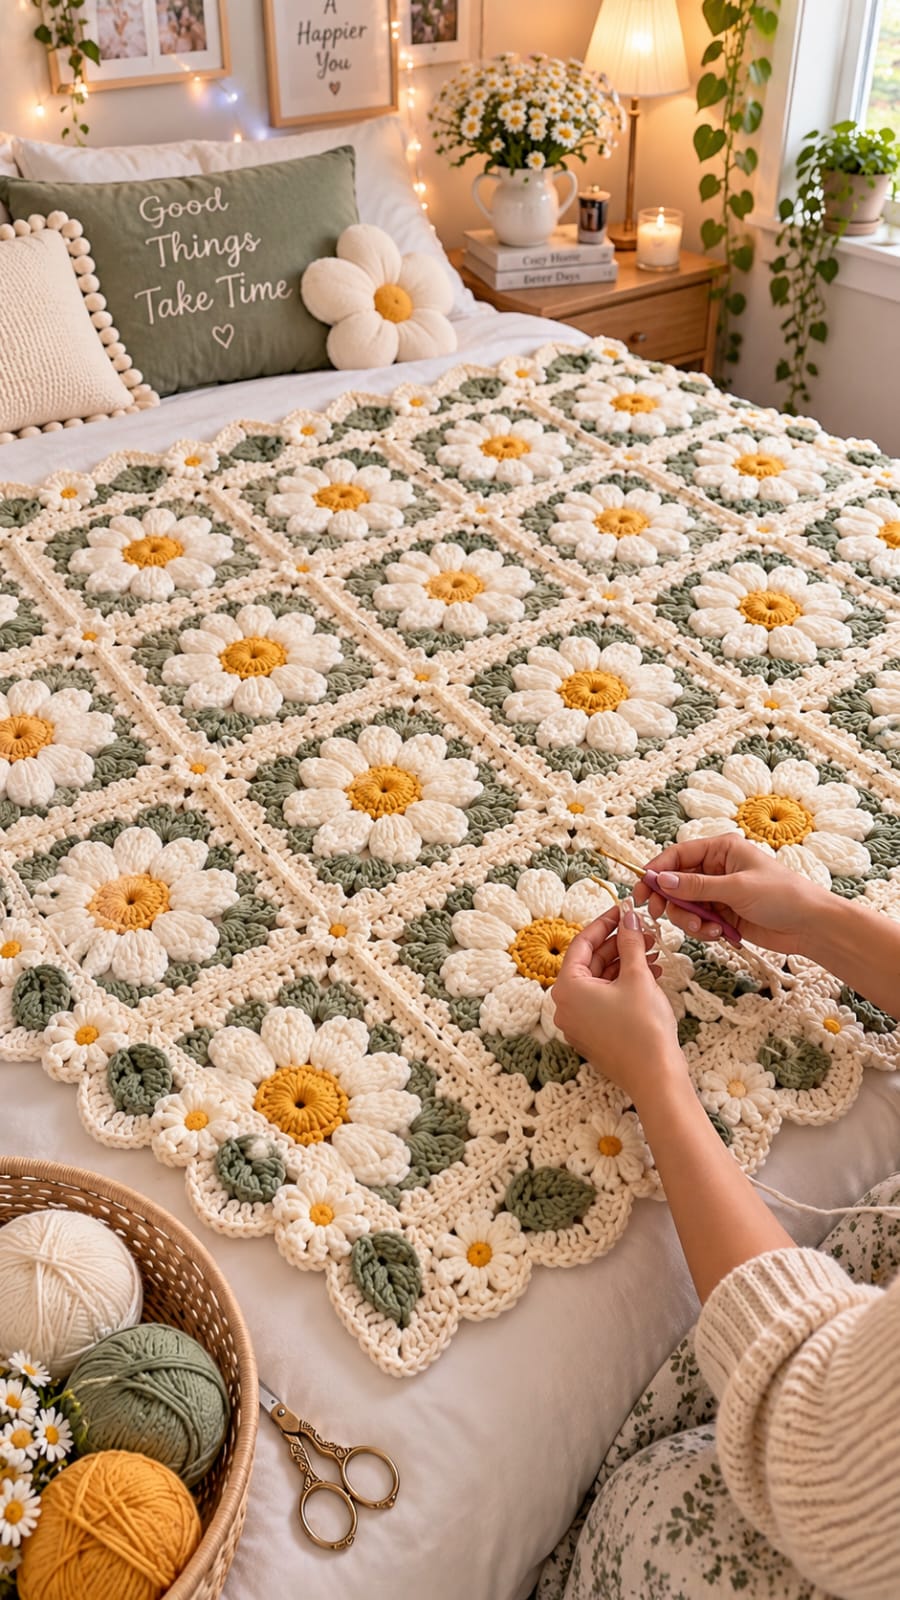
A daisy with flat petals will disappear against this blanket’s sage background; each white petal needs enough height to stand above the square. This daisy granny square crochet blanket pattern combines mustard centers, raised cream petals, sage backgrounds, cream joining strips, miniature flowers and a scalloped botanical border. Worked mainly in worsted-weight yarn with a 5.5 mm hook, the modular construction can be adjusted for a lap blanket, throw or bed covering.
What Makes This Daisy Crochet Blanket Different
The main feature is the dimensional flower. Instead of creating a flat colorwork daisy, each square uses thick cream petal clusters around a mustard center. The petals project above the sage background, giving every flower a separate layer.
A cream frame around each square provides visual separation between the sage sections. Once joined, those frames form the pale grid visible across the entire daisy granny square blanket.
The outer border changes scale. Smaller daisies, green leaves and scalloped cream sections replace the large central flowers, preventing the edge from looking like another row of identical squares.
The primary construction problem is inconsistent square size. Raised petals can change tension around the flower center, so every completed motif should be blocked to the same dimensions before joining.
Project Info at a Glance
| Skill Level | Construction | Square Size | Hook | Yarn |
|---|---|---|---|---|
| Intermediate | Individual motifs joined into a blanket | Approx. 15–16.5 cm after blocking | 5.5 mm | Worsted / Aran |
For a medium throw, arrange approximately 7 squares across and 9 squares long, then add the decorative border. For a larger bed blanket, continue adding complete rows and columns before beginning the edging.
Materials and Tools
Yarn
- Sage green — worsted/Aran weight — approximately 700–900 g for a medium throw
- Cream or warm white — worsted/Aran weight — approximately 600–800 g
- Mustard yellow — worsted/Aran weight — approximately 120–180 g
- Dark sage green — worsted/Aran weight — approximately 100–150 g for leaves and border accents
Yarn requirements depend heavily on blanket dimensions. Dimensional petals consume more cream yarn than flat granny-square flowers, so keep additional cream available before beginning the border.
Tools
- 5.5 mm crochet hook
- 5.0 mm crochet hook — optional for tighter joining rounds
- Tapestry needle
- Locking stitch markers
- Blocking mats
- Rust-resistant blocking pins
- Scissors
- Tape measure
Abbreviations
- MR — magic ring
- ch — chain
- sc — single crochet
- hdc — half double crochet
- dc — double crochet
- tr — treble crochet
- sl st — slip stitch
- st/sts — stitch/stitches
- sp — space
- yo — yarn over
Special Stitch: Raised Daisy Petal
The large petals need more volume than an ordinary double-crochet cluster.
Yarn over, insert the hook into the indicated space and pull up a long loop. Yarn over and pull through two loops, leaving the unfinished stitch on the hook.
Repeat this process four more times into the same space.
Yarn over and pull through all remaining loops. Ch 1 to close the cluster.
Keep every elongated loop approximately the same height. Short loops create narrow petals, while inconsistent loop height produces flowers with visibly different petal sizes.
Large 3D Daisy Granny Square
Make the number required for your selected blanket dimensions. Yarn: mustard, cream, sage and cream border.
Round 1 — Mustard Center
With mustard yarn, make an MR.
R1: Ch 3, work 11 dc into MR. Join with sl st. (12 dc)
Pull the center ring closed firmly.
Round 2 — Textured Center
R2: Ch 1. Work 2 sc into each stitch around. Join. (24 sc)
Fasten off mustard.
This 24-stitch round creates enough attachment points for a full ring of large cream petals.
Round 3 — Raised Cream Petals
Join cream yarn in any stitch.
R3: Ch 1. Work one raised petal over the next 2 stitches, then sl st into the following stitch.
Continue around, distributing 12 raised petals evenly around the center.
Join with sl st.
Fasten off cream.
Spread the petals with your fingers before beginning the green background. Each petal should project outward rather than folding underneath its neighbor.
Round 4 — Sage Foundation
Join sage yarn behind any petal.
R4: Ch 3. Work 2 dc into the same space.
Ch 1, then work 3 dc into the next space between petals.
Continue around, placing one 3-dc group between each pair of petals.
Join with sl st.
Do not crochet through the outer tips of the cream petals. The sage round should sit behind them.
Round 5 — Turning the Flower into a Square
Sl st into the next space.
R5: Ch 3, 2 dc, ch 2, 3 dc in the same space to form the first corner.
Work 3 dc in each of the next two spaces.
In the following space work 3 dc, ch 2, 3 dc.
Repeat around until four corners have been formed.
Join with sl st.
Round 6 — Expanding the Sage Square
Sl st to the first corner.
R6: In the corner work ch 3, 2 dc, ch 2, 3 dc.
Work 3 dc into every space along the first side.
At the next corner work 3 dc, ch 2, 3 dc.
Repeat around all four sides.
Join and fasten off sage.
Round 7 — Cream Frame
Join cream yarn in any corner.
R7: Ch 1. Work sc evenly along the first side.
At the corner work sc, ch 2, sc.
Continue around all four sides.
Join with sl st.
Round 8 — Cream Joining Edge
R8: Ch 3 and dc in each stitch along the side.
At each corner work 2 dc, ch 2, 2 dc.
Continue around and join.
Fasten off, leaving a long tail if the square will be sewn to its neighbor.
Blocking the Daisy Squares
Block the first completed square before making the entire batch.
Target approximately 15–16.5 cm square, depending on yarn and tension.
Pin all four corners first. Measure diagonally from corner to corner in both directions. The measurements should match closely.
Next, pin the midpoint of each side.
Do not flatten the cream petals against the blocking mat. Shape the square around the flower while leaving the dimensional petals raised.
Use the first blocked motif as the size template for every subsequent square.
Blanket Layout
For a medium throw, make approximately 63 large daisy squares and arrange them in a 7 × 9 grid.
A smaller lap blanket can use a 6 × 8 arrangement.
For a larger blanket, use an 8 × 10, 9 × 11 or similar rectangular grid.
Lay every blocked square on a flat surface before joining. Rotate individual motifs if necessary so the petals appear evenly distributed throughout the blanket.
Joining the Daisy Granny Squares
The photographed design uses prominent cream divisions between the sage squares. A visible cream join therefore works better than a hidden same-color seam.
Horizontal Joining
Place two squares side by side with the right sides facing upward.
Join cream yarn through the corresponding corner spaces.
Ch 1.
Working through matching edge stitches, sl st the two squares together.
Keep every joining stitch loose enough for the seam to lie flat.
Continue across the entire row of squares without breaking yarn whenever possible.
Vertical Joining
Turn the joined rows so the unworked seams run vertically.
Repeat the same cream slip-stitch joining method.
At each intersection, pass through the corner spaces of all adjoining squares so no hole forms at the crossing point.
After joining, lay the blanket flat and check the cream grid. Every line should run continuously from one edge to the other.
Small Border Daisy — Make Multiple
The outer edge uses smaller flowers to change the scale of the design.
Yarn: mustard center and cream petals.
R1: With mustard, 6 sc in MR. Join. (6)
R2: Inc ×6. (12)
Fasten off mustard and join cream.
R3: Sl st in first stitch. In the next stitch work hdc, 3 dc, hdc. Sl st in the following stitch.
Repeat around to create six rounded petals.
Join and fasten off, leaving approximately 20 cm for sewing.
These flowers should remain much smaller than the central daisies.
Green Border Leaf — Make Multiple
Yarn: dark sage green.
Ch 9.
Starting in the second chain from the hook, work:
Sc, hdc, dc, tr, tr, dc, hdc.
Work 3 sc into the final chain.
Continue down the opposite side of the foundation chain:
Hdc, dc, tr, tr, dc, hdc, sc.
Join with sl st at the base.
Edging: Ch 1 and sc around the complete leaf, placing 3 sc into the tip.
Fasten off, leaving a 20 cm sewing tail.
Outer Blanket Border
Border Round 1
Join cream yarn in any corner of the assembled blanket.
Ch 1 and sc evenly around the complete blanket.
Work 3 sc in each corner.
Join with sl st.
Border Round 2
Ch 3.
Dc in each stitch around.
At each corner work 2 dc, ch 2, 2 dc.
Join with sl st.
Border Round 3 — Openwork Foundation
Ch 1.
Sc in first stitch, ch 2, skip 2 stitches, sc in next stitch.
Repeat around.
At each corner work sc, ch 3, sc.
Join.
Border Round 4 — Scallops
Sl st into the first ch-2 space.
Work 5 dc into the ch-2 space.
Sl st into the next ch-2 space.
Continue alternating 5-dc shells and slip stitches around the blanket.
Adjust the corner shells so they sit centered on each corner rather than pulling toward one side.
Join and fasten off.
Adding the Small Daisies and Leaves
Lay the finished blanket flat before attaching the decorative border motifs.
Place a small daisy near selected scallops rather than attaching one to every shell.
Position green leaves between some flowers and angle their points away from the blanket.
Alternate flower-only sections with flower-and-leaf sections so the border does not become excessively dense.
Sew through the center of each flower first. Add one small stitch beneath selected petals only when extra stability is needed.
Attach each leaf through its base and lower third. Leave the pointed end free so the leaf remains dimensional.
Assembly
- Complete one large daisy square and block it to establish the target motif dimensions.
- Crochet the remaining large squares using the first blocked square as the size reference.
- Block every square before joining and correct any motif that differs by more than approximately 5 mm.
- Arrange the squares into the selected rectangular grid with all flowers facing upward.
- Join complete horizontal rows with cream yarn before beginning the vertical seams.
- Join the vertical seams and secure each four-square intersection so no large opening remains.
- Work the cream foundation border around the complete joined blanket.
- Add the openwork and scalloped outer rounds only after confirming that the blanket lies flat.
- Pin the miniature daisies and green leaves around the border before sewing any of them permanently.
- Weave in all remaining ends, reshape the large petals by hand and complete a final light blocking of the joined blanket.
The completed blanket should show a regular grid of large dimensional daisies surrounded by a lighter botanical border of miniature flowers, leaves and cream scallops.
7 Technical Tips for a 3D Daisy Granny Square Blanket
- Flat petals: pull each unfinished petal loop to approximately the same height before closing the cluster. Short loops remove the dimensional effect and make one flower look smaller than its neighbors.
- Unequal squares: block every motif to within approximately 5 mm of the master square. A difference of only 1 cm becomes substantial when seven or more squares are joined across one row.
- Curling flower centers: keep the mustard center relaxed before adding the petals. Excessively tight center stitches cause the cream petals to tilt inward instead of spreading across the sage background.
- Wavy seams: do not tighten the cream joining slip stitches. A joining seam shorter than the square edges pulls neighboring motifs toward one another and creates ridges across the blanket.
- Open intersections: pass through all corresponding corner spaces where four squares meet. Missing one corner leaves a visible hole in the center of the cream grid.
- Ruffled border: stop after every side and lay the edge flat. If the scallops begin to ripple, remove one repeat rather than attempting to flatten excess stitches during blocking.
- Loose decorative motifs: sew each border leaf through at least its lower 2–3 cm and secure flower centers with several passes. Attaching either component with one stitch allows it to rotate during washing.
How to Keep Every Daisy the Same Size
Make all mustard centers first if your tension changes noticeably during a long project. Then complete all cream petal rounds, followed by the sage backgrounds.
This assembly-line approach makes tension differences easier to identify because the same stitch is repeated across several motifs.
Count the petals before adding the green background. Every main flower should contain the same number.
Measure the diameter of the flower before squaring it. A substantially larger flower will force the sage rounds outward and produce a larger final square even when the background stitch count is correct.
Keeping the Raised Petals Dimensional
Do not crochet the sage background through the outer edge of each cream petal. Work behind the flower so the petals remain independent from the square.
During blocking, pin only the sage and cream square edges. Arrange the petals with your fingers after the background has been secured.
If one petal folds underneath another, pull it forward before the square dries.
A finished daisy should cast visible shadows between neighboring petals. That relief is a defining feature of this design.
Choosing Yarn for the Daisy Blanket
Worsted or Aran yarn provides enough body for the dimensional petals without making a large blanket excessively heavy. Published daisy-granny blankets commonly use these yarn weights with hooks around 5–6 mm.
A smooth acrylic or acrylic blend makes the stitch definition easy to see. Cotton blends create firmer flowers but generally produce a heavier finished blanket.
Avoid heavily brushed yarn for the white petals. Fuzzy fibers soften the outline between individual clusters and reduce the definition of the daisy.
For the photographed palette, select a muted sage rather than a bright grass green. Warm cream and mustard centers then provide contrast without requiring additional colors.
How to Resize the Daisy Blanket
The modular construction allows the dimensions to change without altering the individual square pattern.
For a baby or lap blanket, use approximately 6 squares across and 7–8 squares long.
For a medium throw, use approximately 7 squares across and 9 squares long.
A larger sofa or bed blanket can use 8–10 squares across and the required number of rows for length.
Calculate the final dimensions from the blocked square measurement rather than the unblocked motif.
For example, a 16 cm square arranged seven across produces approximately 112 cm before accounting for joining and the outer border.
Planning Yarn Quantities
The cream yarn is used in three separate areas: large petals, square frames and the outer border. It may therefore equal or exceed the amount of sage required even though green occupies most of each square background.
Make and weigh one completely finished square before purchasing yarn for an unusually large blanket.
Multiply that weight by the required number of squares, then add the estimated joining and border yarn.
Add approximately 10–15 percent for gauge differences, tails, decorative flowers and leaves.
Keep the mustard center yarn calculation separate. Each center is small, so even a large blanket uses considerably less mustard than cream or sage.
Joining Without Distorting the Squares
Arrange all blocked motifs on a bed or floor before joining.
Connect squares in complete strips rather than randomly adding individual motifs. Long horizontal and vertical seams are easier to inspect for tension changes.
After completing each seam, stretch it gently between both hands. The seam should extend to approximately the same length as the unjoined square edges.
If it remains shorter, redo that section with looser slip stitches or a hook 0.5 mm larger.
Check the blanket after every complete joined row. Correcting a tight seam immediately is easier than removing several intersecting joins later.
Finishing and Blocking the Blanket
Weave the color-change tails into stitches of the same color. Avoid carrying a dark sage tail through the back of a cream petal because it may remain visible from the front.
Lay the complete blanket flat after all decorative motifs are attached.
Pin the four outer corners first, then straighten the cream joining grid.
Shape the scalloped edge without stretching individual shells beyond their natural width.
The large daisy petals should not be pinned flat. Lift and separate them after the rest of the blanket has been positioned.
Allow the blanket to dry completely before folding it.
Final Notes
Complete one blocked motif before committing to the full blanket. The square measurement controls the finished dimensions, yarn calculation and number of motifs required more accurately than an assumed gauge.
For the photographed effect, maintain three dominant colors: muted sage, warm cream and mustard. Let the raised petals provide most of the texture while the cream joining grid controls the geometry.
Once the 3D daisy granny square crochet blanket pattern is complete, photograph it from a slight angle so the height of the petals remains visible. Save the finished blanket to Pinterest or share your color combination on Instagram with #3DDaisyGrannyBlanket. For another version, would you keep the sage background or replace it with dusty blue while retaining the cream daisies?









