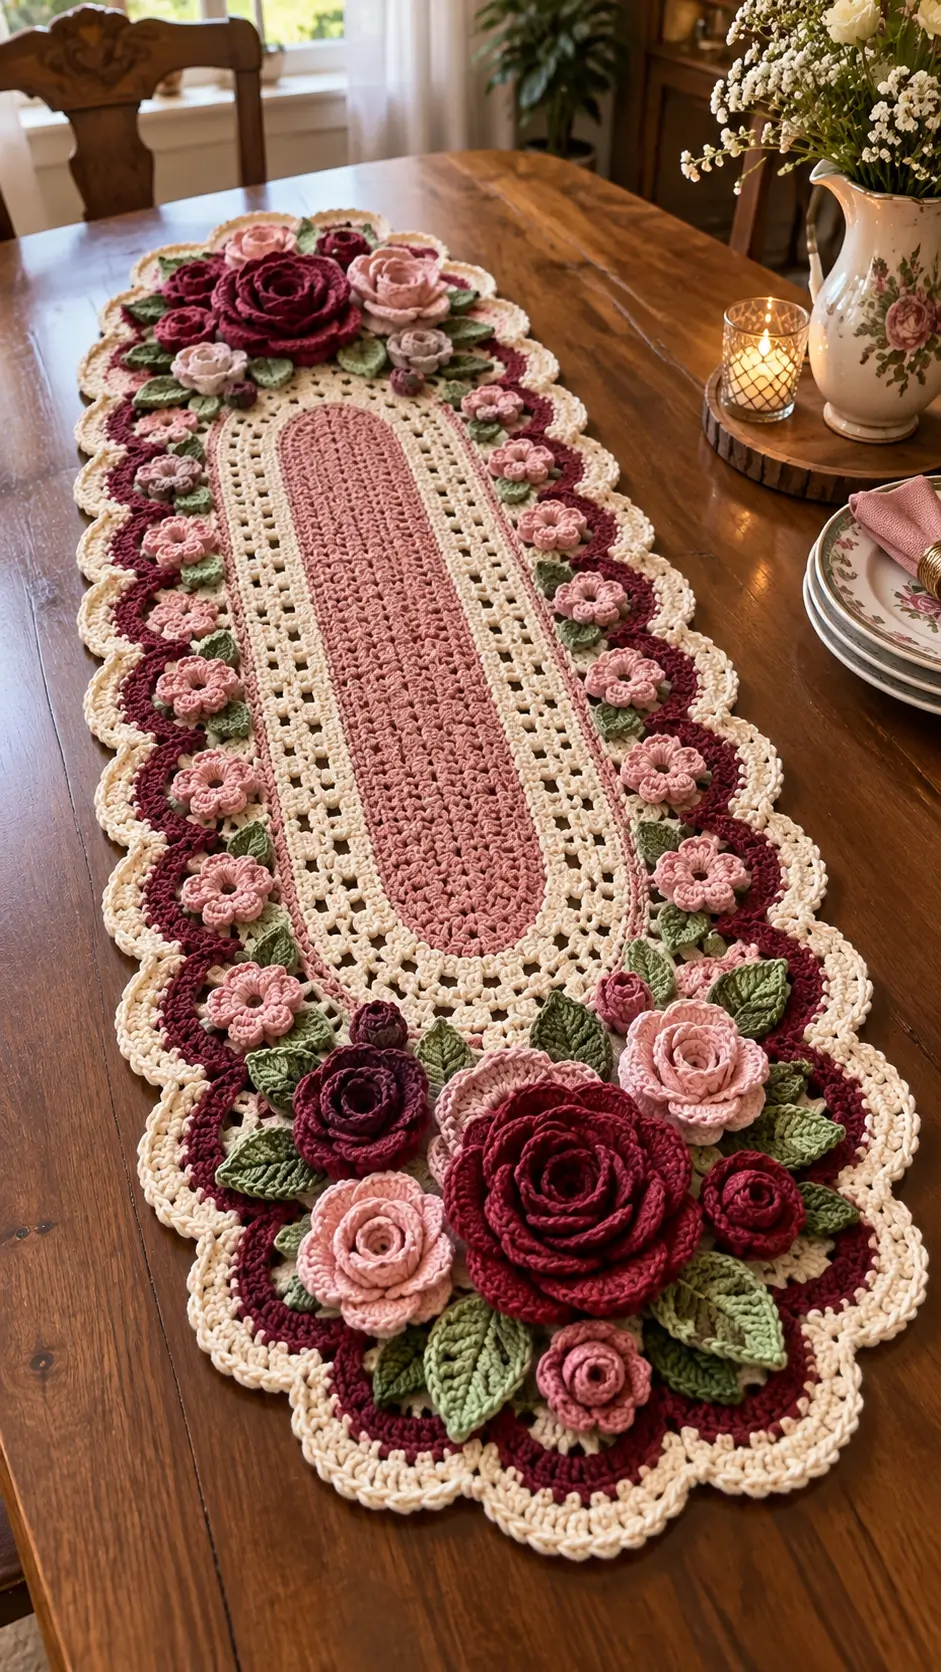
A rose only reads correctly when its inner petals stay tight while the outer petals progressively open, and that proportion controls the floral ends of this runner. This crochet rose table runner pattern combines a dusty-pink oval center, ivory lace, burgundy side panels, scalloped edging, dimensional roses, small flowers, and textured green leaves. Sport-to-DK cotton with a 3.5 mm hook produces defined stitches and a practical dining-table runner.
The Design: What Makes This Rose Table Runner Different
The runner uses two different construction systems. A long oval foundation creates the flat central textile, while separately crocheted flowers and leaves create the raised botanical sections. Keeping those systems separate prevents the large roses from distorting the lace underneath.
Color placement also has a structural purpose. Dusty pink establishes the center, ivory separates it from the darker border, and burgundy frames the smaller flowers along both sides. The result is a 3D crochet flower table runner with a clearly defined center rather than a continuous field of motifs.
The large roses are concentrated at the rounded ends. This leaves the central dining area comparatively flat. A frequent mistake in a crochet rose table runner is sewing every petal to the base. Attach the roses through their centers and lower petals instead; the upper layers need room to retain their shape.
Project Info at a Glance
| Skill Level | Time | Finished Size | Hook | Best For |
|---|---|---|---|---|
| Intermediate | 16–22 hours | Approx. 38 × 145 cm | 3.5 mm | Dining tables, sideboards and floral displays |
The finished dimensions are a design target for this photo-inspired version. Actual measurements depend on yarn, tension, blocking and the number of center rows.
Materials and Tools
Yarn
Use smooth cotton or a cotton-rich blend with clear stitch definition. Sport or light DK yarn works well because the runner needs enough structure to support the dimensional roses without making the central lace excessively heavy.
- Dusty pink: sport/light DK cotton — approximately 180 g
- Ivory/cream: sport/light DK cotton — approximately 220 g
- Burgundy/wine: sport/light DK cotton — approximately 140 g
- Rose pink: sport/light DK cotton — approximately 100 g
- Olive/sage green: sport/light DK cotton — approximately 100 g
These quantities are working estimates for the larger photo-inspired runner. Keep additional ivory available because changes to the runner length also increase the amount required for the lace and scalloped border.
Tools
- 3.5 mm crochet hook
- 3.0 mm crochet hook for tighter flowers if required
- Tapestry needle
- Sharp scissors
- Stitch markers
- Blocking mats
- Rust-resistant blocking pins
- Measuring tape
Abbreviations
- MR — magic ring
- ch — chain
- sc — single crochet
- hdc — half double crochet
- dc — double crochet
- tr — treble crochet
- sl st — slip stitch
- sp — space
- sts — stitches
- inc — increase
- dc2tog — double crochet two together
- BLO — back loop only
- FLO — front loop only
An invisible decrease is not required for the flat runner construction. The dimensional flowers are shaped through petal height, layering and assembly instead of closed-form decreases.
Crochet Rose Table Runner Pattern
The following instructions form an original pattern inspired by the visible construction in the supplied photograph. The central runner is worked first. Roses, small flowers and leaves are made separately and attached after blocking.
Dusty Pink Oval Center
Yarn: dusty pink.
Foundation: Ch 91.
R1: Starting in the second ch from hook, sc in each ch across. Work 5 sc in the final ch. Continue along the unused side of the foundation chain, sc in each ch across. Work 4 additional sc into the first foundation ch. Join with sl st.
The five stitches at each rounded end establish the oval. Place a marker in the center stitch of each end group.
R2: Ch 2. Hdc in each stitch along the first straight side. At the rounded end, work 2 hdc in each of the five end stitches. Hdc along the opposite straight side. Work 2 hdc in each of the five stitches at the second rounded end. Join.
R3: Ch 3. Dc along the straight side. Across each rounded end, alternate 1 dc and 2 dc in the end stitches to increase evenly. Repeat along the second side and opposite end. Join.
R4: Ch 3, dc in each stitch along both straight sides. Increase evenly around each curved end by working 2 dc approximately every third stitch. Join.
R5: Ch 1, sc in each stitch around, increasing at six evenly spaced positions on each rounded end. Join.
R6: Ch 3, dc around. Increase at six evenly spaced positions on each end. Join.
R7: Ch 1, sc around, increasing only where necessary to keep both ends flat.
Continue alternating one dc round and one sc round until the pink center measures approximately 17–19 cm wide.
The oval should lie flat without rippling. If the curved ends begin forming waves, reduce the number of increases on the following round.
Ivory Openwork Lace Section
Change to ivory.
R1: Ch 1, sc evenly around the complete pink oval. Join.
R2: Ch 4, skip 1 st, dc in next st, *ch 1, skip 1 st, dc in next st*. Repeat around. At each rounded end, omit selected skipped stitches so the lace expands without pulling inward.
R3: Ch 1, sc in first dc, *ch 3, sc in next dc*. Repeat around. Join.
R4: Sl st into first ch-3 sp. Ch 3, 2 dc in same sp, ch 1, *3 dc in next ch-3 sp, ch 1*. Repeat around. At each rounded end, work an additional 3-dc group into approximately every fourth space.
R5: Ch 1, sc in each dc and 2 sc in each ch-1 sp. Join.
R6: Ch 5, skip 2 sts, sc in next st, *ch 5, skip 2 sts, sc in next st*. Repeat around. Adjust the spacing slightly at each curved end.
R7: Sl st into first ch-5 sp. Work (sc, ch 3, 3 dc, ch 3, sc) in each ch-5 sp around.
R8: Ch 1 and sc evenly around the outer edge. Work additional stitches at the curved ends only when required to keep the fabric flat.
Do not stretch the lace while measuring it. The ivory section should add approximately 7–9 cm to each side of the pink center.
Dusty Pink Divider Round
Yarn: dusty pink.
Join pink yarn at one straight side.
R1: Sc evenly around the complete runner. Join.
R2: Ch 2, hdc in each stitch around. Increase evenly around both curved ends.
Fasten off.
This narrow pink line separates the ivory lace from the darker burgundy floral border.
Burgundy Side Border
Yarn: burgundy.
R1: Join burgundy and sc around. Join.
R2: Ch 3, dc in each stitch around, increasing evenly at both ends.
R3: Ch 1, sc around.
R4: *Sc in next 3 sts, ch 3, skip 2 sts.* Repeat around, adjusting the final repeat at the ends.
R5: In each ch-3 sp work (sc, hdc, 3 dc, hdc, sc).
Fasten off.
The burgundy section provides the background for the small pink flowers and green leaves positioned along the sides.
Ivory Scalloped Outer Border
Yarn: ivory.
Join ivory yarn to any burgundy edge stitch.
R1: Ch 1, sc evenly around. Join.
R2: *Skip 2 sts, 7 dc in next st, skip 2 sts, sc in next st.* Repeat around.
At the rounded ends, adjust the number of skipped stitches rather than forcing a shell into an undersized space.
R3: Sl st to the first shell. Work *sc in first dc, ch 3, skip 1 dc, sc in next dc, ch 3, skip 1 dc, sc in next dc* across each shell.
R4: In each ch-3 sp work (sc, hdc, 2 dc, hdc, sc).
Fasten off and weave the yarn tail through at least 3 cm of solid stitches.
Small Pink Side Flowers — Make 18
Yarn: rose pink.
R1: 6 sc in MR. Join. (6)
R2: Inc ×6. Join. (12)
R3: *Sl st in next st, ch 3, 3 dc in next st, ch 3, sl st in next st.* Repeat around to form 6 petals.
Fasten off with a 20 cm sewing tail.
Make enough flowers to place approximately nine along each long side. The exact number can be adjusted to match the final runner length.
Small Green Leaves — Make 36
Yarn: olive or sage green.
Ch 9.
Starting in second ch from hook work:
Sl st, sc, hdc, dc, tr, dc, hdc, sc.
Ch 2 at the tip.
Continue along the opposite side of the foundation chain:
Sc, hdc, dc, tr, dc, hdc, sc, sl st.
Join at the base.
Edge: Ch 1 and sc around. At the leaf tip work (sc, ch 2, sc).
Fasten off with a 15 cm sewing tail.
Make two leaves for most small side flowers. A few flowers can use one leaf to prevent the border from becoming mechanically repetitive.
Large Layered Rose — Make 3
Make two burgundy and one dusty pink, or alter the ratio to match your preferred end arrangement.
R1: 6 sc in MR. (6)
R2: Inc ×6. (12)
R3: (1 sc, inc) ×6. (18)
R4: FLO: *sl st in next st, (sc, hdc, 3 dc, hdc, sc) in next st*. Repeat around to create the first petal layer.
Do not fasten off.
R5: Working behind the first petals into the unused back loops, *sl st into next back loop, ch 4*. Repeat around. Join.
R6: In each ch-4 sp work (sc, hdc, 4 dc, hdc, sc).
R7: Working behind R6, create ch-6 spaces anchored between the petals.
R8: In each ch-6 sp work (sc, hdc, dc, 3 tr, dc, hdc, sc).
R9: Working behind the third petal level, create ch-8 spaces around.
R10: In each ch-8 sp work (sc, hdc, 2 dc, 3 tr, 2 dc, hdc, sc).
Fasten off with a 35 cm tail.
Shape the inner petals upward around the center. Pull the middle petals slightly outward and leave the largest outer petals comparatively flat. This produces the layered rose profile rather than a flat circular flower.
Medium Rose — Make 5
Use dusty pink, rose pink and burgundy.
R1: 6 sc in MR. (6)
R2: Inc ×6. (12)
R3: (1 sc, inc) ×6. (18)
R4: *Sl st in next st, (sc, hdc, 3 dc, hdc, sc) in next st.* Repeat around.
R5: Working behind the first petals, create ch-5 spaces around.
R6: Work (sc, hdc, dc, 3 tr, dc, hdc, sc) in each ch-5 sp.
R7: Create ch-7 spaces behind R6.
R8: Work (sc, hdc, 2 dc, 3 tr, 2 dc, hdc, sc) into each ch-7 sp.
Fasten off with a long sewing tail.
Small Rosebuds — Make 6
Use burgundy and dusty pink.
Ch 25.
Row 1: Starting in second ch from hook, sc across. Turn.
Row 2: Ch 2. Work 3 dc in each of the first 8 sts, 4 dc in each of the next 8 sts, then 5 dc in each remaining stitch.
Fasten off with a 30 cm tail.
Starting from the end with the smaller petals, roll the strip tightly around itself. Sew through the foundation edge several times to hold the spiral together.
The center should remain compact while the final section opens into the outer rosebud petals.
Large Rose Leaves — Make 20
Yarn: olive green.
Ch 15.
Starting in second ch from hook:
Side 1: Sl st, sc, hdc, dc, dc, tr, tr, tr, dc, dc, hdc, hdc, sc, sl st.
Ch 2 at the point.
Side 2: Sl st, sc, hdc, hdc, dc, dc, tr, tr, tr, dc, dc, hdc, sc, sl st.
Join at the base.
Border: Ch 1, sc around the complete leaf. Work (sc, ch 2, sc) at the point.
For a lightly serrated outline, work a picot approximately every fourth stitch along both sides.
Fasten off with a 25 cm sewing tail.
Raised Leaf Vein
Join a darker olive yarn at the base of each large leaf.
Surface slip stitch directly over the foundation chain toward the leaf point.
Add two or three short diagonal veins on each side.
Keep the surface stitches loose. A tight central vein folds the leaf lengthwise and makes it difficult to attach flat beneath a rose.
Arranging the Large Rose Clusters
Block the flat runner before adding any three-dimensional flowers. The floral clusters should never be used to correct a distorted oval foundation.
Place one large burgundy rose near the center of the first rounded end. Add a dusty-pink medium rose on one side and a smaller burgundy or pink rose on the other.
Arrange five to seven large leaves beneath and around the flowers. Rotate their tips outward so the leaves extend beyond different petals rather than forming a symmetrical star.
At the opposite end, reverse some of the color placement. Use another large burgundy rose as the strongest focal point, then surround it with dusty-pink roses and green foliage.
The photograph contains more floral mass at the ends than along the middle. Preserve that distribution if the runner will be used beneath serving dishes or tableware.
Arranging the Small Side Flowers
Position the small pink flowers over the burgundy border along both long sides.
Start approximately 12–15 cm away from the large end clusters. Space neighboring flowers roughly 8–11 cm apart, adjusting the interval according to the final length.
Place one or two small leaves beneath each flower.
Alternate leaf direction as you move along the border. Repeating every pair in exactly the same orientation produces a rigid pattern that differs from the botanical appearance of the reference.
Assembly
- Complete the dusty-pink oval center and confirm that both rounded ends have matching dimensions.
- Add the ivory lace, pink divider, burgundy floral band and ivory scalloped border before attaching any flowers.
- Wet-block the complete flat runner to approximately 38 × 145 cm and allow it to dry fully.
- Arrange the small pink flowers and leaves along both long burgundy sections, then pin every motif before sewing.
- Sew the small flowers through their center rounds and attach only the bases of their leaves.
- Arrange the large roses at the first rounded end, beginning with the largest burgundy flower and adding secondary roses around it.
- Position large green leaves beneath the rose petals and sew each leaf through its lower third.
- Repeat the floral arrangement at the opposite end while varying the exact rose positions to avoid a mirrored appearance.
- Attach rosebuds in remaining spaces and reinforce each large rose through several points on its lowest petal layer.
- Turn the runner over, secure all sewing tails inside dense stitches, inspect every attachment point, and reshape the petals by hand.
The completed runner should remain flat through the central oval while the flowers and foliage rise above the fabric at the two ends and along the burgundy side border.
How to Make the Crochet Roses Look More Realistic
Petal position matters more than adding extra rounds. The smallest petals should point upward and partially overlap the flower center.
Move to a wider angle with each subsequent layer. Middle petals can stand at roughly 45 degrees, while the largest outer petals should sit close to horizontal.
Avoid stretching every petal into the same shape. Realistic crochet roses need controlled irregularity. Allow selected outer petals to overlap neighboring petals by approximately 1 cm.
The rose should also have a clear size hierarchy. Use the largest flowers as focal points at the rounded ends, medium roses beside them, and compact rosebuds to close smaller spaces.
Adjusting the Runner Length
The central foundation chain controls most of the finished length. For a shorter runner, reduce the foundation chain in even increments while preserving enough straight stitches between the rounded ends.
A coffee-table version can target approximately 90–100 cm.
A standard dining-table runner can target approximately 130–150 cm.
For a long farmhouse table, extend the center toward 170–190 cm and increase the number of small side flowers proportionally.
Do not increase the size of the large end roses simply because the runner becomes longer. Keeping the flowers close to their original diameter maintains the relationship between the border width and floral clusters.
Controlling the Oval Shape
Oval crochet requires increases only where the fabric changes direction. Excess increases at the ends create ruffles, while too few cause the runner to curl upward.
Lay the work on a flat surface every two or three rounds.
If the straight sides lie flat but the rounded ends ripple, remove several increases from the next curved section.
If the ends cup upward, add two to four increases across each curve on the following round.
Do not compensate by pulling harder on the yarn. Tension changes affect the entire round and can make one side shorter than the other.
7 Technical Tips for This Crochet Rose Table Runner
- Check both curved ends every three rounds. A difference of more than approximately 1 cm between the two ends becomes increasingly visible as the border grows. Count increases separately for each curved section.
- Block the runner before adding roses. Attaching a large flower to unblocked lace can lock a wave permanently into the border. Complete the flat runner and establish its final dimensions first.
- Do not flatten the rose centers. Pinning every petal during blocking removes the three-dimensional profile. Shape large roses by hand and block only the lowest outer petals when necessary.
- Sew each large rose at three or more points. A single center attachment allows an 8–10 cm flower to rotate or flop when the runner is moved. Secure the center and at least two sections of the lowest petal layer.
- Leave the outer two-thirds of each large leaf free. Sewing an entire leaf perimeter removes its raised botanical appearance. Anchor the base and central lower section instead.
- Keep small side flowers 8–11 cm apart. Large variations in spacing create obvious empty sections along the burgundy border. Pin the complete row before attaching the first flower.
- Hide yarn tails inside dense flower centers. Open lace provides little friction and can expose short tails after washing. Weave assembly tails through at least 3 cm of solid stitches and reverse direction once before trimming.
Color Placement
The photographed palette depends on four distinct roles. Dusty pink occupies the center and several roses. Ivory creates visual separation through the lace and outer scallops. Burgundy forms the strongest frame and the darkest flowers. Olive green breaks up the red-pink palette around the botanical elements.
Keep the burgundy band continuous if you want the small pink side flowers to remain clearly visible. Replacing that band with pink reduces the contrast between the flowers and their background.
The large end clusters benefit from uneven color distribution. One end can contain more burgundy while the other includes additional dusty pink. The overall palette remains balanced without creating two identical bouquets.
Blocking the Finished Runner
Perform the primary blocking before floral assembly. Dampen the flat runner according to the yarn manufacturer’s instructions and place it on blocking mats.
Establish the long center line first. Measure outward from that line to keep both sides equal.
Pin the pink oval, followed by the ivory lace and burgundy border. Shape each ivory scallop individually along the perimeter.
Target approximately 38 cm wide and 145 cm long for this version, but treat those dimensions as a design target rather than a fixed gauge requirement.
After attaching the flowers, avoid another aggressive full blocking. Lightly reshape individual leaves and outer rose petals instead.
Finishing the 3D Flowers
Inspect the rose clusters from table height rather than only from above. The large flowers should retain visible height without leaning far enough to expose their attachment stitches.
Turn selected inner petals toward the center with your fingers. Pull the middle petals slightly outward, then position the largest petals over the leaf bases.
Small rosebuds can be inserted where two large flowers leave a narrow opening. Avoid filling every gap. Small areas of visible ivory or burgundy prevent the end clusters from becoming one solid mass.
Check the runner from both ends after the flowers are positioned. Neither bouquet should pull the underlying lace inward.
Conclusion
This design combines a long dusty-pink oval, ivory openwork, a burgundy floral frame, scalloped edging, small side flowers, dimensional roses and textured green leaves. Complete and block the flat foundation before making the floral arrangement permanent; that keeps the lace symmetrical and prevents heavy roses from changing its dimensions. The next practical step is to make one large rose and one leaf first, then compare their scale with the finished border. Save this crochet rose table runner pattern to Pinterest or share the completed runner on Instagram with #RoseGardenTableRunner. For this exact design, would you place the largest burgundy rose at both ends or substitute a dusty-pink focal rose at one end? “`1









