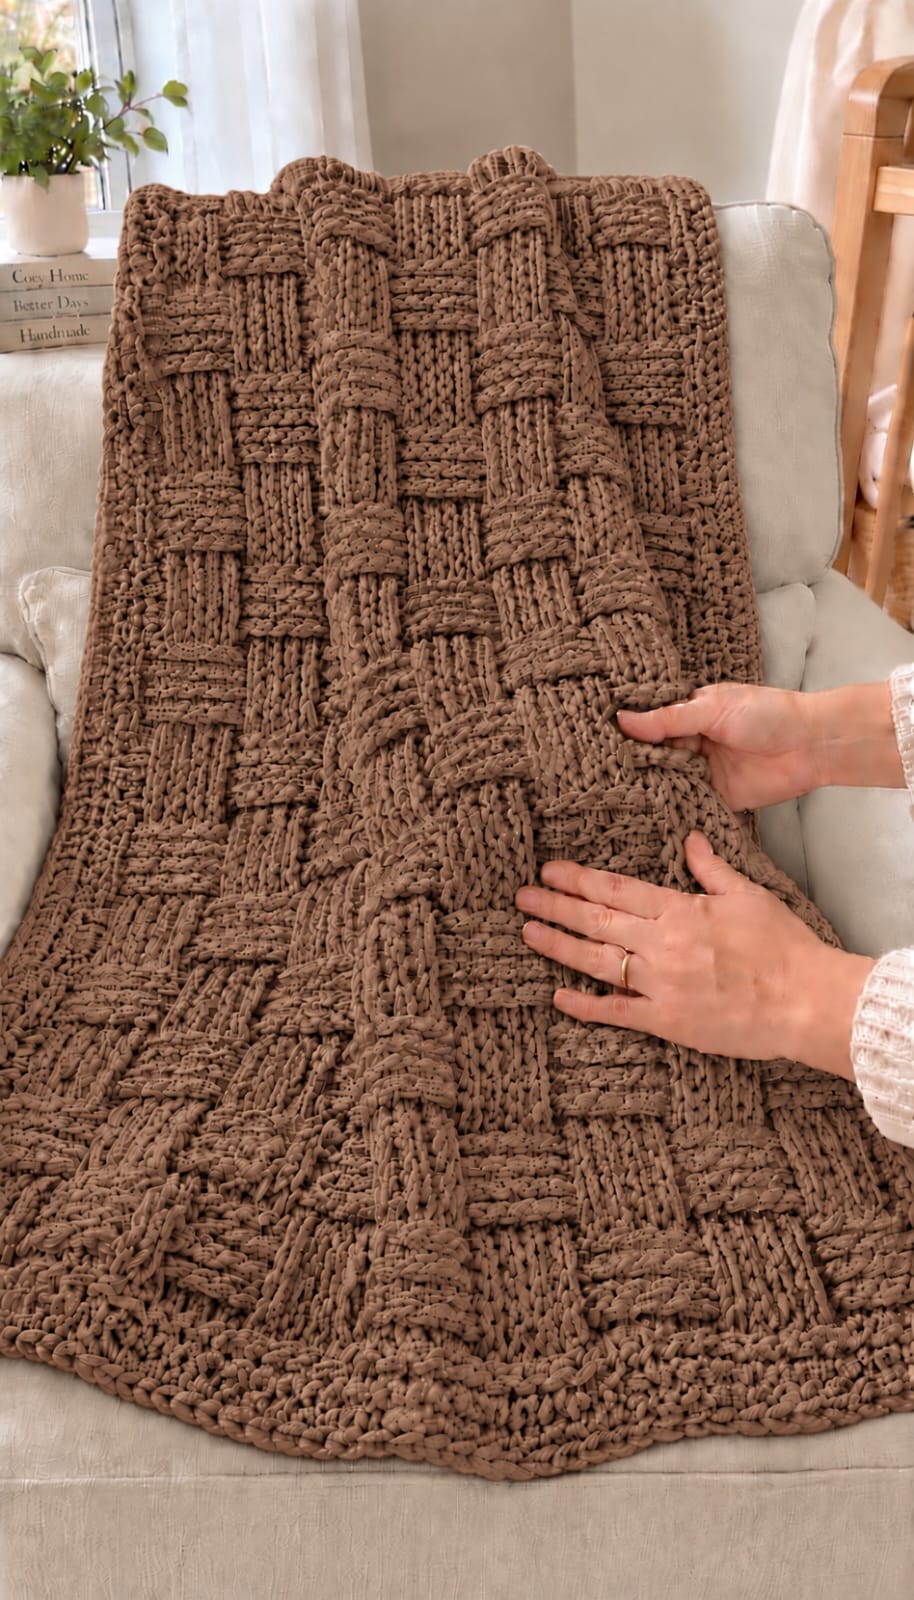
Each raised taupe block has to reverse at the same row or this blanket stops looking like strips woven over and under one another. This chunky basket weave crochet blanket pattern uses super-bulky yarn, an 8 mm hook and alternating front-post and back-post double crochet. The target throw measures approximately 115 × 140 cm. It is an intermediate project designed for a thick sofa throw with substantial three-dimensional texture.
What Makes This Chunky Basket Weave Blanket Different
The blanket uses oversized woven-looking blocks rather than narrow ribs. Groups of post stitches project toward the front or recede toward the back, then reverse after a fixed number of rows. That reversal creates the visual impression that broad strips are passing over and underneath one another.
Super-bulky yarn is important to the scale. The same basket weave crochet stitch worked in thinner yarn produces a much finer grid, while chunky yarn creates the heavy raised sections visible here.
The single taupe color also puts more responsibility on stitch relief. There are no color changes to separate adjacent blocks, so shadows created by front-post and back-post stitches define the pattern.
A tight foundation chain is the main construction problem. It pulls the bottom edge inward and can remain visible even after the border is added.
Project Info at a Glance
| Skill Level | Time | Finished Size | Hook | Best For |
|---|---|---|---|---|
| Intermediate | Approx. 15–20 hours | Approx. 115 × 140 cm | 8 mm | Sofa throws, armchairs and bed layering |
The finished dimensions are a target for this photo-inspired version. Basket-weave blankets are easy to resize because the width can be changed by adding complete stitch repeats and the length by adding complete row sections.
Materials and Tools
Yarn
- Warm taupe or mocha — super-bulky #6 yarn — approximately 1,500–1,700 yards / 1,370–1,555 m
- Border reserve — keep approximately 150–200 yards / 137–183 m of the total yarn available for finishing
Basket-weave fabric consumes more yarn than a flat double-crochet fabric because every post stitch travels around the body of a stitch rather than simply through its top loops.
Buy the full quantity from one dye lot when possible. A monochrome blanket has no planned color changes to disguise a difference between skeins.
Tools
- 8.0 mm crochet hook
- 9.0 mm crochet hook — optional for the foundation chain if your chains are tight
- Large tapestry needle
- Scissors
- Locking stitch markers
- Tape measure
Abbreviations
- ch — chain
- sc — single crochet
- dc — double crochet
- FPdc — front-post double crochet
- BPdc — back-post double crochet
- sl st — slip stitch
- st/sts — stitch/stitches
- rep — repeat
A front-post double crochet is worked around the post of the stitch from front to back to front. A back-post double crochet passes around the same post from back to front to back.
Gauge and Basket-Weave Repeat
Make a swatch before beginning the blanket. Post stitches can produce very different dimensions depending on yarn thickness and individual tension.
This version uses six-stitch blocks. Six FPdc form one raised section and six BPdc form the neighboring recessed section.
The basic pattern therefore repeats over 12 stitches.
After five textured rows, the directions reverse: FPdc sections become BPdc sections, while BPdc sections become FPdc sections.
That reversal creates the apparent woven structure.
Taupe Chunky Basket Weave Crochet Blanket Pattern
Foundation
Yarn: taupe super-bulky #6.
Ch 98 loosely.
The working width can be modified using a multiple of 12 stitches plus the turning-chain allowance required by your edge construction.
If your foundation chain is noticeably tighter than an ordinary double-crochet row, make it with a 9 mm hook and change to the 8 mm hook for Row 1.
Setup Row
Row 1: Dc in 4th ch from hook and dc in each chain across. Turn.
Check the row before continuing. The fabric should lie flat without the chain drawing the lower edge inward.
Basket-Weave Section A
Row 2: Ch 2. Work FPdc around each of the next 6 posts. Work BPdc around each of the following 6 posts. Repeat the sequence of 6 FPdc and 6 BPdc across. Dc in the final edge stitch. Turn.
Row 3: Ch 2. Work FPdc around each raised post and BPdc around each recessed post as they appear. Dc in final edge stitch. Turn.
Row 4: Repeat Row 3.
Row 5: Repeat Row 3.
Row 6: Repeat Row 3.
At this point, the first set of blocks should have five textured rows. Do not reverse the stitches early even if the blocks already appear pronounced.
Basket-Weave Section B
The stitch directions now reverse.
Row 7: Ch 2. Work BPdc around each of the first 6 posts that previously formed the raised block. Work FPdc around each of the next 6 posts. Repeat 6 BPdc and 6 FPdc across. Dc in the final edge stitch. Turn.
Row 8: Work BPdc around the recessed group and FPdc around the raised group as established. Dc in the final edge stitch. Turn.
Row 9: Repeat Row 8.
Row 10: Repeat Row 8.
Row 11: Repeat Row 8.
The first complete basket-weave repeat is now finished.
Continue the Main Blanket
Rows 12–16: Repeat Basket-Weave Section A.
Rows 17–21: Repeat Basket-Weave Section B.
Continue alternating five-row Section A and five-row Section B blocks until the blanket measures approximately 135 cm long before the border.
Finish after completing an entire five-row block rather than stopping in the middle of a section. A partial final block makes the upper edge appear visually incomplete.
How the Basket-Weave Texture Works
The woven appearance comes entirely from post placement. No separate crochet strips are woven through the finished blanket.
FPdc stitches sit toward the viewer. When six are placed together, they create a broad raised band.
BPdc stitches recede toward the back of the fabric. A neighboring group therefore looks as though it passes underneath the raised block.
After five rows, reversing the stitch directions makes the previously raised group recede while its neighbor projects forward.
The eye reads those alternating rectangles as interlaced strips.
Maintaining Straight Blanket Edges
Post stitches make edge control particularly important because the hook is inserted around stitch posts rather than through the ordinary top loops.
Place a locking marker in the first and last true edge stitch of every row.
Do not count the turning chain as part of a six-stitch basket block unless you deliberately modify the pattern to do so.
Count each six-stitch section individually rather than waiting until the end of the row. A missing post can shift every block after it.
Measure the width every 15–20 rows. If the blanket gradually narrows, check the edge stitches before changing hook size.
Chunky Crochet Blanket Border
The photographed blanket has a compact border that frames the oversized texture without adding another competing stitch pattern.
Border Round 1
With the right side facing, join the taupe yarn in any corner.
Ch 1 and sc evenly around the entire blanket.
Along the top and bottom, place approximately one sc into each stitch.
Along the sides, distribute stitches evenly without forcing one sc into every visible row-end loop. Post-stitch fabric can require adjustment to prevent the border from ruffling.
Work 3 sc in each corner.
Join with sl st.
Border Round 2
Ch 1 and sc in every stitch around.
Work 3 sc in the center corner stitch at all four corners.
Join with sl st.
Border Round 3
Ch 1.
Work another round of sc for a firm compact edge.
Place 3 sc into each corner as before.
Join with sl st and fasten off.
Leave approximately 20 cm of yarn for weaving in.
How to Resize the Basket Weave Crochet Blanket
The easiest way to alter the width is to add or remove complete 12-stitch basket-weave repeats.
Make a swatch containing at least two complete blocks and measure its width after the fabric has relaxed.
Use that measurement to calculate how many blocks are required for the target blanket.
For example, if one 12-stitch repeat measures approximately 15 cm, adding two repeats increases the blanket width by roughly 30 cm.
The exact measurement depends on the yarn and tension, so use the blocked swatch rather than assuming a fixed stitch gauge.
Length adjustment is simpler. Continue alternating five-row sections until the blanket approaches the required measurement, then finish after a complete section.
Making a Larger Basket Weave Throw
For a larger sofa throw, target approximately 125 × 150 cm. Add complete stitch repeats to the foundation until the desired width is reached.
A bed-sized blanket requires substantially more yarn because basket weave is a yarn-intensive texture. Calculate yarn from the completed swatch rather than multiplying only by stitch count.
Weigh the swatch if accurate purchasing estimates are required. Determine its area, compare that area with the planned blanket dimensions, and scale the yarn weight accordingly.
Add at least 10 percent for the border, gauge differences and joining a new skein.
7 Technical Tips for Chunky Basket Weave Crochet
- Narrow foundation edge: use a hook 1 mm larger for the starting chain if it contracts beneath Row 1. A tight chain cannot be corrected reliably by adding a loose border later.
- Misaligned blocks: count every group as exactly six post stitches. One seven-stitch block shifts the apparent woven junction in every subsequent row.
- Wrong-facing blocks: identify whether the next group should project or recede before inserting the hook. FPdc and BPdc worked in the wrong direction can remain unnoticed until several rows later.
- Uneven block height: reverse the post direction only after five complete textured rows. Four rows in one section and five in another create rectangular blocks of visibly different heights.
- Flared side border: do not force a single crochet into every possible side loop. Space border stitches according to the actual fabric length and remove stitches if the edge begins to ripple.
- Rigid fabric: make a 20 cm test swatch before starting the full blanket. If the swatch stands stiffly instead of folding under its own weight, increase the hook by approximately 1 mm.
- Loose yarn tails: weave each end through at least 8–10 cm of dense post-stitch fabric and reverse direction once. Super-bulky yarn can work free if a short tail is simply hidden behind one raised block.
Controlling Tension in Post Stitches
The hook travels farther when making a post stitch than when making an ordinary double crochet. Pulling the working yarn too tightly around the post makes the blanket dense and can distort the rectangular blocks.
Keep the loops on the hook at approximately the same height throughout every FPdc and BPdc.
Watch the horizontal span between adjacent six-stitch groups. A sudden narrow section indicates that one group was worked at tighter tension.
If your hands become fatigued, stop at the end of a row rather than changing grip halfway across. Super-bulky yarn and repeated post stitches require more hook movement than ordinary double crochet.
How to Keep the Basket Blocks Aligned
Alignment is more important than speed. Before beginning each five-row section, identify the six-stitch groups from the previous section.
When the direction reverses, every previously raised group becomes recessed. Every recessed group becomes raised.
Do not shift the reversal point by one stitch to compensate for an edge problem. Correct the missing or additional stitch instead.
Run a finger horizontally across the blanket after every completed block section. The transitions should form continuous vertical lines from the lower edge toward the working row.
Joining a New Skein
Change skeins near the edge whenever possible. This places the tails where they can be secured into both the main fabric and the eventual border.
Do not tie a bulky knot in the center of a raised basket block. The knot can create a visible hard point on the finished surface.
Leave at least 15 cm from both the old and new yarn ends.
After several more rows have been completed, weave those tails independently through the backs of nearby post stitches.
A monochrome taupe blanket makes joins less visible than a multicolor project, but the tails still need enough length to resist movement during washing.
Choosing Yarn for the Photographed Texture
The photographed throw has thick, rounded stitch columns rather than sharply defined thin strands. A soft super-bulky yarn is therefore a closer match than standard worsted yarn.
Category 6 yarn also increases the depth between FPdc and BPdc sections. That depth produces stronger shadows and makes the woven illusion readable from several feet away.
Very fluffy yarn can obscure the post structure. Select a yarn whose individual stitches remain visible after crocheting.
A smooth polyester blanket yarn produces a softer rounded surface, while a plied acrylic or wool-blend yarn gives sharper stitch definition. Either can work, but the finished appearance will differ.
Checking the Blanket Before Adding the Border
Lay the unfinished blanket on a large flat surface.
Measure the width at the top, center and bottom. The three measurements should be close enough that the border does not have to correct substantial narrowing.
Next, compare the two long sides. If one side is noticeably shorter, check for skipped edge stitches or rows with inconsistent turning chains.
Inspect the basket blocks from several feet away. Every five-row reversal should line up with the neighboring blocks.
Correct structural errors before adding the border. A border stabilizes an accurate blanket; it does not conceal shifted basket-weave repeats.
Finishing the Chunky Basket Weave Blanket
After the final border round, weave all yarn tails through the back of the fabric. Keep the needle inside stitches of the same color so no tail crosses an open area.
Lay the blanket flat and smooth the four corners into shape. Super-bulky synthetic yarn generally needs only light shaping rather than aggressive stretching.
If the yarn label permits wet blocking, dampen the blanket evenly and allow it to dry flat. Do not stretch the raised blocks until they lose their depth.
The completed fabric should drape while preserving clearly defined alternating rectangles.
Final Notes
Make one complete basket-weave swatch before purchasing yarn for a custom size. The post stitches use considerably more yarn than their flat appearance in a skein suggests, and the swatch provides useful information about width, drape and consumption.
For the photographed look, keep the blocks broad, the border compact and the entire blanket in one warm taupe shade. The relief should supply the pattern rather than color changes.
When the chunky basket weave crochet blanket pattern is complete, photograph it partly folded so both the overall grid and the depth of individual blocks remain visible. Save the project to Pinterest or share your finished version on Instagram with #ChunkyBasketWeaveBlanket. For your next version, would you keep the six-stitch blocks or enlarge them for an even heavier woven effect?









