Introduction
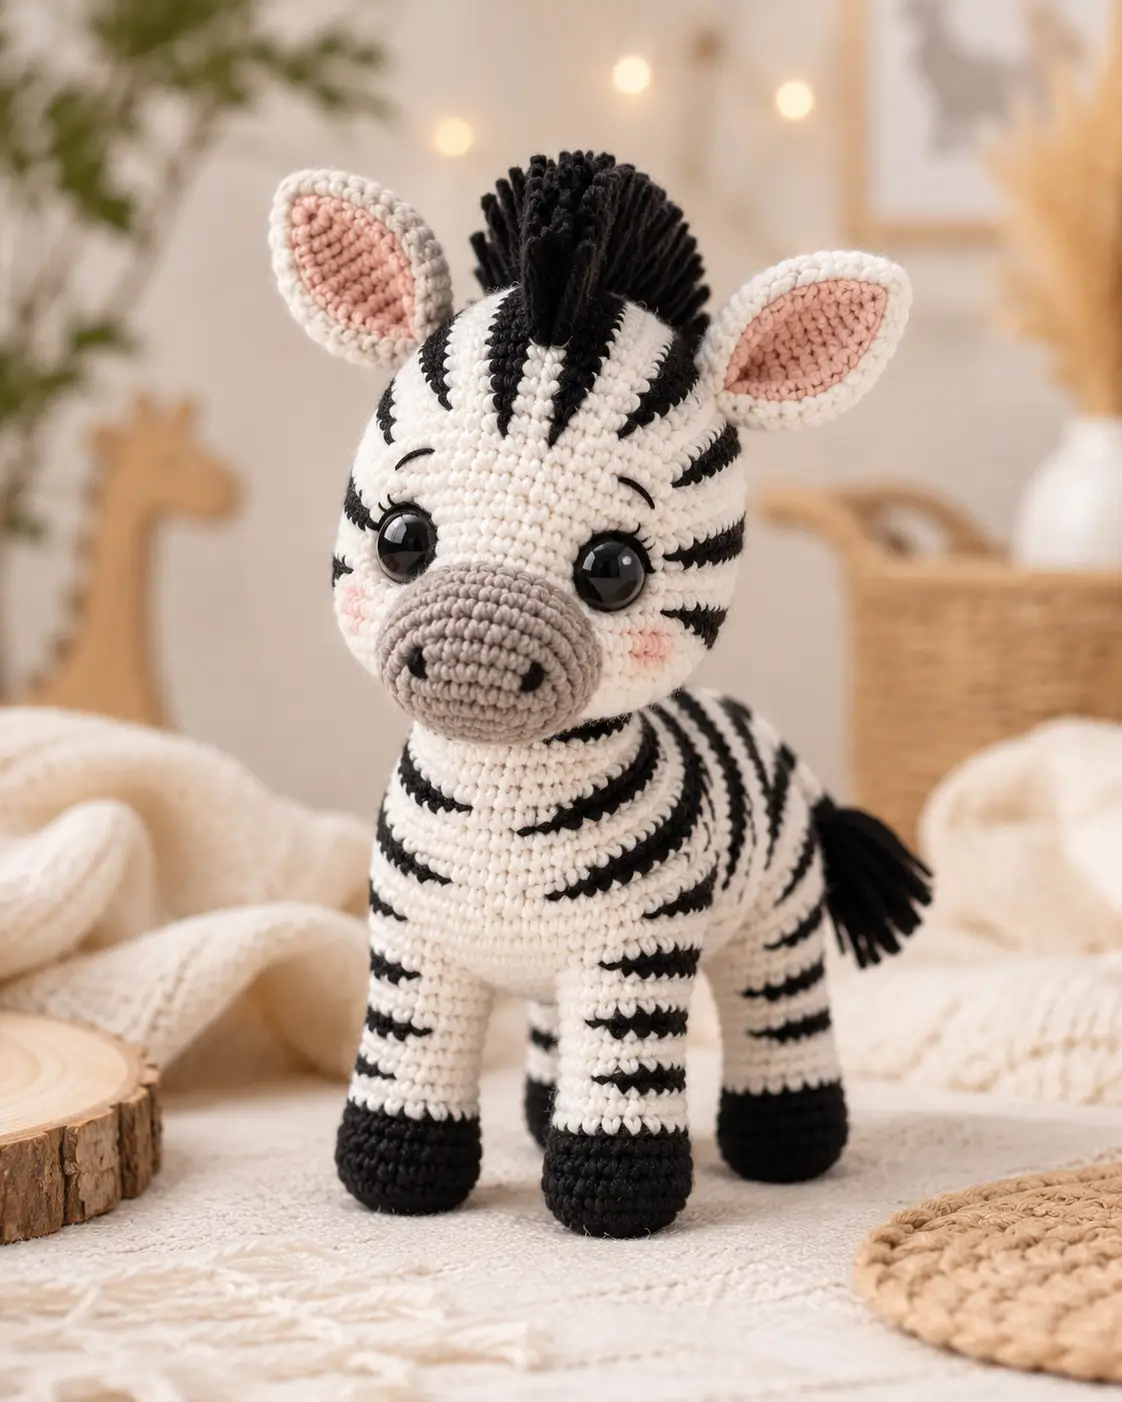
A zebra’s ears stand like pale leaf shapes while its mane cuts a black ridge between uneven facial stripes. This zebra amigurumi crochet pattern builds that anatomy with a 3.5 mm hook, worsted yarn, 12 mm eyes, and a 19 cm standing target. The skill level is advanced beginner because stripe control matters. Make it for a safari set where the silhouette must read clearly from the side.
The Design: What Makes This Zebra Different
Zebra shaping is mostly a proportion problem: a round head, an oval gray muzzle, and a torso that must stay low enough for four legs. This version keeps the head at a 36-stitch plateau so the muzzle can sit wide without dragging the face forward. The body uses the same plateau but adds length; that gives the crochet zebra plushie a stable stance. Stripe placement is handled in two systems: worked black body bands, then surface stitches on the face where curved anatomy would distort color joins. Not random decoration. Anatomy. A common mistake is making the ears round. Zebras need narrow, alert ears, so this free zebra crochet pattern uses folded cones with flat pink inserts. The maker reads the animal instantly from front and side.
Project Info at a Glance
| Skill Level | Time | Finished Size | Hook | Best For |
|---|---|---|---|---|
| Advanced beginner | Not stated in verified sources | 19 cm standing | 3.5 mm | Safari animal set / standing toy |
Skill level and size are benchmarked against published zebra patterns; this article’s stitch plan is original and drafted from the uploaded photo. Source: The Nicole Chase.
Materials and Tools
Yarn
- Warm white / cream — medium 4 worsted — 36 g — WeCrochet Brava Worsted or Yarn and Colors Charming
- Black — medium 4 worsted — 22 g — Lion Brand Wool-Ease or matching worsted
- Gray — medium 4 worsted — 8–10 g — for muzzle
- Pale pink — medium 4 worsted — scrap amount — for inner ears and cheek patches
The cream and black gram benchmarks come from a 16 cm zebra listing, while worsted yarn and 12 mm eye use are verified in separate zebra pattern data. Source: CB’s Creations.
Tools
- Hook 3.5 mm
- 12 mm black safety eyes
- Polyester stuffing
- Yarn needle
- Locking stitch markers
- Pins
- Scissors
- Black embroidery thread for nostrils and brows
Abbreviations
MR = magic ring; sc = single crochet; inc = 2 sc in the same stitch; dec = invisible decrease; sl st = slip stitch; ch = chain; BLO = back loop only; FLO = front loop only.
Invisible decrease works through the front loops of the next two stitches, reducing bulk at the neck, snout, and closed ends.
Pattern — Step by Step
Continuous spiral unless noted.
Head
Yarn: warm white — Source: standard amigurumi math; size and eye timing benchmarked against verified worsted zebra data.
R1: 6 sc in MR (6)
R2: inc ×6 (12)
R3: (1 sc, inc) ×6 (18)
R4: (2 sc, inc) ×6 (24)
R5: (3 sc, inc) ×6 (30)
R6: (4 sc, inc) ×6 (36)
R7–R10: sc around (36)
R11: sc around (36)
Place safety eyes between R11 and R12, 7 stitches apart. Keep the lower center free for the snout.
R12–R15: sc around (36)
R16: (4 sc, dec) ×6 (30)
R17: (3 sc, dec) ×6 (24)
Stuff firmly at the crown and lightly at the lower face.
R18: (2 sc, dec) ×6 (18)
R19: (1 sc, dec) ×6 (12)
R20: dec ×6 (6)
Fasten off. Close the final 6 stitches and hide the tail inside the head.
Body
Yarn: warm white and black — Source: standard amigurumi math; stripe-body benchmark from verified zebra body counts.
R1: with warm white, 6 sc in MR (6)
R2: inc ×6 (12)
R3: (1 sc, inc) ×6 (18)
R4: (2 sc, inc) ×6 (24)
R5: (3 sc, inc) ×6 (30)
R6: (4 sc, inc) ×6 (36)
R7–R8: warm white, sc around (36)
R9: black, sc around (36)
R10–R11: warm white, sc around (36)
R12: black, sc around (36)
R13–R14: warm white, sc around (36)
R15: black, sc around (36)
R16–R17: warm white, sc around (36)
R18: (4 sc, dec) ×6 (30)
R19: (3 sc, dec) ×6 (24)
R20: (2 sc, dec) ×6 (18)
Stuff the body into an oval. Do not overpack the neck end.
R21: (1 sc, dec) ×6 (12)
R22: dec ×6 (6)
Fasten off. Close the opening and leave a 30 cm tail for sewing if the closing tail is long enough.
Front Legs, Make 2
Yarn: black and warm white — Source: standard amigurumi cylinder math; leg placement compared with verified assembly data.
R1: with black, 6 sc in MR (6)
R2: inc ×6 (12)
R3: (1 sc, inc) ×6 (18)
R4: BLO sc around (18)
R5–R6: black, sc around (18)
R7–R8: warm white, sc around (18)
R9: black, sc around (18)
R10–R11: warm white, sc around (18)
R12: black, sc around (18)
R13–R15: warm white, sc around (18)
R16: (1 sc, dec) ×6 (12)
R17: sc around (12)
R18: flatten top; sc through both layers across (6)
Fasten off. Leave a 25 cm tail. Stuff the hoof firmly, then reduce stuffing toward the top.
Back Legs, Make 2
Yarn: black and warm white — Source: standard amigurumi cylinder math.
R1: with black, 6 sc in MR (6)
R2: inc ×6 (12)
R3: (1 sc, inc) ×6 (18)
R4: BLO sc around (18)
R5–R6: black, sc around (18)
R7–R9: warm white, sc around (18)
R10: black, sc around (18)
R11–R13: warm white, sc around (18)
R14: (1 sc, dec) ×6 (12)
R15: sc around (12)
R16: flatten top; sc through both layers across (6)
Fasten off. Leave a 25 cm tail. Stuff the lower half only so the back legs sit close to the body.
Outer Ears, Make 2
Yarn: warm white — Source: 7-round ear benchmark from verified zebra ear data.
R1: 6 sc in MR (6)
R2: sc around (6)
R3: inc ×6 (12)
R4–R6: sc around (12)
R7: flatten top; sc through both layers across (6)
Fasten off. Leave an 18 cm tail for sewing. Shape each ear into a narrow leaf before pinning.
Inner Ear Patches, Make 2
Yarn: pale pink — Source: standard flat circle math.
R1: 6 sc in MR (6)
R2: inc ×6 (12)
sl st to first stitch (12)
Fasten off. Leave a 15 cm tail. Pin the circle into an oval and sew it inside the white ear.
Gray Snout
Yarn: gray — Source: standard amigurumi math; muzzle placement compared with verified zebra assembly notes.
R1: 6 sc in MR (6)
R2: inc ×6 (12)
R3: (1 sc, inc) ×6 (18)
R4–R5: sc around (18)
R6: (1 sc, dec) ×6 (12)
Fasten off. Leave a 30 cm tail. Stuff lightly; flatten into an oval while sewing.
Cheek Patches, Make 2
Yarn: pale pink — Source: standard flat circle math.
R1: 6 sc in MR (6)
sl st to first stitch (6)
Fasten off. Leave a 12 cm tail. Sew one patch below each eye, two stitches away from the snout edge.
Mane
Yarn: black — Source: surface-latched mane method benchmarked from verified zebra mane data.
Cut 28 strands of black yarn, each 10 cm long. Fold one strand in half, pull the folded loop under a head stitch, then pass both tails through the loop and tighten. Work from the top center of the head to the upper back in 14 anchor points, using 2 strands per anchor point.
Trim the mane to 3–4 cm after assembly. Short at the forehead. Taller at the crown.
Tail
Yarn: black and warm white — Source: standard 6-stitch cord math; tail placement benchmarked against verified assembly notes.
R1: with warm white, 6 sc in MR (6)
R2–R6: sc around (6)
R7: black, sc around (6)
R8: sc around (6)
Fasten off. Leave a 20 cm tail for sewing. Add six black 8 cm strands to the end and trim to a blunt tuft.
Facial Stripes, Nostrils, and Brows
Yarn: black — Source: standard surface embroidery.
Add one vertical black stripe from the forehead to the top of the snout, using surface sl st or backstitch. Add two short curved stripes on each cheek, stopping before the pink cheek patches. Embroider two nostrils on the gray snout with 3 mm horizontal stitches. Work each brow as a 2-stitch angled line above the eye.
Fasten and bury all thread tails inside the head.
Assembly
- Pin the head to the front of the body with the snout pointing slightly downward.
- Sew the head through a 10-stitch contact area so it does not wobble.
- Pin the body level before attaching the legs.
- Sew front legs under the chest, about 10 stitches apart.
- Sew back legs under the rear body, about 12 stitches apart.
- Sew the gray snout between the eyes, centered over R12–R16 of the head.
- Attach ears to the upper head, 4 stitches apart, angled outward.
- Add cheek patches, nostrils, brows, and face stripes after the ears are stable.
- Sew the tail to the rear body at the same height as the black body stripe.
- Latch the mane, trim it, then weave every remaining tail through at least 5 nearby stitches.
The finished zebra stands with four black hooves, a gray muzzle, pale cheeks, upright ears, and a black yarn mane.
7 Technical Tips
- Stitch marker drift: Black body stripes show spiral movement quickly. Move the marker after every round and place the color-change jog on the underside of the body.
- Stuffing firmness: A soft snout collapses into the face seam. Fill the gray snout to about 70% capacity, then flatten it into an oval while sewing.
- Invisible decrease holes: Standard decreases leave gaps on R18–R22. Work each dec through FLO only and pull the next stitch slightly tighter.
- Eye placement timing: A 12 mm safety-eye washer is hard to press in after the head drops below 24 stitches. Install eyes between R11 and R12 before R16 begins.
- Velvet tension: A chenille substitute may grow the toy by 30–40%. Use a 4.5–5.0 mm hook only if the stitches still hide stuffing between the black stripes.
- Pinning error: Four legs sewn by sight will twist the stance. Pin front legs 10 stitches apart and back legs 12 stitches apart, then test the toy on a flat table.
- Tail weaving: A tail tuft pulls out when anchored through one stitch only. Weave the tail base through 6 body stitches and bury at least 12 cm of yarn inside the body.
Conclusion
Check the zebra from the front, side, and top before final tail weaving. The face should show a centered gray snout, equal eye spacing, two pink cheek patches, and a mane that runs in a clean ridge behind the ears. Next, photograph the toy against a plain background so the black body bands remain readable. Share the finished zebra on Pinterest with a vertical process image, then post the front and side views on Instagram. Use #ZebraAmigurumiPattern for tracking. This zebra amigurumi crochet pattern is complete when the four hooves stand level without hand support. Which stripe section changed your zebra’s expression most: forehead, cheeks, or body?









