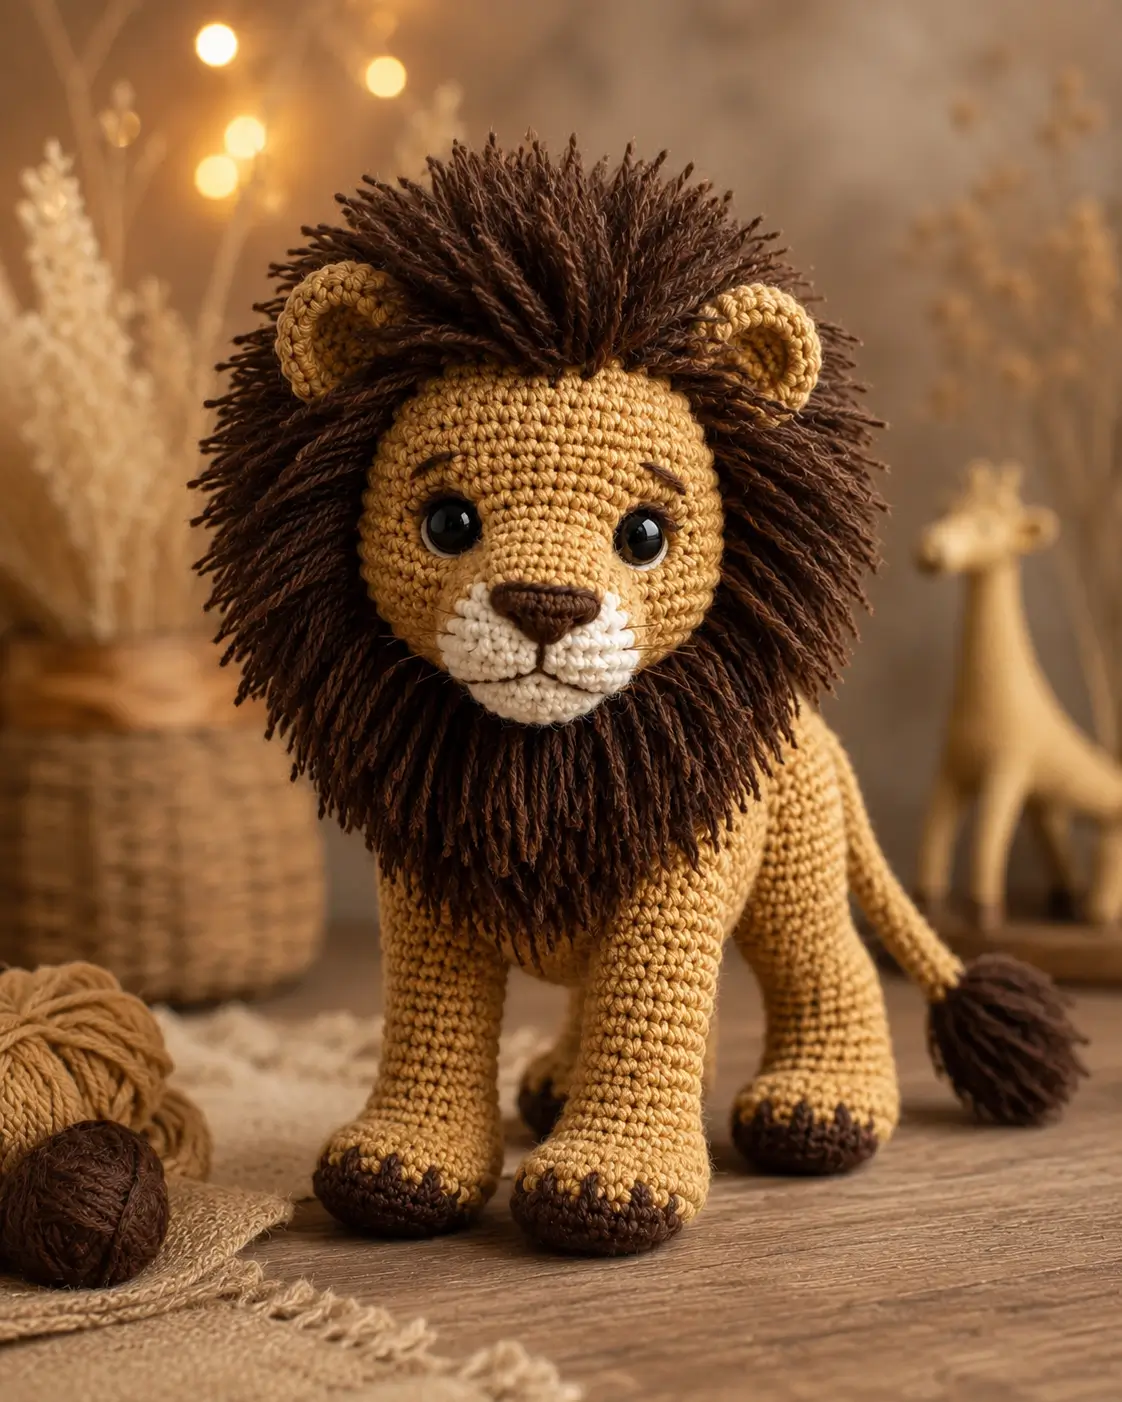
A lion reads as a lion in crochet only when the mane frames the face without hiding the muzzle, and that is the central problem this lion amigurumi crochet pattern solves. Worked in worsted yarn with a 3.5 mm hook, it produces a standing figure around 28 cm tall for intermediate makers. The four-leg stance makes it useful for shelf display or safari nursery styling.
The Design: What Makes This Lion Different
You are not shaping a bear head here. The muzzle needs to stay short and broad, the ears have to remain visible above the mane, and the body must read as a standing cat rather than a tube with four legs attached. A second choice matters just as much: the back legs need slightly more mass at the paw so the figure does not pitch forward. Then the mane has to sit in two zones, one around the face and one at the neck, because a single collar leaves the forehead too flat. Most current results for a standing lion crochet pattern lean either plush and low-sew or small and seated, while many step-heavy posts focus on smaller lions with simpler face shaping. Makers often miss the cheek width, which is why this lion crochet tutorial builds separate cheek patches before the mane goes on.
Project Info at a Glance
| Skill Level | Time | Finished Size | Hook | Best For |
|---|---|---|---|---|
| Intermediate | Weekend build | Approx. 28 cm standing | 3.5 mm | Safari shelf display, nursery set, gift build |
Materials and Tools
Yarn
- Golden tan — worsted / aran #4 — 100–120 g — Brava Worsted or similar
- Cream — worsted / aran #4 — 20–30 g — Brava Worsted or similar
- Dark brown — worsted / aran #4 — 50–75 g — Brava Worsted or similar
- Black or dark brown embroidery yarn — small amount — brows and mouth line
Standing lion patterns in the current results cluster around worsted or aran yarn for medium display pieces, with main-color demand around 100 g and contrast ranging from a single 50 g brown skein to a larger mane allotment in bigger standing builds.
Tools
- Hook 3.5 mm
- 12 mm safety eyes
- Polyester stuffing
- Tapestry needle
- Stitch markers
- Pins
- Small scissors
Abbreviations
MR / sc / inc / dec / sl st / ch / BLO
Work every dec as an invisible decrease through the front loops so the head, legs, and muzzle keep a tighter surface.
Pattern — Step by Step
Continuous spiral unless noted.
This is an original, photo-matched standing lion pattern. It follows standard amigurumi increase and decrease math, and it uses a large 42-stitch plateau because current lion references commonly range from 36 stitches in smaller heads to 42 stitches in larger standing builds.
Head (Make 1)
Yarn: golden tan — original photo-matched construction using standard amigurumi math and a large 42-stitch plateau benchmark.
- R1: 6 sc in MR [6]
- R2: inc x6 [12]
- R3: (sc, inc) x6 [18]
- R4: (sc 2, inc) x6 [24]
- R5: (sc 3, inc) x6 [30]
- R6: (sc 4, inc) x6 [36]
- R7: (sc 5, inc) x6 [42]
- R8: sc in each st around [42]
- R9: sc in each st around [42]
- R10: sc in each st around [42]
- R11: sc in each st around [42]
- R12: sc in each st around [42]
- R13: sc in each st around [42]
- R14: (sc 5, dec) x6 [36]
- R15: sc in each st around [36]
- R16: (sc 4, dec) x6 [30]
- R17: sc in each st around [30]
- R18: (sc 3, dec) x6 [24]
- R19: sc in each st around [24]
- R20: (sc 2, dec) x6 [18]
- R21: (sc, dec) x6 [12]
- R22: dec x6 [6]
Place 12 mm safety eyes between R10 and R11 with 10 stitches between them. Stuff firmly after R19 and top up again before R21.
Fasten off. Leave a 30 cm tail.
Body (Make 1)
Yarn: golden tan — original standing-body build sized to the same large-gauge family as the head.
- R1: 6 sc in MR [6]
- R2: inc x6 [12]
- R3: (sc, inc) x6 [18]
- R4: (sc 2, inc) x6 [24]
- R5: (sc 3, inc) x6 [30]
- R6: (sc 4, inc) x6 [36]
- R7: (sc 5, inc) x6 [42]
- R8: sc in each st around [42]
- R9: sc in each st around [42]
- R10: sc in each st around [42]
- R11: sc in each st around [42]
- R12: sc in each st around [42]
- R13: (sc 5, dec) x6 [36]
- R14: sc in each st around [36]
- R15: sc in each st around [36]
- R16: sc in each st around [36]
- R17: sc in each st around [36]
- R18: (sc 4, dec) x6 [30]
- R19: sc in each st around [30]
- R20: sc in each st around [30]
- R21: (sc 3, dec) x6 [24]
- R22: sc in each st around [24]
- R23: (sc 2, dec) x6 [18]
Stuff the body very firmly through the center, but keep the top opening flexible enough for sewing to the head.
Fasten off. Leave a 40 cm tail.
Front Legs (Make 2)
Yarn: dark brown then golden tan — original paw-first construction based on standard tube shaping.
- R1: With dark brown, 6 sc in MR [6]
- R2: inc x6 [12]
- R3: (sc, inc) x6 [18]
- R4: sc in each st around [18]
- R5: Change to golden tan, sc in each st around [18]
- R6: (sc, dec) x6 [12]
- R7: sc in each st around [12]
- R8: sc in each st around [12]
- R9: sc in each st around [12]
- R10: sc in each st around [12]
- R11: sc in each st around [12]
- R12: sc in each st around [12]
- R13: sc in each st around [12]
- R14: sc in each st around [12]
- R15: sc in each st around [12]
- R16: Flatten opening and sc through both layers across [6]
Stuff the paw and lower leg only. Keep the top 4 rounds softer for sewing.
Fasten off. Leave a 25 cm tail.
Back Legs (Make 2)
Yarn: dark brown then golden tan — original hind-leg version with a broader paw for stance control.
- R1: With dark brown, 6 sc in MR [6]
- R2: inc x6 [12]
- R3: (sc, inc) x6 [18]
- R4: (sc 2, inc) x6 [24]
- R5: sc in each st around [24]
- R6: Change to golden tan, (sc 2, dec) x6 [18]
- R7: sc in each st around [18]
- R8: sc in each st around [18]
- R9: sc in each st around [18]
- R10: sc in each st around [18]
- R11: sc in each st around [18]
- R12: (sc, dec) x6 [12]
- R13: sc in each st around [12]
- R14: sc in each st around [12]
- R15: sc in each st around [12]
- R16: sc in each st around [12]
- R17: sc in each st around [12]
- R18: sc in each st around [12]
- R19: Flatten opening and sc through both layers across [6]
Stuff the paw and lower two-thirds of the leg. Leave the top section slightly softer than the front legs so the rear angle is easier to set.
Fasten off. Leave a 25 cm tail.
Ears (Make 2)
Yarn: golden tan — original folded cup ear for a mane-heavy lion profile.
- R1: 6 sc in MR [6]
- R2: inc x6 [12]
- R3: sc in each st around [12]
- R4: sc in each st around [12]
- R5: Flatten opening and sc through both layers across [6]
Do not stuff.
Fasten off. Leave a 20 cm tail.
Cheek Patches (Make 2)
Yarn: cream — original flat circles sized to keep the muzzle broad.
- R1: 6 sc in MR [6]
- R2: inc x6 [12]
- R3: (sc, inc) x6 [18]
- R4: sc in each st around [18]
Fasten off. Leave an 18 cm tail.
Nose (Make 1)
Yarn: dark brown — original nose pad that is pinched slightly during sewing for a triangular lion look.
- R1: 6 sc in MR [6]
- R2: inc x6 [12]
- R3: (sc, inc) x6 [18]
- R4: sc in each st around [18]
Light stuffing is optional. Pinch the upper edge slightly while sewing so the outline narrows at the top.
Fasten off. Leave a 20 cm tail.
Tail (Make 1)
Yarn: golden tan and dark brown — original tail tube with looped tuft finish, matching common lion tail builds.
- R1: With golden tan, 6 sc in MR [6]
- R2: sc in each st around [6]
- R3: sc in each st around [6]
- R4: sc in each st around [6]
- R5: sc in each st around [6]
- R6: sc in each st around [6]
- R7: sc in each st around [6]
- R8: sc in each st around [6]
- R9: sc in each st around [6]
- R10: sc in each st around [6]
- R11: sc in each st around [6]
- R12: sc in each st around [6]
- R13: sc in each st around [6]
- R14: sc in each st around [6]
- R15: sc in each st around [6]
- R16: sc in each st around [6]
- R17: sc in each st around [6]
- R18: sc in each st around [6]
- R19: Change to dark brown, (ch 10, sl st in same st) x6 [6 loops]
Do not stuff. Cut each loop once after assembly and trim into a rounded tassel.
Fasten off. Leave a 20 cm tail.
Mane (Make 2 strips)
Yarn: dark brown — original fringe-strip method shaped to the photo; current lion patterns use either loops or attached strands for the mane.
Face Strip
- Foundation: ch 41
- Row 1: sc in 2nd ch from hook and across [40]
- Row 2: ch 1, turn, (ch 12, sl st in next st) x40 [40 loops]
Fasten off. Leave a 25 cm tail.
Neck Strip
- Foundation: ch 49
- Row 1: sc in 2nd ch from hook and across [48]
- Row 2: ch 1, turn, (ch 12, sl st in next st) x48 [48 loops]
Fasten off. Leave a 25 cm tail.
After sewing each strip in place, cut every loop once, tease the yarn with a needle, and trim the mane to about 5–6 cm around the cheeks and 6–7 cm under the chin.
Assembly
- Sew the head to the body, centered over the body opening, with the face aimed slightly downward rather than straight ahead.
- Pin the two cheek patches low on the face so they overlap slightly at the center bottom.
- Sew the nose across the upper inner edges of the cheek patches, then embroider the mouth downward from the center and split it outward into two short curves.
- Embroider the brow lines two rounds above each eye, keeping both slants angled slightly inward toward the muzzle.
- Sew the front legs to the lower front half of the body, with the inner paw edges about 10 stitches apart.
- Sew the back legs to the lower rear half of the body, matching the same inner spacing, then stand the lion on a flat surface before tying off.
- Sew the ears into the top side zones of the head so the upper edge of each ear remains visible above the mane line.
- Sew the face-strip mane around the forehead, cheeks, and jaw, leaving the muzzle fully clear and the top half of each ear exposed.
- Sew the neck-strip mane around the head-to-body join, then trim the layers so the chest reads fuller than the brow area.
- Sew the tail to the back center of the body, trim the tuft into a rounded tassel, and weave all remaining ends inside.
The finished lion stands best when the front paws sit directly under the cheek line and the back paws sit just behind the body midpoint.
7 Technical Tips
- Put one stitch marker at head round 7 and another at body round 13. Losing either landmark shifts the mane band or shoulder line by 6 stitches.
- Pack stuffing hard in the paw rounds, then stop one round before the leg closes. Full stuffing in the top 3 to 4 rounds makes the shoulder seam bulge and the lion tips forward.
- Work every visible decrease as an invisible decrease through the front loops only. A regular decrease leaves a ridge on the muzzle edge and along the outer shoulder line.
- Install the 12 mm eyes between rounds 10 and 11 before the head drops below 24 stitches. Waiting until round 18 makes washer placement cramped and pulls the face inward.
- If you swap to velvet or plush yarn, test a 42-stitch flat circle first and keep the hook at least one size below the yarn-label suggestion. A cupped test circle means the mane strip will pull the head into an oval.
- Pin each front leg so the inner edges sit about 10 stitches apart, then repeat the same spacing on the back pair. Even a 3 mm inward twist on one leg is enough to create a rocking stance.
- Weave the tail end through four internal stitch columns before trimming. A short two-pass weave can let the tassel sag after handling.
Conclusion
This build works because the head stays broad, the muzzle stays short, and the mane is trimmed after the last seam rather than before. Finish the assembly, take one front-view photo and one profile photo, then compare ear visibility and cheek width before you bury the final yarn ends. Save this post to Pinterest for later reference, and tag your result on Instagram with #SavannahShelfLion so the mane density and leg spacing are easy to study. The next step is simple: make a second version with a shorter mane for a lioness-style companion. Which trim do you prefer on this lion amigurumi crochet pattern, a full jaw-length mane or a tighter cut that shows more of the rounded ears?









