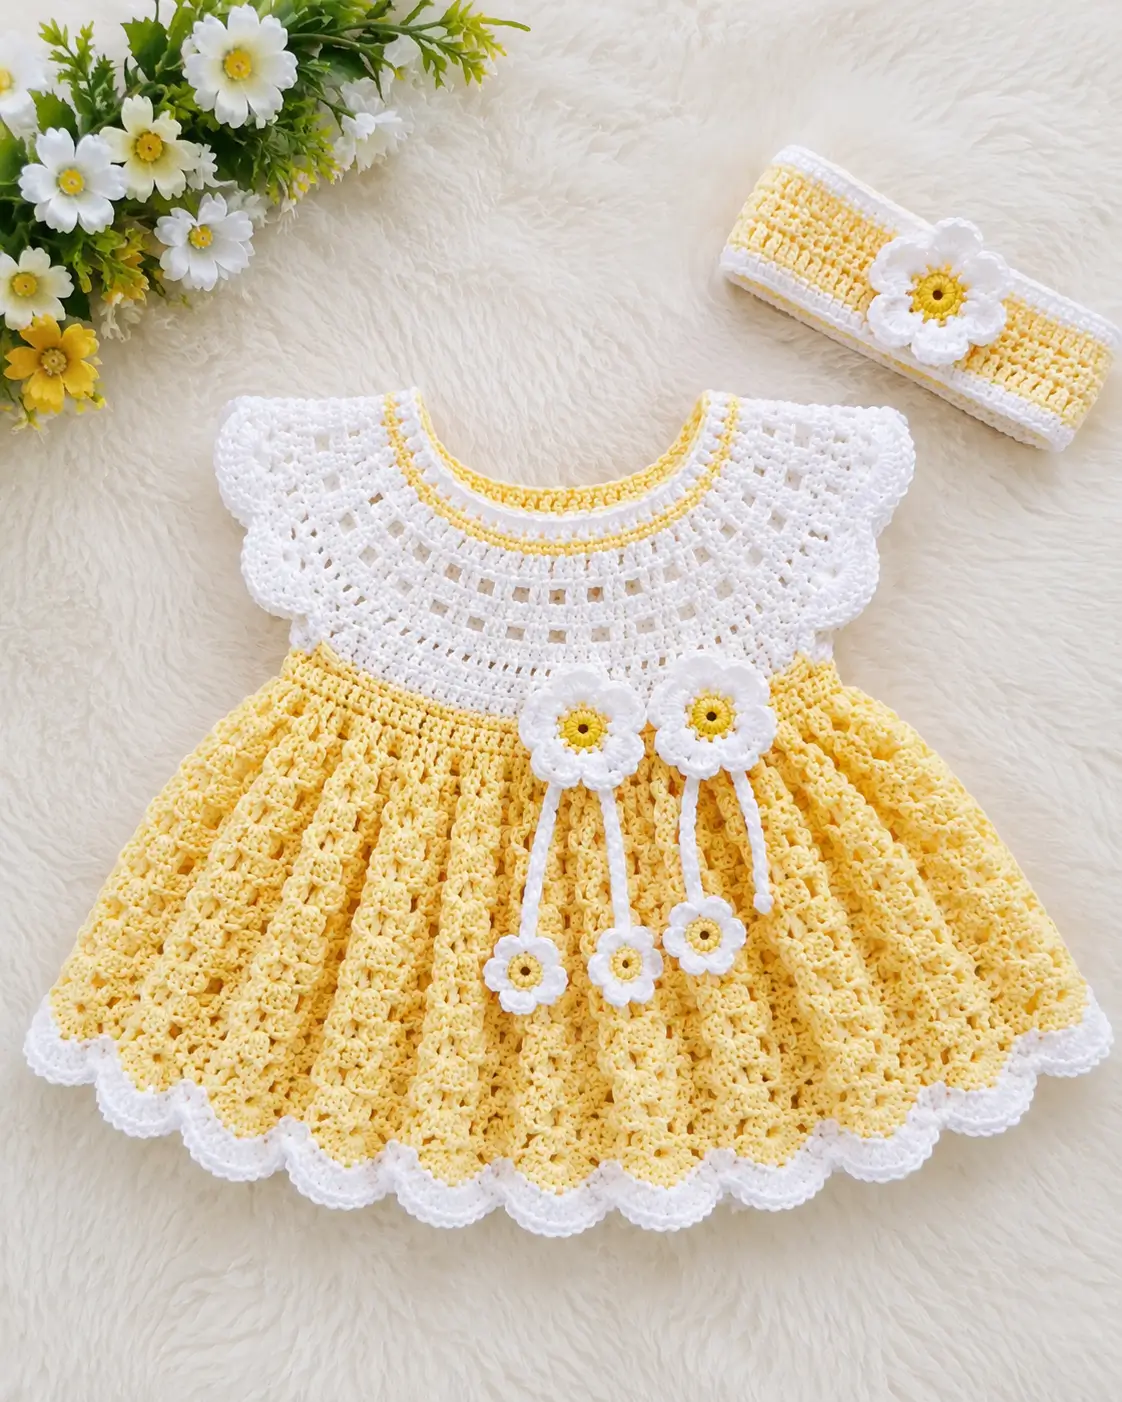
The yellow skirt in this daisy baby dress needs enough flare to carry three hanging flower stems without pulling the white yoke out of shape. This yellow daisy crochet baby dress pattern uses a 4 mm hook, light DK cotton, a 48 cm finished chest, and a 38 cm shoulder-to-hem target for 6–12 months. The construction is intermediate-level and produces a coordinated dress-and-headband set for warm-weather layering.
The Design: What Makes the Daisy Dress Different
Three decisions control this design. First, the white yoke grows by twelve stitches per increase row, which spreads fabric around a rounded neckline rather than forcing four visible raglan corners; that matches the circular structure in the reference image. Second, the skirt jumps from 96 to 144 stitches at the waist. That 50% increase creates the flare needed for a yellow crochet baby dress without building thick gathers under the arms. Third, the daisy stems attach at the waistline instead of through the openwork rows, so their weight sits on denser fabric. You should keep the sleeve edging shallow because deep shells can turn upward on a small armhole. The maker then checks chest width before beginning the skirt. A common error in a crochet baby dress with headband set is scaling only the hook; gauge and finished measurements still need checking.
Project Info at a Glance
| Skill Level | Time | Finished Size | Hook | Best For |
|---|---|---|---|---|
| Intermediate | 8–12 hours | 48 cm chest × 38 cm long | 4.0 mm | 6–12 months after measurement check |
The 48 cm garment chest gives positive ease over standard baby body-chest measurements across the 6–12-month range.
Gauge and Sizing
Work a washed and dried gauge swatch before beginning the neckline.
Target stitch gauge: 20 dc = approximately 10 cm.
Comparable DK baby-dress specifications commonly sit around 20–22 stitches per 10 cm with a 4 mm hook. Yarn labels alone cannot determine the finished dimensions because fiber, stitch height and individual tension all change the fabric.
For this pattern, the 96-stitch body should measure about 48 cm around before the skirt increase. Stop at that checkpoint. A smaller circumference means the fabric is working too tightly for the stated size; a larger circumference changes both ease and skirt proportions.
The sleeve opening uses 28 held yoke stitches plus four underarm chains. This produces 32 stitch positions around each armhole.
Materials and Tools
Yarn
- Pale yellow — light DK/#3 smooth cotton — approximately 150 g purchase allowance.
- White — light DK/#3 smooth cotton — approximately 100 g purchase allowance for the yoke, sleeve borders, flowers and hem.
- Golden yellow — light DK/#3 smooth cotton — approximately 25 g purchase allowance for flower centers and accent details.
Use yarns from the same range when possible. Different manufacturers can produce noticeably different thicknesses even when both yarns are marked DK.
Tools
- 4.0 mm crochet hook
- Yarn needle
- Locking stitch markers
- Scissors
- Measuring tape
- Blocking mat and rust-resistant pins
- Small securely sewn back-neck button, if a button closure is preferred
A loose button is unsuitable on infant clothing. Stitch it through the fabric several times, check the attachment before use, and remove the garment from service if the button begins to loosen.
Abbreviations
- MR — magic ring
- ch — chain
- sc — single crochet
- hdc — half double crochet
- dc — double crochet
- FPdc — front-post double crochet
- inc — two stitches worked into one stitch
- sl st — slip stitch
- sk — skip
- sp — space
- st/sts — stitch/stitches
- BLO — back loop only
An invisible decrease is not used because this garment contains no stuffed three-dimensional shaping.
Construction Notes
This yellow daisy crochet baby dress pattern is worked from the neck downward. The yoke begins flat so the center back remains open, then joins below the armholes. Skirt rounds are joined. Sleeve borders, hem, flowers and headband are added after the main garment is complete.
Beginning chains do not count as stitches unless a row specifically states otherwise.
Check the 96-stitch body circumference before moving into the skirt. Stitch counts are structural targets; measurements determine the final fit.
Pattern — Step by Step
Rounded Lace Yoke
Yarn: white, with optional pale-yellow neckline accent.
Foundation: Ch 62.
Row 1: Dc in 3rd ch from hook and in each ch across. Turn. (60)
Row 2: Ch 2. *Dc in next 4 sts, 2 dc in next st.* Repeat ×12. Turn. (72)
Change to pale yellow for one narrow accent row if matching the photographed neckline.
Row 3: Ch 2. *Dc in next 5 sts, 2 dc in next st.* Repeat ×12. Turn. (84)
Return to white.
Row 4: Ch 2. *Dc in next 6 sts, 2 dc in next st.* Repeat ×12. Turn. (96)
Row 5: Ch 2. *Dc in next 7 sts, 2 dc in next st.* Repeat ×12. Turn. (108)
Row 6: Ch 2. *Dc in next 8 sts, 2 dc in next st.* Repeat ×12. Turn. (120)
Row 7: Ch 2. *Dc in next 9 sts, 2 dc in next st.* Repeat ×12. Turn. (132)
Row 8: Ch 2. *Dc in next 10 sts, 2 dc in next st.* Repeat ×12. Turn. (144)
Row 9 — Eyelet Row: Ch 2. *Dc in next 2 sts, ch 1, sk 1.* Repeat ×48. Turn. (144 pattern positions)
Row 10: Ch 2. Dc in every dc and work 1 dc in every ch-1 sp. Turn. (144)
Measure the yoke depth before dividing the armholes. The target is approximately 9.5 cm, with final fit also affected by the underarm chains.
Armhole Division and Waist
Yarn: white.
Place markers after stitch 22, after the following 28 stitches, after the next 44 stitches and after the next 28 stitches.
The sections are:
22 back + 28 sleeve + 44 front + 28 sleeve + 22 back.
Row 11: Ch 2. Dc in first 22 sts, ch 4, skip 28 sleeve sts, dc in next 44 sts, ch 4, skip next 28 sleeve sts, dc in final 22 sts. Join the center-back edges with a sl st to the first dc. (96)
The sleeve opening consists of 28 held yoke stitches plus four underarm chains: 32 positions.
Change to pale yellow.
Round 12: Ch 1. Sc in each st and each underarm chain around. Join. (96)
Measure around this round. It should be approximately 48 cm at pattern gauge.
Flared Yellow Skirt
Yarn: pale yellow.
Round 13 — Flare Increase: Ch 2. *Dc in next st, 2 dc in next st.* Repeat ×48. Join. (144)
The skirt now uses a four-round lace-and-texture block.
Round 14: Ch 2. *Dc in next 2 sts, ch 2, sk 2 sts, dc in next 2 sts.* Repeat ×24. Join. (144 pattern positions)
Round 15: Ch 2. *Dc in next 2 dc, 2 dc in ch-2 sp, dc in next 2 dc.* Repeat ×24. Join. (144)
Round 16: Ch 2. *FPdc around next dc, dc in next 5 sts.* Repeat ×24. Join. (144)
Round 17: Ch 2. Dc in every st around. Join. (144)
Repeat Rounds 14–17 five more times to create six complete lace blocks.
- Rounds 18–21 — second block
- Rounds 22–25 — third block
- Rounds 26–29 — fourth block
- Rounds 30–33 — fifth block
- Rounds 34–37 — sixth block
Measure from the shoulder after Round 37. Add or remove one complete four-round block when required. The target finished length for this version is approximately 38 cm from shoulder to hem.
Do not add extra flare increases merely to gain length. More stitches change the circumference, while extra rounds change length.
White Scalloped Hem
Yarn: white.
Round 38: Ch 1. Sc in every st around. Join. (144)
Round 39: *Sk 2 sts, 7 dc in next st, sk 2 sts, sl st in next st.* Repeat ×24.
Fasten off and leave a 15 cm tail for weaving.
The six-stitch repeat divides evenly into 144 stitches, producing 24 scallops without a partial repeat at center back.
Cap Sleeve Edging — Make 2
Yarn: white.
Join yarn at the center of one four-chain underarm section.
Round 1: Ch 1. Sc once in each of the four underarm chains and each of the 28 held sleeve stitches. Join. (32)
Round 2: *Sk 1 st, 5 dc in next st, sk 1 st, sl st in next st.* Repeat ×8.
Fasten off. Repeat for the second sleeve.
If the edge turns sharply upward, the likely problem is excess shell height relative to the 32-stitch armhole. Change the five-dc shells to four-dc shells rather than adding more base stitches.
Back Opening and Neckline Edge
Yarn: white.
Join at one lower edge of the center-back opening. Work sc evenly up the opening, around the entire foundation neckline and down the opposite back edge.
At the upper corner of one back edge, form a button loop sized for the selected button. A ch 4–5 loop is a practical starting point, but test the actual button before fastening off.
Work a second sc pass around the neckline if additional firmness is needed.
Fasten off.
Large Daisy Appliqué — Make 3
Two flowers sit at the skirt waist. The third attaches to the headband.
Center: golden yellow. Petals: white.
Round 1: With golden yellow, 6 sc in MR. Join. (6)
Round 2: Inc ×6. Join. (12)
Change to white.
Round 3: *Sl st in next st, ch 3, 3 dc in same st, ch 3, sl st in same st, sl st in next st.* Repeat ×6.
Fasten off with a 25 cm tail on the two waist flowers for sewing.
Pin the waist flowers approximately 2–3 cm apart before sewing. Attach them through the dense waist round rather than through an open chain space.
Small Hanging Daisy — Make 3
Center: golden yellow. Petals: white.
Round 1: 6 sc in MR. Join. (6)
Round 2: Inc ×6. Join. (12)
Change to white.
Round 3: *Sl st in next st, ch 2, 2 hdc in same st, ch 2, sl st in same st, sl st in next st.* Repeat ×6.
Fasten off, retaining a tail for connection to the cord.
Hanging Flower Cords — Make 3
Yarn: white.
Cord 1: Ch 20. Sl st in second ch from hook and each remaining ch.
Cord 2: Ch 24. Sl st in second ch from hook and each remaining ch.
Cord 3: Ch 28. Sl st in second ch from hook and each remaining ch.
Fasten one small daisy to each lower end.
Position the cords behind or immediately below the two large waist daisies. Place the longest cord between the shorter two so the flowers finish at three different heights.
Matching Crochet Headband
Measure the intended wearer’s head before beginning. Baby head measurements vary too much for age alone to determine the final chain count.
Yarn: pale yellow and white.
Foundation: Ch 72 loosely. Check the chain against the required head circumference before joining. Add or remove chains in multiples of 2. Join without twisting.
Round 1: Ch 1. Sc in every ch around. Join. (72)
Round 2: Ch 2. *Dc in next st, ch 1, sk 1.* Repeat ×36. Join. (72 pattern positions)
Round 3: Ch 1. Work 1 sc in each dc and 1 sc in each ch-1 sp. Join. (72)
Change to white.
Round 4: Sc in every st. Join. (72)
Fasten off.
Sew one large daisy over the join. The band should sit without leaving pressure marks. Use infant headbands under direct adult supervision and remove them for sleep.
Assembly
- Block the completed yoke flat before assessing the neckline curve.
- Measure the 96-stitch body round and compare it with the 48 cm project target.
- Block the skirt lightly so all six lace blocks hang to the same depth.
- Shape both sleeve scallop rounds with eight shells per sleeve.
- Finish the back-neck opening and attach the selected closure securely.
- Pin the two large daisies across the front waist before sewing either flower permanently.
- Position the three cords behind the large daisies with the longest cord in the center.
- Sew one small daisy to the end of each cord and check that every yarn tail is buried.
- Join and finish the headband, then sew its large daisy directly over the band seam.
- Weave every remaining tail through several neighboring stitches and trim only after the garment has been measured again.
The finished set consists of one round-yoke dress, six dress flowers and one matching floral headband.
7 Technical Tips
- Marker drift: Place a locking marker at the first stitch of every skirt round. Being one stitch off by Round 14 breaks the 24-repeat lace division, so count all 144 positions before beginning each new four-round block.
- Gauge failure: If the 96-stitch waist measures 52 cm rather than the 48 cm target, continuing will produce excessive chest ease. Change hook size or yarn before working the 144-stitch skirt.
- Armhole restriction: Each sleeve opening uses 32 positions. If the opening is too tight, correct it at the underarm section instead of trying to stretch the finished sleeve during blocking.
- Eyelet distortion: Pulling the ch-2 spaces tighter than the surrounding dc makes the skirt contract every fourth round. Keep every two-chain span wide enough to accept exactly two dc on the next round.
- Scallop flare: Seven dc over each six-stitch hem repeat creates 24 scallops across 144 base stitches. Adding an eighth dc to every shell may cause the white border to ripple beyond the yellow skirt.
- Flower placement: Pin both large daisies with their centers approximately 2–3 cm apart before stitching. Sewing the first flower permanently without testing the second can shift the pair away from the visual center of the waist.
- Tail failure: Flower cords are moving components, so short yarn tails can pull free after washing. Leave at least 15 cm for structural ends and weave each tail through several neighboring stitches in more than one direction.
Fit Checks Before Finishing
Age labels should not replace measurements. Check the finished garment against the intended wearer before trimming structural yarn tails.
Chest: approximately 48 cm around the 96-stitch waist round.
Armhole: compare the 32-stitch opening with the child’s upper arm plus enough room for dressing.
Length: target approximately 38 cm from shoulder to the finished scallop for this version.
Headband: compare directly with the child’s head rather than relying only on an age-based size chart.
Cotton can change after washing. Measure the gauge swatch after the same wash-and-dry treatment planned for the finished garment.
Why the Skirt Uses 144 Stitches
The skirt count is structural rather than arbitrary. Ninety-six waist stitches produce approximately 48 cm at a 20-stitch-per-10-cm gauge. Increasing every second stitch adds 48 stitches:
96 + 48 = 144.
The new total works with both major skirt repeats. The lace repeat spans six base positions:
144 ÷ 6 = 24 repeats.
The hem also consumes six base stitches per scallop:
144 ÷ 6 = 24 scallops.
No compensating stitches are required at center back. The transition gives a 50% increase in stitch count without placing several increases into a single point, which would create localized folds.
Daisy Placement and Proportion
The photographed design depends on hierarchy. Two large flowers sit close to the waist, while smaller daisies finish lower on independent cords. Making all five dress flowers the same diameter removes that hierarchy and makes the cords look like accidental extensions.
Keep the large flower petal round in dc. Work the small version in hdc. Both retain six petals and the same 12-stitch center, so the visual relationship stays consistent while the petal depth changes.
Golden centers should remain small. Expanding the center beyond the second round moves the motif toward a sunflower proportion and reduces the white-petal area visible against the yellow skirt.
For attachment, stitch through the flower center and the inner base of each petal. Leaving the outer petal tips free preserves the layered outline.
Color Placement
The color balance in the reference image is divided into three functions rather than three equal areas.
White carries structure at the upper body: neckline, rounded yoke, sleeve edges and final hem.
Pale yellow provides the largest field through the skirt and narrow neckline accent.
Golden yellow acts only as a focal color in the flower centers.
Do not distribute the golden shade across broad skirt rows. Small repeated centers provide enough contrast without competing with the white openwork.
If the yellow and white yarns come from different manufacturers, compare their gauges using the same stitch. A thicker white yarn can make the yoke wider than the skirt waist even when both labels say DK.
Washing and Blocking
Follow the care directions printed on the selected yarn label. A cotton dress should be supported while wet rather than hung from the shoulders because the skirt carries substantially more yarn than the yoke.
Lay the yoke flat and arrange its increase rows into a smooth semicircle. Spread the 24 hem scallops so their outer edges form an even arc.
Pin the daisies only enough to separate the petals. Do not stretch the hanging cords to identical lengths; their three finished levels are intentional.
Measure the dress again after drying. Record the final chest, garment length and headband circumference in the project notes before making another size.
Conclusion
Measure the intended wearer before cutting any yarn tails permanently, with the 48 cm chest and 38 cm length treated as project targets rather than substitutes for body measurements. Block one finished sleeve and one daisy first, then compare their proportions with the unblocked pieces before completing the set. Save the finished yellow daisy crochet baby dress pattern project to Pinterest with the size, hook and yarn recorded in the pin description, and share the completed dress on Instagram with #YellowDaisyBabyDress. For the next version, decide one construction detail before buying yarn: would you keep the three hanging daisies at different lengths, or replace the center stem with another flower fixed directly to the waist?









