Introduction
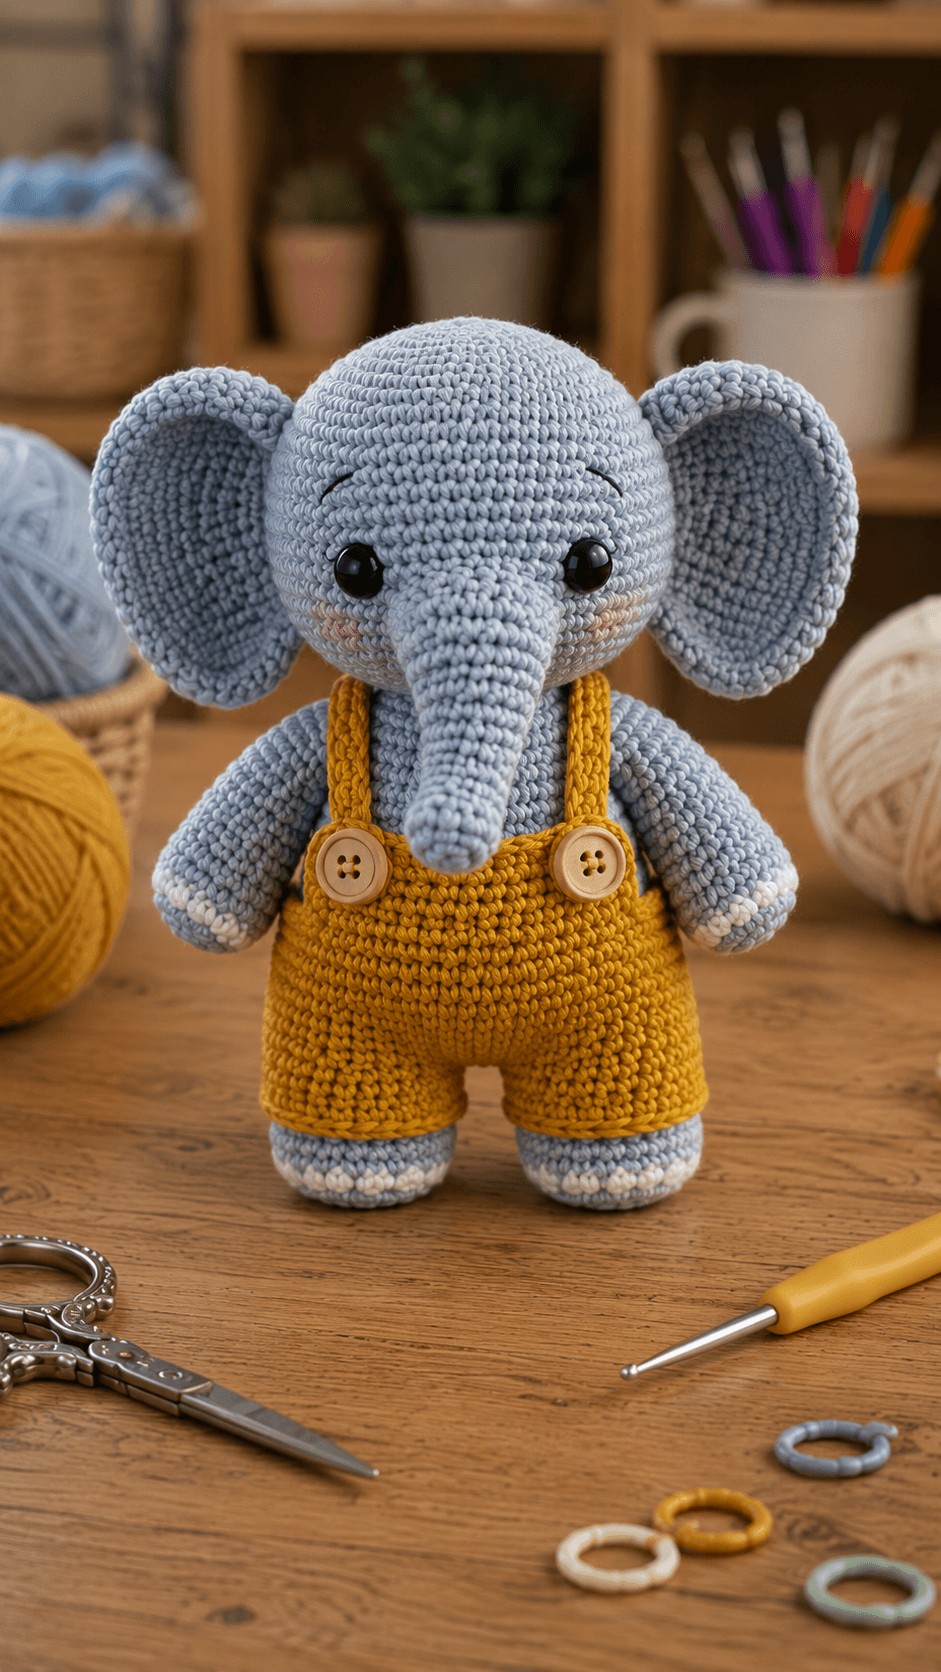
A standing elephant with ears this wide needs its trouser legs centered beneath the head or the whole silhouette leans sideways. This blue elephant amigurumi crochet pattern uses worsted yarn, a 3.5 mm hook and 14–16 mm eyes to make an approximately 28–32 cm toy. Oversized ears, a long trunk, cream toes and fitted mustard overalls make it an intermediate construction.
The Design: What Makes This Elephant Different
The 42-stitch head creates enough width for the broad ears and long trunk without producing a narrow forehead. A smaller 36-stitch torso keeps the head visually dominant, while two 24-stitch legs carry the figure in a standing pose instead of a seated one. The arms are slimmer because they hang outside the bib and do not need to support the body. Mustard overalls are worked as a separate garment with a 36-stitch waist, split short legs, a flat bib and two shoulder straps. That construction lets you correct clothing fit before final assembly. A common mistake in an elephant with overalls crochet pattern is making the shorts tight enough to compress the stuffing. The body then becomes narrower at the waist and the large head appears disproportionately heavy.
Project Info at a Glance
| Skill Level | Time | Finished Size | Hook | Best For |
|---|---|---|---|---|
| Intermediate | 10–13 hours | Approx. 28–32 cm standing height | 3.5 mm | Display toys, nursery decor and handmade gifts |
Materials and Tools
Yarn
- Powder blue — worsted / Aran #4 — approximately 180–210 g — head, ears, trunk, body, arms and legs.
- Mustard yellow — worsted / Aran #4 — approximately 50–65 g — shorts, bib and shoulder straps.
- Warm cream — worsted / Aran #4 — approximately 10–15 g — toe accents.
- Light peach — small quantity — cheek embroidery.
- Black — small quantity — eyebrows and optional embroidered eyes.
Use a smooth yarn with enough twist to retain dense single-crochet definition. The large head and long trunk place visible pressure on the stitches, so the fabric should remain closed when stuffed firmly.
Tools
- 3.5 mm crochet hook
- 14–16 mm safety eyes
- Polyester fiberfill
- Two 18–22 mm wooden buttons or crochet button substitutes
- Long tapestry needle
- Standard yarn needle
- Stitch markers
- Dressmaking pins
- Scissors
- Measuring tape
For a toy intended for a child who may pull or chew components, replace plastic eyes and wooden buttons with embroidered eyes and firmly sewn crochet button discs.
Abbreviations
- MR — magic ring
- sc — single crochet
- inc — increase
- dec — decrease
- sl st — slip stitch
- ch — chain
- hdc — half double crochet
- dc — double crochet
- BLO — back loop only
An invisible decrease is worked through the front loops of the next two stitches before completing one single crochet through both loops.
Pattern — Step by Step
Work all stuffed components in continuous spirals unless another construction is stated. Move the stitch marker to the first stitch after every completed round.
Head
Yarn: powder blue — original reconstruction using standard six-stitch amigurumi geometry.
R1: 6 sc in MR (6)
R2: inc ×6 (12)
R3: (sc, inc) ×6 (18)
R4: (2 sc, inc) ×6 (24)
R5: (3 sc, inc) ×6 (30)
R6: (4 sc, inc) ×6 (36)
R7: (5 sc, inc) ×6 (42)
R8: sc around (42)
R9: sc around (42)
R10: sc around (42)
R11: sc around (42)
R12: sc around (42)
R13: sc around (42)
R14: sc around (42)
R15: sc around (42)
R16: (5 sc, dec) ×6 (36)
R17: sc around (36)
R18: (4 sc, dec) ×6 (30)
R19: (3 sc, dec) ×6 (24)
R20: (2 sc, dec) ×6 (18)
R21: (sc, dec) ×6 (12)
R22: dec ×6 (6)
Insert the eyes between R12 and R13 with approximately 9–10 stitches between their posts. Stuff the forehead and sides firmly while keeping the lower center slightly softer for the trunk attachment.
Fasten off and close the remaining six stitches.
Trunk
Yarn: powder blue.
R1: 6 sc in MR (6)
R2: inc ×6 (12)
R3: (sc, inc) ×6 (18)
R4: sc around (18)
R5: (4 sc, dec) ×3 (15)
R6: sc around (15)
R7: (3 sc, dec) ×3 (12)
R8: sc around (12)
R9: sc around (12)
R10: 7 sc, dec, 3 sc (11)
R11: sc around (11)
R12: 6 sc, dec, 3 sc (10)
R13: sc around (10)
R14: 5 sc, dec, 3 sc (9)
R15: sc around (9)
R16: 4 sc, dec, 3 sc (8)
R17: sc around (8)
R18: 3 sc, dec, 3 sc (7)
R19: sc around (7)
R20: dec, 5 sc (6)
R21: sc around (6)
R22: sc around (6)
Stuff R1–R12 lightly. Leave the narrow end less densely filled so the trunk hangs vertically instead of projecting rigidly away from the face.
Fasten off with a 40 cm sewing tail.
Shape the Trunk
The reference trunk is long and mostly downward-facing rather than sharply curled.
Thread approximately 40 cm of blue yarn onto a needle.
Take one concealed stitch from the underside near R18 toward R13.
Pull only enough to create approximately 10–15 degrees of forward curve.
A stronger curve changes the straight, youthful silhouette visible in the photograph.
Outer Ears — Make 2
Yarn: powder blue.
R1: 6 sc in MR (6)
R2: inc ×6 (12)
R3: (sc, inc) ×6 (18)
R4: (2 sc, inc) ×6 (24)
R5: (3 sc, inc) ×6 (30)
R6: (4 sc, inc) ×6 (36)
Fasten off with a 45 cm sewing tail.
Target approximately 10–11 cm across. Flatten each circle and stretch it slightly vertically.
Ear Edge Round — Make 2
Yarn: powder blue.
Join yarn at the lower inner edge.
Sc evenly around the complete ear.
Work one extra sc at the widest outer side if the disc needs a slightly more oval profile.
Fasten off.
Cheek Marks — Make 2
Yarn: light peach.
Thread approximately 20 cm of yarn onto a needle.
Work three short horizontal stitches approximately 5–7 mm long.
Keep each cheek cluster low and slightly outside the eye line.
Body
Yarn: powder blue.
R1: 6 sc in MR (6)
R2: inc ×6 (12)
R3: (sc, inc) ×6 (18)
R4: (2 sc, inc) ×6 (24)
R5: (3 sc, inc) ×6 (30)
R6: (4 sc, inc) ×6 (36)
R7: sc around (36)
R8: sc around (36)
R9: sc around (36)
R10: sc around (36)
R11: sc around (36)
R12: sc around (36)
R13: sc around (36)
R14: (4 sc, dec) ×6 (30)
R15: sc around (30)
R16: (3 sc, dec) ×6 (24)
R17: sc around (24)
R18: (2 sc, dec) ×6 (18)
R19: (sc, dec) ×6 (12)
R20: dec ×6 (6)
Stuff the lower body firmly enough to resist compression from the overalls. Keep the upper neck area slightly softer.
Fasten off and close.
Arms — Make 2
Yarn: powder blue.
R1: 6 sc in MR (6)
R2: inc ×6 (12)
R3: (sc, inc) ×6 (18)
R4: sc around (18)
R5: sc around (18)
R6: (sc, dec) ×6 (12)
R7: sc around (12)
R8: sc around (12)
R9: sc around (12)
R10: sc around (12)
R11: sc around (12)
R12: sc around (12)
Stuff the lower half lightly.
Fasten off with a 30 cm sewing tail.
Cream Finger Marks — Make 6
Yarn: warm cream.
Make three short surface stitches at the rounded end of each arm.
Target approximately 5–6 mm per mark.
Space them evenly across the visible front edge.
Standing Legs — Make 2
Yarn: powder blue.
R1: 6 sc in MR (6)
R2: inc ×6 (12)
R3: (sc, inc) ×6 (18)
R4: (2 sc, inc) ×6 (24)
R5: sc around (24)
R6: sc around (24)
R7: (2 sc, dec) ×6 (18)
R8: sc around (18)
R9: sc around (18)
R10: sc around (18)
R11: (sc, dec) ×6 (12)
R12: sc around (12)
R13: sc around (12)
Stuff the foot and lower leg firmly.
Keep the final two rounds slightly softer for attachment to the torso.
Fasten off with a 35 cm sewing tail.
Cream Toe Marks — Make 6
Yarn: warm cream.
Embroider three short marks across the front of each standing foot.
Keep each mark approximately 6–8 mm long.
Do not pull hard enough to flatten the rounded foot.
Tail
Yarn: powder blue.
Ch 10.
Starting in the second chain, sl st through all 9 chains.
Fasten off with a 20 cm sewing tail.
Add three short blue strands to the tip and trim to approximately 15–20 mm.
Mustard Overalls
Make the clothing before permanently attaching the arms. The garment needs to pass over the body and sit beneath the arm attachment points.
Overalls Waist and Shorts
Yarn: mustard yellow.
Ch 37.
Join into a ring without twisting.
R1: sc around. (36)
R2: sc around. (36)
R3: sc around. (36)
R4: sc around. (36)
R5: sc around. (36)
R6: sc around. (36)
Do not fasten off.
Try the tube around the lower body. It should sit firmly without indenting the stuffing.
First Shorts Leg
Count 18 stitches from the start of the round.
Join the 18th stitch back to the first stitch to create the first leg opening.
R1: sc around first 18 stitches. (18)
R2: sc around. (18)
R3: sc around. (18)
R4: sc around. (18)
Fasten off.
Second Shorts Leg
Join mustard yarn to the remaining 18 stitches.
R1: sc around. (18)
R2: sc around. (18)
R3: sc around. (18)
R4: sc around. (18)
Fasten off.
Use a short mustard strand to close any small central crotch gap.
Overalls Bib
Yarn: mustard yellow.
Mark the center front of the waistband.
Join yarn 8 stitches before center.
Row 1: sc across 16 stitches. (16)
Row 2: ch 1, turn, sc across. (16)
Row 3: ch 1, turn, dec, 12 sc, dec. (14)
Row 4: ch 1, turn, sc across. (14)
Row 5: ch 1, turn, dec, 10 sc, dec. (12)
Rows 6–7: ch 1, turn, sc across. (12)
Fasten off.
Target bib height: approximately 5–6 cm.
Shoulder Straps — Make 2
Yarn: mustard yellow.
Join at one upper bib corner.
Ch 24.
Starting in the second chain, sl st through all 23 chains.
Fasten off with a 25 cm tail.
Repeat on the opposite bib corner.
Crossing the straps is optional, but the reference uses nearly vertical straps.
Crochet Button Substitute — Make 2
Yarn: warm tan or mustard.
R1: 6 sc in MR (6)
R2: inc ×6 (12)
Fasten off with a 15 cm tail.
Flatten firmly.
These discs can replace the wooden buttons for a fully yarn-based toy.
Fit the Overalls
Slide the garment onto the body from the lower end before the legs are permanently attached.
Center the bib on the front.
The waistband should sit around the widest lower-body rounds without creating a visible indentation.
Bring each strap over the shoulder area.
Pin the straps approximately 4–5 cm apart at the back or tack them directly beside the bib if you want the front-button appearance shown in the photograph.
Attach one button at each upper bib corner.
Face Placement
Place the eyes between R12 and R13 with approximately 9–10 stitches between their posts.
Pin both ears before locking the eye backs because the large discs change the apparent width of the face.
Center the trunk directly beneath the midpoint between both eyes.
Embroider one curved black eyebrow above each eye.
Add the peach cheek marks below and slightly outside the eye line.
Attach the Oversized Ears
Pin the top of each ear around R7–R8 of the head.
Start the inner edge only a few stitches behind the eye line.
Sew through approximately 35–40 percent of each circumference.
Leave the outer section free.
The ears should project beyond the head by several centimeters when viewed from the front.
Build the Standing Base
Pin both legs beneath the body before sewing either one permanently.
Leave approximately 2–3 cm between their inner edges.
The feet should face forward and sit parallel rather than turning outward sharply.
Place the elephant upright on a level table.
Shift the legs until the head sits directly above the midpoint between both feet.
Sew each leg through a broad attachment zone approximately 3–4 cm wide.
Attach the Arms Around the Overalls
Fit the overalls first.
Pin the arms just outside the mustard shoulder straps.
The upper arm attachment should sit below the ear line and above the bib midpoint.
Sew through several shoulder stitches rather than one narrow point.
Let the hands angle slightly toward the body.
Assembly
- Complete and stuff the 42-stitch head, then position the 14–16 mm eyes between R12 and R13 approximately 9–10 stitches apart.
- Attach the long trunk beneath the eyes and use one concealed shaping stitch if a slight 10–15 degree forward curve is needed.
- Sew both 36-stitch ears through only the inner 35–40 percent of their circumference and add the eyebrows and cheek marks.
- Stuff the 36-stitch body, then slide the completed mustard shorts onto it before the legs and arms are attached.
- Pin both standing legs beneath the torso with approximately 2–3 cm between them and test the figure upright on a hard level surface.
- Sew the legs through broad 3–4 cm attachment zones and keep both cream-toed feet parallel.
- Center the overalls bib, position the two straps and attach the buttons or crochet substitutes at the upper corners.
- Pin and sew both arms outside the shoulder straps, keeping the cream hand details visible from the front.
- Attach the blue tail to the rear above the shorts waistband and trim its tassel to approximately 15–20 mm.
- Stand the elephant on a level surface, correct any head or leg lean and weave all remaining yarn tails through at least 4 cm of matching stitches.
The finished elephant should stand independently with both feet flat, the bib centered beneath the trunk and the oversized ears extending evenly beyond the head.
7 Technical Tips
- Elephant tips sideways: A 42-stitch head magnifies small leg-placement errors. Keep the inner feet approximately 2–3 cm apart and center the head directly over the midpoint between them before sewing.
- Trunk sticks straight outward: Too much stuffing in the narrow rounds creates a rigid lever. Keep the final 4–5 cm lightly filled and add one underside shaping stitch for only about 10–15 degrees of curve.
- Ears disappear behind the head: Sewing more than about 40 percent of each 36-stitch perimeter pulls the discs backward. Leave the majority of the outer edge unattached.
- Overalls squeeze the body: A 36-stitch waistband that is worked too tightly compresses the stuffing and distorts the torso. The garment should slide around the widest body round without creating an indentation deeper than approximately 3–4 mm.
- Shoulder straps pull the arms inward: Tight straps change the shoulder angle after the arms are sewn. Leave approximately 5–10 mm of ease and pin both arms only after the straps are in their final position.
- Feet rock instead of lying flat: Uneven stuffing creates a rounded sole. Pack the lowest four rounds firmly, then press each 24-stitch foot against the table before final leg attachment.
- Buttons rotate or loosen: A single attachment pass can pivot under handling. Stitch through each button opening at least twice in crossed directions, or use the 12-stitch crochet discs for an all-yarn alternative.
Adjusting the Elephant Size
This blue elephant amigurumi crochet pattern is written for a medium-large standing toy. For a smaller elephant, use DK yarn with a 2.75–3 mm hook and stop the head at 36 stitches. Reduce the body to 30 stitches and the legs to an 18-stitch maximum.
For a larger version, continue the head to 48 stitches with (6 sc, inc) ×6. Increase the body to 42 stitches using (5 sc, inc) ×6 and enlarge the legs to a 30-stitch maximum.
Resize the clothes after the body is complete. Garment measurements matter more than repeating the exact stitch count with a different yarn.
Adjusting the Overalls Fit
The shorts are designed around a 36-stitch torso. If the waistband is loose, reduce the foundation by two stitches and divide the remaining count evenly between both legs.
For a larger body, add stitches in pairs so each shorts leg receives the same number.
The bib should cover roughly 40–45 percent of the body width from the front.
A bib wider than half the torso can hide the arms and make the elephant look like it is wearing a full apron rather than short overalls.
Shorten or lengthen the straps by changing the foundation chain before attachment.
Choosing the Blue and Mustard Colors
The reference uses a pale cool blue against a strong warm mustard. That contrast makes the clothing easy to read without adding several garment colors.
Powder blue, denim blue-gray or soft slate can all work for the elephant.
For the clothes, ochre, marigold and antique gold produce a similar effect.
Keep the cream toe details light. They provide small repeated accents at the hands and feet without competing with the overalls.
A darker elephant can use camel overalls, while a cream elephant can use teal or rust for the same two-color structure.
Controlling the Standing Pose
A standing amigurumi requires stricter alignment than a seated toy because the lower body has fewer contact points with the table.
Stuff both legs to the same weight and height.
Measure from the lowest foot round to the upper attachment opening before sewing.
The difference should remain below approximately 5 mm.
Pin both legs simultaneously and set the toy upright.
Only after it stands without hand support should either leg be stitched permanently.
If the finished elephant leans, correct the leg angle before adding more stuffing to one foot.
Finishing the Overalls
Steam or wet blocking is unnecessary on the stuffed toy, but the bib and straps can be finger-shaped before attachment.
Pull the bib corners gently outward until the upper edge sits level.
Keep both straps the same visible length from bib to shoulder.
The buttons should sit at roughly equal heights.
If using wooden buttons, bury their yarn tails inside the body rather than leaving knots beneath the bib.
Check the crotch seam last. It should remain centered between the legs and should not pull either shorts opening higher than the other.
Finishing the Face
The face depends on the spacing between the ears, eyes and trunk more than on additional embroidery.
Keep the trunk base centered beneath both eyes.
Place the peach cheek marks low enough that they do not touch the eye washers.
Curve each eyebrow slightly upward toward the outside.
Check the elephant from straight ahead before burying the facial yarn tails.
A few millimeters of trunk offset become noticeable once the centered bib and two parallel straps are directly below it.
Conclusion
Fit the overalls before attaching the arms because the straps determine the final shoulder positions. Your next step is to complete the 42-stitch head, 36-stitch body and both standing legs, then test the figure upright before making the clothing permanent. Pin the bib, straps and arms together so the front remains centered beneath the trunk. Share the finished blue elephant amigurumi crochet pattern project on Pinterest with a straight-on standing photograph, then post a close view of the mustard overalls on Instagram using #MustardOverallsCrochetElephant. For this elephant specifically, would you keep the natural wooden buttons or replace them with cream crochet discs?









