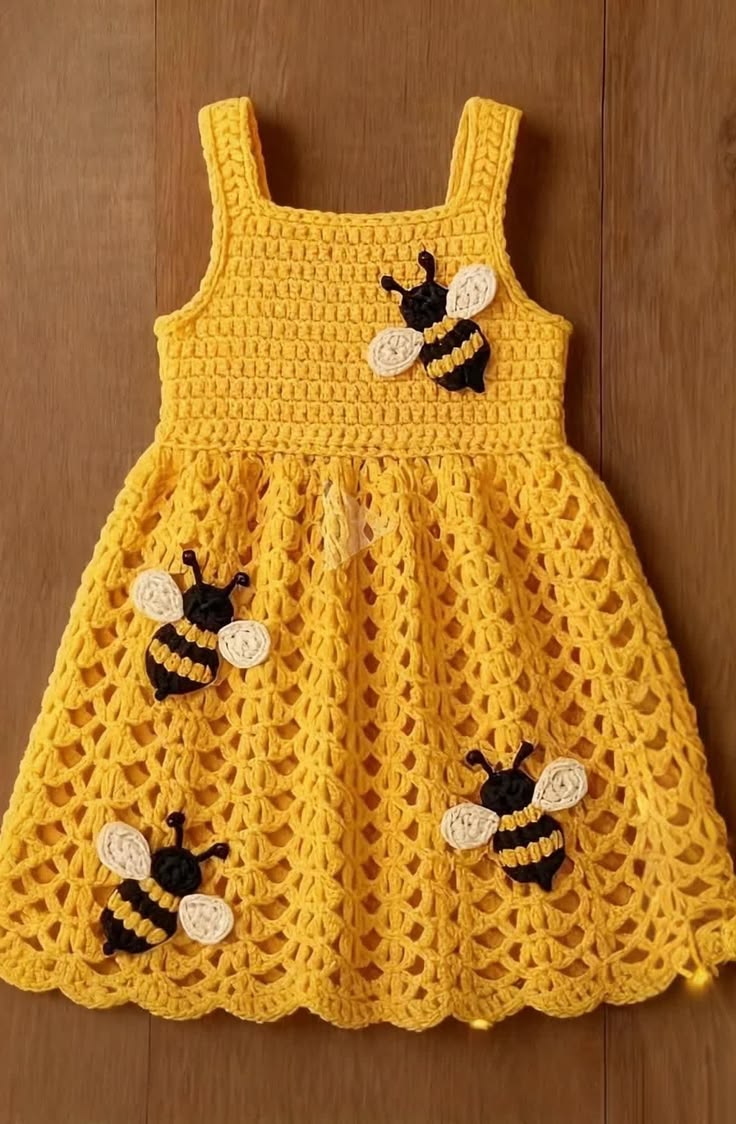
A bee dress has one visual requirement that cannot be hidden by the lace: the black-and-yellow insects must remain readable against the yellow fabric. This crochet bee dress pattern combines a firm sleeveless bodice, wide shoulder straps, an openwork flared skirt and four dimensional bee appliqués. Cotton or cotton-blend yarn gives the dress defined stitches while keeping the lace skirt light enough for warm-weather wear.
The Design: What Makes This Crochet Bee Dress Different
The dress uses two contrasting crochet structures. Dense stitches form the bodice so the upper section keeps its shape, while repeating openwork motifs create expansion through the skirt without requiring bulky increases in every row. A scalloped lower edge finishes the flare.
Four bee appliqués connect the two sections visually. Each bee combines a black body, narrow yellow bands, cream wings and short antennae. Published bee appliqué patterns commonly use separate or layered wings, color changes and small amounts of yarn; finished examples range from approximately 5.5–8 cm depending on yarn and hook size.
The main construction error is beginning the skirt with too little circumference. A yellow crochet sundress needs enough ease at the waist or the openwork section will pull vertically instead of hanging in a full A-line shape.
Project Info at a Glance
| Skill Level | Construction | Hook | Yarn | Best For |
|---|---|---|---|---|
| Intermediate | Dense bodice with openwork skirt | 3.5–4 mm | DK/light-worsted cotton | Spring and summer children’s wear |
The photograph contains no reliable physical scale. Measure the intended wearer before beginning and use the sizing formula below rather than treating a photograph-derived measurement as a garment size. Vintage pineapple-style children’s crochet dresses were commonly sized by changing gauge and construction measurements rather than relying on one universal stitch count.
Materials and Tools
Yarn
- Golden yellow — DK or light-worsted cotton — approximately 250–400 g, depending on size and skirt length.
- Black — DK cotton — approximately 15–25 g for four bee appliqués.
- Golden yellow — small additional amount for bee stripes.
- Cream or ivory — DK cotton — approximately 15–20 g for bee wings.
The exact dress yardage depends on chest measurement, length, gauge and the number of openwork repeats. Buy additional yellow yarn from the same dye lot when making a longer skirt.
Tools
- 3.5–4 mm crochet hook for the dress
- 3–3.5 mm crochet hook for the bee appliqués
- Stitch markers
- Tapestry needle
- Scissors
- Tape measure
- Blocking mat
- Optional small button if a back opening is required
Abbreviations
- MR — magic ring
- ch — chain
- sc — single crochet
- hdc — half double crochet
- dc — double crochet
- tr — treble crochet
- sl st — slip stitch
- inc — increase
- dec — decrease
- st/sts — stitch/stitches
- sp — space
- sk — skip
- rep — repeat
- BLO — back loop only
Invisible decreases are useful for the bee bodies when a compact tapered end is needed, but the dress itself uses conventional garment shaping.
How to Size the Crochet Bee Dress
Measure the child’s chest circumference first. Add approximately 4–6 cm of positive ease for a comfortable sleeveless dress, then make a gauge swatch with the selected yarn.
For example, if the required finished chest is 60 cm and your blocked gauge is 18 stitches per 10 cm:
60 ÷ 10 × 18 = 108 stitches.
Adjust the result to suit the stitch multiple used for the bodice.
Also measure from the underarm to the waist and from the waist to the required hem. Children’s garment sizing varies considerably, so actual body measurements are more dependable than age labels.
Yellow Crochet Bee Dress Pattern — Step by Step
This is a photo-inspired construction rather than a transcription of a commercial pattern. The bodice is worked in firm rows, the skirt is attached at the waist and worked downward in repeating openwork sections, and the bees are made separately before sewing.
Front Bodice
Yarn: golden yellow.
Using your gauge calculation, chain enough stitches to equal approximately half of the required finished chest circumference.
For the sample construction:
Foundation: Ch 56.
Row 1: Dc in fourth ch from hook and in each ch across (53).
Row 2: Ch 2, turn, dc across (53).
Rows 3–12: Repeat Row 2 (53).
Measure the width after several rows. Adjust now if it does not equal approximately half of the required finished chest measurement.
Front Armhole Shaping
Row 13: Sl st across first 3 sts, ch 2, dc across, leaving final 3 sts unworked.
Row 14: Ch 2, turn, dc2tog, dc across to final 2 sts, dc2tog.
Row 15: Ch 2, turn, dc across.
Row 16: Repeat Row 14.
Continue working even until the bodice reaches the required depth from waist to neckline.
Front Neckline
Divide the remaining stitches into three sections: left strap, neckline and right strap.
Work the first strap section in dc.
Leave the center stitches unworked.
Attach yarn to the opposite side and work the second strap to the same height.
The neckline in the photograph is broad and approximately square with softly rounded corners. Do not make the center opening excessively narrow.
Back Bodice
Work the back to the same width and underarm height as the front.
For a pullover version, make the back neckline deep enough for the child’s head to pass through comfortably.
For a closer neckline, divide the upper back and add a short button opening.
Match both shoulder straps exactly to the front strap width.
Shoulder Straps
The reference dress uses broad straps rather than narrow ties.
Each strap should measure approximately 3–4 cm wide after blocking.
Join the front and back straps with slip stitches or a sewn mattress seam.
Work one finishing round of sc around each armhole.
At the underarm, use sc2tog if the edging begins to flare.
Neckline Edging
Join yellow yarn at one shoulder.
Round 1: Sc evenly around the complete neckline.
Round 2: Sl st or reverse sc around for a compact finished edge.
Keep the edging relaxed. A tight neckline round can reduce the opening enough to make dressing difficult.
Waistband
Join the front and back bodice side seams before beginning the skirt.
Attach yellow yarn at one side seam.
Round 1: Ch 1, sc evenly around the waist. Join.
Round 2: Ch 2, dc around. Join.
Round 3: Ch 1, sc around. Join.
The final stitch count should be divisible by the repeat used for the skirt.
Skirt Setup Round
The skirt needs substantially more circumference than the bodice.
Round 1: Ch 3, *dc in next 2 sts, 2 dc in next st*. Repeat around, adjusting the final repeat if necessary.
This distributes increases around the waist instead of placing all fullness at a few points.
Round 2: Dc in every st around.
Openwork Lace Skirt
The photographed skirt resembles repeating fan or pineapple-inspired columns rather than a dense fabric.
Round 1: Ch 3, *dc in next st, ch 2, sk 2 sts, 2 dc in next st, ch 2, sk 2 sts*. Repeat around. Join.
Round 2: Ch 3, dc in same sp, *ch 2, 3 dc in next ch-2 sp, ch 2, 3 dc in next ch-2 sp*. Repeat around.
Round 3: Sl st to first ch-2 sp, ch 3, 2 dc in same sp, *ch 3, 3 dc in next ch-2 sp*. Repeat around.
Round 4: Sl st to next sp, ch 3, 3 dc in same sp, *ch 3, 4 dc in next sp*. Repeat around.
Round 5: Ch 3, dc across each cluster, working ch 3 between clusters.
Round 6: Work 2 dc into selected clusters at evenly spaced intervals to increase the skirt circumference gradually.
Repeat the openwork sequence while maintaining the established vertical columns.
Add an increase round approximately every 5–7 cm if additional flare is required.
Continue until the skirt reaches the measured length.
Scalloped Hem
The reference dress finishes with rounded scallops.
Round 1: Sc evenly around the final skirt round.
Round 2: *Sk 2 sts, 7 dc in next st, sk 2 sts, sl st in next st.* Repeat around.
If the stitch count does not divide evenly, distribute the adjustment across several scallops rather than making one unusually large section.
Fasten off and weave in the yellow yarn tail.
Crochet Bee Appliqué Pattern
The image contains four bees: one on the upper bodice and three distributed across the lace skirt. Published crochet bee appliqués commonly use black, yellow and white yarn and can range from approximately 5.5 cm to 8 cm depending on yarn weight and hook size. A smaller appliqué is preferable for a child’s garment because it adds less weight.
Bee Body — Make 4
Yarn: black and yellow.
Begin with black.
R1: 6 sc in MR (6).
R2: Inc ×6 (12).
R3: (Sc, inc) ×6 (18).
R4: Sc around in black (18).
Change to yellow.
R5: Sc around (18).
R6: Sc around (18).
Change to black.
R7: Sc around (18).
Change to yellow.
R8: Sc around (18).
Change to black.
R9: Sc around (18).
R10: (Sc, dec) ×6 (12).
R11: Dec ×6 (6).
Fasten off, leaving a 20 cm sewing tail.
Flatten the body instead of stuffing it. The appliqué should remain thin against the dress.
Bee Head — Make 4
Yarn: black.
R1: 6 sc in MR (6).
R2: Inc ×6 (12).
R3: Sc around (12).
Fasten off with a long sewing tail.
Flatten the circle and sew it to the upper edge of the striped body.
Bee Wings — Make 8
Yarn: cream or ivory.
Ch 7.
Starting in second ch from hook:
Sc, hdc, dc, 2 dc, hdc.
Work 4 dc into the final chain.
Continue along the opposite side:
Hdc, 2 dc, dc, hdc, sc.
Join with sl st.
Fasten off, leaving a 15 cm tail.
The finished wing should form a narrow oval or teardrop.
Bee Antennae — Make 8
Yarn: black.
Join yarn at the top of the bee head.
Ch 5.
Work 2 sc into the second ch from the hook, then sl st down the remaining chains.
Attach to the head.
Repeat for the second antenna.
For children’s clothing, crochet or embroider the antennae rather than adding wire.
Assembling Each Bee
Position one cream wing behind each side of the upper body.
Sew through the inner half of each wing so the outer edge remains slightly raised.
Attach the head over the upper edge of the body.
Secure the antennae.
Do not add safety eyes, beads or other small detachable parts when the garment is intended for a young child. Embroidered facial details are the safer option if a face is wanted.
Positioning the Four Bees
- Finish and block the complete yellow dress before positioning any appliqués.
- Lay the garment flat with the center front marked.
- Place the first bee on the upper-right portion of the bodice without covering the neckline edging.
- Angle that bee slightly upward to match the flying position in the reference image.
- Place the second bee on the upper-left portion of the lace skirt.
- Position the third bee lower on the left side, leaving several lace motifs between the two insects.
- Place the fourth bee on the lower-right section of the skirt to balance the composition.
- Pin every bee through the head, body and inner wing edges before sewing.
- Sew the appliqués only through structural stitches rather than pulling large lace chain spaces together.
- Inspect the inside of the garment and weave every attachment tail securely before wear.
The finished dress should have a firm upper body, an evenly flared lace skirt and four flat bee appliqués distributed asymmetrically across the front.
7 Technical Tips for a Better Crochet Bee Dress
- Prevent a tight bodice. Add approximately 4–6 cm of positive ease to the measured chest before calculating the starting width. Lace in the skirt does not compensate for insufficient room across the upper body.
- Stop the armholes from stretching. Work one firm round of sc around each opening after joining the shoulder seams. If an armhole flares by more than approximately 1 cm, distribute two or three decreases around its lower half.
- Control an uneven skirt. Place a stitch marker at the beginning of every round. A missed lace repeat can shift the vertical columns and become increasingly visible toward the hem.
- Prevent a wavy waistband. Distribute skirt increases evenly around the complete waist rather than concentrating them at the side seams. Large increase groups create visible bulges beneath the bodice.
- Keep bee appliqués flat. Do not stuff the bodies. A garment appliqué should remain thin enough that its weight does not pull an open lace motif downward.
- Avoid distorted lace when sewing bees. Catch several solid stitches behind each appliqué instead of sewing tightly around a single chain space. Pulling one open space closed creates a visible dent in the skirt.
- Check skirt length after blocking. Cotton lace can change length once wet and dried. Block the dress before attaching the lowest bee so its final position remains balanced above the hem.
Adjusting the Dress for Different Sizes
Use measurements rather than simply adding a fixed number of stitches for each age. Begin with the chest circumference, add wearing ease, and convert that measurement into stitches using a blocked gauge swatch.
The skirt can be lengthened without changing the bodice. Repeat established lace rounds until the required waist-to-hem measurement is reached, then work the scalloped border.
For additional fullness, add increases between lace motifs every few rounds. Avoid doubling the entire stitch count at the waist because excessive immediate fullness can make the skirt bulky beneath the solid bodice.
Strap length should also be measured independently. A difference of only 1–2 cm at the shoulders can move the waistline noticeably on a child’s dress.
Choosing Yarn for a Summer Crochet Dress
Cotton and cotton-rich blends suit the photographed construction because the bodice needs clear stitch definition and the skirt contains substantial openwork. The yarn should be smooth enough that the lace motifs remain visible.
DK or light-worsted yarn gives the bee appliqués enough definition without making them excessively heavy. Current published bee appliqué designs use weights ranging from crochet thread through DK and worsted, with hooks from approximately 1.8 mm to 5 mm depending on the required finished size.
Make one bee before completing all four. If it looks oversized against the bodice, reduce the hook and yarn weight rather than removing structural rounds randomly.
Finishing the Yellow Crochet Dress
Weave all yellow yarn tails into dense bodice stitches or solid sections of the lace pattern. Avoid carrying tails across large open spaces where they remain visible from the front.
Wash or damp-block according to the yarn label. Shape the skirt into an even circle and arrange every scallop separately along the hem.
Allow the garment to dry before attaching the bees. Once dry, try the dress on the intended wearer or compare it with the final body measurements. Check the armholes, neckline and total length before permanently sewing the appliqués.
After the bees are attached, inspect the inside surface. No long sewing strands, loose knots or detachable embellishments should remain accessible.
Conclusion
Measure the bodice before investing time in the lace skirt because chest fit, armhole depth and strap length determine whether the finished garment will sit correctly. Once those dimensions are established, build the skirt downward and add increases gradually to preserve the open A-line shape. Make one bee appliqué as a scale test before crocheting the remaining three, then attach all four only after the dress has been blocked. Save this crochet bee dress pattern to Pinterest or share the finished garment on Instagram with #YellowBeeCrochetDress. For this specific design, would you keep all four bees the same size or make the skirt bees slightly larger than the bee on the bodice? “`0









