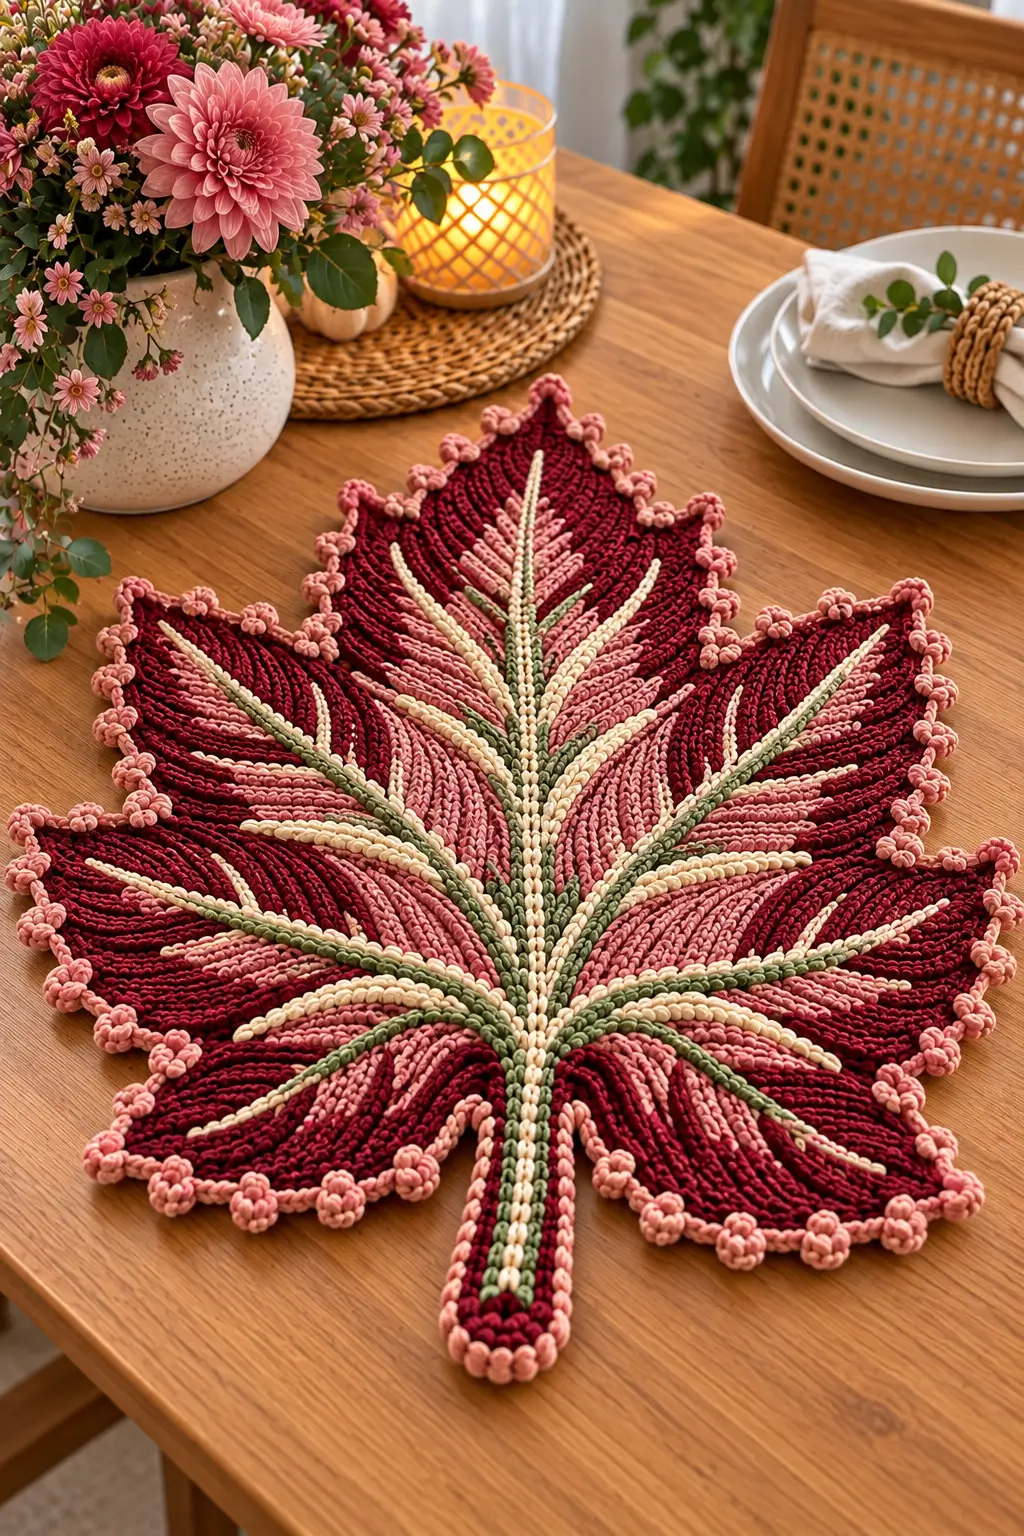
A burgundy maple leaf needs sharply separated lobes to keep its silhouette visible beneath an elaborate network of pink, cream and green veins. This crochet maple leaf placemat pattern combines a deep wine-red body with dusty-pink texture, raised botanical veins and a knotted blush border. Worked in cotton with a 4–5 mm hook, the photo-inspired design targets a finished width of approximately 35–38 cm.
The Design: What Makes This Burgundy Maple Leaf Different
The strongest feature is the contrast between the dark burgundy background and the branching surface decoration. Instead of relying on holes to represent veins, cream and muted-green lines sit above the fabric and divide the leaf into distinct sections. Dusty-pink ridges fill the spaces between them.
The lobe hierarchy matters just as much. A tall central point establishes the axis, two broad upper lobes create most of the width, and the lower lobes turn toward the stem. Smaller perimeter points break up the outer edge.
Blush knots finish the border without creating a wide decorative band. They must be spaced carefully. Adding a knot and extra stitches at every edge position can produce a ruffled burgundy crochet maple leaf that will not lie flat after blocking.
Project Info at a Glance
| Skill Level | Time | Finished Size | Hook | Best For |
|---|---|---|---|---|
| Intermediate | Approx. 7–10 hours | Approx. 35–38 cm wide | 4–5 mm | Placemats, fall tables and decorative centerpieces |
The physical dimensions cannot be measured from the photograph. The 35–38 cm target is suitable for a full-size decorative placemat; yarn weight, hook size, stitch tension and blocking will change the final measurement.
Materials and Tools
Yarn
- Deep burgundy — worsted-weight cotton — approximately 100–120 g.
- Dusty pink — worsted-weight cotton — approximately 30–40 g.
- Blush pink — worsted-weight cotton — approximately 20–25 g.
- Cream — worsted-weight cotton — approximately 15–20 g.
- Muted sage green — worsted-weight cotton — approximately 15–20 g.
Use a smooth cotton with clear stitch definition. The raised veins and closely spaced surface ridges depend on visible stitch structure, while a low-stretch fiber helps the pointed lobes hold their blocked shape.
Tools
- 4–5 mm crochet hook
- 3.5–4 mm crochet hook for surface details
- Stitch markers
- Tapestry needle
- Scissors
- Tape measure
- Blocking mat
- Rust-resistant blocking pins
Abbreviations
- ch — chain
- sc — single crochet
- hdc — half double crochet
- dc — double crochet
- tr — treble crochet
- sl st — slip stitch
- inc — increase
- dec — decrease
- sc2tog — single crochet two stitches together
- st/sts — stitch/stitches
- sp — space
- BLO — back loop only
Use compact decreases at the inner valleys so those sections pull inward instead of developing rounded transitions between neighboring lobes.
Burgundy Crochet Maple Leaf Placemat Pattern — Step by Step
This is a photo-inspired construction rather than a transcription of an existing commercial pattern. Build the burgundy leaf first, then add the dusty-pink ribbing, cream and sage vein system, stem and knotted blush perimeter.
Central Foundation
Yarn: deep burgundy.
Ch 17.
Row 1: Sc in second ch from hook and across (16).
Row 2: Ch 1, turn, sc across (16).
Row 3: Ch 1, turn, 2 sc in first st, sc across to final st, 2 sc in final st (18).
Row 4: Ch 1, turn, sc across (18).
Row 5: Ch 1, turn, 2 sc in first st, sc across to final st, 2 sc in final st (20).
Row 6: Ch 1, turn, sc across (20).
Mark the exact midpoint. The central lobe, principal cream vein and stem must remain aligned with this marker.
Central Upper Lobe
Yarn: deep burgundy.
Join yarn across the center section.
Row 1: Ch 1, sc across the selected center stitches.
Row 2: Ch 1, turn, 2 sc in first st, sc across to final st, 2 sc in final st.
Row 3: Sc across.
Row 4: Repeat Row 2.
Rows 5–9: Sc across.
Begin tapering toward the primary upper point.
Row 10: Ch 1, turn, sc2tog, sc across to final 2 sts, sc2tog.
Row 11: Sc across.
Rows 12–19: Repeat Rows 10–11 four times.
Continue decreasing at both edges every other row until 3 stitches remain.
Final Row: Sc3tog.
Fasten off.
This lobe must extend farther from the center than the surrounding sections.
Upper Left Lobe
Yarn: deep burgundy.
Join yarn at the upper-left side of the foundation.
Row 1: Sc across the selected section.
Row 2: Ch 1, turn, 2 sc in first st, sc across to final st, 2 sc in final st.
Row 3: Sc across.
Row 4: Repeat Row 2.
Rows 5–8: Sc across.
Row 9: Ch 1, turn, sc2tog, sc across to final 2 sts, sc2tog.
Row 10: Sc across.
Repeat Rows 9–10 until 3 stitches remain.
Final Row: Sc3tog.
Fasten off.
Upper Right Lobe
Repeat the upper-left lobe instructions on the opposite side.
Use exactly the same number of rows. Do not judge symmetry by stretching the fabric because surface decoration will later change the visual proportions.
Middle Left Lobe
Yarn: deep burgundy.
Join below the upper-left section.
Row 1: Sc across the selected section.
Row 2: Ch 1, turn, 2 sc in first st, sc across to final st, 2 sc in final st.
Row 3: Sc across.
Row 4: Repeat Row 2.
Rows 5–7: Sc across.
Row 8: Ch 1, turn, sc2tog, sc across to final 2 sts, sc2tog.
Row 9: Sc across.
Repeat Rows 8–9 until 3 stitches remain.
Final Row: Sc3tog.
Fasten off.
Middle Right Lobe
Repeat the middle-left instructions as a mirror image.
Before fastening off, place the leaf flat and compare both points from the central marker.
Lower Left Lobe
Yarn: deep burgundy.
Join at the lower-left portion of the foundation.
Row 1: Sc across.
Row 2: Ch 1, turn, 2 sc in first st, sc across to final st, 2 sc in final st.
Row 3: Sc across.
Row 4: Repeat Row 2.
Rows 5–6: Sc across.
Row 7: Ch 1, turn, sc2tog, sc across to final 2 sts, sc2tog.
Row 8: Sc across.
Repeat Rows 7–8 until 3 stitches remain.
Final Row: Sc3tog.
Fasten off.
Lower Right Lobe
Repeat the lower-left lobe on the opposite side.
Angle both lower sections slightly toward the stem. They should not extend as far horizontally as the middle lobes.
Smaller Perimeter Points
The photographed leaf has multiple secondary points between its principal lobes. Add them before working the final blush border.
Join burgundy yarn along an outer edge.
Work sc until reaching a marked point position.
In that position work:
(Hdc, dc, tr, ch 2, sl st in second ch from hook, tr, dc, hdc) in the same edge space.
Continue in sc toward the next marked point.
Repeat as needed around the leaf.
Keep these secondary points shorter than the main lobe tips.
Dusty-Pink Raised Texture
Yarn: dusty pink.
The photographed design uses rows of pink surface texture radiating from the central vein.
Join dusty-pink yarn close to the center.
Work surface slip stitches outward toward the perimeter of one lobe.
Stop approximately 5–8 mm before the outer edge.
Fasten off.
Move approximately 6–8 mm sideways and make another line.
Repeat across selected portions of each lobe.
Alternate dusty-pink ridges with exposed burgundy fabric rather than covering the complete surface.
Burgundy Raised Ridges
Yarn: deep burgundy.
Add surface slip-stitch lines between selected pink ridges to strengthen the directional texture.
Every line should radiate from the center toward an outer point.
Avoid horizontal ridges. They interrupt the vein structure and make the fabric look striped instead of botanical.
Main Cream Vein
Yarn: cream.
Join the cream yarn at the bottom center.
Work surface slip stitches along the exact center of the leaf toward the top lobe.
Stop approximately 1 cm before the highest point.
Keep the stitches relaxed enough for the leaf to remain flat.
Fasten off.
Sage Central Vein Accent
Yarn: muted sage green.
Work a narrow line of surface slip stitches immediately beside the lower portion of the cream central vein.
Continue through the center junction and approximately halfway toward the upper point.
Fasten off.
The green accent should remain subordinate to the cream line.
Upper Cream Side Veins — Make 2
Join cream yarn near the center junction.
Surface crochet diagonally toward the upper-left lobe.
Stop approximately 1–2 cm before the point.
Repeat toward the upper-right lobe.
Fasten off.
Middle Sage Veins — Make 2
Yarn: muted sage green.
Start close to the central vein junction.
Work one surface-crochet line toward each middle lobe.
Follow the natural center line of the lobe and stop before reaching the border.
Fasten off.
Lower Cream Veins — Make 2
Join cream yarn near the base of the central vein.
Work diagonally toward the lower-left lobe.
Repeat toward the lower-right lobe.
These lines should curve slightly downward as they approach the perimeter.
Secondary Branch Veins
Yarn: cream, sage green and blush pink.
Add shorter branches from the major veins into open sections of burgundy fabric.
Each branch should measure approximately 3–7 cm.
Begin at a major vein and angle the branch toward the closest perimeter point.
Do not connect every branch directly to the border. Leave approximately 1 cm of burgundy fabric between the branch tip and edge.
Maple Leaf Stem
Yarn: deep burgundy.
Join yarn at the bottom center.
Ch 29.
Starting in the second chain from the hook, sc in every chain back toward the leaf.
Work along the opposite side of the foundation chain.
At the bottom tip work 3 sc around the end.
Join securely to the leaf.
Fasten off.
Stem Vein Stripes
Join cream yarn at the lower tip of the stem.
Work surface slip stitches up the center until the line joins the cream central leaf vein.
Fasten off.
Join sage green beside the cream line and work a second stripe upward.
The stem should visually continue the vein system rather than appearing as a separate attachment.
Blush Pink Edge Round
Yarn: blush pink.
Join at the bottom of the stem.
Work sc evenly around the entire stem and leaf.
At a large outer point work:
(Sc, ch 2, sc) in the same point stitch.
Inside a deep valley, work sc2tog if the border begins to flare.
Continue around all lobes.
Join with sl st.
Knotted Blush Border
The rounded border details are one of the most visible features in the reference image.
Work approximately 2–3 sc between knots.
For each knot:
Ch 3, work 3 hdc in the third ch from hook, ch 1, sl st into the same base stitch.
At a major outer point use:
Ch 4, work 4 hdc in the third ch from hook, sl st into the point.
Continue around the complete perimeter and stem.
Reduce the number of knots inside narrow valleys. Crowding decorative stitches into an indentation will force the border outward.
Fasten off and weave the tail through several blush stitches.
Creating the Botanical Vein Layout
Place the central cream vein first. It acts as the reference line for every other surface detail. Next, add the sage-green veins toward the broad side lobes, followed by cream branches and shorter blush accents.
Keep all branches directional. Lines should travel from the center toward the perimeter instead of crossing one another randomly.
The cream lines need the most open burgundy background because they create the strongest contrast. Sage can sit closer to dusty-pink ridges without disappearing visually.
Do not make the two halves perfectly identical. Natural leaf venation has small differences, and slight variation in the secondary branches keeps the finished surface from looking mechanically striped. The principal paired veins, however, should remain similar in length and angle.
Controlling the Raised Surface Texture
Surface crochet adds yarn without adding width to the underlying fabric. That difference creates tension. If each raised line is worked tightly, several lines together will pull a lobe inward.
Lay the placemat flat after every three or four ridges. No part of the perimeter should lift more than approximately 5 mm from the table at this stage.
Use the smaller hook only when your surface stitches remain relaxed. If the smaller hook creates tight chains, return to the same hook size used for the body.
Stop every decorative line before the border. Running dense surface crochet directly into the perimeter can create stiff spots that resist blocking.
Blocking the Burgundy Maple Leaf
- Dampen the finished cotton leaf according to the yarn care instructions.
- Lay it face up and align the cream central vein vertically.
- Pin the highest burgundy point directly above the stem.
- Position the two upper side lobes at matching angles.
- Pull the middle lobes outward until the target width is reached.
- Angle the lower lobes slightly downward toward the stem.
- Pin every inner valley separately to maintain clear divisions between lobes.
- Shape each secondary point and blush border knot with individual pins where necessary.
- Straighten the stem and align its cream stripe with the main vein.
- Allow the placemat to dry completely before removing the pins.
The finished piece should lie flat without waves around the blush border or puckering beside the raised veins.
7 Technical Tips for a Better Burgundy Maple Leaf
- Prevent the center from shifting. Place a marker at the exact midpoint before shaping the first lobe. A central vein that begins even two stitches off-center becomes increasingly crooked as it approaches the upper point.
- Stop surface-crochet puckering. Check the leaf after every three or four raised lines. If an edge rises more than approximately 5 mm, loosen or replace the newest surface stitches.
- Control border ruffling. Do not add an increase beside every blush knot. Add stitches at convex points and remove stitches with sc2tog inside deep valleys.
- Match paired lobes by row count. Record every row used on the left side and duplicate it on the right. Stretching the fabric to compare lengths can hide a construction error.
- Keep the center junction thin. Weave cream, green and pink tails in different directions. Stacking all the yarn ends beneath one center point creates a visible lump.
- Protect the sharp outer points. Pin every primary point and neighboring valley during blocking. Pulling only on the tips makes the outer edge wider without deepening the indentations.
- Control knot spacing. Keep approximately 2–3 plain border stitches between most decorative knots. Packing them closer together adds excess circumference and encourages rippling.
Choosing the Burgundy, Pink and Green Color Balance
Burgundy should cover most of the surface. It provides the dark field required for cream veins to remain visible and keeps the dusty-pink texture from dominating the leaf.
Use dusty pink for secondary ridges and blush for the perimeter. Keeping those two pinks slightly different gives the edge enough contrast to remain identifiable without disconnecting it from the interior decoration.
Sage green works best as a narrow botanical accent. Large green sections would compete with the burgundy body, while thin green veins introduce a recognizable leaf color without changing the overall palette.
Cream is the highest-contrast yarn. Concentrate it along the central axis and selected major branches rather than filling every vein with cream.
How to Adjust the Finished Size
For a full dining placemat, target approximately 35–38 cm across after blocking. This provides enough width for the outer lobes to remain visible around a standard plate.
For a smaller centerpiece mat, use DK cotton with a 3.5–4 mm hook and shorten every lobe proportionally. The border knots should also be reduced so they do not overpower the smaller silhouette.
For a larger table centerpiece, add rows to all seven lobe sections rather than only lengthening the central point. Increase the stem length and vein branches proportionally.
Complete one leaf before beginning a matching set. Record the final blocked width, central-lobe length, stem length, hook size and row counts for each paired lobe.
Using the Burgundy Maple Leaf as Table Decor
The burgundy palette works particularly well for late-summer, fall and floral table settings. Place a dinner plate over the central vein junction while leaving the upper and side lobes exposed.
For centerpiece use, position a vase over the lower-middle section rather than directly over the pointed upper lobe. That placement leaves more of the cream branching veins visible.
A coordinated set can reverse the color balance while retaining the same construction. One placemat might use burgundy with blush veins, another dusty pink with burgundy veins, and a third cream with sage details.
If the pieces will be used around warm tableware, cotton is preferable to heat-sensitive synthetic fibers. A decorative placemat should not be treated as a heat-rated trivet for cookware directly from an oven or stovetop.
Finishing the Placemat
Inspect the reverse before the final blocking. Weave burgundy tails into the body, pink tails into nearby surface ridges and cream tails along the central vein where possible.
Each structural tail should travel at least 4–5 cm through dense stitches before reversing direction. Avoid carrying cream yarn across an exposed burgundy section on the back because the pale strand can become visible between stitches.
Check every blush border knot for matching size. Replace any knot that is substantially larger than its neighbors before blocking.
Finally, measure the leaf from its farthest left point to its farthest right point. Record that number along with the stem length if additional matching placemats will be made.
Conclusion
Establish the burgundy silhouette before adding the dense surface decoration because correct lobe proportions determine where every cream, sage and dusty-pink line belongs. Work the central vein first, add the principal branches next, then fill selected spaces with shorter raised ridges. The blush knotted border comes last so its spacing can respond to the finished perimeter. Before starting a matching set, block one burgundy crochet maple leaf placemat pattern and record its final dimensions and lobe row counts. Save the design to Pinterest or share the finished table arrangement on Instagram with #BurgundyMapleLeafPlacemat. For this version, would you keep the sage-green veins or replace them with additional cream branches?









