Introduction
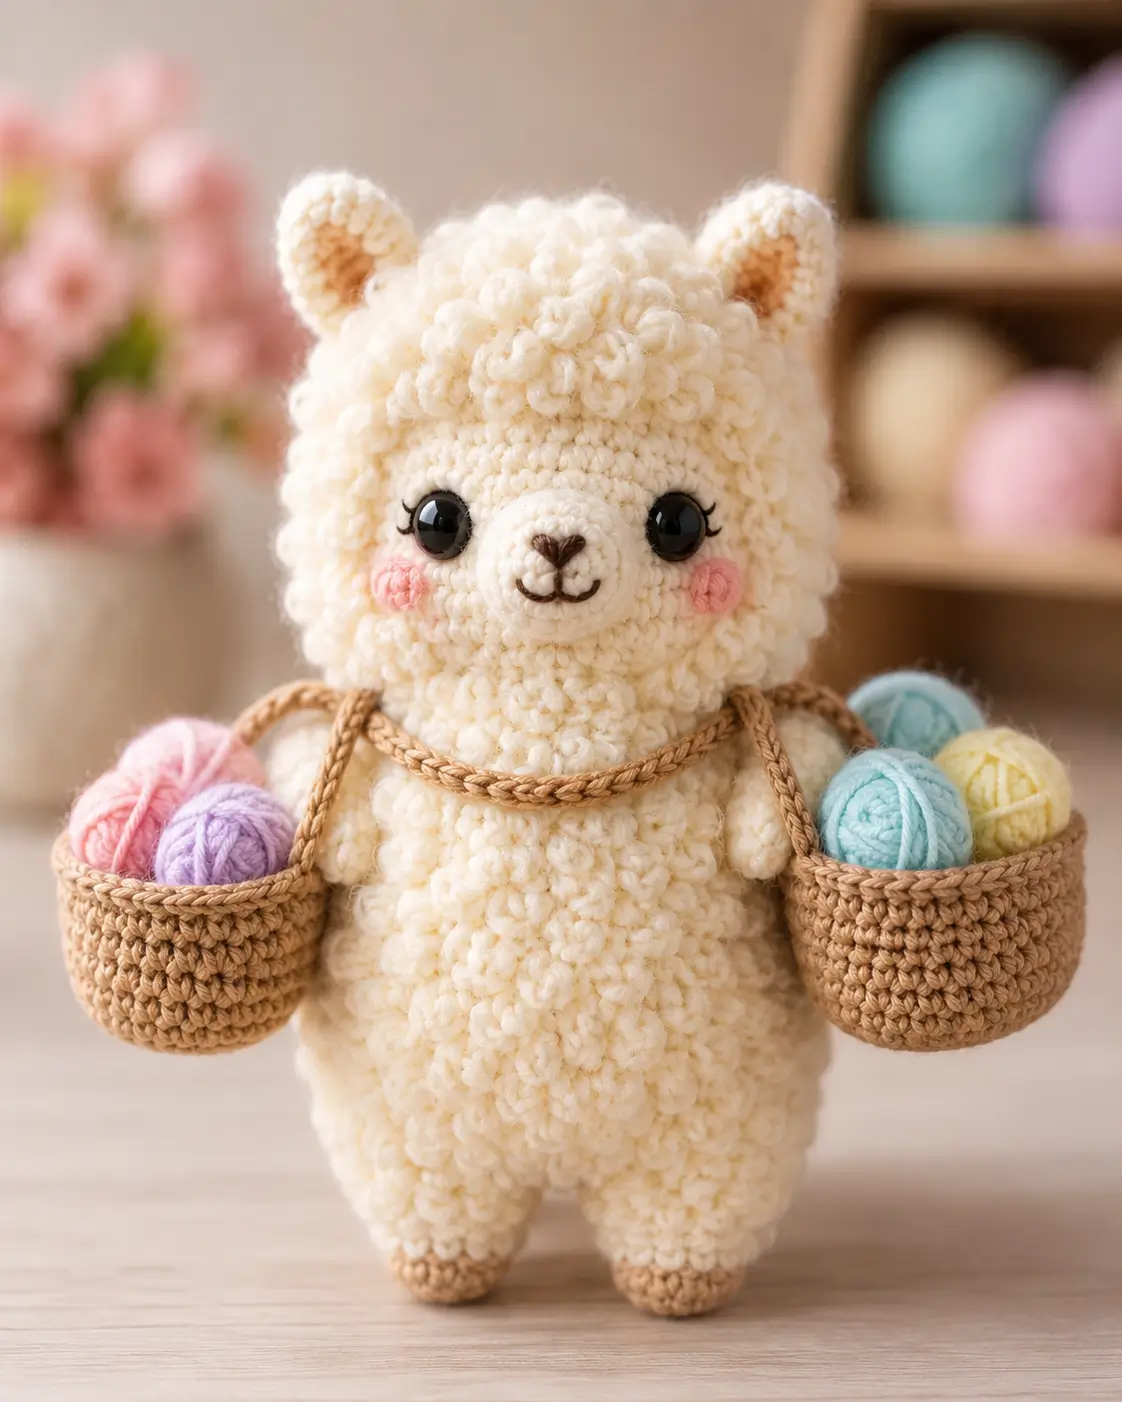
Alpacas grow fleece in a dense halo, so this alpaca amigurumi crochet pattern starts with a round body under a raised wool layer. Work it with chunky furry yarn, 15 mm safety eyes, and 4 mm to 7 mm hooks for a 33 cm advanced-beginner project. The finished alpaca can hold small yarn balls in hanging baskets for a craft-room display.
The Design: What Makes This Alpaca Different
This alpaca needs a compact core first and surface texture second. The body and head use a large 42-stitch plateau so the toy stays wide enough to carry two baskets without tilting. The muzzle sits low and forward; placing it too high changes the face into a bear shape. Ears stay short and rounded because alpaca ears read better as small upright ovals than long llama points. The hanging baskets add a balance problem. A normal fluffy alpaca amigurumi can stand with soft limbs, but a basket alpaca needs firmer back legs and a cord that crosses the chest, not the neck. Many crochet alpaca pattern projects skip that load path, then the arms pull down after stuffing settles.
Project Info at a Glance
| Skill Level | Time | Finished Size | Hook | Best For |
|---|---|---|---|---|
| Advanced beginner | 6–8 hours | 33 cm | 4 mm and 7 mm | Shelf display, yarn-room decor, handmade market sample |
Finished size, hook sizes, 15 mm eyes, and furry yarn basis follow the Durable Alpaca Almina data set. Source
Materials and Tools
Yarn
- Ivory furry yarn — chunky polyester furry yarn — 150 g — Durable Furry Ivory or similar.
- Tan yarn — DK/worsted cotton-acrylic — 50 g — Durable Cosy Fine Ash or similar.
- Taupe yarn — DK/worsted cotton-acrylic — 15 g — hoof, inner ear, basket shadows.
- Pink yarn — DK cotton or cotton blend — 5 g — cheek patches.
- Pastel yarn scraps — DK or worsted — 5–8 g each — yarn balls.
Durable’s furry alpaca lists three main-color furry balls, and Durable Furry is sold in 50 g balls. Source Durable Cosy Fine is listed as a 50 g yarn with 105 m per ball. Source
Tools
- Hook 7 mm for furry body fabric
- Hook 4 mm for muzzle, ears, limbs, baskets, cheeks, and yarn balls
- 15 mm black safety eyes
- Polyester stuffing
- Tapestry needle
- Locking stitch markers
- Pins
- Black embroidery thread
- Pet slicker brush for controlled fluffing
Abbreviations
MR = magic ring; sc = single crochet; inc = increase; dec = decrease; sl st = slip stitch; ch = chain; BLO = back loop only; FLO = front loop only. Invisible decrease works through front loops only, turning two stitches into one without a raised ridge.
Pattern — Step by Step
Continuous spiral unless noted.
Head
Yarn: ivory furry yarn — Source: standard amigurumi math, matched to verified furry alpaca materials.
R1: 6 sc in MR (6)
R2: inc ×6 (12)
R3: (sc, inc) ×6 (18)
R4: (2 sc, inc) ×6 (24)
R5: (3 sc, inc) ×6 (30)
R6: (4 sc, inc) ×6 (36)
R7: (5 sc, inc) ×6 (42)
R8–R14: sc around (42)
Insert 15 mm eyes between R10 and R11, 10 stitches apart. Do not lock washers until the muzzle position is pinned.
R15: (5 sc, dec) ×6 (36)
R16: sc around (36)
R17: (4 sc, dec) ×6 (30)
R18: (3 sc, dec) ×6 (24)
Stuff firmly around the eyes and upper head.
R19: (2 sc, dec) ×6 (18)
R20: (sc, dec) ×6 (12)
R21: dec ×6 (6)
Fasten off. Leave a 25 cm tail and close the final hole.
Body
Yarn: ivory furry yarn — Source: standard amigurumi math with large 42-stitch plateau.
R1: 6 sc in MR (6)
R2: inc ×6 (12)
R3: (sc, inc) ×6 (18)
R4: (2 sc, inc) ×6 (24)
R5: (3 sc, inc) ×6 (30)
R6: (4 sc, inc) ×6 (36)
R7: (5 sc, inc) ×6 (42)
R8–R15: sc around (42)
R16: (5 sc, dec) ×6 (36)
R17: sc around (36)
R18: (4 sc, dec) ×6 (30)
R19: sc around (30)
R20: (3 sc, dec) ×6 (24)
Stuff the lower body more firmly than the top. This supports the basket load.
R21: sc around (24)
R22: (2 sc, dec) ×6 (18)
R23: (sc, dec) ×6 (12)
R24: dec ×6 (6)
Fasten off. Leave a 35 cm tail for joining to the head.
Front Legs / Arms
Yarn: taupe for hoof, ivory for upper limb — Source: standard amigurumi math.
Make 2.
R1: 6 sc in MR with taupe (6)
R2: inc ×6 (12)
R3: (sc, inc) ×6 (18)
R4: sc around (18)
R5: BLO with ivory, sc around (18)
R6–R8: sc around (18)
R9: (sc, dec) ×6 (12)
R10–R14: sc around (12)
Stuff hoof only. Leave the upper limb flat enough to angle under the basket cord.
R15: flatten opening and sc through both layers (6)
Fasten off. Leave a 25 cm tail.
Back Legs
Yarn: taupe for hoof, ivory for upper leg — Source: standard amigurumi math.
Make 2.
R1: 6 sc in MR with taupe (6)
R2: inc ×6 (12)
R3: (sc, inc) ×6 (18)
R4: (2 sc, inc) ×6 (24)
R5: sc around (24)
R6: BLO with ivory, sc around (24)
R7–R9: sc around (24)
R10: (2 sc, dec) ×6 (18)
R11: (sc, dec) ×6 (12)
R12–R14: sc around (12)
Stuff the hoof and lower half. Leave the upper edge soft for sewing to the body curve.
Fasten off. Leave a 30 cm tail.
Ears
Yarn: taupe inner start, ivory outer edge — Source: alpaca ear construction verified as a required part in comparable patterns.
Make 2.
R1: 6 sc in MR with taupe (6)
R2: inc ×6 (12)
R3: sc around (12)
R4: (sc, inc) ×6 with ivory (18)
R5–R7: sc around (18)
R8: (sc, dec) ×6 (12)
R9: flatten and sc through both layers (6)
Fasten off. Leave a 25 cm tail.
Muzzle
Yarn: ivory smooth or low-fuzz yarn — Source: standard amigurumi math; muzzle placement checked against alpaca face references.
R1: 6 sc in MR (6)
R2: inc ×6 (12)
R3: (sc, inc) ×6 (18)
R4: (2 sc, inc) ×6 (24)
R5–R6: sc around (24)
R7: (2 sc, dec) ×6 (18)
Fasten off. Leave a 30 cm tail. Embroider a small dark brown or black V nose centered over R2–R3, then add a short vertical line and two curved mouth stitches.
Cheek Patches
Yarn: blush pink — Source: standard flat-circle math.
Make 2.
R1: 6 sc in MR (6)
R2: inc ×6 (12)
sl st to first stitch (12)
Fasten off. Leave a 20 cm tail.
Tail
Yarn: ivory furry yarn — Source: comparable alpaca patterns include tail construction; this version uses a round bobble tail.
R1: 6 sc in MR (6)
R2: inc ×6 (12)
R3: (sc, inc) ×6 (18)
R4–R5: sc around (18)
R6: (sc, dec) ×6 (12)
Fasten off. Leave a 25 cm tail. Brush the outside lightly after sewing.
Forehead Fleece Curls
Yarn: ivory furry yarn or ivory DK held double — Source: photo-matched detail, standard chain curl method.
Make 12.
Row 1: ch 6 (6 ch)
Row 2: starting in second ch from hook, 2 sc in each ch across (10)
Fasten off each curl with a 12 cm tail. Knot tails in pairs before sewing so the curls sit as a grouped fringe.
Neck Cord
Yarn: tan DK/worsted — Source: photo-matched accessory.
Row 1: ch 72 (72 ch)
Row 2: sl st in second ch from hook and across (71)
Fasten off. Leave two 20 cm tails. The cord should cross the upper chest, pass under both arms, and connect to the basket handles.
Hanging Baskets
Yarn: tan DK/worsted — Source: photo-matched accessory, standard circular basket math.
Make 2.
R1: 6 sc in MR (6)
R2: inc ×6 (12)
R3: (sc, inc) ×6 (18)
R4: (2 sc, inc) ×6 (24)
R5: (3 sc, inc) ×6 (30)
R6: (4 sc, inc) ×6 (36)
R7: BLO, sc around (36)
R8–R13: sc around (36)
R14: sl st around rim (36)
Fasten off and weave in. For each handle, ch 30, then sl st in second ch from hook and across (29). Sew handle ends opposite each other inside the rim.
Yarn Balls
Yarn: pastel scraps — Source: photo-matched accessory, standard sphere math.
Make 6 in pink, lavender, sky blue, pale yellow, mint, and cream.
R1: 6 sc in MR (6)
R2: inc ×6 (12)
R3: (sc, inc) ×6 (18)
R4: (2 sc, inc) ×6 (24)
R5–R6: sc around (24)
R7: (2 sc, dec) ×6 (18)
R8: (sc, dec) ×6 (12)
Stuff lightly. The ball should stay round, not hard.
R9: dec ×6 (6)
Fasten off. Weave the tail across the surface in two curved passes to imitate wrapped yarn.
Assembly
- Sew the head to the body with the body tail, placing the head slightly forward so the muzzle clears the chest.
- Pin the muzzle between the eyes, covering R12–R16 of the head, then sew it down while adding a thin layer of stuffing.
- Attach the cheek patches two rounds below the eyes and one stitch outside the muzzle edge.
- Sew the ears to the top sides of the head between R4 and R7, tilted outward by 20 degrees.
- Sew the back legs to the lower body so the flat foot fronts touch the table surface.
- Sew the front legs to the side body at R10–R13, angled downward toward the baskets.
- Sew the tail to the back of the body at R13–R15.
- Attach the forehead curls across the top front of the head, keeping the densest curls between the ears.
- Place one basket on each side, then stitch the neck cord to the handle tops and tack the cord to the chest at two hidden points.
- Add the yarn balls inside the baskets and secure each with one hidden stitch through the basket base.
The alpaca is complete when both baskets hang at the same height and the back legs remain flat on the surface.
7 Technical Tips
- Eye placement failure mode: locked washers too early. Pin the muzzle first, then lock the 15 mm eyes only after both eyes sit 10 stitches apart and level across the face.
- Basket sag failure mode: cord sewn only to the neck. Tack the cord to the chest at two points 2 cm apart so the baskets pull against the body, not the head seam.
- Stuffing failure mode: hollow lower body. Pack the bottom third firmly enough that it resists a thumb press by about 5 mm, then soften the upper chest.
- Invisible decrease failure mode: visible ridges in furry yarn. Work each decrease through front loops only, then brush the fabric after assembly rather than during shaping.
- Velvet and furry tension failure mode: skipped stitches. Place a stitch marker every 12 stitches on 42-stitch rounds because the pile hides the next insertion point.
- Pinning failure mode: uneven basket height. Pin the baskets with the alpaca standing on a flat table and measure from table to rim; both rims should match within 5 mm.
- Tail weaving failure mode: loose yarn-ball wraps. Pass the tail through the ball core after each surface curve so the decorative strand cannot slide off the sphere.
Conclusion
Use the assembly stage as the final gauge test. If the baskets pull the arms down, remove the cord tacks and reset them lower on the chest before hiding the yarn ends. Photograph the alpaca from the front and from a slight overhead angle so the basket interiors and yarn balls are visible. Save one image for Pinterest and one square crop for Instagram, then tag it with #YarnBasketAlpaca. For the next sample, change only the basket colors before changing the head size. That keeps the alpaca amigurumi crochet pattern consistent while you test display variations. Would you make both baskets tan, or match them to the pastel yarn balls?









