Introduction
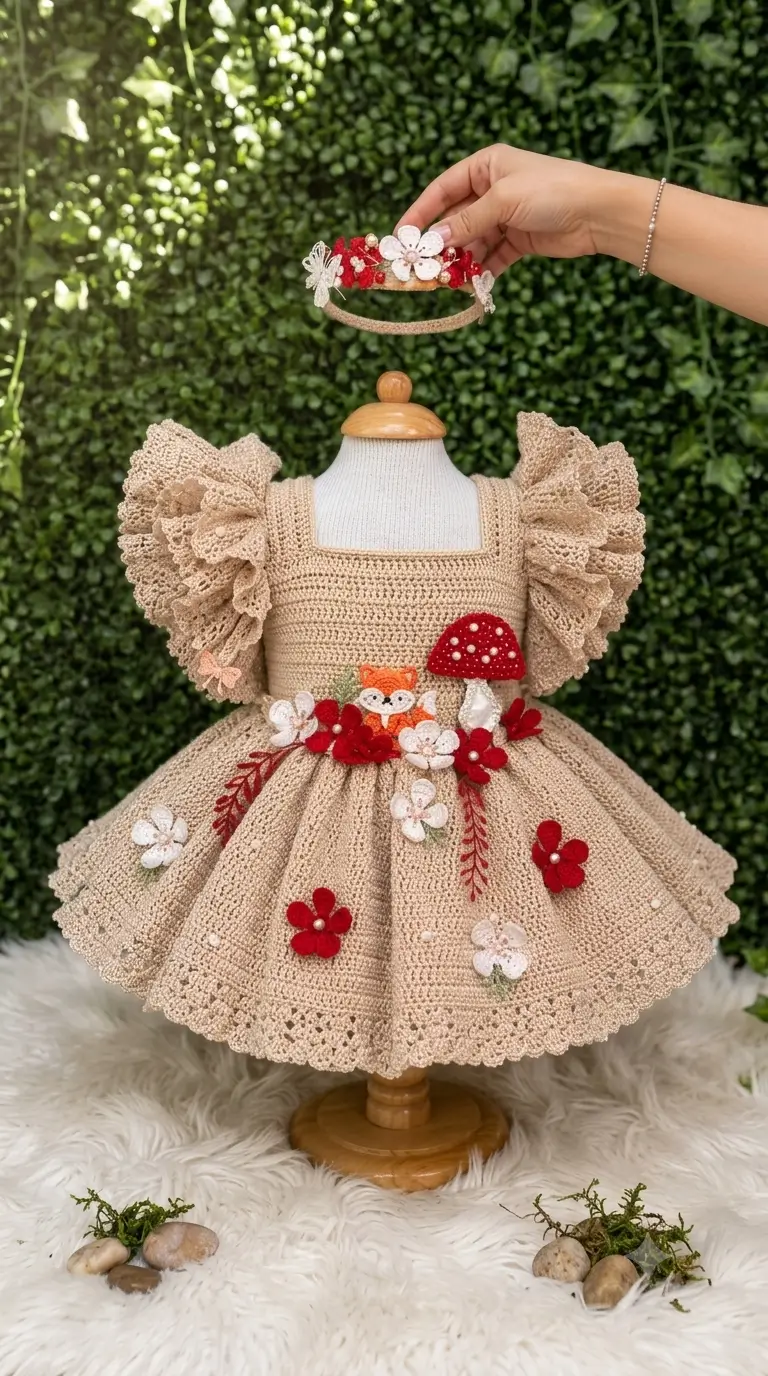
A fox at the waist and a red-capped mushroom on the bodice turn this beige dress into a woodland scene, which means the crochet structure must carry decoration without sagging. This woodland crochet flower girl dress uses a fitted square-neck bodice, full skirt, layered sleeve ruffles and small appliqués. DK yarn with a 4 mm hook is a documented garment starting point. Plan it as an intermediate project where fit and motif placement matter equally.
The Design: What Makes This Woodland Dress Different
Three structural decisions control the design. First, the square neckline and relatively firm bodice give the fox, flowers and mushroom a stable foundation; a loose lace bodice would distort once several motifs were sewn across the waist. Second, the skirt expands immediately below the waist so the crochet woodland dress pattern can carry scattered flowers without flattening the flare. Third, the sleeve volume comes from multiple narrow ruffles stacked around each armhole rather than one oversized flutter.
The common mistake is adding decoration before blocking and fitting the plain garment. Once appliqués are sewn down, correcting neckline width or waist placement becomes harder. A ruffle sleeve crochet dress should therefore be fitted as a finished base first. The motifs are a separate engineering layer: light at the outer skirt, denser near the waist, and balanced from left to right.
Project Info at a Glance
| Skill Level | Time | Finished Size | Hook | Best For |
|---|---|---|---|---|
| Intermediate | Multi-session garment project | Made to measured child size; comparable references span infant to age 4+ | 4.0 mm with DK as a verified starting point | Ceremonial dress, portraits, flower-girl garment, woodland-themed clothing |
The 4 mm/DK combination comes from published child-dress patterns and should be treated as a swatching reference rather than proof that the photographed garment uses the same yarn.
Materials and Tools
Yarn
- Warm beige — DK — quantity determined by measured size — smooth cotton, cotton blend or garment DK
- Orange — DK or finer — small quantity — fox face
- White or cream — DK or finer — small quantity — fox muzzle, mushroom stem, white flowers
- Deep red — DK or finer — small quantity — mushroom cap and red flowers
- Leaf green — DK or finer — small quantity — leaves and stems
- Peach — crochet thread or fine yarn — small quantity — butterfly or floral accent
Published child-dress patterns show why yardage should not be guessed from a photograph. Yarn use changes substantially with chest size, skirt circumference, stitch density and sleeve volume. Buy against your swatch, measurements and planned skirt fullness rather than using one generic gram figure.
Tools
- 4.0 mm crochet hook for the DK garment swatch
- Smaller hook for fine flowers if their yarn is thinner
- Tapestry needle
- Locking stitch markers
- Flexible tape measure
- Sewing pins
- Small pearl-style beads if reproducing the visual treatment
- Matching sewing thread for beads
- Scissors
- Blocking mats
The photograph does not clearly show plastic safety eyes on the fox. Stitched facial details are better suited to a flat garment appliqué and avoid adding hard components to the motif.
Abbreviations
- ch — chain
- sc — single crochet
- hdc — half double crochet
- dc — double crochet
- sl st — slip stitch
- st/sts — stitch/stitches
- inc — two stitches worked into one stitch
- dec — decrease
- BLO — back loop only
- MR — magic ring
An invisible decrease is mainly relevant to dimensional motifs; for this garment, standard decreases should be positioned symmetrically at shaping points so the fabric does not twist.
Construction — Step by Step
The photograph cannot provide hidden seams, exact stitch counts, wearer measurements or gauge, so the following is an original construction framework based on the visible architecture rather than an exact transcription of the pictured designer’s pattern.
1. Swatch Before the Bodice
Use the main beige yarn and a 4 mm hook. Work a square in the stitch intended for the bodice, wash it as the finished dress will be washed, dry it flat, then count stitches and rows across 10 cm.
Different published child-dress patterns show noticeably different gauges, which means garment counts cannot be copied safely from another design unless your swatch matches it.
Do not borrow another designer’s stitch count while using a different gauge.
2. Square-Neck Bodice
Measure the wearer around the chest, shoulder to waist, neckline width and armhole depth. Draft the bodice with slight positive ease appropriate to the yarn and intended underlayer.
The photographed dress has a broad square neckline with relatively substantial shoulder sections. Keep the top edge firm. Work front and back sections flat if that makes square shaping easier, then seam the sides, or construct in joined rounds after the armholes.
Place stitch markers at the four square-neck corners. Those points need clean turning stitches; accidental increases at each corner can make the neckline flare outward.
A denser stitch than the skirt is useful here because the bodice will carry the heaviest appliqué cluster.
3. Shoulder Straps and Armholes
The shoulder sections in the image are wide rather than cord-like. Narrow straps would look visually weak beside the very large ruffle sleeves.
Work each shoulder to the measured length, then join to the back. Try the undecorated bodice on the intended wearer or dress form.
Measure both armhole circumferences after joining. If one differs by more than roughly one stitch width, correct it before attaching ruffles because stacked sleeve layers amplify asymmetry.
4. Layered Ruffle Sleeves
The sleeves are the strongest construction feature in the photograph. They appear to contain several concentric or vertically stacked ruffle bands.
Start with a firm armhole foundation round. For the first ruffle, work multiple stitches into selected foundation stitches to create flare. Subsequent layers can be attached into reserved loops or separate surface rounds.
Do not place the highest expansion ratio directly under the arm. Excess fabric there forms a bulky wedge. Concentrate the visible flare over the shoulder cap and outer arm.
Make both sleeves from the same written count rather than shaping the second by eye.
5. Waist Transition
The photographed waist is defined without a separate contrasting waistband. The visual transition comes from the change between fitted bodice and expanding skirt.
Finish the bodice with one stable round before beginning skirt increases. Mark the center front, center back and side points.
Those markers will later control motif placement. The fox sits near center front, so an unnoticed spiral shift will become obvious once the animal face is attached.
6. Full Skirt
Increase the skirt progressively until the desired fullness is reached. The image shows substantial flare and dense crochet rather than an open lace skirt through most of its depth.
Once the target circumference is established, work even rounds to length. Add extra expansion only if more sweep is required near the lower third.
The appliqué layout depends on this geometry. Flowers positioned before the final flare is known may rotate toward the side seams after blocking.
7. Decorative Hem
The hem uses an openwork border followed by a scalloped finish.
Work one transition round to establish evenly spaced openings. Follow with arches or shell groups sized to the repeat count. The final scallops should lie flat when the skirt is spread naturally.
A common failure mode is forcing a border repeat into an incompatible stitch total. Adjust the plain setup round first rather than hiding extra stitches inside random shells.
8. Fox Appliqué
The fox is small, flat and centered in the waist bouquet. Keep the motif approximately palm-small relative to the bodice so it does not dominate the surrounding flowers.
- Orange head
- Two pointed ears
- White cheek or muzzle sections
- Embroidered black nose
- Embroidered eyes
- Tiny green leaves behind the head if desired
Make the ears proportionally large enough to read against the neighboring flowers.
Sew the fox only after arranging the complete waist cluster with pins.
9. Mushroom Appliqué
The mushroom is positioned higher than the fox and slightly to the wearer’s right. That separation prevents the two figurative motifs from competing for the same focal point.
Build the mushroom from a cream stem and a deep-red semicircular cap. Add small pale circles or tightly secured pearl-style details across the cap.
For a child garment, sew every decorative component firmly rather than depending on surface adhesive.
10. White and Red Flowers
Build several flower sizes instead of repeating one identical motif. The image uses larger flowers around the waist and smaller flowers scattered down the skirt.
Place the largest motifs where the garment is structurally firmest. Near the waist, several flowers can overlap. Toward the hem, use isolated motifs so the skirt retains movement.
Keep red and white flower totals visually balanced even when they are not numerically equal.
11. Leaf Sprays and Branches
The red branch-like pieces create vertical lines through the waist bouquet. Green leaves around the fox break up the beige, orange and red palette.
Crochet thin stems as chain-based appliqués, then work leaves at intervals. Pin them with the skirt hanging naturally.
Avoid stretching a chain stem during sewing. A stretched stem contracts after laundering and puckers the surrounding skirt.
12. Butterflies
The photograph contains small butterfly forms at the sleeve and lower decoration zones. They function as light filler motifs rather than focal pieces.
Work them from fine yarn or crochet thread so they remain visibly smaller than the flowers. Attach through the center body and only lightly secure the wings if a raised effect is wanted.
13. Pearl-Style Details
Pearl embellishment appears on the flowers, mushroom cap, sleeves and skirt.
Treat bead distribution as a separate layout pass. Heavy concentrations can pull a lightweight crochet fabric downward.
Use matching sewing thread and secure each bead independently. If one thread breaks, an individually sewn bead is less likely to release neighboring embellishments.
Assembly
- Block the plain bodice to the target measurements before adding the skirt decoration.
- Join shoulders and side seams, then confirm the square neckline lies level.
- Complete the skirt and hem before fixing any woodland motifs.
- Add both layered ruffle sleeves and compare them from front, back and side views.
- Pin the fox at the front waist without sewing it yet.
- Position the mushroom above and to one side of the fox, leaving clear negative space between their outlines.
- Build the waist bouquet outward with the largest red and white flowers, followed by leaves and narrow branch motifs.
- Add smaller flowers and butterflies to the skirt, keeping them clear of fold lines and side seams.
- Sew motifs from the lowest layer upward, then attach pearl-style details separately.
- Block or steam only with a method suitable for the chosen fiber and inspect the reverse side for loose ends.
The finished garment should hang evenly before any additional surface decoration is added.
7 Technical Tips
- Armhole mismatch: mark the first stitch of every sleeve foundation round and count both armholes before starting ruffles. A difference of even two foundation stitches becomes obvious once three or four ruffle layers are added.
- Ruffle collapse: avoid working every layer at the same expansion ratio. Too many stitches close to the underarm create a dense folded mass instead of controlled shoulder volume.
- Neckline stretch: measure the square neckline immediately after blocking. If the top edge grows noticeably under its own weight, stabilize it before sewing the waist appliqués.
- Motif puckering: pin every fox, flower and mushroom piece with the garment resting in its natural shape. Sewing an appliqué onto a stretched skirt section causes that area to contract once the dress is released.
- Fox placement: establish the true center front from the neckline and skirt markers, not from the visual center of a fold. A fox shifted even 2–3 cm becomes conspicuous because its face creates a strong symmetry cue.
- Bead weight: distribute pearl-style embellishments rather than loading one unsupported crochet flower with many beads. The mushroom cap can carry clustered spots because its small silhouette is sewn directly to the bodice.
- Tail weaving: route yarn tails through several stitch directions on the wrong side rather than along one straight channel. Straight tails can pull back through an appliqué when the garment flexes during wear or washing.
Conclusion
The next step for this woodland crochet flower girl dress is measurement, not decoration: record chest, shoulder-to-waist length, armhole depth and target skirt length, then make a washed gauge swatch before calculating the bodice. Finish and block the plain dress before positioning the fox, mushroom, flowers and pearl details. That order gives the appliqués a stable final surface and makes symmetry easier to judge. Save the finished layout to Pinterest and share the completed garment on Instagram with #WoodlandFlowerDress. When placing the woodland scene, would you keep the fox centered beneath the mushroom, or shift the mushroom farther toward the side seam?









