Introduction
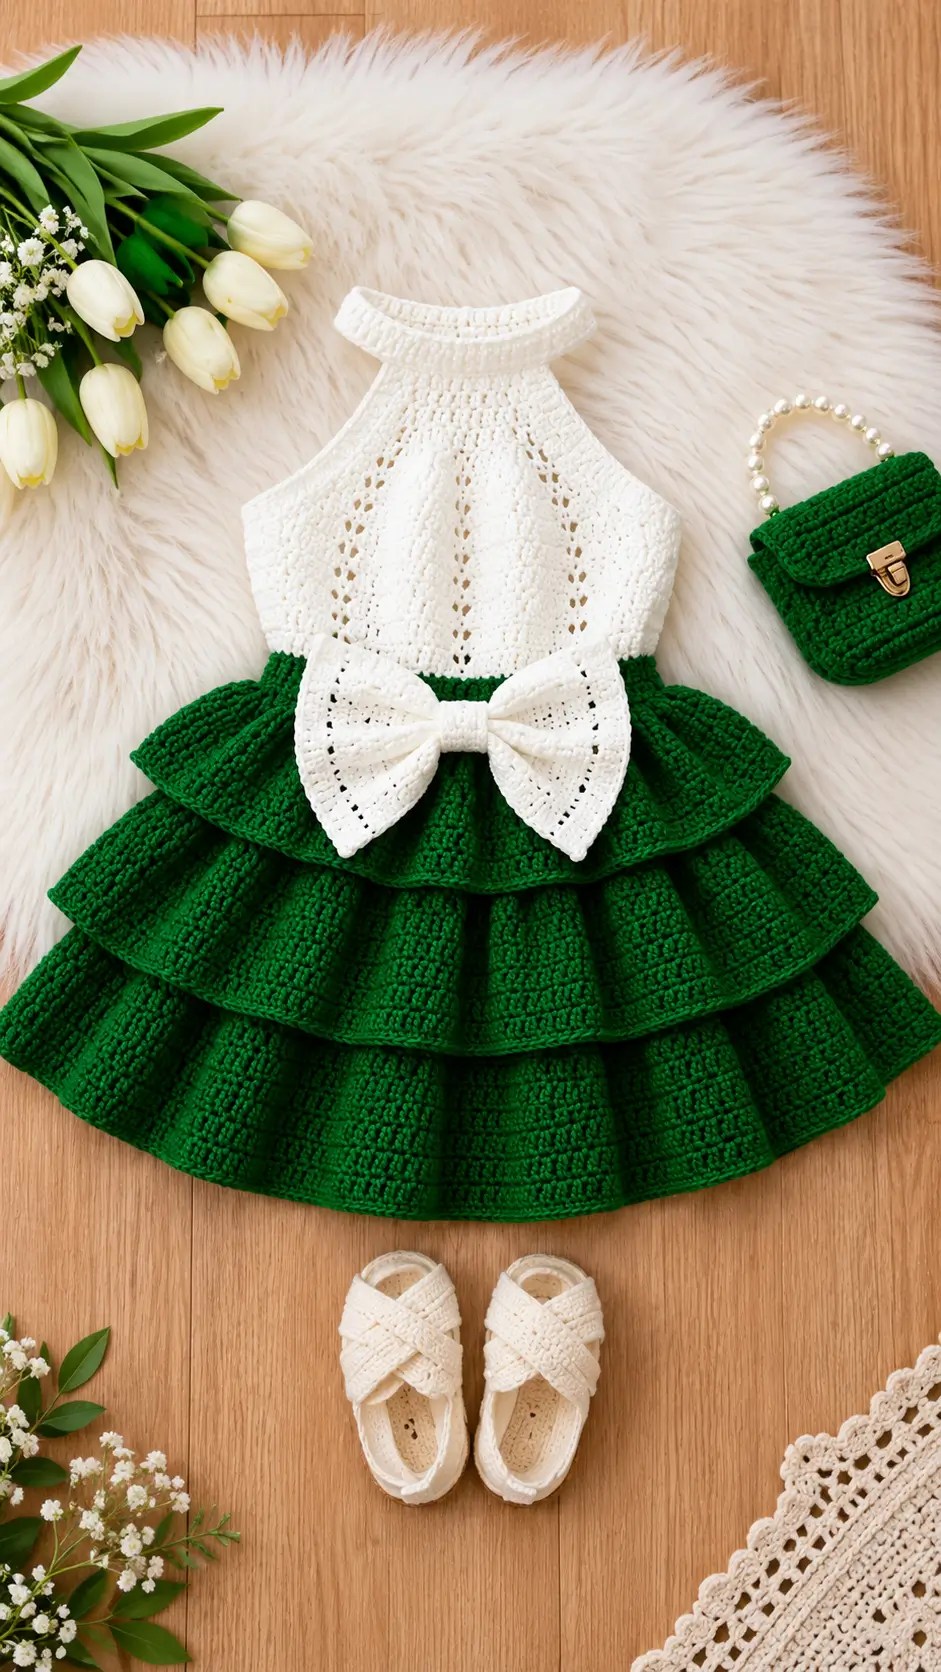
Three separate emerald skirt tiers change both the weight distribution and construction of this dress. This crochet toddler halter dress pattern pairs an ivory openwork bodice with a dense green waistband, layered ruffles and a large waist bow. The reference version uses Sport-weight cotton, a 3.5 mm hook and 3–4-year sizing. It suits an intermediate crocheter who needs a structured special-event garment with replaceable, independently attached skirt layers.
The Design: What Makes This Tiered Dress Different
The skirt is built around three attachment levels rather than one continuously flared fabric. That decision keeps each ruffle edge distinct and prevents the lower tier from pulling the upper layers flat. A firm waistband is equally important because it carries the mass of the tiered crochet toddler dress while keeping the halter bodice from stretching vertically.
The ivory upper section uses a narrower front bib and open sides. This reproduces the visual proportions of the photographed halter without adding bulky sleeve seams. A large separate bow covers the transition between bodice and skirt and gives the crochet bow dress pattern a clearly defined center front.
A frequent construction error is adding too much fullness at the first ruffle round. Excess stitches make the waistband flare before the skirt begins, shifting weight away from the waist and producing a wavy attachment seam.
Project Info at a Glance
| Skill Level | Time | Finished Size | Hook | Best For |
|---|---|---|---|---|
| Intermediate | Approx. 12–20 hours | Reference: 56.5 cm long, 59 cm waist | 3.5 mm | Toddler/preschool special-event dress |
The measurement benchmark comes from a published 3–4-year toddler dress rather than direct measurement of the photograph. A 3.5 mm hook with Sport-weight yarn is also documented in published toddler-dress patterns.
Materials and Tools
Yarn
- Emerald green — Sport-weight cotton — allow approximately 250–300 g for a three-tier skirt and waistband — suggested type: firm mercerized cotton.
- Ivory/cream — Sport-weight cotton — allow approximately 100–150 g for the halter, bow and finishing — suggested type: the same yarn family as the green.
The color split above is a pattern-planning estimate because no source can verify how many grams of each color appear in the photographed garment. Published toddler dresses in the 3–4-year range commonly require approximately 300–400 g total, depending on stitch density, skirt fullness and yarn weight.
Tools
- 3.5 mm crochet hook
- Yarn needle
- Locking stitch markers
- Scissors
- Measuring tape
- Dressmaker pins
- Optional small button for the back neck closure
- Washable blocking mat
Work a gauge swatch before starting. A useful initial target for Sport/DK garment fabric is approximately 18 hdc × 12 rows over 10 cm, although the finished project should be adjusted to the intended child’s actual measurements rather than age alone.
Abbreviations
- ch — chain
- sc — single crochet
- hdc — half double crochet
- dc — double crochet
- tr — treble crochet
- sl st — slip stitch
- st/sts — stitch/stitches
- sk — skip
- BLO — back loop only
- RS — right side
- WS — wrong side
Invisible decrease is mainly an amigurumi technique and is not required for the primary dress construction; garment shaping here is handled through skipped stitches, decreases and controlled changes in circumference.
Pattern — Step by Step
Pattern note: This is an original photo-inspired size 3–4 drafting framework, not a transcription of another designer’s pattern. Target a waist circumference close to 59 cm only when that measurement fits the intended wearer.
Waistband
Yarn: emerald green.
At a gauge near 18 hdc per 10 cm, 108 stitches measure approximately 60 cm before final blocking.
R1: Ch 109. Hdc in second ch from hook and each ch across. (108)
R2: Ch 1, turn. Hdc BLO in each st across. (108)
R3: Ch 1, turn. Hdc in each st across. (108)
R4: Repeat R2. (108)
R5: Hdc in each st across. (108)
Join the short ends only after checking the actual waistband circumference. The band should lie flat without requiring heavy stretching around the intended waist.
Fasten off only if the bodice will be sewn on separately.
Ivory Halter Bodice
Yarn: ivory.
Mark the center 66 stitches of the waistband for the front bodice. The remaining waistband section forms the side and back opening.
Row 1: Join ivory at the first front marker. Ch 1, hdc across 66 marked sts. (66)
Row 2: Ch 1, turn. Hdc across. (66)
Row 3: Ch 1, hdc2tog, hdc 62, hdc2tog. (64)
Row 4: Hdc across. (64)
Row 5: Hdc2tog, hdc 60, hdc2tog. (62)
Row 6: Hdc across. (62)
Row 7: Hdc2tog, hdc 58, hdc2tog. (60)
Begin the decorative openwork.
Row 8: Ch 3, dc in next 2 sts, *ch 1, sk 1, dc in next 3 sts* across, adjusting the final repeat to finish symmetrically.
Row 9: Ch 1, sc in every dc and every ch-1 space across.
Row 10: Hdc2tog at both edges; hdc across remaining sts.
Row 11: Repeat the eyelet sequence from Row 8.
Row 12: Repeat Row 9.
Row 13: Decrease one stitch at each edge.
Row 14: Hdc across.
Row 15: Decrease one stitch at each edge.
Row 16: Repeat the openwork sequence.
Row 17: Sc across all stitches and chain spaces.
Continue the same edge-reduction logic until the upper edge measures approximately 28–32 cm, depending on the child’s chest and neck width.
The photographed garment has a curved high neckline rather than thin tie straps. To reproduce that structure, work four to six additional rows while reducing at both sides, then finish with two firm rows of sc.
Neck Band
Yarn: ivory.
Join yarn to one upper corner.
Row 1: Ch enough stitches to span the back neck comfortably, then sl st to the opposite upper corner.
Row 2: Ch 1. Sc in each chain around the neck opening.
Row 3: Ch 1. Sc BLO around.
Row 4: Sc in each st.
For a button closure, leave the final 3–4 cm open and make a small chain loop on one end rather than permanently joining the neck band.
The neck opening must pass comfortably over the wearer’s head or open fully at the back.
Upper Ruffle Tier
Yarn: emerald green.
Work this tier into the upper skirt attachment line immediately below the waistband.
R1: Join green and work 2 dc in each alternate stitch, 1 dc in the intervening stitches, distributing increases evenly.
R2: Ch 2, dc in each st around.
R3: *Dc 8, 2 dc in next st* around, adjusting the last repeat if needed.
R4: Dc in each st.
R5: Repeat R3 with increases spaced farther apart.
R6–R12: Dc evenly around unless more flare is required.
R13: Sc in each st.
R14: Reverse sc or firm sc around the hem.
Stop the first tier roughly around the upper-middle section of the finished skirt. Its job is to cover the second attachment line without extending to the final hem.
Middle Ruffle Tier
Yarn: emerald green.
Locate an attachment line about 7–9 cm below the waistband. This can be formed from exposed loops on a base skirt or sewn to a marked support round.
R1: Join green and distribute approximately 1.4–1.5 times the attachment-line stitch count.
R2: Dc around.
R3: Increase evenly at 8–10 points.
R4–R14: Dc around, adding only enough increases to keep the fabric flat above the flare.
R15: Sc around.
R16: Firm sc edging.
The middle tier should finish below the top tier by several centimetres, creating a visible second step.
Lower Ruffle Tier
Yarn: emerald green.
Attach the final tier low enough that its upper section remains hidden beneath the middle ruffle.
R1: Work evenly around the attachment line, adding approximately 40–50% fullness.
R2: Dc around.
R3: Increase at evenly spaced intervals.
R4–R16: Continue in dc, extending the tier to the target skirt length.
R17: Sc around.
R18: Reverse sc or one tight row of standard sc.
A finished dress length around 56.5 cm provides one 3–4-year reference point, but actual shoulder-to-hem length should be checked on the wearer.
Skirt Support Layer
Yarn: emerald green.
A lightweight support layer prevents the ruffles from relying on one waistband seam.
Join to the lower edge of the waistband.
R1: Hdc around at the established waist stitch count.
R2: *Hdc 8, 2 hdc in next st* around.
R3: Hdc around.
R4: Add evenly spaced increases.
R5 onward: Continue until the support layer reaches beneath the lowest ruffle attachment point.
Keep this layer narrower than the visible ruffles. It exists to carry attachment lines and distribute weight.
Oversized Waist Bow
Yarn: ivory.
Make 2 bow panels.
Row 1: Ch 33. Hdc in second ch and across. (32)
Rows 2–8: Ch 1, turn, hdc across. (32)
Row 9: Sc across. (32)
Fasten off.
Block both panels flat. Pinch one short end of each panel toward the center so the two pieces fan outward. Sew the inner ends together firmly.
For the center band:
Row 1: Ch 9, hdc in second ch and across. (8)
Rows 2–12: Ch 1, turn, hdc across. (8)
Wrap the band around the center of both bow panels and stitch at the back.
Sew the bow to the waistband through several rows rather than attaching it to a single stitch.
Optional Green Mini Handbag
Yarn: emerald green.
The handbag in the photograph is an accessory, not part of the garment.
Base Row 1: Ch 25, hdc in second ch and across. (24)
Rows 2–18: Ch 1, turn, hdc BLO across. (24)
Fold so the back extends above the front to create the flap. Seam both sides.
For the flap edge, work two rounds of sc. Add a crochet handle for a child-safe interpretation.
The photographed pearl-style handle and metal clasp should be treated as decorative components that require secure attachment. Small detachable beads are unsuitable where they could present a choking hazard.
Optional Ivory Crochet Sandals
The photograph also includes matching ivory crossover sandals. Footwear requires precise sole dimensions and fit testing, so an exact sandal pattern should not be inferred from an overhead image.
For a coordinated pattern set, the footwear should be drafted separately using measured sole lengths for each child size rather than scaling it by age alone.
Assembly
- Join the waistband after confirming its circumference against the intended wearer or a verified garment measurement.
- Attach the ivory halter bodice to the center front of the waistband with the side edges placed symmetrically.
- Finish the neckline and check that the neck opening can open wide enough for dressing without excessive stretching.
- Add the skirt support layer beneath the waistband and keep its seam centered at the back.
- Attach the upper ruffle first, pinning it at quarter points so the fullness remains evenly distributed.
- Position the middle ruffle below the first tier and check that its attachment line is completely hidden when the upper layer falls naturally.
- Sew or crochet the lower ruffle to the final marked attachment line and measure the complete shoulder-to-hem length before finishing its border.
- Block the dress to the planned waist, bodice and length measurements without pulling the ruffle edges into points.
- Sew the ivory bow firmly at center front, spreading the two wings so they cover the waistband without folding the bodice inward.
- Weave in every yarn tail through several directional changes on the wrong side, then trim only after the dress has been checked for loose ends.
The completed garment consists of one halter bodice, a supporting waistband, three independently defined skirt tiers and one separate waist bow.
7 Technical Tips
- Mark every ruffle quarter point before joining. A ruffle shifted by even 8–10 stitches can concentrate fullness on one side and make the skirt appear twisted.
- Check the waistband after the first 3–5 rows. If a target 59 cm band grows by several centimetres after handling, the yarn or stitch tension is too elastic for the planned fit.
- Do not pack extra stitches into the ruffle seam to hide a counting error. The failure mode is a rippled waistband rather than additional useful skirt fullness.
- Pin the bow at its center and both outer wings before sewing. A center-only attachment allows a large crochet bow to rotate or droop under its own weight.
- Keep the three attachment lines roughly 7–9 cm apart on this size range. Putting them too close produces stacked bulk, while excessive spacing exposes the support skirt between tiers.
- Work the neck edge firmly but measure it before closing. A high halter opening that is 2–3 cm too small can make the dress impossible to pull over the head unless a back closure is added.
- Weave skirt tails horizontally and then reverse direction. A tail run vertically through a ruffle can pull the tier upward after laundering and create a visible pucker.
Conclusion
Measure the waistband before committing to all three ruffle tiers; that single checkpoint controls the fit and the alignment of every section below it. The next practical step is to make a washed 10 cm gauge swatch, calculate the required waist count, then mark all future tier positions on the support skirt. This crochet toddler halter dress pattern can be shared on Pinterest with a front-view construction photo and on Instagram with close-ups of the three attachment levels. Use #TieredHalterDress when posting the finished garment. Which feature would you keep from the photographed design: the high ivory halter neckline, the oversized waist bow, or all three emerald ruffle tiers?









