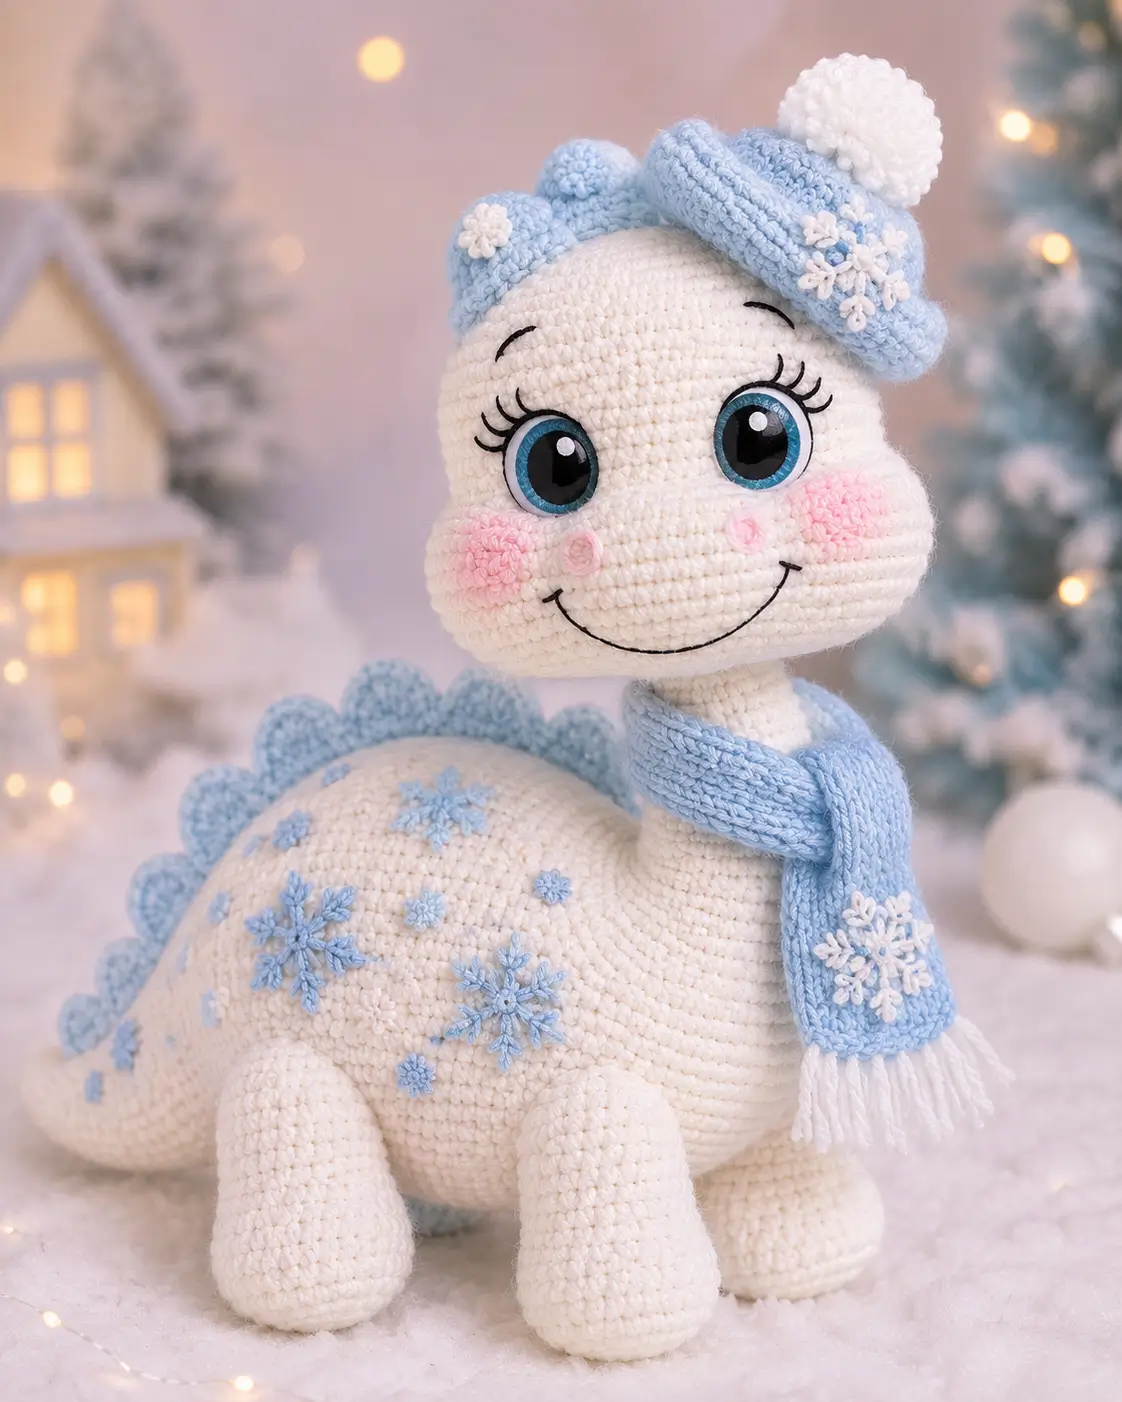
A brontosaurus cannot hide its neck; the hat and scarf must be sized around that vertical line. This brontosaurus amigurumi crochet pattern makes a white winter sauropod with ice-blue accents, a 4 mm hook, worsted yarn, and a finished height near 25 cm. Work it as an intermediate project for a shelf toy that stands with four legs, a weighted tail, and removable-looking cold-weather pieces.
The Design: What Makes This Winter Brontosaurus Different
The long neck is built as a narrow stuffed core, not a loose tube, because a long neck dinosaur amigurumi will fold forward when the head carries large eyes and a hat. A 42-stitch head gives room for cheeks, lashes, and a broad smile without crowding the face. For the body, the oval stays low and long; the tail then works as a counterweight. The dorsal bumps are rounded instead of sharp, matching the soft winter dinosaur crochet pattern style and making the blue line read as snow-covered plates. One common maker mistake is sewing all four legs flat to the sides. The front pair needs to sit slightly forward, while the rear pair supports the body near the tail base.
Project Info at a Glance
| Skill Level | Time | Finished Size | Hook | Best For |
|---|---|---|---|---|
| Intermediate | 8–11 hours | About 25 cm high | 4.0 mm | Winter display, nursery shelf, dinosaur gift |
Size and hook are benchmarked against published brontosaurus amigurumi listings using worsted yarn and 4 mm hooks.
Materials and Tools
Yarn
- White / ivory — worsted weight — 86 g — brand suggestion: smooth acrylic or cotton-acrylic worsted
- Ice blue — worsted weight — 30 g — brand suggestion: Yarn and Colors Epic or matching medium cotton
- Pale pink — worsted weight — 5 g — cheek patches
- Black embroidery yarn — small amount — smile, brows, lashes
- White embroidery yarn — small amount — snowflake arms, pom-pom texture, scarf fringe
Tools
- Hook 4.0 mm
- Safety eyes 14 mm, blue or black with blue felt rings
- Polyester stuffing
- Yarn needle
- Stitch markers
- Pins
- Scissors
- Optional glass pellets or weighted pouch for tail only
Abbreviations
MR = magic ring / sc = single crochet / inc = 2 sc in one stitch / dec = single crochet 2 together / sl st = slip stitch / ch = chain / BLO = back loop only / FLO = front loop only / R = round or row / invdec = invisible decrease.
Invisible decrease works through the front loops of the next two stitches; it hides the gap at dec rounds.
Pattern — Step by Step
Continuous spiral unless noted.
Head Make 1
Yarn: white — Source: Standard amigurumi math; 42-stitch head benchmark cross-checked against published brontosaurus head shaping.
R1: 6 sc in MR (6)
R2: inc ×6 (12)
R3: (sc, inc) ×6 (18)
R4: (2 sc, inc) ×6 (24)
R5: (3 sc, inc) ×6 (30)
R6: (4 sc, inc) ×6 (36)
R7: (5 sc, inc) ×6 (42)
R8–R13: sc around (42)
Place safety eyes between R10 and R11, 10 sts apart. Add blue felt rings before locking washers if using black eyes.
R14: (5 sc, dec) ×6 (36)
R15: (4 sc, dec) ×6 (30)
R16: (3 sc, dec) ×6 (24)
Stuff cheeks firmly before the opening becomes small.
R17: (2 sc, dec) ×6 (18)
R18: (sc, dec) ×6 (12)
R19: dec ×6 (6)
Fasten off. Leave 20 cm tail.
Body Make 1
Yarn: white — Source: Standard amigurumi math; long body proportion benchmarked against brontosaurus body references.
R1: 6 sc in MR (6)
R2: inc ×6 (12)
R3: (sc, inc) ×6 (18)
R4: (2 sc, inc) ×6 (24)
R5: (3 sc, inc) ×6 (30)
R6: (4 sc, inc) ×6 (36)
R7: (5 sc, inc) ×6 (42)
R8–R20: sc around (42)
Mark the top center between R9 and R19 for dorsal bumps. Stuff from R15 onward.
R21: (5 sc, dec) ×6 (36)
R22: sc around (36)
R23: (4 sc, dec) ×6 (30)
R24: sc around (30)
R25: (3 sc, dec) ×6 (24)
R26: (2 sc, dec) ×6 (18)
R27: (sc, dec) ×6 (12)
R28: dec ×6 (6)
Fasten off. Leave 25 cm tail.
Neck Make 1
Yarn: white — Source: Standard amigurumi math; neck length adjusted for the photographed sauropod posture.
R1: 6 sc in MR (6)
R2: inc ×6 (12)
R3: (sc, inc) ×6 (18)
R4–R19: sc around (18)
Stuff every 3 rounds. The neck should bend slightly backward, not forward.
Fasten off. Leave 35 cm tail for sewing.
Front Legs Make 2
Yarn: white — Source: Standard amigurumi math.
R1: 6 sc in MR (6)
R2: inc ×6 (12)
R3: (sc, inc) ×6 (18)
R4: (2 sc, inc) ×6 (24)
R5–R9: sc around (24)
R10: (2 sc, dec) ×6 (18)
R11–R12: sc around (18)
Stuff the lower half firmly and leave the top softer for a flat join.
Fasten off. Leave 30 cm tail.
Back Legs Make 2
Yarn: white — Source: Standard amigurumi math.
R1: 6 sc in MR (6)
R2: inc ×6 (12)
R3: (sc, inc) ×6 (18)
R4: (2 sc, inc) ×6 (24)
R5–R10: sc around (24)
R11: (2 sc, dec) ×6 (18)
R12–R13: sc around (18)
Back legs are one round taller than front legs to lift the tail line.
Fasten off. Leave 30 cm tail.
Tail Make 1
Yarn: white — Source: Standard amigurumi math; tail presence cross-checked against published brontosaurus tail pattern sections.
R1: 6 sc in MR (6)
R2: sc around (6)
R3: inc ×6 (12)
R4: sc around (12)
R5: (sc, inc) ×6 (18)
R6–R7: sc around (18)
R8: (2 sc, inc) ×6 (24)
R9–R16: sc around (24)
Stuff the tail from the tip outward. Add a small weighted pouch only when the toy is not for a young child.
Fasten off. Leave 35 cm tail.
Dorsal Bumps Make 12
Yarn: ice blue — Source: Standard amigurumi math; replaces ears/wings because the photographed brontosaurus has no visible ears or wings.
R1: 6 sc in MR (6)
R2: inc ×6 (12)
R3: sc around (12)
Add a pea-size amount of stuffing to each bump.
Fasten off. Leave 18 cm tail.
Cheek Patches Make 2
Yarn: pale pink — Source: Standard amigurumi flat-circle math.
R1: 6 sc in MR (6)
R2: inc ×6 (12)
R3: (sc, inc) ×6 (18)
Sl st to first stitch.
Fasten off. Leave 20 cm tail.
Hat Cap Make 1
Yarn: ice blue — Source: Standard amigurumi math; cap sized to sit over the 42-stitch head.
R1: 6 sc in MR (6)
R2: inc ×6 (12)
R3: (sc, inc) ×6 (18)
R4: (2 sc, inc) ×6 (24)
R5: (3 sc, inc) ×6 (30)
R6: (4 sc, inc) ×6 (36)
R7–R9: sc around (36)
R10: BLO sc around (36)
Fasten off. Leave 25 cm tail.
Hat Brim Make 1
Yarn: ice blue — Source: Standard flat-row math.
Row 1: ch 37, sc in 2nd ch from hook and across (36)
Row 2–Row 5: ch 1, turn, BLO sc across (36)
Wrap brim around the front half of the cap. Sew only the short ends and lower edge.
Fasten off. Leave 25 cm tail.
Hat Side Knobs Make 2
Yarn: ice blue — Source: Standard amigurumi math; matches the rounded blue side shapes visible near the hat.
R1: 6 sc in MR (6)
R2: inc ×6 (12)
R3: (sc, inc) ×6 (18)
R4: sc around (18)
R5: (sc, dec) ×6 (12)
Fasten off. Leave 18 cm tail.
Pom-Pom Make 1
Yarn: white — Source: Standard amigurumi math.
R1: 6 sc in MR (6)
R2: inc ×6 (12)
R3: (sc, inc) ×6 (18)
R4–R5: sc around (18)
R6: (sc, dec) ×6 (12)
R7: dec ×6 (6)
Brush lightly or add short white yarn loops after sewing.
Fasten off. Leave 20 cm tail.
Scarf Make 1
Yarn: ice blue — Source: Standard flat-row math.
Row 1: ch 7, sc in 2nd ch from hook and across (6)
Row 2–Row 74: ch 1, turn, BLO sc across (6)
Add 5 cm white fringe to both short ends. Keep the scarf flat so it does not push the neck forward.
Fasten off. Weave both ends.
Snowflake Motifs Make 7
Yarn: white or ice blue — Source: Standard appliqué math.
R1: 6 sc in MR, sl st to first sc (6)
Arm repeat: *ch 4, sl st in 2nd ch from hook, sc in next ch, sl st in next ch, sl st in next base st* ×6 (6 base sts)
Fasten off. Leave 15 cm tail for sewing.
Face Embroidery
Yarn: black — Source: visual placement from the photo and standard amigurumi face finishing.
Place the smile between R13 and R15, spanning 18 stitches. Add three lashes at each outer eye, one brow 3 rounds above each eye, and a small pink highlight stitch near the center of each cheek patch.
Assembly
- Sew the neck to the underside of the head, centered between the eyes and back of head.
- Sew the lower neck to the front top of the body across a 10-stitch oval.
- Add the eye rings or felt backing, then lock the safety eyes if they are not already fixed.
- Sew cheek patches on R12–R14, 2 stitches outside each eye.
- Embroider the smile, lashes, and brows before adding the hat.
- Pin front legs under the chest, 8 rounds from the body front, then sew.
- Pin back legs near the tail base, 6 rounds from the rear end, then sew.
- Sew the tail to the rear body opening with the tip angled down.
- Sew dorsal bumps from hat line to tail, spacing each bump 1 round apart.
- Add hat, pom-pom, scarf, fringe, and snowflakes last.
The finished toy is a winter brontosaurus with four contact points, a balanced tail, and removable-looking cold-weather accessories.
7 Technical Tips
- Stitch marker drift: Move the marker after every round on the 42-stitch head; one skipped move shifts the smile by 1 stitch. Mark body top and belly with two colors before R8.
- Stuffing firmness: The neck needs about 85–90% firmness or the head folds under the hat. Add pea-size stuffing pieces every 3 rounds instead of one large clump.
- Invisible decrease gap: Work front loops only on Head R14–R19 and Body R21–R28. A normal two-loop decrease leaves six visible bars around the face and rump.
- Eye placement timing: Install eyes after Head R13 and before Head R14. A 14 mm eye set 10 stitches apart leaves space for lashes, cheeks, and the wide sauropod smile.
- Velvet tension check: If changing to velvet yarn, test 10 sc by 10 rounds before starting the head. More than 1 cm stretch across that swatch will make the hat too tight.
- Pinning failure mode: A diagonal leg layout makes the neck tip forward. Pin all four feet to the table first, then sew only after the body stands without hand support.
- Tail weaving length: Weave the tail yarn through the body for at least 8 cm after sewing. A single knot at the tail base can loosen when the dinosaur is picked up by the body.
Conclusion
This design works because the brontosaurus shape is treated as a balance problem first: heavy head, narrow neck, long body, four legs, and tail counterweight. Make one test head before cutting the scarf length, then adjust the hat brim by 2 rows if your yarn compresses more than expected. Save the pattern to Pinterest, post the finished dinosaur on Instagram, and tag the project with #WinterBrontosaurus. For the final photo, place the scarf knot slightly off center so the neck line stays visible. This brontosaurus amigurumi crochet pattern has one key styling choice left: should the blue dorsal bumps continue onto the tail tip?









