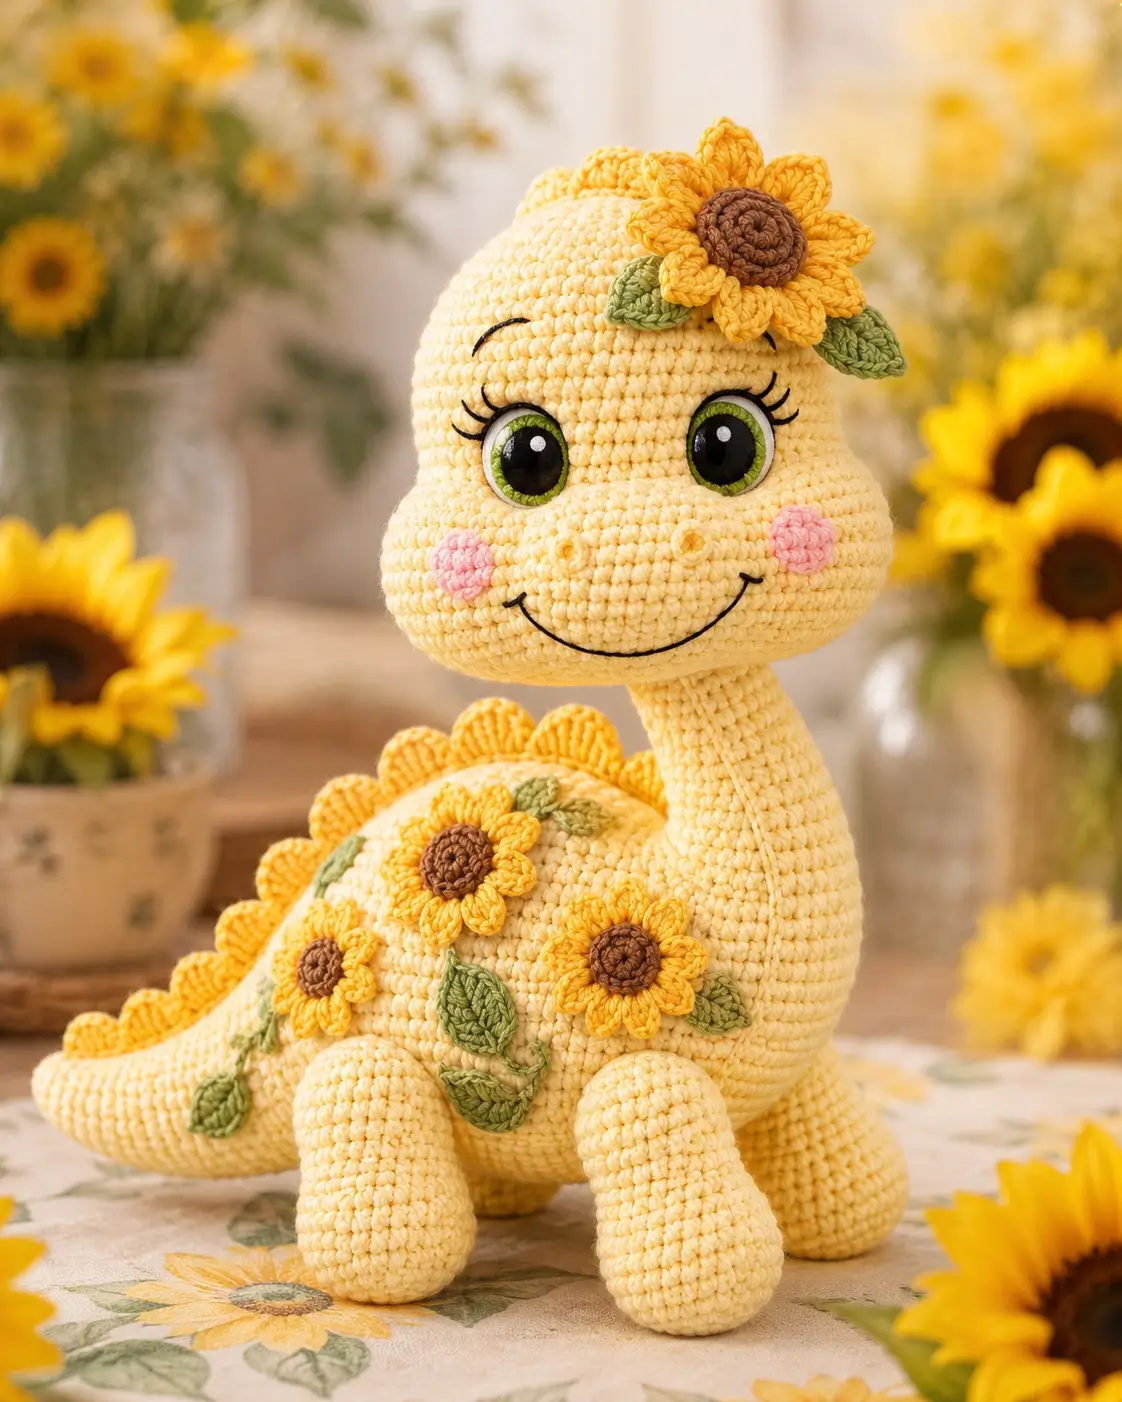
A long-neck dinosaur fails at the neck before any other seam shows. This dinosaur amigurumi crochet pattern uses cotton aran yarn, a 4 mm hook, and 14 mm eyes to build a sunflower bronto about 26 cm tall for an intermediate maker. It suits nursery shelving and gift display because the broad body, four feet, and tail create a stable base.
The Design: What Makes Sunflower Bronto Different
Sunflower Bronto needs three decisions that generic dinos can skip. First, the neck has to step from a narrow column into a wider base gradually, because a sudden flare makes the head pitch forward and leaves a hard hinge line. Second, the body has to stay broad enough to counter the neck; a round belly alone is not enough, so the tail acts as a rear brace. Third, the facial volume comes from flat cheek patches and tiny nostril rings instead of a separate muzzle, which keeps the silhouette closer to a cotton brontosaurus amigurumi.
You should pin the head flower before sewing the dorsal trim. The maker who places the eyes too low turns a long neck dinosaur crochet pattern into a turtle profile.
Project Info at a Glance
| Skill Level | Time | Finished Size | Hook | Best For |
|---|---|---|---|---|
| Intermediate | Multi-session build | 26 cm | 4.0 mm | Shelf display, gift toy |
Materials and Tools
This recolor keeps the cotton build framework and shifts the contrast allowance into sunflower shades rather than spots.
Yarn
- Butter yellow — aran cotton — about 145 g — Yarn and Colors Epic or similar
- Sunflower gold — aran cotton — about 25 g — same line or equivalent
- Leaf green — aran cotton — about 20 g — same line or equivalent
- Brown — aran cotton — about 10 g — same line or equivalent
- Blush pink — aran cotton — about 5 g — same line or equivalent
- Black and lime green — scrap amounts — for smile, lashes, and eye accents
Tools
- Hook 4.0 mm
- 14 mm safety eyes
- Stuffing
- Tapestry needle
- Stitch markers
- Pins
- Scissors
- Optional small weighted pouch for the body base
Abbreviations
MR = magic ring, sc = single crochet, inc = increase, dec = decrease, sl st = slip stitch, ch = chain, BLO = back loop only, hdc = half double crochet, dc = double crochet.
Use invisible decrease through the front loops only on all closing rounds; working through both loops leaves a six-point ridge on the head and body.
Pattern — Step by Step
Continuous spiral unless noted.
Head (Make 1)
Yarn: butter yellow
R1: 6 sc in MR [6]
R2: inc x6 [12]
R3: (sc, inc) x6 [18]
R4: (2 sc, inc) x6 [24]
R5: (3 sc, inc) x6 [30]
R6: (4 sc, inc) x6 [36]
R7: (5 sc, inc) x6 [42]
R8: sc around [42]
R9: sc around [42]
R10: sc around [42]
R11: sc around [42]
R12: sc around [42]
R13: sc around [42]
R14: sc around [42]
Place the 14 mm eyes between R10 and R11, spaced 11 stitches apart.
R15: (5 sc, dec) x6 [36]
R16: (4 sc, dec) x6 [30]
R17: (3 sc, dec) x6 [24]
Stuff firmly through the cheeks and crown, but keep the lower center slightly softer for the smile line.
R18: (2 sc, dec) x6 [18]
R19: (sc, dec) x6 [12]
R20: dec x6 [6]
Fasten off. Leave a 25 cm tail.
Neck (Make 1)
Yarn: butter yellow
R1: 6 sc in MR [6]
R2: inc x6 [12]
R3: (sc, inc) x6 [18]
R4: sc around [18]
R5: sc around [18]
R6: sc around [18]
R7: sc around [18]
R8: sc around [18]
R9: sc around [18]
R10: sc around [18]
R11: sc around [18]
R12: (2 sc, inc) x6 [24]
R13: sc around [24]
R14: sc around [24]
R15: sc around [24]
R16: sc around [24]
R17: sc around [24]
R18: sc around [24]
R19: sc around [24]
R20: sc around [24]
R21: sc around [24]
R22: (3 sc, inc) x6 [30]
R23: sc around [30]
R24: sc around [30]
R25: sc around [30]
Stuff the neck harder than the head. The piece should feel dense and spring back when pressed.
Fasten off. Leave a 30 cm tail.
Body (Make 1)
Yarn: butter yellow
R1: 6 sc in MR [6]
R2: inc x6 [12]
R3: (sc, inc) x6 [18]
R4: (2 sc, inc) x6 [24]
R5: (3 sc, inc) x6 [30]
R6: (4 sc, inc) x6 [36]
R7: (5 sc, inc) x6 [42]
R8: sc around [42]
R9: sc around [42]
R10: sc around [42]
R11: sc around [42]
R12: sc around [42]
R13: sc around [42]
R14: sc around [42]
R15: sc around [42]
R16: sc around [42]
R17: (5 sc, dec) x6 [36]
R18: (4 sc, dec) x6 [30]
Add a small weighted pouch now if the toy is for display rather than a small child.
R19: sc around [30]
R20: sc around [30]
R21: (3 sc, dec) x6 [24]
R22: sc around [24]
R23: (2 sc, dec) x6 [18]
Stuff the lower half heavily so the belly stays round and the base stays flat.
R24: (sc, dec) x6 [12]
R25: dec x6 [6]
Fasten off. Leave a 30 cm tail.
Front Legs (Make 2)
Yarn: butter yellow
R1: 6 sc in MR [6]
R2: inc x6 [12]
R3: (sc, inc) x6 [18]
R4: sc around [18]
R5: sc around [18]
R6: sc around [18]
R7: sc around [18]
R8: sc around [18]
R9: sc around [18]
R10: (sc, dec) x6 [12]
R11: sc around [12]
R12: sc around [12]
R13: sc around [12]
R14: sc around [12]
R15: sc around [12]
Stuff the lower two-thirds only. Leave the top edge slightly soft for easier sewing.
Fasten off. Leave a 20 cm tail on each leg.
Back Legs (Make 2)
Yarn: butter yellow
R1: 6 sc in MR [6]
R2: inc x6 [12]
R3: (sc, inc) x6 [18]
R4: sc around [18]
R5: sc around [18]
R6: sc around [18]
R7: sc around [18]
R8: (sc, dec) x6 [12]
R9: sc around [12]
R10: sc around [12]
R11: sc around [12]
R12: sc around [12]
R13: sc around [12]
Fasten off. Leave a 20 cm tail on each leg.
Tail (Make 1)
Yarn: butter yellow
R1: 6 sc in MR [6]
R2: inc x6 [12]
R3: (sc, inc) x6 [18]
R4: (2 sc, inc) x6 [24]
R5: sc around [24]
R6: sc around [24]
R7: sc around [24]
R8: (2 sc, dec) x6 [18]
R9: sc around [18]
R10: sc around [18]
R11: sc around [18]
R12: (sc, dec) x6 [12]
R13: sc around [12]
R14: sc around [12]
R15: sc around [12]
R16: dec x6 [6]
R17: sc around [6]
R18: sc around [6]
R19: sc around [6]
R20: sc around [6]
Stuff from base to tip, but keep the last 2 rounds a bit softer so the tail can sit on the surface.
Fasten off. Leave a 25 cm tail.
Dorsal Scallops (Make 1 Strip)
Yarn: sunflower gold — worked in rows, not spiral.
Ch 25.
Row 1: Starting in 2nd ch from hook, *(sl st in next ch, hdc, dc, hdc in next ch)* repeat 12 times across. [12 scallops]
Fasten off. Leave a 25 cm tail at each end.
Cheek Patches (Make 2)
Yarn: blush pink
R1: 6 sc in MR [6]
R2: inc x6 [12]
R3: (sc, inc) x6 [18]
Fasten off. Leave a 15 cm tail.
Nostril Rings (Make 2)
Yarn: butter yellow
R1: 6 sc in MR [6]
Fasten off. Leave a 12 cm tail.
Leaves (Make 8)
Yarn: leaf green
Ch 7.
Row 1: Starting in 2nd ch from hook, sl st in next ch, sc in next ch, hdc in next ch, dc in next ch, hdc in next ch, sc in last ch. [6]
Row 2: Rotate to the opposite side of the foundation chain and work hdc in next space, dc in next space, hdc in next space, sc in next space, sl st in last space. [5]
Fasten off. Leave a 15 cm tail.
Large Sunflower Appliqué (Make 1)
Center yarn: brown. Petal yarn: sunflower gold.
Center
R1: 6 sc in MR [6]
R2: inc x6 [12]
R3: (sc, inc) x6 [18]
R4: (2 sc, inc) x6 [24]
Change to sunflower gold.
Petal Round: *(In next st work sl st, ch 2, 2 dc, ch 2, sl st), sl st in next st* repeat 12 times around. [12 petals]
Fasten off. Leave a 20 cm tail.
Small Sunflower Appliqués (Make 3)
Center yarn: brown. Petal yarn: sunflower gold.
Center
R1: 6 sc in MR [6]
R2: inc x6 [12]
R3: (sc, inc) x6 [18]
Change to sunflower gold.
Petal Round: *(In next st work sl st, ch 2, 2 dc, ch 2, sl st), sl st in next st* repeat 9 times around. [9 petals]
Fasten off. Leave a 20 cm tail.
Assembly
- Sew the neck to the underside of the head, centered between the closing rounds so the face tilts slightly upward rather than straight ahead.
- Sew the lower end of the neck to the front third of the body, not the midpoint, so the belly stays under the weight line.
- Install the eyes now if you did not place them during the head section, then embroider a lime green ring around each eye, black upper lashes, short brows, and the curved smile.
- Stitch the cheek patches one stitch below the eyes and about three stitches outside the smile line.
- Sew the nostril rings to the snout, four stitches apart, slightly above the smile curve.
- Pin and sew the front legs to the body with the inner edges about six stitches apart.
- Pin and sew the back legs with the inner edges about eight stitches apart, checking that all four feet touch the table before closing the seams.
- Attach the tail to the lower back center and angle it downward so the tip reaches the surface.
- Sew the dorsal scallop strip from the top back edge of the head down the spine and onto the tail base.
- Attach one large sunflower with two leaves on the upper right head side, then place three small sunflowers with six leaves across the body panel and weave every remaining tail inside.
The finished piece should sit on four feet with the tail touching the surface as a fifth contact point.
7 Technical Tips
- Stitch markers: Move the marker every round on the neck and body. A one-stitch drift over eight rounds is enough to twist the head off center.
- Stuffing firmness: Pack the neck about 15–20% firmer than the head. A soft neck is the first cause of forward droop in long-neck builds.
- Invisible decrease: Work every dec through the front loops only on the head, body, and tail. Full-loop decreases leave six visible dents that read as corners under side lighting.
- Eye placement timing: Install 14 mm eyes before the head closes past 24 stitches. Pushing posts through a nearly closed sphere can warp the face and throw off the cheek spacing.
- Velvet tension: If you swap cotton for velvet, make a 12-stitch test ring first. A hook that is 0.5 mm too large will blur the nostril rings and flatten the sunflower centers.
- Pinning: Pin all four legs and the tail before sewing any permanent seam. Even a 5 mm height difference between front and back feet will make the toy rock on a hard surface.
- Tail weaving: Weave the tail end through at least five internal stitch posts after sewing. Shorter weaving lets the tail twist, and that changes the support angle over time.
Conclusion
Next, block the leaves lightly with distant steam, photograph the right profile, and compare the neck line before posting the project notes. Pin one image to Pinterest with the flower crown visible and share a close face crop on Instagram with #SunflowerBronto. This build reads best when the head flower sits above the right eye rather than centered, because that keeps the neck line and brow visible. Keep strong contrast between body, petals, and flower centers when you change colors. Did you place the crown flower above the eye or between the first two scallops in your dinosaur amigurumi crochet pattern?









