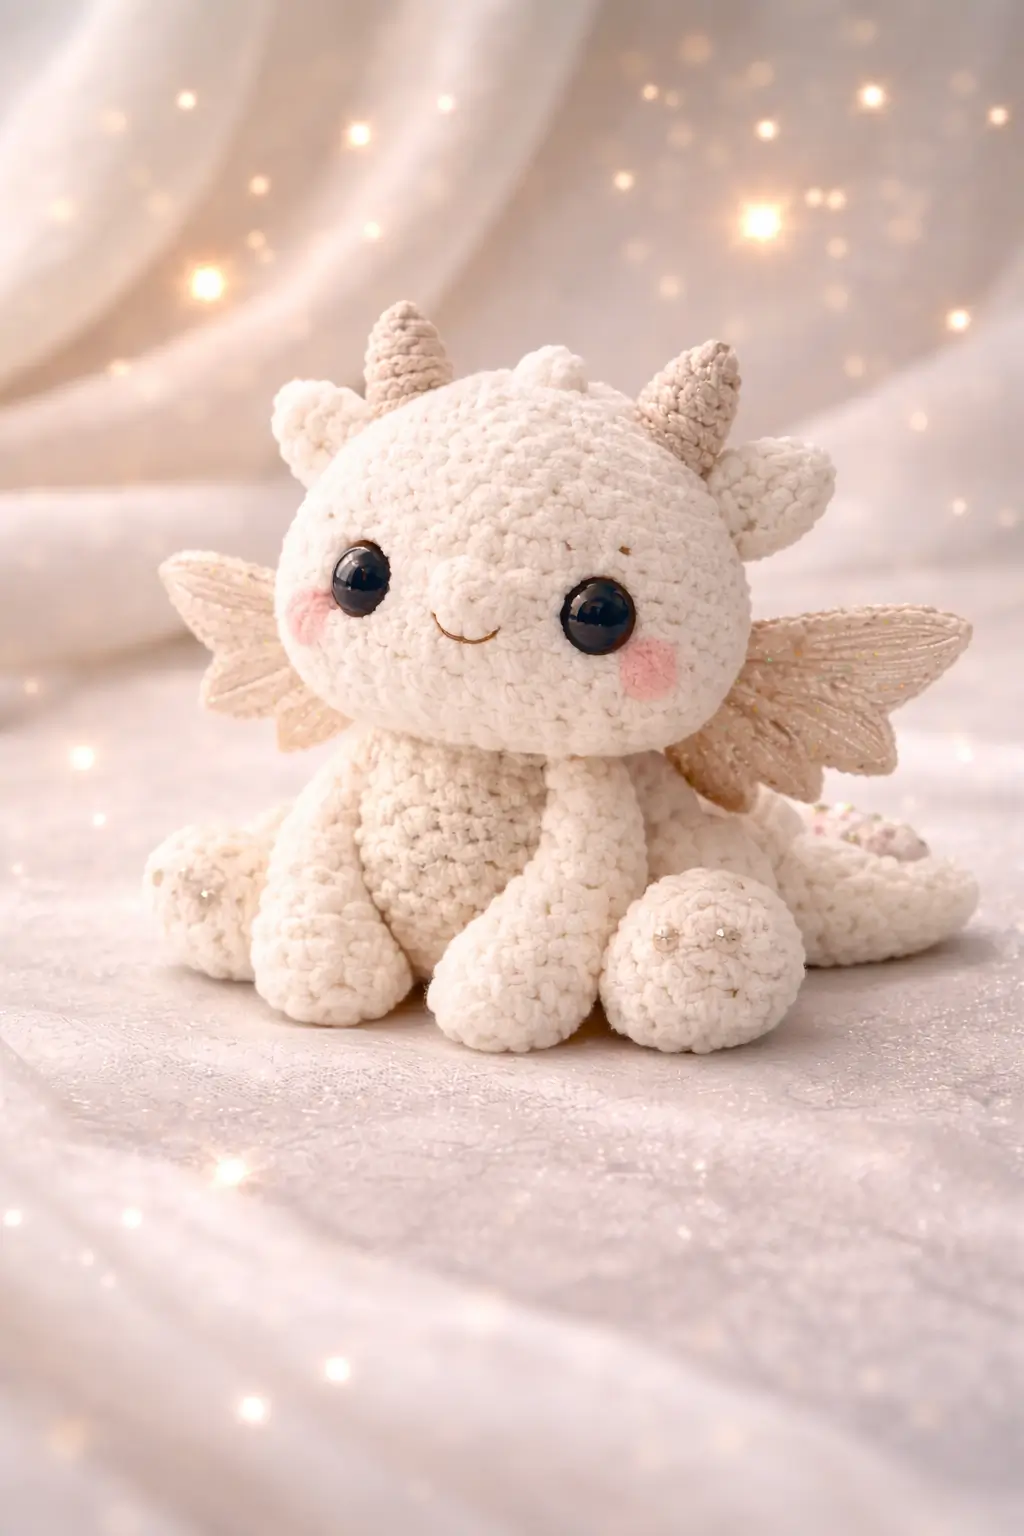
Dragons stop looking airborne the moment the wings sit below the cheek line. This dragon amigurumi crochet pattern uses white plush chenille, a 19 cm seated build, and intermediate shaping to keep the horns, face, and tail readable at small scale. Make it as a shelf mascot, nursery piece, or fantasy market sample that stands without a base.
The Design: What Makes This Dragon Different
You need three ratios to sell this silhouette: a head wider than the chest, horns shorter than the eye width, and wings mounted behind the jaw instead of the shoulder seam. That combination keeps the toy in baby-dragon territory rather than dinosaur territory. In this plush dragon crochet pattern, the body stays compact so the figure sits forward on its hind legs while the tail works as a rear brace. A second choice matters just as much. The snout projects only slightly, because a long muzzle hardens the expression and steals space from the cheeks. Many makers place the wings too low or crochet the horns in the same bulky yarn as the body; then the top of the head crowds out the face. That is where a baby dragon crochet pattern usually loses proportion. Recent dragon builds also range widely in yarn, hook, and eye scale, so matching the face to the plush yarn matters from the first six rounds.
Project Info at a Glance
| Skill Level | Time | Finished Size | Hook | Best For |
|---|---|---|---|---|
| Intermediate | 5–7 hours | 19 cm | 4 mm | seated shelf display / nursery décor |
Materials and Tools
Recent dragon references that match this photo most closely use plush or chenille yarn, larger eye sizes, and a hook in the 3.5–4.5 mm range. The supply list below is scaled to a seated white plush dragon rather than a cotton dragon.
Yarn
- Ivory white — plush chenille / soft plush — 50–60 g — Alize Soft Plush or Hobbii Honey Bunny
- Warm beige — DK cotton or plush scrap — 5 g — any smooth horn yarn
- Blush pink — light chenille or cotton scrap — 2 g — cheek patches
- Champagne shimmer — metallic thread or fine sparkle yarn — 4–6 g — wing veins and trim
- Pale oatmeal — plush or cotton scrap — 5 g — belly patch and snout shading
Tools
- Hook 4 mm
- Safety eyes 20 mm
- Polyfill stuffing
- Tapestry needle
- Stitch markers
- Embroidery thread for smile
- Pins or clips
- Optional 4 mm pearl beads for decorative claw sparkle
Abbreviations
MR / sc / inc / dec / sl st / ch / BLO / FLO / hdc / dc
Use invisible decrease through the front loops only; plush yarn shows standard decreases faster along the cheeks, body taper, and tail base.
Pattern — Step by Step
Continuous spiral unless noted.
Head (Make 1)
Yarn: ivory white — Source: Standard amigurumi math adapted for a 19 cm seated plush dragon.
R1: 6 sc in MR (6)
R2: inc x6 (12)
R3: (sc, inc) x6 (18)
R4: (2 sc, inc) x6 (24)
R5: (3 sc, inc) x6 (30)
R6: (4 sc, inc) x6 (36)
R7: sc around (36)
R8: sc around (36)
R9: sc around (36)
R10: sc around (36)
R11: sc around (36)
R12: sc around (36)
R13: (4 sc, dec) x6 (30)
R14: (3 sc, dec) x6 (24)
R15: (2 sc, dec) x6 (18)
R16: (sc, dec) x6 (12)
R17: dec x6 (6)
Insert the 20 mm eyes between R9 and R10, spaced 8–9 stitches apart. Stuff firmly before R15, then add smaller pieces of fill through the closing rounds.
Fasten off. Leave a 20 cm tail.
Body (Make 1)
Yarn: ivory white — Source: Standard amigurumi math adapted for seated balance.
R1: 6 sc in MR (6)
R2: inc x6 (12)
R3: (sc, inc) x6 (18)
R4: (2 sc, inc) x6 (24)
R5: (3 sc, inc) x6 (30)
R6: (4 sc, inc) x6 (36)
R7: sc around (36)
R8: sc around (36)
R9: (4 sc, dec) x6 (30)
R10: sc around (30)
R11: sc around (30)
R12: (3 sc, dec) x6 (24)
R13: sc around (24)
R14: (2 sc, dec) x6 (18)
R15: sc around (18)
R16: (sc, dec) x6 (12)
R17: dec x6 (6)
Stuff the lower half more firmly than the upper half so the dragon sits instead of folding under the head.
Fasten off. Leave a 25 cm tail.
Belly Patch (Make 1)
Yarn: pale oatmeal — Source: Standard amigurumi math.
R1: 6 sc in MR (6)
R2: inc x6 (12)
R3: (sc, inc) x6 (18)
R4: sc around (18)
Steam or finger-stretch this flat circle into a slight oval before sewing.
Fasten off. Leave a 20 cm tail.
Front Legs / Arms (Make 2)
Yarn: ivory white — Source: Standard amigurumi math.
R1: 6 sc in MR (6)
R2: inc x6 (12)
R3: sc around (12)
R4: sc around (12)
R5: sc around (12)
R6: dec x6 (6)
R7: sc around (6)
R8: sc around (6)
R9: sc around (6)
R10: sc around (6)
R11: sc around (6)
R12: sc around (6)
Stuff only the paw section through R5. Leave the upper tube soft so it bends forward against the chest.
Fasten off. Leave a 20 cm tail.
Back Legs (Make 2)
Yarn: ivory white — Source: Standard amigurumi math.
R1: 6 sc in MR (6)
R2: inc x6 (12)
R3: (sc, inc) x6 (18)
R4: sc around (18)
R5: sc around (18)
R6: (sc, dec) x6 (12)
R7: sc around (12)
R8: sc around (12)
R9: sc around (12)
Stuff the foot and front curve only. Keep the top edge flatter for easier pinning to the body.
Fasten off. Leave a 20 cm tail.
Ear Nubs (Make 2)
Yarn: ivory white — Source: Standard amigurumi math.
R1: 6 sc in MR (6)
R2: inc x6 (12)
R3: sc around (12)
Fold each nub flat before sewing so it reads as a soft side ear rather than a third horn.
Fasten off. Leave a 15 cm tail.
Horns (Make 2)
Yarn: warm beige — Source: Standard amigurumi math, worked smaller for head contrast.
R1: 6 sc in MR (6)
R2: sc around (6)
R3: (sc, inc) x3 (9)
R4: sc around (9)
R5: (2 sc, inc) x3 (12)
Do not stuff. For a sharper cone, use a smaller hook or a smoother yarn than the body yarn.
Fasten off. Leave a 15 cm tail.
Snout (Make 1)
Yarn: pale oatmeal or ivory white — Source: Standard amigurumi math.
R1: 6 sc in MR (6)
R2: inc x6 (12)
R3: sc around (12)
Lightly stuff. The snout should project only a little from the face.
Fasten off. Leave a 20 cm tail.
Wings (Make 2)
Yarn: ivory white or champagne shimmer blend — Source: Standard flat-wing shaping.
Row 1: ch 11, starting in 2nd ch from hook sc 10 (10)
Row 2: ch 1, turn, dec, 6 sc, dec (8)
Row 3: ch 1, turn, sc across (8)
Row 4: ch 1, turn, dec, 4 sc, dec (6)
Row 5: ch 1, turn, sc across (6)
Work 3 small picots evenly along the lower edge if you want a more lacy silhouette. Make the second wing the same way.
Fasten off. Leave a 20 cm tail.
Tail (Make 1)
Yarn: ivory white — Source: Standard amigurumi math.
R1: 6 sc in MR (6)
R2: sc around (6)
R3: sc around (6)
R4: sc around (6)
R5: sc around (6)
R6: (sc, inc) x3 (9)
R7: sc around (9)
R8: sc around (9)
R9: sc around (9)
R10: (2 sc, inc) x3 (12)
R11: sc around (12)
R12: sc around (12)
R13: sc around (12)
Stuff only the base at R10–R13. Leave the rest lightly filled so the tail can curl under or beside the body as a rear support.
Fasten off. Leave a 25 cm tail.
Cheek Patches (Make 2)
Yarn: blush pink — Source: Standard flat circle math.
R1: 6 sc in MR (6)
R2: inc x6 (12)
Keep these flat. If you prefer a softer blush, replace them with felted dry-brush color or surface embroidery.
Fasten off. Leave a 15 cm tail.
Shimmer Wing Veins (Make 2)
Accessory from photo.
Cut three lengths of metallic thread for each wing: one center vein and two diagonal branches. Tack them onto each wing with small stitches, keeping the top anchor point close to the body edge so the shimmer stays inside the wing outline.
Pearl Claw Beads (Optional)
Accessory from photo.
Sew three small pearl beads onto one front paw and one or two near the tail tip for a sparkled display finish. Skip beads on toys meant for small children and replace them with French knots or metallic embroidery.
Assembly
- Sew the head to the body with the head centered slightly forward, not straight on top of the body.
- Attach the belly patch to the front of the body, centered from the neck area to the lower belly.
- Sew the snout between the eyes, then embroider a small curved smile under it.
- Add the cheek patches one stitch below the eye line and one stitch outside each eye.
- Pin the front legs to the lower front body so the paws angle inward slightly, then sew them in place.
- Attach the back legs at the side base of the body, leaving about 4 stitches between the inner edges when viewed from the front.
- Sew the tail low on the back and curve it to one side so it helps stabilize the seated pose.
- Attach the ear nubs high on the side crown, then place the horns between them and the center line of the head.
- Sew the wings behind the cheek line with the top edge beginning near the jaw level, then add the shimmer wing veins.
- Add optional pearl claw details, weave in every tail, and shape the body by hand so the dragon rests on hind paws, front paws, and tail base.
The finished toy should sit on multiple contact points with the wings reading above the eye line.
7 Technical Tips
- Stitch markers: Miss one increase round on the head and the 20 mm eyes stop fitting the face proportion. Keep a hard marker in every round from R1 through R13 on the head.
- Stuffing firmness: Underfilled lower bodies collapse under the oversized head in plush yarn. Pack the base to roughly 80% firmness, then back off in the top third of the body.
- Invisible decrease: Standard decreases create six raised dents on plush surfaces, especially in R13–R17 of the head. Work invisible decreases and tighten the following stitch so the taper stays round.
- Eye placement timing: Install the eyes before R13 on the head or the opening narrows too far for large washers. For this scale, 8–9 stitches between eyes keeps the snout centered and leaves room for blush circles.
- Velvet tension: If the 36-stitch head plateau ripples, the hook is too large for the yarn. Drop by 0.5 mm before continuing rather than trying to fix the wave with tighter hands.
- Pinning: Wings that start below the outer eye corner pull the silhouette downward. Pin both wings first, check them from the front, then sew only after the top edges match.
- Tail weaving: A straight buried tail seam can drag the rear off center and spoil the seated pose. Weave the attachment tail in a shallow S-path across 3–4 stitches inside the body before knotting it off.
Conclusion
This build works because the face stays short, the horns stay controlled, and the wings sit high enough to read as flight anatomy instead of shoulder decoration. Start with the head first, test the eye spacing in plush yarn, and then match every later piece to that scale before sewing anything down. Once the dragon is assembled, photograph one front view and one side view so the cheek line, wing height, and tail brace are visible. Save the project to Pinterest, post the finished toy on Instagram, and tag it with #WhitePlushDragonPattern. Did you keep the side head nubs as ears, or did you treat them as a second horn pair in this dragon amigurumi crochet pattern?









