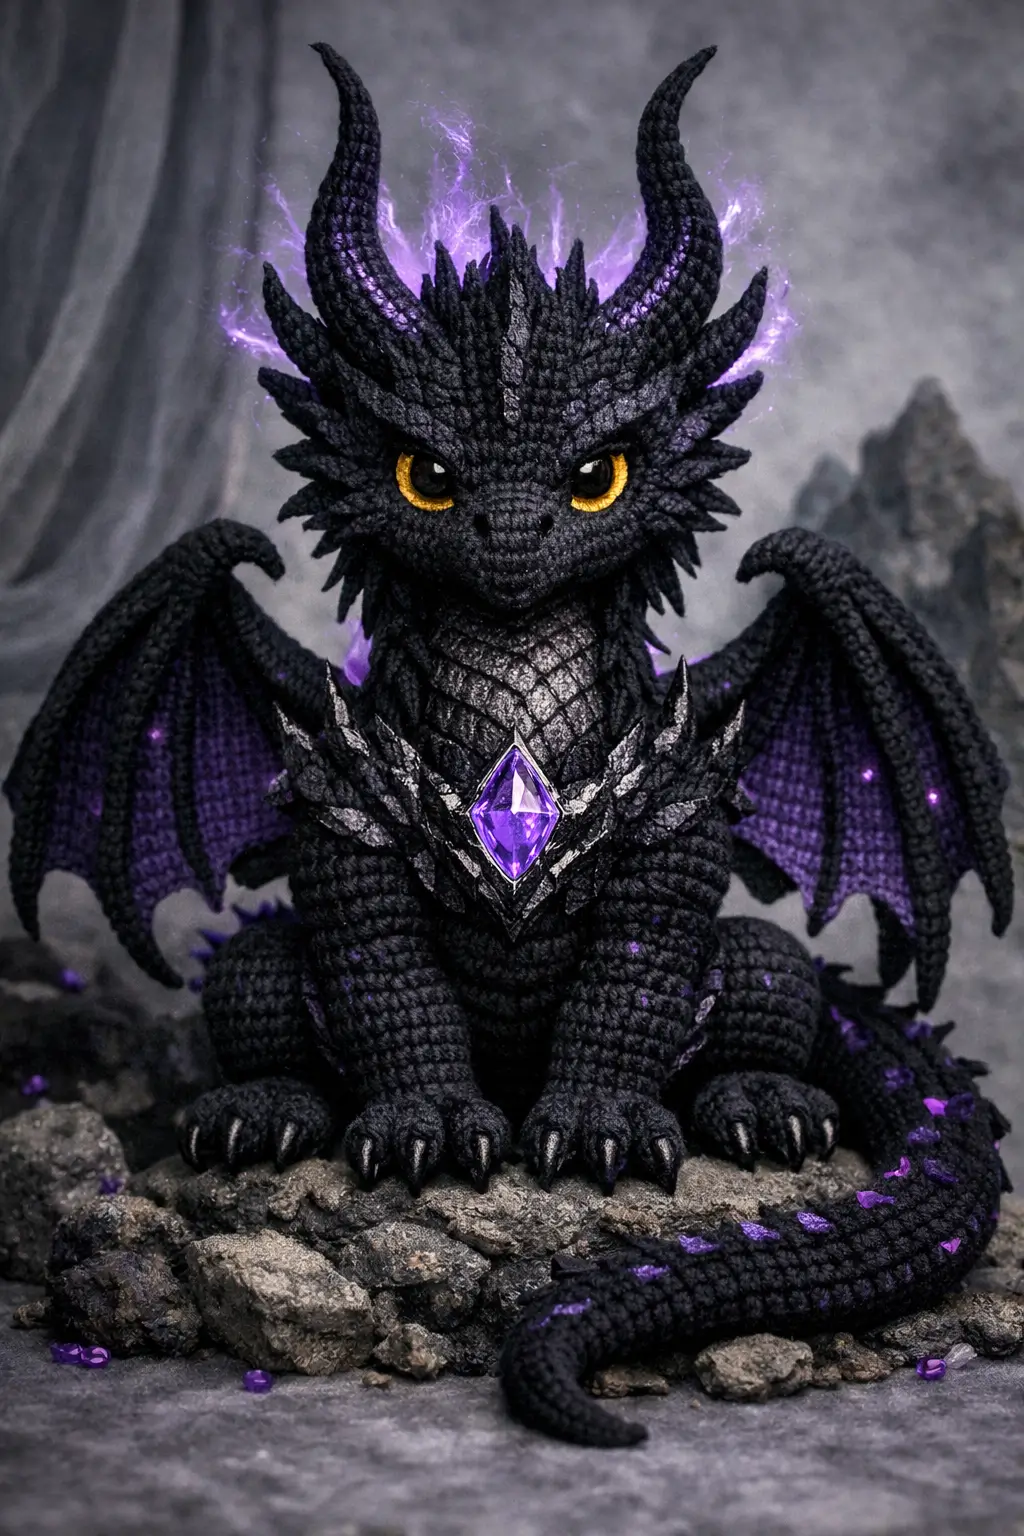
A black dragon with two forward-curving horns needs forehead width before it needs scale detail, and that is the central drafting problem in this dragon amigurumi crochet pattern. This version uses aran-weight yarn, a 4 mm hook, and 18 mm eyes to build a seated figure around 25 cm tall. Skill level is intermediate. It works well as shelf décor because the horns, wings, and chest gem stay readable from a distance.
The Design: What Makes This Dragon Different
You are not building a round baby dragon here. The photographed model depends on three structural moves: a wider cranium for the horn base, a separate snout so the face narrows forward, and broad wings that sit low enough to frame the body without tipping it backward. Midway through the build, the design shifts from toy logic to display logic. That is why the black dragon amigurumi uses a chest plate and cheek frills instead of a flat belly-only finish. A common failure with any fantasy dragon crochet pattern is undersizing the head and then forcing oversized horns onto it. The result looks goat-like, not draconic. Current ranking pages also lean cute or low-sew, leaving a clear gap for a darker, more layered seated dragon.
Project Info at a Glance
| Skill Level | Time | Finished Size | Hook | Best For |
|---|---|---|---|---|
| Intermediate | Weekend build | 25 cm tall | 4 mm | Shelf display / fantasy décor |
Materials and Tools
Yarn
- Black — aran / heavy cotton — 200 g benchmark — heavy cotton such as Yarn and Colors Epic style yarn
- Purple — aran / heavy cotton — 40 g benchmark — for wing membranes and gem surround
- Dark gray / charcoal — aran / heavy cotton — 20 g benchmark — for armor accents, frills, and claws
- Gold felt or embroidered iris backing — small scrap
- Polyfill — about 100 g
Tools
- Hook 4 mm
- 18 mm safety eyes
- Stuffing
- Tapestry needle
- Stitch markers
- Pins
- Optional thin craft wire for horn curve or wing support
Abbreviations
MR = magic ring, sc = single crochet, inc = increase, dec = decrease, sl st = slip stitch, ch = chain, BLO = back loop only, hdc = half double crochet, dc = double crochet.
Use invisible decrease on visible shaping rounds from 36 down to 12 so the black fabric stays smooth and the stuffing does not flash through the decrease line.
Pattern — Step by Step
Continuous spiral unless noted.
All shaping below is an original photo-based draft using standard amigurumi math.
Head (Make 1)
Yarn: black
R1: 6 sc in MR (6)
R2: inc ×6 (12)
R3: (sc, inc) ×6 (18)
R4: (2 sc, inc) ×6 (24)
R5: (3 sc, inc) ×6 (30)
R6: (4 sc, inc) ×6 (36)
R7–R13: sc around (36)
R14: (4 sc, dec) ×6 (30)
R15: sc around (30)
R16: (3 sc, dec) ×6 (24)
R17: (2 sc, dec) ×6 (18)
R18: (sc, dec) ×6 (12)
Insert eyes between R9 and R10, about 10 stitches apart. Mount them over gold felt ovals if you want the photographed glare.
R19: dec ×6 (6)
Stuff firmly before the last round.
Fasten off. Leave 20 cm tail.
Snout (Make 1)
Yarn: black
R1: 6 sc in MR (6)
R2: inc ×6 (12)
R3: (sc, inc) ×6 (18)
R4–R5: sc around (18)
R6: (sc, dec) ×6 (12)
Stuff lightly. Flatten the back edge before sewing.
Fasten off. Leave 18 cm tail.
Body (Make 1)
Yarn: black
R1: 6 sc in MR (6)
R2: inc ×6 (12)
R3: (sc, inc) ×6 (18)
R4: (2 sc, inc) ×6 (24)
R5: (3 sc, inc) ×6 (30)
R6: (4 sc, inc) ×6 (36)
R7–R10: sc around (36)
R11: (4 sc, dec) ×6 (30)
R12–R13: sc around (30)
R14: (3 sc, dec) ×6 (24)
R15–R16: sc around (24)
R17: (2 sc, dec) ×6 (18)
R18–R19: sc around (18)
R20: (sc, dec) ×6 (12)
Stuff the lower belly harder than the top third. The piece must sit, not slump.
Fasten off. Leave 20 cm tail.
Front Legs (Make 2)
Yarn: black
R1: 6 sc in MR (6)
R2: inc ×6 (12)
R3: BLO sc around (12)
R4–R6: sc around (12)
R7: dec ×6 (6)
R8–R11: sc around (6)
Stuff the paw and lower half only.
Fasten off. Leave 18 cm tail.
Back Legs (Make 2)
Yarn: black
R1: 6 sc in MR (6)
R2: inc ×6 (12)
R3: (sc, inc) ×6 (18)
R4–R5: sc around (18)
R6: (sc, dec) ×6 (12)
R7–R8: sc around (12)
R9: dec ×6 (6)
R10: sc around (6)
Stuff the front half more than the back edge so the leg sits flat against the ground.
Fasten off. Leave 18 cm tail.
Wings (Make 2)
Yarn: black outer edge or purple membrane
Ch 17
Row 1: sc in 2nd ch from hook and across (16)
Row 2: dec, sc 12, dec (14)
Row 3: sc across (14)
Row 4: dec, sc 10, dec (12)
Row 5: sc across (12)
Row 6: dec, sc 8, dec (10)
Row 7: sc across (10)
Row 8: dec, sc 6, dec (8)
Row 9: sc across (8)
Make the second wing as a mirror by starting the first decrease from the opposite side if you want a sharper outer sweep.
Fasten off. Leave 22 cm tail.
Optional: add surface sl st ribs after assembly or trap a light wire along the top edge.
Horns (Make 2)
Yarn: charcoal
R1: 6 sc in MR (6)
R2–R5: sc around (6)
R6: inc ×6 (12)
R7–R8: sc around (12)
Insert thin wire only if you want a stronger forward curve. Stuff very lightly.
Fasten off. Leave 15 cm tail.
Cheek Patches (Make 2)
Yarn: dark gray
R1: 6 sc in MR (6)
R2: inc ×6 (12)
Sl st to first stitch.
Fasten off. Leave 12 cm tail.
Cheek Frills (Make 2)
Yarn: dark gray
Ch 15
Row 1: sc in 2nd ch from hook and across (14)
Row 2: sl st, sc, hdc, dc, hdc, sc, hdc, dc, hdc, sc, hdc, dc, hdc, sl st (14)
Fasten off. Leave 15 cm tail.
These strips sit behind the cheek patches and create the layered jawline seen in the photo.
Spine Scales (Make 10)
Yarn: dark gray or purple
Ch 4
Row 1: sc in 2nd ch from hook and across (3)
Row 2: ch 1, inc, sc, inc (5)
Row 3: sl st, sc, hdc, sc, sl st (5)
Fasten off. Leave 10 cm tail.
Sew 4 between the horns and 6 along the tail curve.
Belly Scale Panel (Make 1)
Yarn: dark gray
Ch 6
Row 1: sc in 2nd ch from hook and across (5)
Row 2: ch 1, inc, sc 3, inc (7)
Row 3: sc across (7)
Row 4: ch 1, inc, sc 5, inc (9)
Row 5: sc across (9)
Row 6: ch 1, dec, sc 5, dec (7)
Row 7: ch 1, dec, sc 3, dec (5)
Fasten off. Leave 18 cm tail.
Surface-stitch diagonal lines after sewing it on to imitate armor scales.
Chest Armor Base (Make 1)
Yarn: dark gray
Ch 7
Row 1: sc in 2nd ch from hook and across (6)
Row 2: ch 1, inc, sc 4, inc (8)
Row 3: sc across (8)
Row 4: ch 1, inc, sc 6, inc (10)
Row 5: sc across (10)
Row 6: ch 1, dec, sc 6, dec (8)
Row 7: sc across (8)
Row 8: ch 1, dec, sc 4, dec (6)
Fasten off. Leave 18 cm tail.
Gem Appliqué (Make 1)
Yarn: purple
Ch 2
Row 1: 2 sc in 2nd ch from hook (2)
Row 2: ch 1, inc in each st (4)
Row 3: ch 1, sc across (4)
Row 4: ch 1, dec, dec (2)
Fasten off. Leave 12 cm tail.
For a closer photo match, replace this with a plastic gem and stitch it through the armor base.
Assembly
- Sew the snout centered on the lower half of the head so its top edge sits just below the eye line.
- Close and shape the head with thumb pressure at the forehead so the horn base reads broad, not round.
- Attach the head to the 12-stitch body opening with a slight forward tilt. The dragon should look downward, not skyward.
- Sew the belly scale panel to the front of the body from neck seam to lower belly. Add diagonal surface lines after it is fixed in place.
- Attach the front legs close together at the front base. Sew the back legs wider and slightly lower so the figure carries its weight on four contact points.
- Pin the wings one round below the neck seam and test them from the front before sewing. A low wing root frames the head better on this shape.
- Sew the horns on top of the head, about 8 stitches apart at the base. Curve them forward as you stitch so they copy the photo silhouette.
- Add the cheek patches under the eyes, then place the cheek frills just behind them. Sew four spine scales between the horns.
- Attach the tail high on the back and curve it around the body. Sew the remaining scales along the outer tail edge and embroider three claws on each foot in charcoal or black.
- Fix the chest armor base to the upper chest and stitch the gem into its center. Weave in all ends from two directions so the heavy front details do not pull loose.
The piece is complete when it sits upright without the tail acting as a prop.
7 Technical Tips
- Marker drift: Move the marker every round, not every other round. A one-stitch drift by Round 12 is enough to throw the horn line off center.
- Stuffing firmness: Pack the head to a firm dome, but keep the top third of the body softer than the belly. A hard upper body pushes the dragon backward and lifts the front feet.
- Invisible decrease line: Use invisible dec on every visible closing round from 36 to 12. Standard decreases on black yarn can leave pale stuffing flashes that show under direct light.
- Eye placement timing: Install the eyes before the head drops below 24 stitches. Waiting until the 18-stitch stage makes washer placement clumsy and often dents the face.
- Hook correction: If you can spread a stitch and see more than a 2 mm gap, drop from 4 mm to 3.5 mm. The photographed dragon depends on a dense fabric, especially around the snout and horn base.
- Wing pinning: Use at least three pins per wing before sewing: top point, outer tip, and lower corner. That one step stops the common failure where one wing sits a full row higher than the other.
- Tail anchoring: Weave the tail sewing strand through at least 8 cm of internal body stitches before trimming. A curled display tail pulls sideways over time if the tail is attached only at the seam ring.
Conclusion
This build works because the silhouette is handled in the right order: forehead width, horn angle, wing height, then chest detail. Start with the head and snout first, test the eye spacing before closure, and pin every large part before sewing. After that, photograph the dragon in front and profile view so the horns, cheek frills, and gem stay visible. Share the finished piece on Pinterest and Instagram with #BlackDragonAmigurumi. One question matters more than any other on this design: did you keep the horns close together or widen them for a heavier crown line? That single change can redefine a dragon amigurumi crochet pattern.









