Introduction
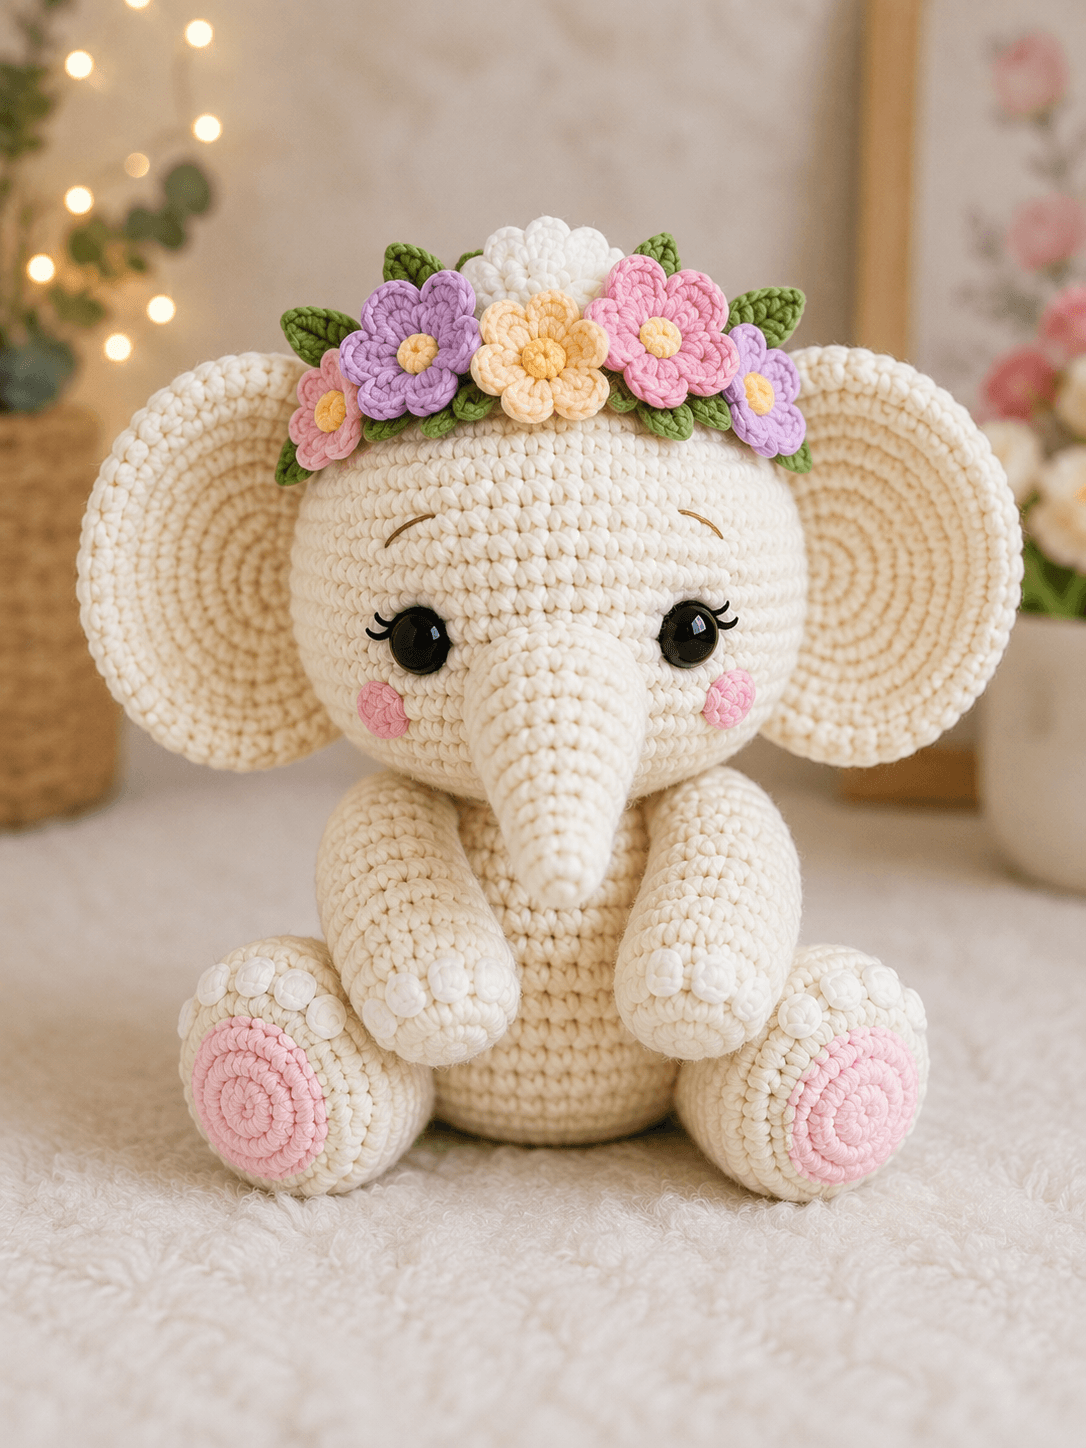
Six flowers have to fit between two elephant ears wider than the body without pushing either ear backward. This white elephant amigurumi crochet pattern uses worsted yarn, a 3.5 mm hook, 15–16 mm eyes, a 42-stitch head, oversized ears, pink paw pads, and a pastel floral crown. The finished elephant sits approximately 29–32 cm high and requires intermediate shaping, flat appliqué work, and structured assembly.
The Design: What Makes This Elephant Different
The color system does most of the visual work. Head, ears, trunk, body, arms, and legs remain ivory, so the face is framed by shape rather than contrast inner ears. Pink returns only at the cheeks and rear paw pads. The crown then carries lavender, pink, yellow, white, and olive green across the upper head. Structurally, this floral elephant crochet pattern uses a 42-stitch head with 36-stitch ears, giving each ear enough diameter to remain visible behind the flowers. A tapered trunk broadens from six stitches at its tip to eighteen at the face. The seated base uses oversized rear feet and narrower front arms. One common mistake is fixing the flower crown before attaching the ears. Doing that makes it difficult to judge the available crown width and can force the flowers over the ear attachment seams.
Project Info at a Glance
| Skill Level | Time | Finished Size | Hook | Best For |
|---|---|---|---|---|
| Intermediate | 14–18 hours | Approx. 29–32 cm sitting | 3.5 mm | Nursery display, large amigurumi, floral animal collection |
Materials and Tools
Yarn
- Warm ivory / cream-white — worsted or Aran #4 — approximately 210–250 g — head, ears, trunk, body, arms, legs, toes, and one crown flower
- Blush pink — matching worsted yarn — approximately 30–40 g — cheeks, sole pads, and crown flowers
- Lavender — matching worsted yarn — approximately 15–20 g — crown flowers
- Soft yellow — matching worsted yarn — approximately 15–20 g — flower centers and one crown flower
- Olive green — matching worsted yarn — approximately 20–25 g — crown leaves
- Black embroidery yarn — small amount — eyelashes and eyebrows
Tools
- 3.5 mm crochet hook
- 15–16 mm safety eyes ×2
- Polyester toy stuffing
- Large-eye yarn needle
- Locking stitch marker
- Dressmaking pins
- Sharp scissors
- Measuring tape
Use securely embroidered eyes instead of plastic safety eyes when the finished elephant is intended for a child under three.
Abbreviations
MR — magic ring
sc — single crochet
inc — increase, 2 sc in one stitch
dec — invisible decrease
sl st — slip stitch
ch — chain
hdc — half double crochet
dc — double crochet
tr — treble crochet
BLO — back loop only
For an invisible decrease, insert the hook through the front loops of the next two stitches, draw up one loop, then finish both stitches together as one single crochet.
Pattern — Step by Step
Work stuffed pieces in continuous spirals unless a section states otherwise. The construction below is photo-matched to the supplied elephant and uses standard six-stitch amigurumi shaping.
Head
Yarn: ivory — standard amigurumi math.
R1: 6 sc in MR (6)
R2: inc ×6 (12)
R3: (sc, inc) ×6 (18)
R4: (2 sc, inc) ×6 (24)
R5: (3 sc, inc) ×6 (30)
R6: (4 sc, inc) ×6 (36)
R7: (5 sc, inc) ×6 (42)
R8: sc around (42)
R9: sc around (42)
R10: sc around (42)
R11: sc around (42)
R12: sc around (42)
R13: sc around (42)
R14: sc around (42)
Insert 15–16 mm eyes between R10 and R11, approximately 8–9 visible stitches apart. Check the central trunk position before locking the washers.
R15: (5 sc, dec) ×6 (36)
R16: (4 sc, dec) ×6 (30)
R17: (3 sc, dec) ×6 (24)
Stuff the crown and side walls firmly. Add small pieces around both safety-eye washers.
R18: (2 sc, dec) ×6 (18)
R19: (sc, dec) ×6 (12)
R20: dec ×6 (6)
Finish stuffing before the final decrease.
Fasten off and close.
Body
Yarn: ivory.
R1: 6 sc in MR (6)
R2: inc ×6 (12)
R3: (sc, inc) ×6 (18)
R4: (2 sc, inc) ×6 (24)
R5: (3 sc, inc) ×6 (30)
R6: (4 sc, inc) ×6 (36)
R7: (5 sc, inc) ×6 (42)
R8: sc around (42)
R9: sc around (42)
R10: sc around (42)
R11: sc around (42)
R12: sc around (42)
R13: sc around (42)
Begin stuffing through the base and lower belly.
R14: (5 sc, dec) ×6 (36)
R15: sc around (36)
R16: sc around (36)
R17: (4 sc, dec) ×6 (30)
R18: sc around (30)
R19: (3 sc, dec) ×6 (24)
R20: sc around (24)
R21: (2 sc, dec) ×6 (18)
Pack the neck area firmly so the large head cannot tilt forward after assembly.
Fasten off with a 45 cm sewing tail.
Trunk
Yarn: ivory.
R1: 6 sc in MR (6)
R2: sc around (6)
R3: sc around (6)
R4: sc around (6)
R5: sc around (6)
R6: inc ×6 (12)
R7: sc around (12)
R8: sc around (12)
R9: sc around (12)
R10: sc around (12)
R11: sc around (12)
R12: sc around (12)
R13: (sc, inc) ×6 (18)
R14: sc around (18)
R15: sc around (18)
Stuff the upper 18-stitch section moderately, the 12-stitch middle lightly, and leave the lower six-stitch tip almost empty.
Fasten off with a 40 cm sewing tail.
Large Ears — Make 2
Yarn: ivory. Work flat in joined rounds.
R1: 6 sc in MR (6)
R2: inc ×6 (12)
R3: (sc, inc) ×6 (18)
R4: (2 sc, inc) ×6 (24)
R5: (3 sc, inc) ×6 (30)
R6: (4 sc, inc) ×6 (36)
Join with sl st.
Do not stuff.
Fasten off with a 45 cm sewing tail.
Gently stretch each circle into a broad vertical oval during blocking. The finished ears should remain completely ivory to match the photograph.
Front Arms — Make 2
Yarn: ivory.
R1: 6 sc in MR (6)
R2: inc ×6 (12)
R3: (sc, inc) ×6 (18)
R4: sc around (18)
R5: sc around (18)
R6: sc around (18)
R7: sc around (18)
R8: sc around (18)
R9: (sc, dec) ×6 (12)
R10: sc around (12)
R11: sc around (12)
R12: sc around (12)
R13: sc around (12)
Stuff the lower paw firmly and the upper third lightly. Flatten the final opening.
Fasten off with a 35 cm sewing tail.
Back Legs — Make 2
Yarn: ivory.
R1: 6 sc in MR (6)
R2: inc ×6 (12)
R3: (sc, inc) ×6 (18)
R4: (2 sc, inc) ×6 (24)
R5: sc around (24)
R6: sc around (24)
R7: sc around (24)
R8: sc around (24)
R9: sc around (24)
R10: (2 sc, dec) ×6 (18)
R11: sc around (18)
R12: sc around (18)
R13: (sc, dec) ×6 (12)
Stuff the feet firmly through R10. Keep the 12-stitch attachment area slightly softer.
Fasten off with a 40 cm tail.
Pink Rear Paw Pads — Make 2
Yarn: blush pink. Work flat.
R1: 6 sc in MR (6)
R2: inc ×6 (12)
R3: (sc, inc) ×6 (18)
Join with sl st.
Fasten off with a 25 cm sewing tail.
Do not stuff.
Cream Toe Bumps — Make 12
Yarn: ivory.
R1: 6 sc in MR (6)
Join with sl st.
Pull the center tightly closed.
Fasten off with a 12–15 cm sewing tail.
Make three for each hand and three for each back foot.
Pink Cheek Patches — Make 2
Yarn: blush pink.
R1: 6 sc in MR (6)
R2: inc ×6 (12)
Join with sl st.
Fasten off with a 20 cm sewing tail.
Lavender Flowers — Make 2
Yarn: lavender with yellow center.
With yellow:
R1: 6 sc in MR (6)
Change to lavender.
R2: *sl st in next st, ch 2, 3 dc in same st, ch 2, sl st in same st* around as evenly as possible to create five rounded petals.
Fasten off with a 25 cm sewing tail.
Pink Crown Flowers — Make 2
Yarn: blush or medium pink with yellow center.
With yellow:
R1: 6 sc in MR (6)
Change to pink.
R2: *sl st, ch 2, 3 dc, ch 2, sl st* in five evenly distributed petal positions around the center.
Fasten off with a 25 cm sewing tail.
Yellow Crown Flower — Make 1
Yarn: soft yellow.
R1: 6 sc in MR (6)
R2: *sl st, ch 2, 3 dc, ch 2, sl st* in five petal positions.
Fasten off with a 25 cm tail.
White Crown Flower — Make 1
Yarn: ivory.
R1: 6 sc in MR (6)
R2: *sl st, ch 2, 4 dc, ch 2, sl st* in five petal positions.
This flower is slightly larger than the colored flowers and sits toward the rear center of the crown.
Fasten off with a 25 cm sewing tail.
Olive Leaves — Make 8
Yarn: olive green. Work around both sides of the foundation chain.
Ch 7.
Starting in second ch from hook:
sl st in next ch,
sc in next ch,
hdc in next ch,
dc in next 2 ch,
3 sc in final ch.
Continue down the opposite side:
dc in next 2 ch,
hdc in next ch,
sc in next ch,
sl st in final ch.
Fasten off with a 20 cm sewing tail.
Eyebrows and Eyelashes
Yarn: black embroidery yarn.
Embroider one shallow eyebrow above each eye approximately 20–25 mm long.
Add two short lashes at the outer corner of each eye.
Keep the lashes approximately 4–5 mm long.
Assembly
- Attach the head to the 18-stitch body opening, adding extra stuffing inside the neck before closing the final section of the seam.
- Center the trunk vertically between the eyes and sew its 18-stitch upper edge to the lower face without covering either eye.
- Pin both ivory ears to the sides of the head with their upper edges near the crown and their front edges approximately level with the eye line.
- Sew only the inner 5–6 cm of each ear to the head, leaving most of the outer circumference free so the broad circular shape remains visible.
- Attach the two pink cheeks below and slightly outside the eyes, then embroider eyebrows and short outer eyelashes.
- Pin the front arms high on the body with the paws angled inward, sew them securely, and attach three ivory toe bumps across each hand.
- Position both back legs low and forward on the body, test the seated balance, then sew one pink 18-stitch pad to the visible front of each foot.
- Attach three ivory toe bumps above each pink pad and check that neighboring bumps remain separate rather than forming one continuous cream strip.
- Arrange the white flower near the rear center of the crown, place the yellow flower toward the center front, add two pink and two lavender flowers across the remaining width, and tuck eight olive leaves between them.
- Sew the flowers and leaf bases to the crown, weave all remaining tails into matching-color stitches, straighten the trunk, and place the elephant on a flat surface for the final balance check.
The finished elephant should sit independently with both large ivory ears visible, the trunk centered vertically, pink paw pads facing forward, and the six-flower crown spanning the head without covering the ear edges.
7 Technical Tips
- Ear collapse: A 36-stitch ear sewn around too much of its circumference loses the open circular profile. Attach only the inner 5–6 cm and leave the remaining edge unsupported.
- Trunk twist: An 18-stitch trunk base can rotate while the seam is being closed. Pin its top, bottom, left, and right points before sewing any section longer than approximately 2 cm.
- Head tipping: The flower crown and oversized ears add weight above the neck. Pack the upper 4–5 cm of the body firmly enough that it compresses less than roughly 1 cm under finger pressure.
- Paw-pad cupping: Pulling the pink sewing yarn too tightly turns an 18-stitch pad into a recessed bowl. Stitch through the outer loops and keep the pad flat against the foot surface.
- Toe merging: Three six-stitch toe circles sewn edge-to-edge appear as one cream band. Leave approximately one visible ivory body stitch between neighboring toe bases.
- Crown crowding: Six flowers placed at identical depth create a straight floral wall. Set the white flower approximately 1–1.5 cm farther back than the yellow center flower and overlap only the petal edges.
- Flower droop: Leaves and flowers sewn only through one loose stitch can rotate during handling. Anchor every crown component through at least two head stitches while leaving the outer petals free.
Building the Oversized Ivory Ears
Unlike many elephant patterns, this design does not rely on a pink or cream insert to define the ear. The complete ear remains ivory.
That makes the outer contour more important.
Each piece expands through the standard six-stitch sequence to 36 stitches. Stop there rather than adding another increase round. A 42-stitch ear would approach the head diameter and leave too little clear space for the flower crown.
Block the circles as soft vertical ovals.
When attaching them, resist the tendency to sew around a long arc. Only the inner section needs structural stitching. The free outer edge is what gives the photograph its broad, open-ear silhouette.
Shaping the Long Tapered Trunk
The trunk is widest where it meets the face and narrowest at the tip.
This construction starts with six stitches, holds that narrow circumference, expands to twelve, then reaches eighteen near the attachment edge.
Stuffing density should follow the same progression in reverse.
Pack the upper section enough to prevent flattening. Reduce the amount through the center and leave the final narrow tip nearly empty.
A uniformly stuffed trunk becomes rigid and projects forward. The photographed trunk falls vertically with only a slight outward curve near its lower half.
Creating the Seated Base
The body and back legs work together as three support points.
Each rear foot reaches 24 stitches, considerably wider than the 18-stitch front paws. The enlarged lower feet counterbalance the 42-stitch head and the floral crown.
Before attaching the legs permanently, pin them and place the elephant upright.
Move both feet forward until the torso remains vertical without using the trunk as support.
If the elephant falls backward, move the rear feet approximately 1 cm forward before changing the stuffing.
Only complete the seams once the figure can remain seated on a hard tabletop.
Positioning the Pink Paw Pads
The pink rear pads face the viewer rather than the floor.
That orientation is important because the reference displays the pads almost like circular appliqués on the front of the feet.
Center each 18-stitch circle inside the ivory foot with an even cream margin.
The three ivory toe bumps sit immediately above the pink area.
This reverses the usual accent system: instead of cream toes on a colored animal, the body and toes are ivory while the sole provides the pink contrast.
Building the Six-Flower Crown
The crown should read as one continuous floral band rather than six isolated appliqués.
Begin with the white flower slightly behind the central line. Place the yellow flower in front of it and slightly lower.
Add one lavender flower and one pink flower on each side.
The two outer flowers may sit partly behind neighboring petals so the total crown width remains smaller than the distance between the outer ear edges.
Tuck the olive leaves underneath the flower edges before sewing.
Pin all fourteen crown pieces—six flowers and eight leaves—before fixing any of them permanently.
Controlling Flower Scale
The flowers should remain secondary to the elephant’s face.
If each five-petal flower becomes wider than approximately 5–6 cm in the chosen yarn, switch to a 3 mm hook for the crown pieces while keeping the elephant at 3.5 mm.
The white rear flower can be slightly larger. Its extra volume creates a raised center at the crown without requiring another row of flowers.
A useful test is to pin the complete crown before assembly. Both eyebrows and both upper ear edges should remain visible from the front.
Eye, Eyelash, and Cheek Placement
The black eyes form the strongest contrast in an almost entirely ivory face.
Keep them approximately eight to nine visible stitches apart. That leaves enough space for the wide trunk base while preventing the eyes from drifting toward the ears.
Position the pink cheeks below the eyes and slightly outward.
Add eyelashes after the trunk and cheeks are fixed. Two small stitches are sufficient.
Long or densely embroidered lashes would compete with the flower crown and alter the restrained facial proportions shown in the reference.
Choosing Yarn and Hook Size
Published elephant amigurumi varies considerably by material. Craft Passion’s 9-inch seated elephant uses a 2.5 mm hook with acrylic yarn and 10 mm eyes, while contemporary larger plush patterns often move into hooks around 4–4.5 mm. The photo uses smooth, compact stitches rather than loose chenille fabric.
A 3.5 mm hook with worsted or Aran yarn provides the required density while still producing a 29–32 cm elephant when the large ears, feet, and crown are included.
Work the head through R7 as a gauge test.
Stretch the fabric lightly over two fingers. If visible openings exceed approximately 2 mm, move down to a 3.25 mm hook.
Estimating Yarn Quantity
Large ears consume more yarn than their flat appearance suggests. Two 36-stitch circles, a 42-stitch head, a 42-stitch body, four substantial limbs, and the long trunk make ivory the dominant requirement.
For an accurate project calculation, weigh the finished head and body before assembly.
Then weigh one ear, one arm, and one rear leg.
Double the paired components and add the trunk requirement.
Reserve at least 10% more ivory for toe bumps, sewing tails, and gauge differences.
The flower crown requires comparatively little yarn, making it practical for using small coordinated remnants of pink, lavender, yellow, and green.
Why the Body Stays Mostly Ivory
The visual hierarchy depends on restraint.
Adding pink inner ears or a colored belly would create more contrast, but it would compete with the flower crown and rear paw pads.
The reference keeps the main body almost monochrome. The crown becomes the highest concentration of color, while the cheeks and feet repeat only one accent shade.
This makes the elephant with flower crown crochet design distinct from nursery elephants that depend on patterned ears, dresses, bows, or multicolor bodies.
Competition Gap
Current white-elephant search results include minimalist toys, baby-elephant patterns, spotted white elephants, plush elephants, safari designs, and dressed characters. Etsy alone indexes hundreds of results in this category.
The photo uses a narrower combination: ivory body, ivory ears with no contrasting insert, long centered trunk, pink cheek circles, pink rear sole pads, twelve raised ivory toes, and a pastel six-flower crown.
That gives the project a clearer visual identity than a generic sitting elephant amigurumi. The floral accessory is integrated into the proportions rather than added as a small optional embellishment.
Finishing Checks
Place the finished elephant on a hard, level surface.
Both rear feet and the lower body should support the figure without assistance from the trunk.
View the face straight on. The trunk should divide the eye spacing evenly, and the ears should extend to similar widths.
Check each foot pad for equal diameter and similar vertical position.
Count three visible toe bumps on every limb.
Inspect the crown last. Six distinct flowers should remain readable, olive leaves should appear between the petals, and neither outer flower should conceal the front attachment edge of an ear.
Conclusion
Complete the head, ears, and trunk before arranging the floral crown because those three components determine the available crown width in this white elephant amigurumi crochet pattern. Build the seated base next, test the leg position on a hard surface, then add pink pads, toe bumps, cheeks, and facial embroidery. Pin all six flowers and eight leaves simultaneously before sewing them to the crown. Record the finished ear diameter and seated height if a matching second elephant is planned. Share the crown close-up on Pinterest and the completed elephant on Instagram with #FloralWhiteElephant. Which crown flower would you move to the exact center: yellow, pink, or lavender?









