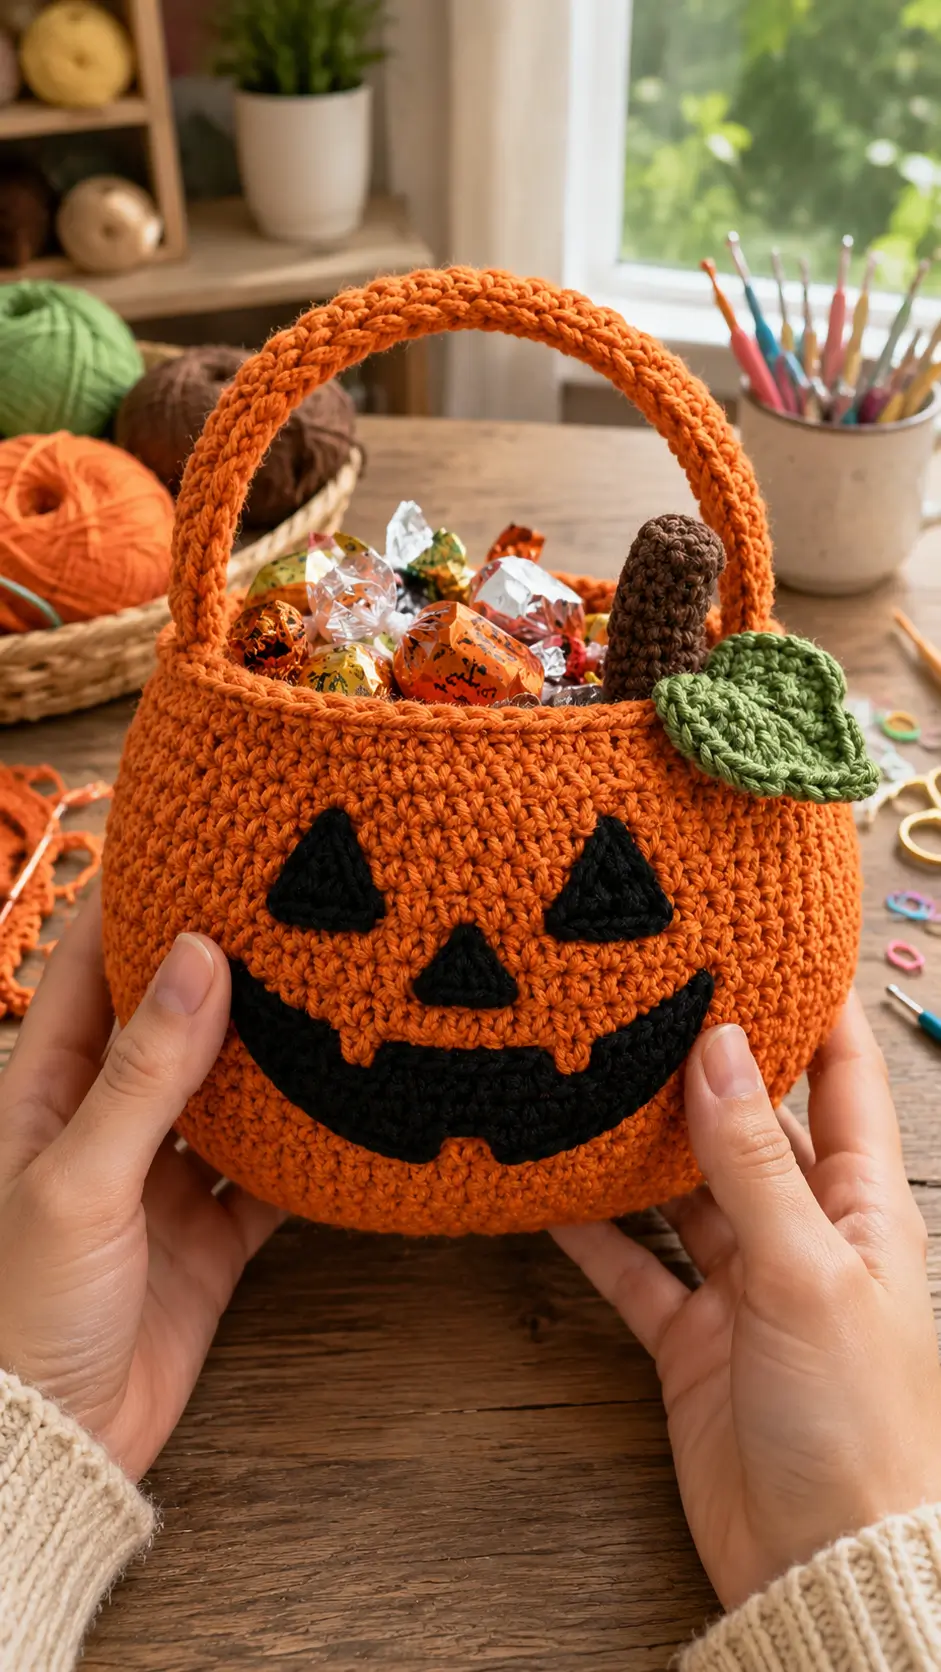
Jack-o’-lanterns need a face that stays readable even when the pumpkin wall curves around a load of candy. This jack o lantern crochet basket pattern uses worsted cotton, a 4 mm hook, and crocheted black appliqués to build a roughly 25 cm-wide basket at confident-beginner level. The arched handle keeps the opening accessible, while separate face pieces can be repaired or replaced without rebuilding the basket.
The Design: What Makes This Jack-O’-Lantern Different
Three structural choices control this design. First, the base grows as a true crochet circle before the sidewall rises, which gives a crochet pumpkin candy basket enough floor area for wrapped treats instead of producing a narrow plush shape. Second, the handle is worked as a dense strip and attached across several rounds; concentrated attachment at only one stitch can stretch the rim under load. Third, each black facial feature is crocheted separately. That keeps the eyes and mouth readable against a curved orange surface and avoids relying on felt.
The common mistake is placing the face before the basket reaches its final shape. A flattened Halloween crochet basket can make correctly spaced eyes look too far apart after the wall rounds are formed. Pin the features only after the body is complete.
Project Info at a Glance
| Skill Level | Time | Finished Size | Hook | Best For |
|---|---|---|---|---|
| Confident beginner | Not reported by source | 24.8–25.4 cm wide; about 20.3 cm body height | 4.0 mm | Trick-or-treating, candy storage, seasonal décor |
The size, hook, skill classification, and stated uses are based on a close-match pumpkin basket listing.
Materials and Tools
Yarn
- Pumpkin orange — Category 4 worsted — allow 250–300 g — Lion Brand 24/7 Cotton or another firm cotton/cotton-blend.
- Black — Category 4 worsted — allow 40–50 g for eyes, nose, and mouth.
- Olive green — Category 4 worsted — allow 20–25 g for the leaf.
- Dark brown — Category 4 worsted — allow 15–20 g for the stem.
The close-match research pattern specifies Category 4 cotton or cotton-blend yarn with a 4 mm hook. Lion Brand 24/7 Cotton is a 100 g/186 yd worsted cotton yarn and is suitable when a firm basket fabric is required.
Tools
- 4.0 mm crochet hook
- Polyester stuffing, small amount for the stem only
- Yarn needle
- Locking stitch markers
- Straight pins
- Scissors
- Measuring tape
No safety eyes are needed. The photographed eyes are represented with crocheted triangular appliqués.
Gauge
Target approximately 16 sc × 16 rounds = 10 cm in firm single crochet after the fabric has relaxed. Gauge matters here because the basket must remain close to the verified 25 cm width rather than merely matching a plush-toy stitch count.
Abbreviations
MR — magic ring
sc — single crochet
inc — 2 sc in the same stitch
dec — single crochet decrease
sl st — slip stitch
ch — chain
BLO — back loop only
FLO — front loop only
hdc — half double crochet
dc — double crochet
rsc — reverse single crochet
For an invisible decrease, insert the hook through the front loops of the next two stitches, then complete one sc through both loops.
Pattern — Step by Step
Work the basket body in a continuous spiral unless a section says otherwise. Mark the first stitch of every round.
The familiar six-stitch increase sequence reaches 42 stitches at R7, a useful large-amigurumi checkpoint. A functional 25 cm candy container needs considerably more circumference, so the same +6 arithmetic continues until the base reaches working diameter.
Basket Body
*Yarn: pumpkin orange — Source: Standard amigurumi math, scaled to the verified approximately 25 cm basket width. Published basket construction also confirms the 6-stitch circular increase method. *
R1: 6 sc in MR (6)
R2: inc ×6 (12)
R3: (1 sc, inc) ×6 (18)
R4: (2 sc, inc) ×6 (24)
R5: (3 sc, inc) ×6 (30)
R6: (4 sc, inc) ×6 (36)
R7: (5 sc, inc) ×6 (42)
R8: (6 sc, inc) ×6 (48)
R9: (7 sc, inc) ×6 (54)
R10: (8 sc, inc) ×6 (60)
R11: (9 sc, inc) ×6 (66)
R12: (10 sc, inc) ×6 (72)
R13: (11 sc, inc) ×6 (78)
R14: (12 sc, inc) ×6 (84)
R15: (13 sc, inc) ×6 (90)
R16: (14 sc, inc) ×6 (96)
R17: (15 sc, inc) ×6 (102)
R18: (16 sc, inc) ×6 (108)
R19: (17 sc, inc) ×6 (114)
R20: (18 sc, inc) ×6 (120)
Check the circle before continuing. It should lie flat rather than forming six obvious corners.
R21: BLO sc around (120)
R22: (19 sc, inc) ×6 (126)
R23: (20 sc, inc) ×6 (132)
R24: sc around (132)
R25: sc around (132)
R26: sc around (132)
R27: sc around (132)
R28: sc around (132)
R29: sc around (132)
R30: sc around (132)
R31: sc around (132)
R32: sc around (132)
R33: sc around (132)
R34: sc around (132)
R35: sc around (132)
R36: sc around (132)
R37: sc around (132)
R38: sc around (132)
R39: sc around (132)
R40: sc around (132)
R41: sc around (132)
R42: sc around (132)
R43: sc around (132)
R44: sc around (132)
R45: sc around (132)
Do not stuff the basket. Push the base flat and let the sidewall rise naturally.
R46: (20 sc, dec) ×6 (126)
R47: (19 sc, dec) ×6 (120)
R48: sc around (120)
R49: sc around (120)
R50: sc around (120)
R51: sc around (120)
R52: rsc around, sl st to first rsc (120)
Fasten off. Leave a 15 cm tail and weave it through the upper wall rather than trimming at the rim.
Handle
*Yarn: pumpkin orange — Technical comparison: dense crocheted straps are used in published pumpkin trick-or-treat bags; one Sewrella version works a six-stitch strap through 60 rows. The dimensions below are original for the photographed arch. *
Ch 101.
Row 1: sc in second ch from hook and across (100)
Row 2: ch 1, turn, BLO sc across (100)
Row 3: ch 1, turn, sc across (100)
Row 4: ch 1, turn, BLO sc across (100)
Row 5: ch 1, turn, sc across (100)
Fasten off, leaving a 35 cm tail.
Fold the strip lengthwise and whipstitch the long edges together. The finished handle should be approximately 48–52 cm long before attachment. Do not stretch it while measuring.
Triangular Eyes — Make 2
*Yarn: black — Source: original flat shaping; crocheted triangular face pieces are also documented in pumpkin bag competition results. *
Ch 8.
Row 1: sc in second ch from hook and across (7)
Row 2: ch 1, turn, dec, 3 sc, dec (5)
Row 3: ch 1, turn, dec, 1 sc, dec (3)
Row 4: ch 1, turn, dec, 1 sc (2)
Row 5: ch 1, turn, dec (1)
Fasten off. Leave a 25 cm sewing tail.
Use the starting tail to square the lower corners if needed. Both eyes should measure close to 4–4.5 cm wide after light blocking.
Triangular Nose
Yarn: black — Source: original flat shaping based on the photographed nose proportions.
Ch 6.
Row 1: sc in second ch from hook and across (5)
Row 2: ch 1, turn, dec, 1 sc, dec (3)
Row 3: ch 1, turn, dec, 1 sc (2)
Row 4: ch 1, turn, dec (1)
Fasten off. Leave a 20 cm tail.
The nose should finish about 3 cm wide, smaller than either eye.
Jagged Grin
Yarn: black — Source: photo-specific original shaping.
Ch 33.
Row 1: sc in second ch from hook and across (32)
Row 2: ch 1, turn, dec, 28 sc, dec (30)
Row 3: ch 1, turn, dec, 26 sc, dec (28)
Row 4: ch 1, turn, dec, 24 sc, dec (26)
Row 5: ch 1, turn, dec, 22 sc, dec (24)
Row 6: ch 1, turn, dec, 20 sc, dec (22)
Fasten off. Leave a 50 cm sewing tail.
Do not block this piece flat. When pinned to the basket, raise both outer ends by approximately 2 cm relative to the center so the lower edge reads as a grin.
Orange Mouth Notches — Make 4
Yarn: pumpkin orange — Source: original appliqué masking method.
Ch 4.
Row 1: sc in second ch from hook and across (3)
Row 2: ch 1, turn, dec, 1 sc (2)
Row 3: ch 1, turn, dec (1)
Fasten off. Leave a 15 cm tail.
Make four. Place two triangles pointing downward from the upper mouth edge and two pointing upward from the lower edge. Because the yarn matches the basket, these pieces visually cut notches from the black grin.
Stem
*Yarn: dark brown — Source: Standard amigurumi math; the close-match researched basket also uses a separately shaped stem. *
R1: 6 sc in MR (6)
R2: inc ×6 (12)
R3: sc around (12)
R4: sc around (12)
R5: sc around (12)
R6: sc around (12)
R7: sc around (12)
R8: sc around (12)
R9: sc around (12)
R10: sc around (12)
Stuff lightly from R6 onward. Keep the lower 1 cm almost unstuffed so the stem can bend where it joins the rim.
Fasten off. Leave a 30 cm sewing tail.
Leaf
Yarn: olive green — Source: photo-specific flat crochet shaping.
Ch 11.
Round 1: starting in second ch from hook, sl st in next ch, sc in next ch, hdc in next 2 ch, dc in next 4 ch, hdc in next ch, 5 dc in last ch. Continue along the unused loops on the opposite side of the foundation chain: hdc in next ch, dc in next 4 ch, hdc in next 2 ch, sc in next ch, sl st in final ch (23).
Sl st into the first stitch.
Fasten off. Leave a 25 cm sewing tail.
Join olive yarn near the base and work surface sl sts along the center line toward the tip to form the vein. Fasten off and weave that short tail to the back.
The finished leaf should be approximately 8–9 cm long.
Cheek Patches
The photographed jack-o’-lantern has no cheek patches. None are added because extra circles would change the reference face.
Head, Arms, Back Legs, Ears, and Wings
These parts are not applicable. The reference is a functional pumpkin basket rather than an animal or doll; the body, handle, stem, leaf, and facial appliqués account for every crocheted component visible in the photo.
Assembly
- Set the finished basket body upright and press the base flat. Mark the visual front directly opposite the point where the spiral finish is least noticeable.
- Pin the eyes with their top points approximately four rounds below the rim. Keep their centers about 8 cm apart and angle the lower outside corners slightly outward.
- Position the nose midway between the eyes and roughly 3 cm lower. Sew around the edge with black yarn, passing through the front wall stitches without carrying the yarn across the basket interior.
- Center the black mouth approximately 4–5 cm below the nose. Raise each outer corner around 2 cm above the centerline before pinning.
- Sew the mouth around its perimeter. Add the four orange notch pieces afterward so two break the upper edge and two break the lower edge.
- Place one handle end behind each side of the basket. Each attachment should overlap at least five wall rounds and about 4 cm of horizontal width.
- Stitch each handle end in a boxed pattern, then add one diagonal pass in each direction. Keep attachment stitches below the reverse-single-crochet rim so the top edge does not distort.
- Sew the brown stem to the inner rear section of the rim, offset about 2 cm from the center. Angle the top slightly forward so it remains visible above the handle opening.
- Place the green leaf against the stem base and let its tip extend over the outside rim. Sew around the lower half only, leaving the outer half free to lie on the basket.
- Weave all remaining tails through at least three stitch directions and trim only after checking the handle with a light load. The completed basket now contains every visible structural and decorative element from the reference.
7 Technical Tips
- Stitch-marker drift: missing the true first stitch can move the increase line several centimeters by R20. Move a locking marker into the first stitch immediately after completing every round.
- Stem stuffing: packing the stem until it feels rigid can make the base bulge when sewn to the rim. Stop when the filled stem still compresses about 3 mm under light finger pressure.
- Invisible-decrease bars: a conventional two-stitch decrease can leave horizontal loops on the pumpkin wall at R46 and R47. Work both decreases through the front loops so the reduction sits on the inside-facing side of the fabric.
- Eye-placement timing: sewing the eyes before the basket wall is shaped can shift their apparent spacing. Complete R52 first, then pin the eye centers about 8 cm apart and four rounds below the rim.
- Velvet substitution tension: chenille or velvet yarn can enlarge the basket sharply if worked at the same stitch count. Make a 10 cm swatch first and target roughly 15–16 sc per 10 cm; a looser fabric can produce a collapsing rim.
- Mouth pinning: attaching the grin as a flat horizontal strip removes the jack-o’-lantern curve. Pin the center first, then raise both ends approximately 2 cm before adding the remaining pins.
- Tail weaving: handle tails shorter than about 10 cm can work free after repeated loading. Weave each structural tail in three directions through dense wall stitches before trimming.
Related Patterns
- Crochet Ghost Candy Basket — A white round basket with a black ghost face and reinforced handle — anchor text: crochet ghost candy basket. [INTERNAL LINK NEEDED: ghost Halloween basket]
- Mini Pumpkin Amigurumi — A closed stuffed pumpkin using six-stitch increase geometry and a short stem — anchor text: mini pumpkin amigurumi pattern. [INTERNAL LINK NEEDED: pumpkin amigurumi]
- Crochet Frankenstein Treat Bucket — A flat-faced Halloween bucket suited to rectangular appliqué work — anchor text: Frankenstein crochet treat bucket. [INTERNAL LINK NEEDED: Frankenstein basket]
- Crochet Bat Candy Bag — A dark trick-or-treat bag with separate wings and reinforced strap attachment — anchor text: crochet bat candy bag. [INTERNAL LINK NEEDED: bat Halloween pattern]
Conclusion
The finished basket should stand about 20 cm high at the body and roughly 25 cm across, with the handle reaching about 42 cm overall when the target gauge is met. Check the handle attachment under a light test load before filling it with candy, then record any gauge change if a second version will use acrylic or velvet. Save the pattern to Pinterest and share the finished basket on Instagram with #JackOLanternBasket. For the next version, make a gauge swatch before changing yarn weight. Which face detail would you alter first: the eye angle, nose width, or the two lower grin notches? This jack o lantern crochet basket pattern is ready for repeated seasonal use.









