Introduction
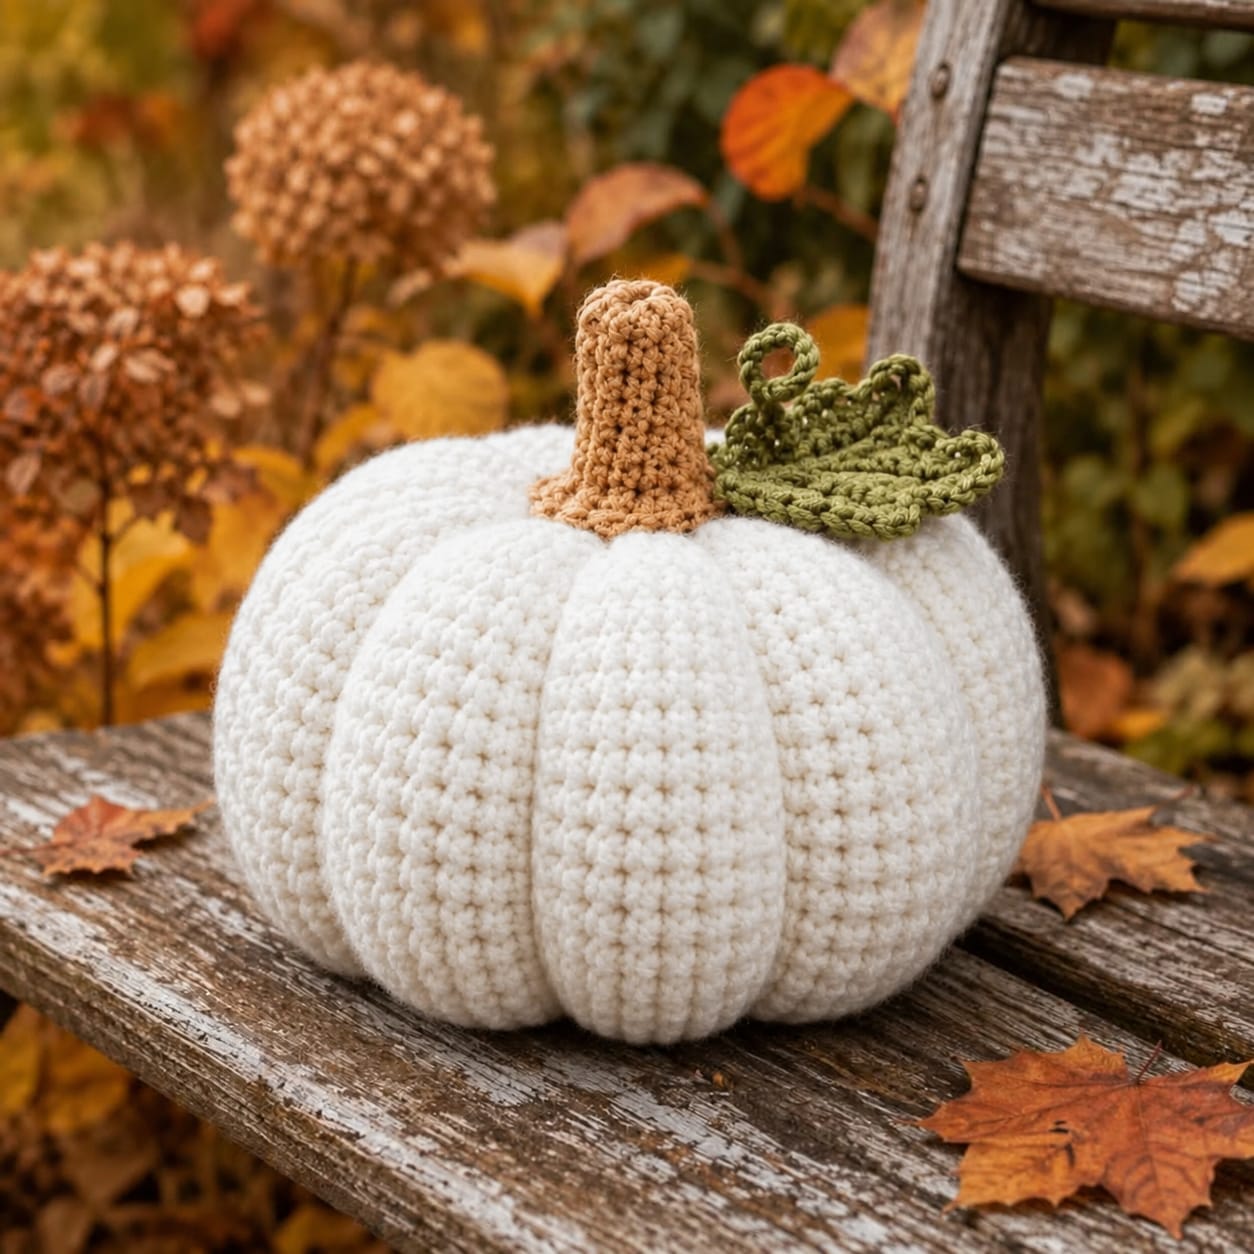
An ivory pumpkin with eight lobes exposes every millimeter of uneven sculpting because color cannot hide a narrow section. This white crochet pumpkin pattern uses worsted yarn and a 5 mm hook to make an approximately 22–25 cm decoration. A smooth stuffed body, tan stem, broad olive leaf and two curled vines create an intermediate fall project with measurable shaping points.
The Design: What Makes This White Pumpkin Different
The body is crocheted as one smooth 42-stitch form, then compressed and divided into eight sections after stuffing. That construction keeps horizontal single-crochet rows visible across the lobes instead of creating the vertical ridges found on rectangle-based pumpkins. A deep crown recess supports the comparatively tall stem without making the body look cylindrical. The botanical topper is deliberately asymmetric: one broad leaf spreads across one side while two spirals rise beside it. Their darker olive yarn separates the crown from the ivory surface. The tan stem adds a third value and keeps the center readable. A common failure in a farmhouse crochet pumpkin is tightening all eight shaping strands in clockwise order. Stuffing shifts toward the unfinished side, causing the final sections to become noticeably narrower than the first ones.
Project Info at a Glance
| Skill Level | Time | Finished Size | Hooks | Best For |
|---|---|---|---|---|
| Intermediate | 6–8 hours | Approx. 22–25 cm wide × 22–25 cm high including stem | 5.0 mm body / 4.0 mm topper | Fall tables, farmhouse displays and neutral seasonal decor |
Materials and Tools
Yarn
- Soft ivory / natural white — worsted or Aran #4 — approximately 160–190 g — complete body and hidden shaping strands.
- Warm tan brown — worsted or Aran #4 — approximately 15–20 g — tall crochet stem.
- Olive green — worsted or Aran #4 — approximately 20–25 g — broad leaf and two curled vines.
Use a firm, plied white yarn rather than a loosely spun strand. The lobe channels put considerable pressure on the outer fabric, and a soft yarn can spread until the stuffing becomes visible inside the deepest grooves.
Tools
- 5.0 mm crochet hook
- 4.0 mm crochet hook for the stem, leaf and vines
- Polyester fiberfill — approximately 200–250 g
- Long tapestry or doll needle
- Standard yarn needle
- Eight removable stitch markers
- Dressmaking pins
- Scissors
- Measuring tape
Abbreviations
- MR — magic ring
- sc — single crochet
- inc — increase
- dec — decrease
- sl st — slip stitch
- ch — chain
- hdc — half double crochet
- dc — double crochet
- tr — treble crochet
- BLO — back loop only
An invisible decrease is worked through the front loops of the next two stitches before one single crochet is completed through both loops.
Pattern — Step by Step
Work the body in a continuous spiral unless stated otherwise. Move the stitch marker after every completed round.
White Pumpkin Body
Yarn: soft ivory — original reconstruction based on standard six-stitch amigurumi geometry.
R1: 6 sc in MR (6)
R2: inc ×6 (12)
R3: (sc, inc) ×6 (18)
R4: (2 sc, inc) ×6 (24)
R5: (3 sc, inc) ×6 (30)
R6: (4 sc, inc) ×6 (36)
R7: (5 sc, inc) ×6 (42)
R8: sc around (42)
R9: sc around (42)
R10: sc around (42)
R11: sc around (42)
R12: sc around (42)
R13: sc around (42)
R14: sc around (42)
R15: sc around (42)
R16: sc around (42)
R17: sc around (42)
R18: sc around (42)
R19: (5 sc, dec) ×6 (36)
R20: sc around (36)
R21: (4 sc, dec) ×6 (30)
R22: sc around (30)
R23: (3 sc, dec) ×6 (24)
R24: (2 sc, dec) ×6 (18)
R25: (sc, dec) ×6 (12)
R26: dec ×6 (6)
Begin stuffing after R21. Fill the outer wall firmly, but keep the central vertical axis approximately 15–20 percent softer.
Fasten off with approximately 120 cm of white yarn remaining.
Check the Body Before Closing
Press the upper opening toward the magic-ring base.
The body should shorten by approximately 20 mm without extreme hand pressure.
If the center feels solid, remove a small amount of fiberfill before closing.
The widest part should remain rounded and full.
Check the fabric around R10–R16 under light stretching. Stuffing should not show through the stitches.
Close the Six-Stitch Opening
Thread the long white tail through the front loops of the remaining six stitches.
Pull until the opening closes to approximately 6–8 mm.
Cross the small opening once with the needle.
Keep the long yarn tail attached because it can be used for the first compression pass.
Compress the Pumpkin Vertically
Push the needle from the crown center through the complete stuffed body and out through the magic-ring center.
Return through the same vertical axis.
Pull the two centers toward one another.
Target approximately 18–22 mm of permanent height reduction.
The body should widen as the crown and bottom move inward.
Stop before either center becomes a narrow pointed hole.
Secure the compression yarn beneath the pumpkin.
Mark Eight Lobe Positions
View the pumpkin directly from above.
Place eight removable markers around the widest circumference at roughly 45-degree intervals.
Pair Marker 1 with Marker 5, Marker 2 with Marker 6, Marker 3 with Marker 7 and Marker 4 with Marker 8.
Compare opposite sections.
Move a marker if one planned lobe differs from its neighbor by more than approximately 10 mm.
Sculpting Groove 1
Yarn: matching ivory.
Cut approximately 180 cm of yarn.
Anchor it at the lower center.
Bring the strand over the outside through the first marked valley.
Insert at the crown center and pass through the complete body to the lower center.
Pull until the groove sits approximately 10–14 mm below the neighboring rounded surfaces.
Do not make the final knot yet.
Sculpting Groove 2
Move to the marker directly opposite Groove 1.
Repeat the center-to-center shaping pass.
Compare both lobe widths from above.
Correct the filling with your fingers before changing yarn tension if one lobe looks flatter.
Sculpting Grooves 3 and 4
Shape the second opposite pair.
Rotate the pumpkin between channels.
Alternating sides prevents fiberfill from migrating toward one unfinished section.
Sculpting Grooves 5 and 6
Repeat the same method across the third pair.
Place each external strand along a natural low line between crochet columns when possible.
Do not drag a shaping strand diagonally across the surface.
Sculpting Grooves 7 and 8
Complete the final opposite pair.
Set the pumpkin on a hard table.
Compare all eight lobes from the front, side and top.
Adjust individual groove tension until neighboring sections remain within approximately 10 mm of one another in visible width.
Secure the sculpting strands beneath the body and bury the tails through the stuffing.
Deepen the Crown Recess
Cut approximately 80 cm of ivory yarn.
Pass from the upper center to the lower center and back.
Pull until the crown sits approximately 15–18 mm below the highest part of the surrounding lobes.
Keep the depression at least approximately 30 mm across.
The stem and leaf need a broad attachment area rather than one sharply gathered point.
Tan Crochet Stem
Yarn: warm tan brown, 4.0 mm hook.
R1: 6 sc in MR (6)
R2: sc around (6)
R3: sc around (6)
R4: sc around (6)
R5: sc around (6)
R6: sc around (6)
R7: sc around (6)
R8: (2 sc, inc) ×2 (8)
R9: sc around (8)
R10: sc around (8)
R11: (3 sc, inc) ×2 (10)
R12: sc around (10)
R13: (4 sc, inc) ×2 (12)
R14: (sc, inc) ×6 (18)
R15: sc around (18)
Stuff R10–R15 lightly. Keep the upper six-stitch section almost empty.
Fasten off with a 40 cm sewing tail.
Target approximately 7–8 cm of visible stem height.
Shape the Stem
Hold the 18-stitch base flat.
Curve the upper 4–5 cm gently to one side if a less rigid stem is preferred.
Take one concealed brown stitch along the inside of the bend if the tube returns to a straight position.
Avoid one sharp fold.
Large Olive Leaf
Yarn: olive green, 4.0 mm hook.
The leaf is built around one center ring with five pointed lobes.
Center: 10 sc in MR. Join with sl st.
Leaf Lobe 1 — Long Center Point
Ch 12.
Starting in the second chain, work:
sl st, sc, hdc, dc, dc, tr, tr, dc, dc, hdc, sc.
Work 3 sc into the final chain.
Continue along the opposite side of the foundation chain:
sc, hdc, dc, dc, tr, tr, dc, dc, hdc, sc, sl st.
Sl st into the next center stitch.
Leaf Lobe 2 — Medium Point
Ch 10.
Starting in the second chain:
sl st, sc, hdc, dc, tr, dc, dc, hdc, sc.
Work 3 sc in the final chain.
Return along the opposite side in mirrored order.
Sl st into the next two center stitches.
Leaf Lobe 3 — Short Point
Ch 8.
Starting in the second chain:
sl st, sc, hdc, dc, dc, hdc, sc.
Work 3 sc in the end chain.
Return in mirrored order.
Sl st into the next two center stitches.
Leaf Lobe 4 — Short Point
Repeat Lobe 3.
Angle it away from the previous point.
Leaf Lobe 5 — Medium Point
Repeat Lobe 2.
Fasten off with approximately 35 cm of green yarn remaining.
Target overall leaf span: approximately 10–12 cm.
Shape the Green Leaf
Spread all five lobes on a flat surface.
The longest lobe should project farther than the other four.
Run one green surface stitch from the center toward the tip of each lobe.
Keep those vein stitches loose enough that the leaf remains almost flat.
A slight curve is useful because the leaf must drape over the rounded pumpkin crown.
Long Curled Vine
Yarn: olive green.
Ch 24.
Starting in the second chain, work 3 sc in every chain.
The dense increases force the cord into a tight spiral.
Fasten off with a 20 cm attachment tail.
Short Curled Vine
Ch 16.
Starting in the second chain, work 3 sc in every chain.
Fasten off with an 18 cm tail.
Do not stretch either spiral before assembly.
Position the Crown Pieces
Place the brown stem in the crown center first.
Angle the large leaf toward one side so its longest lobe extends across an upper pumpkin section.
Position the long vine behind or beside the stem.
Place the shorter spiral on the opposite side or slightly forward.
Pin the complete arrangement before sewing.
The leaf should cover no more than approximately one-third of the pumpkin when viewed from above.
Attach the Stem
Sew the entire 18-stitch stem base into the recessed crown.
Pass the needle through several different pumpkin lobes around the crown rather than attaching only into the six-stitch closure.
Check the stem from four directions.
Its base should remain centered even if the upper section bends slightly.
Attach the Leaf
Place the center ring beside the stem base.
Sew through the center and the first 15–20 mm of each lobe.
Leave approximately the final 25–40 mm of the larger points free.
This allows the leaf to sit above the ivory body instead of looking like a flat patch.
Attach the Curled Vines
Sew approximately 10–15 mm of the straight starting end of each vine to the crown.
Leave the remaining spiral free.
Arrange one curl to rise slightly from the surface and let the other remain closer to the leaf.
Do not sew through the coil itself.
Check the Final Proportions
Measure the pumpkin across its widest point.
Target approximately 22–25 cm.
Before the stem, body height should be approximately 15–17 cm.
Total height with the botanical crown should fall near 22–25 cm.
At least three lower lobes should contact the table when the piece is set down.
Assembly
- Crochet the ivory body from the 6-stitch magic ring through the 42-stitch plateau and complete all decreases to the six-stitch closure.
- Stuff the outer body firmly while keeping the central axis approximately 15–20 percent softer than the outside wall.
- Compress the pumpkin vertically by approximately 18–22 mm before adding any external groove strands.
- Mark eight sections at roughly 45-degree intervals and sculpt them as four opposite pairs with channels approximately 10–14 mm deep.
- Deepen the crown to approximately 15–18 mm while preserving a broad attachment area around 30 mm across.
- Crochet the tan stem from 6 stitches to its 18-stitch flared base and sew the complete base into the crown.
- Make the five-lobed olive leaf and add relaxed surface veins through the centers of the lobes.
- Crochet one 24-chain and one 16-chain spiral vine using 3 sc in every foundation chain.
- Attach the leaf beside the stem and sew only the first 10–15 mm of each vine so the remaining curls stay free.
- Set the pumpkin on a flat surface, correct uneven lobe widths or rocking points and bury every remaining yarn tail through the stuffed interior.
The completed piece should show eight broad ivory lobes, one recessed botanical crown, a tall tan stem, a five-point olive leaf and two dimensional green curls.
7 Technical Tips
- Lobes become progressively smaller: Tightening all eight grooves in one direction shifts stuffing toward the unfinished side. Work opposite pairs and keep neighboring lobe widths within approximately 10 mm.
- White stitches expose stuffing: Sculpting tension is too high for the fabric density. Test the 42-stitch plateau under light stretching and reduce the hook by approximately 0.5 mm if fiberfill becomes visible.
- Body remains round instead of squat: The vertical center has not been compressed enough. Reduce total body height by approximately 18–22 mm before tightening the eight outer channels.
- Crown collapses into a narrow hole: Center tension is concentrated on too small an area. Keep the recess approximately 30 mm across and stop at roughly 15–18 mm of depth.
- Leaf hides the lobe pattern: Too much of the foliage is directed down the pumpkin side. Limit visible leaf coverage to roughly one-third of the upper surface and keep several points close to the crown.
- Vines lose their curl: Stretching the chains during assembly opens the spiral. Work 3 sc into every chain and attach only the first 10–15 mm of each vine.
- Stem rocks at the crown: Sewing only through the narrow stem tube creates a pivot. Use the full 18-stitch flared base and attach it into several surrounding ivory sections.
Why a Smooth Body Works for a White Pumpkin
The image does not depend on ribbed-row texture alone. Most of the pumpkin definition comes from deep structural grooves formed after the body is stuffed.
That matters on a white pumpkin because every section shares the same color.
Shadow becomes the separator.
A smooth continuous-round body also allows lobe spacing to be adjusted after stuffing. If one section looks narrow, the maker can move filling before locking its neighboring sculpting strands.
A rectangle-based pumpkin provides strong built-in ribs, but it gives less control over the exact width of eight large lobes.
Adjusting the Pumpkin Size
This white crochet pumpkin pattern can be scaled by changing the maximum round count.
For a smaller version, stop at 36 stitches after (4 sc, inc) ×6. Use fewer plateau rounds and reduce the stem to a 12-stitch base.
For a larger centerpiece, continue to 48 stitches with (6 sc, inc) ×6.
Add two plateau rounds before beginning the matching decrease sequence.
Increase the leaf foundation chains by approximately two stitches per lobe if the crown becomes substantially wider.
Changing the Botanical Topper
The crown can be simplified without changing the pumpkin body.
For a cleaner version, omit the short vine and keep one leaf plus one spiral.
A second leaf can replace both vines if a flatter topper is needed.
For a more botanical arrangement, make two smaller leaves using the short-lobe sequence and position them behind the stem.
Keep the crown lighter than the body. Too many dense accessories can pull a soft stuffed pumpkin toward one side.
Choosing the White Yarn
Bright optical white creates stronger contrast with tan and olive, while ivory gives a softer neutral result.
Oatmeal introduces more visible fiber variation.
Cream yarn with a slight warm undertone matches the supplied image most closely.
Acrylic provides good shape memory, while cotton produces sharper stitches and a heavier finished body.
If cotton is used, reduce stuffing gradually because the extra yarn weight already gives the lower lobes more mass.
Changing the Crown Colors
Olive green and tan create the botanical contrast visible in the reference.
Sage can replace olive for a lighter palette.
Forest green gives the crown considerably more contrast.
The stem can shift from camel to chocolate brown if stronger definition is preferred.
Keep the stem distinguishable from the leaf. When both pieces are nearly the same value, the crown silhouette becomes harder to read.
Finishing the Pumpkin
Final wet blocking is unnecessary after stuffing.
Shape the lobes by hand once all crown pieces are attached.
View the pumpkin from directly above and confirm that opposite sections have similar widths.
Then set it on a hard surface.
The gathered bottom should sit slightly above the table while several broad lobes carry the weight.
Lift the leaf tips and rearrange both spiral vines last so their curls remain visible from the front.
Conclusion
Balance the eight ivory lobes before attaching the botanical crown because the contrasting stem and leaf make asymmetry easier to see. Your next step is to finish the 42-stitch body, compress it and mark four opposite lobe pairs before permanently tightening the sculpting yarn. Add the stem first, then layer the leaf and two curls around its base. Share the finished white crochet pumpkin pattern project on Pinterest with the eight-section body visible, then post a crown close-up on Instagram using #IvoryLeafCrochetPumpkin. For this pumpkin specifically, would you keep the single broad olive leaf or add a second smaller leaf behind the stem?









