Introduction
A pumpkin stops reading as a pumpkin when its ribs fail to converge at both the stem and the base. This crochet pumpkin amigurumi pattern uses a 42-stitch body, deep post-stuffing sculpting, cranberry worsted yarn, and a long curved stem to reproduce that structure. Expect a piece about 20 cm wide with medium yarn and a 3.75–4 mm hook. The project suits a confident beginner and works as stable tabletop fall décor.
The Design: What Makes This Pumpkin Different
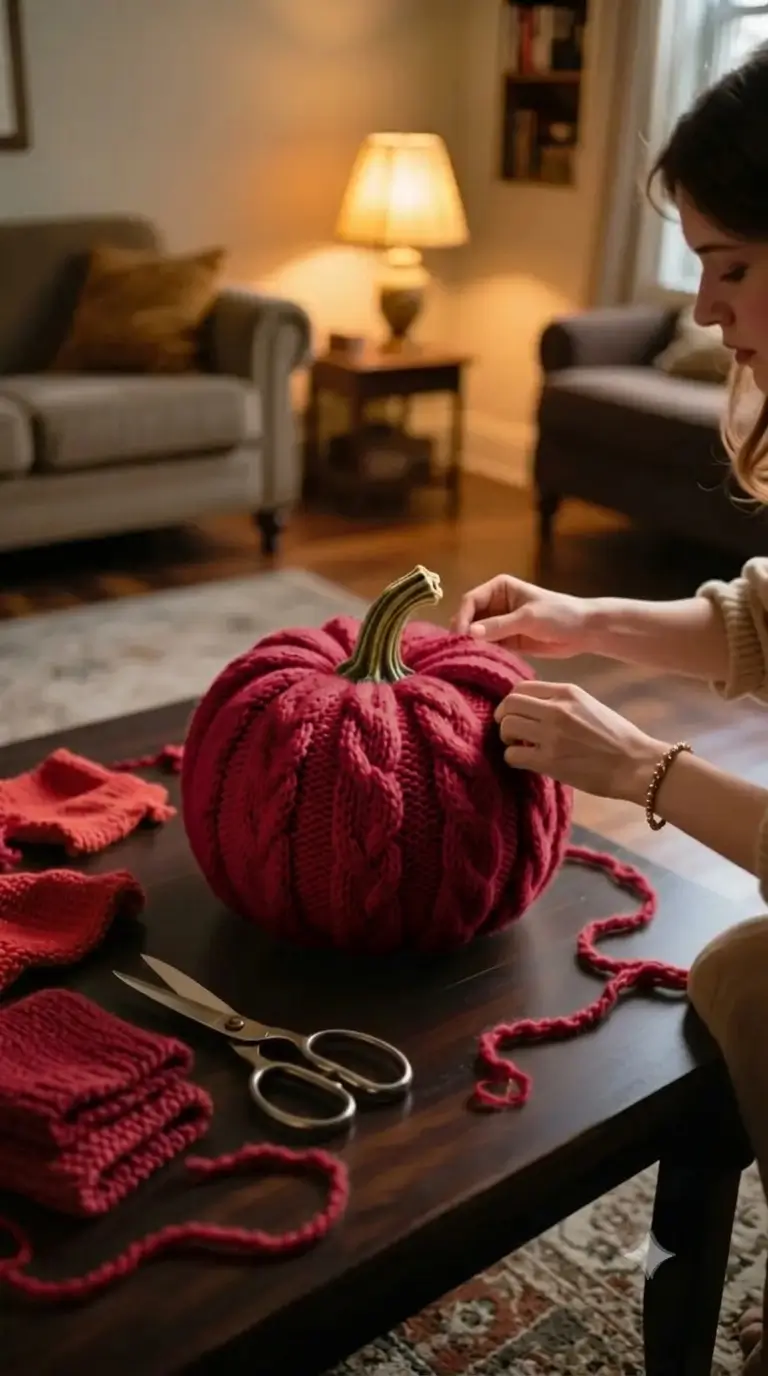
The photographed pumpkin is wider than it is tall, so the body reaches a 42-stitch plateau and stays there long enough to build volume across the middle. Its ribs are also much deeper than ordinary surface texture can produce. For that reason, strong shaping strands are passed from the crown to the base after stuffing, dividing the shell into six substantial lobes. The curved stem is intentionally longer than the short stalk used on many small pumpkin patterns because its height balances the broad body. This ribbed crochet pumpkin also uses dark cranberry rather than standard orange, while the olive stem keeps the silhouette recognizable. A common mistake in a large crochet pumpkin is packing the center with too much stuffing; dense filling resists the shaping strand and leaves shallow grooves.
Project Info at a Glance
| Skill Level | Time | Finished Size | Hook | Best For |
|---|---|---|---|---|
| Confident beginner | 3–5 hours | Approx. 20 cm wide with worsted yarn | 3.75–4 mm | Tabletop fall décor and centerpiece displays |
Materials and Tools
Yarn
- Deep cranberry or burgundy — medium/worsted #4 — approximately 50–65 g — choose a matte acrylic, wool blend, or low-sheen chenille with enough body to hold sculpted ribs.
- Olive green — medium/worsted #4 — approximately 5–10 g — a firm cotton-acrylic blend works well for the stem.
- Matching cranberry shaping yarn or strong cotton thread — approximately 3–4 m — this strand forms the external pumpkin grooves.
Tools
- 3.75–4 mm crochet hook
- Polyester fiberfill
- Long doll or upholstery needle
- Standard yarn needle
- Locking stitch marker
- Six straight pins or removable markers
- Scissors
No safety eyes are required. The reference pumpkin has no face, cheek patches, arms, legs, leaves, or attached accessories.
Abbreviations
- MR — magic ring
- sc — single crochet
- inc — two single crochet stitches in the same stitch
- dec — invisible decrease
- sl st — slip stitch
- ch — chain
- BLO — back loop only
- st / sts — stitch / stitches
For an invisible decrease, insert the hook under the front loops of the next two stitches, pull up a loop through both, then complete one single crochet.
Pattern — Step by Step
Work the main body in a continuous spiral unless stated otherwise. Place a marker in the first stitch of every round and move it only after the completed stitch count has been checked.
Pumpkin Body — Make 1
Yarn: deep cranberry — construction uses standard six-stitch amigurumi expansion with a 42-stitch maximum.
R1: 6 sc in MR (6)
R2: inc ×6 (12)
R3: (1 sc, inc) ×6 (18)
R4: (2 sc, inc) ×6 (24)
R5: (3 sc, inc) ×6 (30)
R6: (4 sc, inc) ×6 (36)
R7: (5 sc, inc) ×6 (42)
R8: sc around (42)
R9: sc around (42)
R10: sc around (42)
R11: sc around (42)
R12: sc around (42)
R13: sc around (42)
R14: sc around (42)
R15: sc around (42)
R16: sc around (42)
R17: (5 sc, dec) ×6 (36)
R18: (4 sc, dec) ×6 (30)
R19: (3 sc, dec) ×6 (24)
Begin stuffing after R19. Press most of the fiberfill toward the outer wall and leave the exact center slightly less dense so the sculpting needle can pass through it.
R20: (2 sc, dec) ×6 (18)
R21: (1 sc, dec) ×6 (12)
Add the final stuffing now. The body should hold its shape but still compress when squeezed between the top and bottom centers.
R22: dec ×6 (6)
Fasten off, leaving a 25 cm tail. Pass the tail through the front loops of the remaining six stitches and pull the opening closed. Secure the yarn inside the body without trimming the fabric surface.
Curved Stem — Make 1
Yarn: olive green. Work in a continuous spiral.
R1: 6 sc in MR (6)
R2: sc around (6)
R3: sc around (6)
R4: sc around (6)
R5: sc around (6)
R6: sc around (6)
R7: inc ×6 (12)
R8: sc around (12)
R9: sc around (12)
R10: sc around (12)
Place only a thin roll of stuffing inside the lower half. Keep R1–R5 lightly filled so the stem can bend instead of standing as a rigid vertical tube.
Fasten off. Leave a 35 cm tail for sewing.
Pumpkin Rib Sculpting
Use cranberry yarn or strong matching thread. This stage creates the six deep channels visible in the reference image.
Cut a shaping strand approximately 3–4 m long and thread it through a long doll needle. Identify the center of the bottom closure and the center of the crown. Place six pins around the upper body at approximately equal intervals. Each marked section should occupy roughly one sixth of the circumference.
Insert the needle through the bottom center and bring it out at the crown. Carry the strand down the exterior of the pumpkin beside the first pin, return through the bottom center, and pull until a definite channel forms. Pass through the center again and repeat the same route once more before moving to the next section.
Form six channels in total. Compare the lobes after every pass rather than tightening all six at maximum tension. The finished body should remain broad and rounded, not collapse into a narrow bundle.
After the sixth groove is balanced, knot the strand at the bottom center and bury the remaining tail inside the stuffing.
Assembly
- Set the closed pumpkin body on a flat surface and locate the natural top and bottom centers.
- Compress the body vertically by about 1–2 cm before sculpting; this produces the low profile visible in the reference.
- Divide the circumference into six equal lobe sections with removable pins.
- Run the first shaping strand from the bottom center to the crown and back, pulling only until the first visible channel appears.
- Repeat the same path once before moving to the next marked section.
- Shape all six lobes, comparing their width from directly above after every completed groove.
- Pin the 12-stitch base of the stem over the crown so it covers the center where the shaping strands meet.
- Sew the stem base to the body with small whipstitches spaced about 4–5 mm apart.
- Bend the upper stem slightly to one side and add two small anchoring stitches near its base if it returns to a vertical position.
- Bury the remaining yarn tails through the body and trim only after each tail has travelled at least 4 cm through the stuffing.
The finished piece should have six balanced lobes, a depressed crown, a slightly flattened base, and one curved stem.
7 Technical Tips
- Stitch-marker drift: A misplaced round marker can shift the decrease line by one or two stitches and produce a twisted body. Count all 42 stitches at the end of every plateau round before moving the marker.
- Stuffing firmness: Overfilling the exact center can stop the sculpting strand from pulling the top and bottom together. Leave the central core approximately 20% softer than the outer wall while keeping the circumference evenly padded.
- Invisible decrease gaps: A standard sc2tog can expose fiberfill along R17–R22. Work each decrease through the front loops only and check that no opening wider than about 2 mm remains.
- Eye placement timing: This photographed version has no safety eyes, so the correct placement measurement is zero. If a jack-o’-lantern variation is made later, any safety eyes must be inserted before R17 because the reverse side becomes inaccessible after the decrease section closes.
- Chenille or velvet tension: Loose plush stitches can stretch when the rib thread is tightened. If a 3.75 mm hook leaves visible holes larger than about 2 mm, reduce the hook by 0.5 mm rather than pulling each stitch excessively tight.
- Uneven pinning: Six randomly spaced sculpting points create one narrow lobe beside one oversized lobe. View the pumpkin from directly above and place the six markers at roughly 60-degree intervals before threading the needle.
- Tail-weaving failure: A short buried tail can work back through the surface when the pumpkin is handled. Run each finishing tail at least 4 cm through the stuffed interior, reverse direction once, then cut it close to the fabric.
Why the Ribbing Method Matters
A spherical amigurumi body alone does not reproduce the reference. The silhouette depends on compression. Each shaping strand pulls the crown and base toward one another while pressing an external line into the stuffed shell, which makes neighboring sections bulge outward into lobes.
That method also gives the maker more control than adding decorative surface stitches. If one section looks wider, the next shaping pass can be tightened slightly more. When a groove becomes too deep, release a small amount of tension before the strand is secured.
The amount of stuffing controls this process. The outside wall needs enough fiberfill to stay rounded, but the center must accept a long needle without excessive resistance. A densely packed core can turn a realistic crochet pumpkin into a hard sphere with superficial lines instead of deep structural ribs.
Color and Yarn Choices
The reference image uses a dark red close to cranberry, wine, or muted burgundy rather than a conventional bright pumpkin orange. That color changes the character of the finished object without changing any stitch counts. For a similar result, choose a yarn with low shine so highlights do not flatten the rib definition in photographs.
Standard worsted acrylic creates the clearest single-crochet surface. Chenille makes the stitches less visible and produces a softer outer texture, while wool blends add body and may hold the sculpted form more firmly. The pumpkin crochet pattern can also be enlarged with bulky yarn, but hook size must follow the yarn rather than the stitch count alone.
For an oversized version closer to the apparent scale of the photograph, keep the same round sequence and switch to a substantially thicker yarn with a correspondingly larger hook. Make a test swatch first because changing from worsted to chunky yarn can increase the finished diameter dramatically.
How to Adjust the Shape
Width is controlled mainly by the maximum stitch count and yarn thickness. Height is controlled by the number of 42-stitch plateau rounds. The written version has nine rounds at maximum circumference, producing a broad body after sculpting.
For a flatter pumpkin, remove one or two plateau rounds but keep the increase and decrease sequence unchanged. A taller gourd can be made by adding two or three 42-stitch rounds before R17. Do not add stitches randomly within the plateau because that can interrupt the six-section geometry used later for the ribs.
Rib depth should be adjusted only after the body is fully closed. Pulling the strands during stuffing makes it difficult to compare all six channels under equal pressure. The strongest visual match to the photograph comes from broad lobes with narrow, deep valleys rather than twelve shallow sections.
Conclusion
The reference pumpkin depends on proportion more than decorative stitch complexity: a wide 42-stitch body, controlled filling, six deep sculpted channels, and a narrow curved stem establish the form. Complete the body first, check that all six lobes are similar in width, then adjust the stem angle before burying the final tails. Save the finished crochet pumpkin amigurumi pattern project to Pinterest and share the completed version on Instagram with #LargeRibbedPumpkin. For the next variation, test one structural change at a time rather than altering yarn, stitch count, and stuffing simultaneously. Which part would you exaggerate to match the photograph more closely: the depth of the burgundy ribs or the length of the curved stem?









