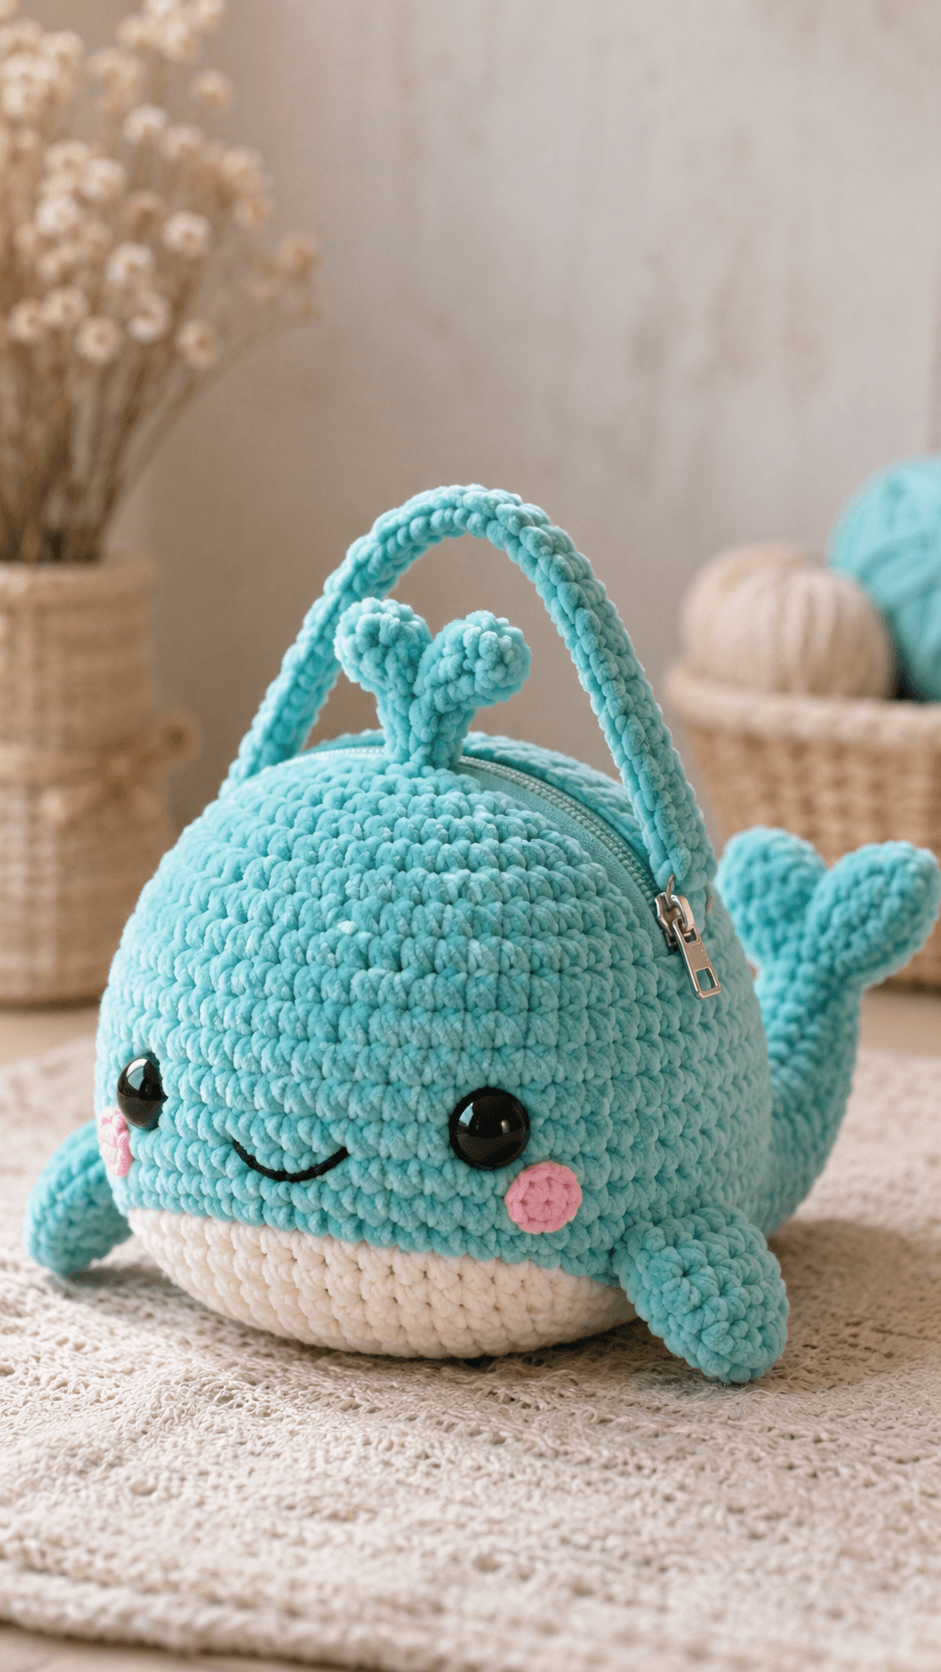
A whale reads as a whale only when the forehead stays blunt and the tail forks late. This crochet whale zipper pouch is built around that silhouette, with a rounded top shell, a pale belly panel, short side fins, and a raised tail that balances the zipper line. The photographed version uses plush chenille-style yarn, oversized safety eyes, and a top handle, so the project functions as both a soft amigurumi and a small carry pouch.
The Design: What Makes This Whale Different
This piece is not a standard whale plush. The zipper changes the construction. You need enough body depth to hold small items, but the curve still has to stay smooth once the zipper is installed. That is why the top dome remains broad for several rounds before tapering. The belly is worked as a contrasting lower panel to keep the whale shape readable from the front, even when the pouch is sitting flat on a table.
The handle matters too. In the photo, it sits high over the body rather than hugging the shell. That extra height keeps the zipper accessible and stops the top from collapsing inward when the pouch is lifted. The tail is also more upright than on a sleeping-whale plush. That choice is structural. A flatter tail disappears visually behind the body, while a raised forked tail finishes the silhouette from the side.
The most common mistake with a whale pouch is treating it like a sphere with fins. That produces a fish shape, not a whale. You need a blunt face, a wide brow, low side fins, and a tail attached high enough to extend the back line instead of drooping under it.
Project Info at a Glance
| Skill Level | Time | Finished Size | Hook | Best For |
|---|---|---|---|---|
| Intermediate | 5–7 hours | About 20 cm wide | 5.0 mm | Coin pouch, notions case, bag charm display piece |
Materials and Tools
Yarn
- Aqua blue chenille — bulky to super bulky — about 120 g — for main body, fins, tail, sprouts, and handle
- White chenille — bulky to super bulky — about 35 g — for belly panel
- Pink cotton or chenille scrap — small amount — for cheek circles
- Black embroidery thread — small amount — for smile
Tools
- 5.0 mm hook
- 18–24 mm safety eyes
- 20–23 cm zipper
- Tapestry needle
- Stitch markers
- Polyester stuffing
- Sewing needle and matching thread for zipper installation
Abbreviations
MR = magic ring, sc = single crochet, inc = increase, dec = invisible decrease, sl st = slip stitch, ch = chain, BLO = back loop only, FLO = front loop only, st = stitch.
Use invisible decrease for all shaping rounds. With chenille yarn, regular decreases create visible gaps along the crown and tail base.
Pattern Notes
Work in continuous rounds unless noted. The pouch is constructed as a front shell, a back shell, a separate belly oval, two fins, a tail made in joined parts, two decorative top sprouts, and a handle. The zipper is sewn between the top edges of the front and back body pieces after both panels are complete.
This is an original image-based draft written to match the photographed whale pouch style, not a copy of any outside pattern.
Pattern — Step by Step
Front Body Panel (Make 1)
Yarn: aqua blue
- R1: 6 sc in MR (6)
- R2: inc x6 (12)
- R3: (sc, inc) x6 (18)
- R4: (2 sc, inc) x6 (24)
- R5: (3 sc, inc) x6 (30)
- R6: (4 sc, inc) x6 (36)
- R7: (5 sc, inc) x6 (42)
- R8: (6 sc, inc) x6 (48)
- R9: (7 sc, inc) x6 (54)
- R10-15: sc around (54)
Fasten off. Leave a tail for sewing to the zipper edge later if preferred.
Back Body Panel (Make 1)
Yarn: aqua blue
- Repeat R1-R15 of Front Body Panel (54)
Fasten off.
Belly Panel (Make 1)
Yarn: white
- R1: ch 9, 2 sc in 2nd ch from hook, 6 sc, 4 sc in last ch, working on opposite side 6 sc, 2 sc in last ch (20)
- R2: inc, sc, inc, 6 sc, inc x4, 6 sc, inc, sc, inc (28)
- R3: (sc, inc), sc, (sc, inc), 6 sc, (sc, inc) x4, 6 sc, (sc, inc), sc, (sc, inc) (36)
- R4: sc around (36)
- R5: sc around (36)
Fasten off. This piece is appliquéd to the lower front body panel.
Side Fins (Make 2)
Yarn: aqua blue
- R1: 6 sc in MR (6)
- R2: inc x6 (12)
- R3: (sc, inc) x6 (18)
- R4-5: sc around (18)
- R6: (sc, dec) x6 (12)
- R7: sc around (12)
Flatten lightly. Do not overstuff. The fins should angle outward, not downward.
Fasten off. Leave a 20 cm tail.
Tail Base (Make 1)
Yarn: aqua blue
- R1: 6 sc in MR (6)
- R2: inc x6 (12)
- R3: (sc, inc) x6 (18)
- R4-6: sc around (18)
- R7: (sc, dec) x6 (12)
Stuff lightly so the tail can hold an upward curve.
Fasten off. Leave a 25 cm tail.
Tail Flukes (Make 2)
Yarn: aqua blue
- R1: 6 sc in MR (6)
- R2: inc x6 (12)
- R3: (sc, inc) x6 (18)
- R4-5: sc around (18)
- R6: (sc, dec) x6 (12)
Flatten each fluke. Sew both to the open end of the tail base, one on each side, with the points angled slightly outward.
Fasten off. Leave a 20 cm tail on each.
Top Sprouts (Make 2)
Yarn: aqua blue
- R1: 6 sc in MR (6)
- R2: sc around (6)
- R3: (sc, inc) x3 (9)
- R4: sc around (9)
- R5: (sc, dec) x3 (6)
Stuff only the tips. These are decorative and should stay short and rounded.
Fasten off. Leave a 15 cm tail.
Handle (Make 1)
Yarn: aqua blue
- Ch 36.
- Row 1: sc in 2nd ch from hook and across (35)
- Row 2-4: ch 1, turn, sc across (35)
Fold lengthwise and seam the long edges together to create a padded strap. For a firmer handle, insert a narrow strip of felt or work a second strip and join both layers.
Fasten off. Leave long tails on both ends.
Cheek Patches (Make 2)
Yarn: pink
- R1: 6 sc in MR (6)
- R2: inc x6 (12)
- R3: sc around (12)
Fasten off. Leave a 12 cm tail.
Assembly
- Center the white belly panel on the lower half of the front body panel and sew it down evenly.
- Install the safety eyes on the front body panel before joining the pouch, placing them low and wide with the cheeks directly beneath.
- Embroider the smile between the eyes, slightly below their midpoint.
- Sew the pink cheek circles under the outer lower corners of the eyes.
- Attach both side fins at the lower sides of the front and back body area so they project forward slightly.
- Sew the completed tail to the upper rear side of the back panel, angling it upward.
- Sew the two top sprouts near the zipper line, centered above the face.
- Pin the zipper between the top edges of the front and back body panels and sew it in by hand.
- Join the remaining outer edges of the front and back panels with single crochet or whipstitch, adding light stuffing around the lower curve only if you want a softer plush profile.
- Sew the handle ends on either side of the zipper so the arch clears the top sprouts.
The completed whale should sit flat on its belly, open cleanly across the zipper line, and keep its rounded silhouette even when lightly filled.
7 Technical Tips
- Keep the eye placement low. If the eyes rise more than one round above the horizontal centerline, the face shifts from whale to generic plush orb.
- Do not overtighten chenille stitches. Tight pulling compresses the pile and makes the body surface look uneven under soft lighting.
- Stabilize the zipper before sewing. Clip or baste it in place first, because plush yarn distorts if the zipper is attached under tension.
- Stuff the tail base lightly, not firmly. A rigid tail twists the back seam and pulls the pouch off balance.
- Flatten the fins before attachment. Fully stuffed fins look like arms, which changes the marine silhouette.
- Test the handle drop before sewing. If the arch sits too low, the zipper pull catches the strap during opening.
- Weave tails through multiple directions. Chenille sheds under friction, so a single straight bury is less secure than two turns through dense stitches.
Conclusion
This whale zipper pouch depends on proportion more than decoration. The broad forehead, low fins, pale belly, raised tail, and curved top handle are the details that keep the character readable at a glance. Start with the front panel first, check the eye spacing, then compare the zipper length against the body diameter before joining the shells. After finishing, photograph the pouch closed and open, then share one image on Pinterest and one on Instagram with #WhaleZipperPouch. The useful final question is simple: should the tail stand more upright, or should it angle back to make the pouch easier to store in a tote?









