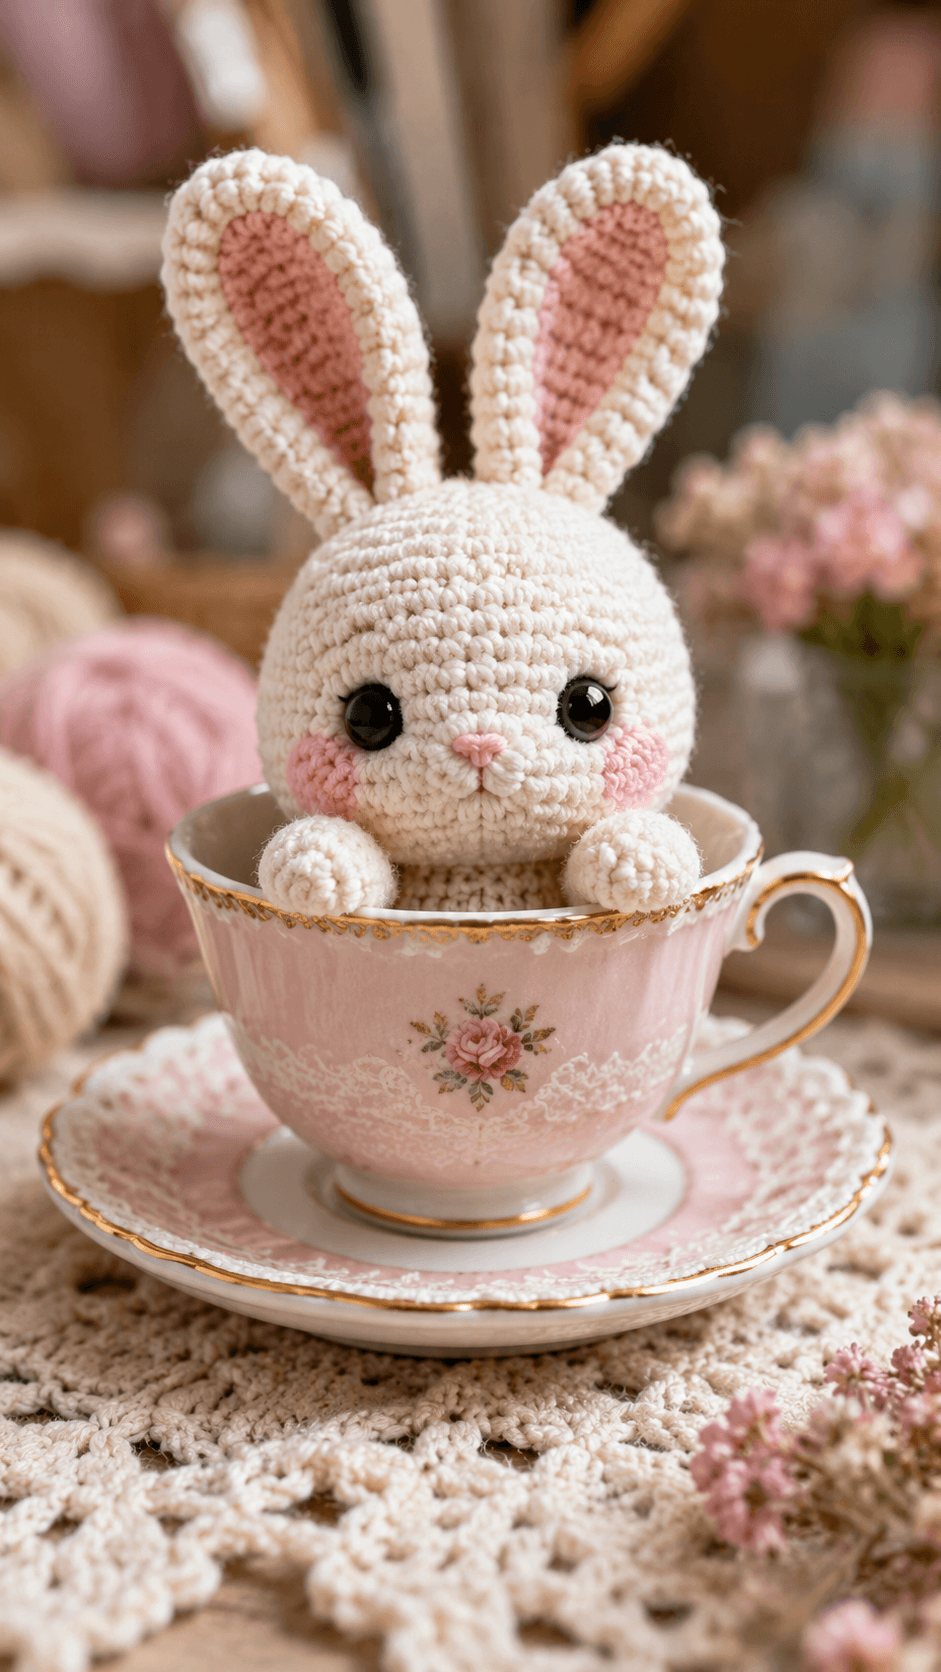
A rabbit’s ears cannot read as rabbit ears unless they rise higher than the head and narrow late, not early. This teacup bunny amigurumi crochet pattern is built for that proportion, using DK cotton, a 2 mm hook, and a compact finished height of about 9 cm in comparable small bunny patterns. It suits an intermediate beginner who wants a display piece that fits a shelf, nursery tray, or seasonal table vignette. Sources for comparable size and materials: Little Crochet Farm; comparable small-bunny eye and yarn references: Supergurumi.
The Design: What Makes This Bunny Different
This version is built around three structural choices visible in the photo. First, the head stays nearly spherical, then drops into a short lower-face taper so the muzzle can project without becoming a snout. Second, the ears are worked as two layers joined at the edge, because a single tube often twists and collapses when the ear is this tall relative to the head. Third, the body is undersized on purpose. You look at the head first, then the ears, then the tiny paws over the teacup rim. That sequence is what makes the piece read as a miniature display bunny instead of a standard stuffed rabbit.
You need to keep the cheeks low and the eyes wide. A maker often places the safety eyes too high on a small rabbit amigurumi, which shortens the muzzle and removes the baby-animal proportion. In a bunny amigurumi crochet pattern, the face has to stay low-centered. The piece also depends on restrained stuffing in the body. The head can stay firm; the body should compress slightly so the bunny sits into the cup rather than floating above it. Comparable small-bunny references for scale, hook size, and eye size come from Little Crochet Farm and Supergurumi, while larger rabbit references from StringyDingDing show how proportions change when yarn weight and hook size increase.
Project Info at a Glance
| Skill Level | Time | Finished Size | Hook | Best For |
|---|---|---|---|---|
| Intermediate beginner | 4–6 hours | About 9 cm sitting | 2 mm | Teacup decor, nursery styling, spring display |
Verified size and hook reference for comparable small bunny patterns: Little Crochet Farm. Comparable small-bunny yarn and 6 mm safety-eye reference: Supergurumi.
Materials and Tools
Yarn
- Cream or warm white — DK cotton — approx. 20 g — comparable yarn class: light worsted/DK cotton for a 9 cm bunny at Little Crochet Farm, or sport cotton in Schachenmayr Catania at Supergurumi.
- Soft pink — DK cotton — approx. 5 g — for inner ears, cheeks, and nose.
The gram amounts above are working estimates based on a 9 cm bunny format from Little Crochet Farm and a 50 g / 125 m sport-cotton reference ball listed by Supergurumi.
Tools
- Hook: 2 mm
- Safety eyes: 6 mm for a small-format bunny
- Stuffing: polyester fiberfill
- Needle: tapestry needle
- Other: stitch markers, scissors, pins, pink embroidery thread for nose shaping if preferred
Comparable references: Little Crochet Farm lists a 2 mm hook with DK/light-worsted cotton for a 9 cm bunny; Supergurumi lists 6 mm safety eyes for a small bunny; StringyDingDing and StringyDingDing Bunny Rabbit show 10 mm eyes on much larger 4 mm hook / medium-weight rabbits.
Abbreviations
MR = magic ring, sc = single crochet, inc = increase, dec = invisible decrease, sl st = slip stitch, ch = chain, BLO = back loop only, FLO = front loop only.
Use invisible decrease on all shaping rounds that reduce the stitch count; it keeps the face and crown cleaner than a standard two-stitch decrease.
Pattern — Step by Step
Work in a continuous spiral unless noted. Stitch counts are shown in parentheses at the end of every round.
Head (Make 1)
Yarn: cream — shaping based on standard amigurumi math with a small 30-stitch plateau, aligned with the 30-stitch gauge point cited by Little Crochet Farm.
- R1: 6 sc in MR (6)
- R2: inc x6 (12)
- R3: (sc, inc) x6 (18)
- R4: (2 sc, inc) x6 (24)
- R5: (3 sc, inc) x6 (30)
- R6–10: sc around (30)
- R11: (3 sc, dec) x6 (24)
- R12: sc around (24)
- R13: (2 sc, dec) x6 (18)
- R14: (sc, dec) x6 (12)
Place 6 mm eyes between R8 and R9, with 7 stitches between them. Add stuffing before the final opening tightens. The eyes should sit slightly below the horizontal midline of the sphere.
Fasten off. Close the opening. Leave a 20 cm tail for sculpting and joining if needed.
Body (Make 1)
Yarn: cream — compact body so the head dominates, matching the teacup proportion in the photo.
- R1: 6 sc in MR (6)
- R2: inc x6 (12)
- R3: (sc, inc) x6 (18)
- R4: (2 sc, inc) x6 (24)
- R5–7: sc around (24)
- R8: (2 sc, dec) x6 (18)
- R9: sc around (18)
- R10: (sc, dec) x6 (12)
Stuff lightly. This piece should compress when pressed into the cup.
Fasten off. Leave a 20 cm tail.
Arms / Front Paws (Make 2)
Yarn: cream — rounded paws sized to sit over the teacup rim.
- R1: 6 sc in MR (6)
- R2: inc x6 (12)
- R3–4: sc around (12)
- R5: (dec) x6 (6)
Add a pinch of stuffing only in the paw end. Flatten the opening.
Fasten off. Leave a 15 cm tail.
Back Legs (Make 2)
Yarn: cream — mostly hidden in the cup, but they help the body angle forward.
- R1: 6 sc in MR (6)
- R2: inc x6 (12)
- R3–5: sc around (12)
- R6: (dec) x6 (6)
Stuff minimally. These are support parts, not feature parts.
Fasten off. Leave a 15 cm tail.
Outer Ears (Make 2)
Yarn: cream — based on elongated rabbit-ear shaping seen across bunny references, but resized for a small head.
- R1: 6 sc in MR (6)
- R2: inc x6 (12)
- R3: (sc, inc) x6 (18)
- R4–8: sc around (18)
- R9: (4 sc, dec) x3 (15)
- R10–12: sc around (15)
- R13: (3 sc, dec) x3 (12)
- R14–15: sc around (12)
Do not stuff. Flatten after round 15.
Fasten off. Leave a 20 cm tail.
Inner Ear Panels (Make 2)
Yarn: pink — flatter insert so the white rim stays visible all around.
Work in rows.
- Row 1: ch 7, sc in 2nd ch from hook and across (6)
- Row 2: ch 1, turn, inc, 4 sc, inc (8)
- Row 3: ch 1, turn, sc across (8)
- Row 4: ch 1, turn, inc, 6 sc, inc (10)
- Row 5: ch 1, turn, sc across (10)
- Row 6: ch 1, turn, dec, 6 sc, dec (8)
- Row 7: ch 1, turn, sc across (8)
- Row 8: ch 1, turn, dec, 4 sc, dec (6)
Lay each panel over a flattened outer ear and whipstitch in place, leaving one round of cream visible at the edge.
Fasten off. Leave a 12 cm tail.
Muzzle (Make 1)
Yarn: cream — compact oval to keep the lower face centered.
- R1: ch 5, 2 sc in 2nd ch from hook, 2 sc, 4 sc in last ch, working on opposite side 2 sc, 2 sc in last ch (12)
- R2: inc, sc, inc, 2 sc, inc x4, 2 sc, inc, sc, inc (20)
- R3: sc around (20)
Lightly stuff or leave flat, depending on how much projection you want.
Fasten off. Leave a 20 cm tail.
Cheek Patches (Make 2)
Yarn: pink — flat circles, as required.
- R1: 6 sc in MR (6)
- R2: inc x6 (12)
- R3: sc around (12)
Fasten off. Leave a 12 cm tail.
Nose (Make 1)
Yarn: pink.
- R1: 3 sc in MR (3)
- R2: inc, sc, inc (5)
Alternatively embroider a small upside-down triangle over the top center of the muzzle.
Fasten off. Leave a 15 cm tail.
Tail (Make 1)
Yarn: cream — optional, mostly hidden inside the cup.
- R1: 6 sc in MR (6)
- R2: inc x6 (12)
- R3: (sc, dec) x4 (8)
Add a pinch of stuffing.
Fasten off. Leave a 12 cm tail.
Teacup Rim Paws Placement Note
This photo-specific feature matters more than a standard standing-bunny arm placement. Before sewing, test the front paws over the cup rim or over a folded edge of cardboard 5–7 mm thick. That check sets the angle.
Assembly
- Sew the head to the body with the body centered under the lower third of the head, not directly under its midpoint.
- Attach the muzzle between R9 and R13 of the head.
- Sew the nose at the top center of the muzzle, then run one short vertical stitch downward to split the mouth.
- Sew the cheek patches one stitch below the outer lower corners of the eyes.
- Join the inner pink ear panels to the outer ears if not already done.
- Pin both ears to the crown so they stand high and slightly outward, then sew them between the upper head rounds with a 4–5 stitch gap.
- Sew the front paws low on the body so they rise naturally in front when the bunny is placed in a cup.
- Attach the back legs at the lower body sides to cant the bunny slightly forward.
- Sew the tail to the back base of the body only if it will remain visible outside the cup.
- Set the bunny into the teacup and adjust the paw angle, ear symmetry, and head tilt before weaving in all remaining tails.
The completed piece should sit with the head above the rim, paws visible, and the body compressed enough to remain stable inside the cup.
7 Technical Tips
- Mark round 1 immediately. On a 30-stitch plateau, losing the start point by even 2 stitches will pull the face off-center and shift the muzzle seam to one side.
- Do not overfill the body. A body stuffed to full firmness will lift the bunny out of the cup by 5–10 mm and remove the nested look visible in the photo.
- Use invisible decrease on the head. Standard decreases leave horizontal dents that show most clearly across cream cotton on rounds 11, 13, and 14.
- Install eyes before the opening narrows below 18 stitches. After that point, eye washers are harder to seat cleanly and the fabric around the socket can distort.
- Pin the ears before sewing anything permanent. A difference of one round in placement changes the ear height enough to make one ear look shorter even when both pieces match.
- Keep cheek circles flat. If you add stuffing or pull the sewing thread too hard, the cheeks turn into bumps and compete with the muzzle instead of framing it.
- Weave tails through a change of direction. On small parts like paws and ears, a straight buried tail can slide out after handling, while one turn through 2 paths holds far better.
Conclusion
This teacup bunny amigurumi crochet pattern works because every proportion is compressed except the ears. The hook, yarn class, and small-format references point to a display bunny around 9 cm tall, which matches the scale needed for a cup-top composition rather than a full plush toy. Your next step is to make the head first, test the eye spacing, and compare the diameter to the cup you plan to use. After finishing, share one photo for Pinterest and one close crop for Instagram under #TeacupBunnyPattern. One question remains useful before you stitch the ears down: do you want this rabbit to sit alert, or with one ear tilted a few degrees for asymmetry?
Source notes: Comparable small-bunny finished size, hook size, DK/light-worsted cotton, and 30-stitch gauge reference from Little Crochet Farm. Comparable small-bunny yarn specification (50 g / 125 m sport cotton), 2.5 mm hook, and 6 mm safety-eye reference from Supergurumi. Larger rabbit references used only for comparative scaling and anatomy conventions from StringyDingDing Bunny Doll and StringyDingDing Bunny Rabbit.









