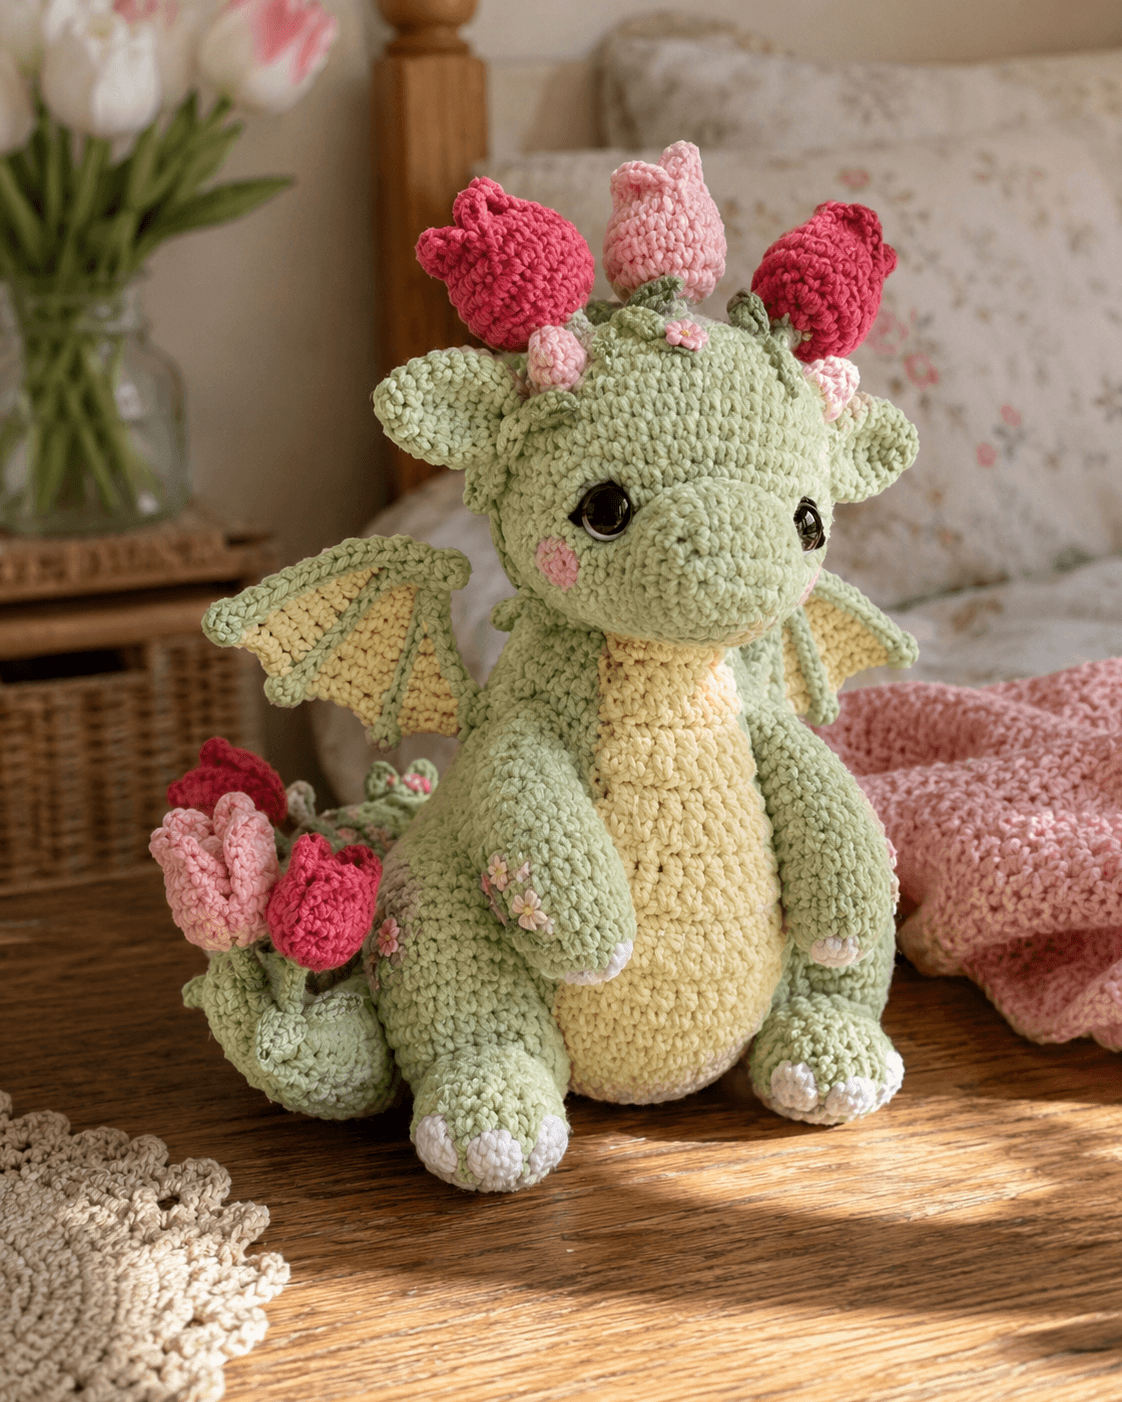
Tulip buds change the silhouette before the wings do. This tulip dragon amigurumi crochet pattern uses soft green yarn, a pale contrast belly, small framed wings, and separate flower details to build a seated dragon with a rounded snout and balanced floral crown. It suits an intermediate maker who wants a display piece with clear shaping, stable posture, and decorative surface details that read well from the front.
The Design: What Makes Tulip Dragon Different
The crown is the main structural choice here. Tulip buds add height to the head, so they must sit high enough to read as flowers without pulling the face upward. The second choice is the long belly panel. A tulip dragon looks more grounded when the contrast section runs from the lower snout through the body front in one continuous line. That breaks up the green mass and gives the plush a cleaner front view. The third choice is wing scale. Small wings work better than oversized ones because the floral crown and tail bouquet already carry most of the visual weight.
The snout stays broad and short. That keeps the dragon soft rather than reptilian. Many makers place the flowers too close together and lose the ear line, or they push the eyes outward and flatten the front of the face. In stronger versions, the tulips frame the top silhouette while the face stays centered and readable. This character depends more on spacing than on complexity.
Project Info at a Glance
| Skill Level | Time | Finished Size | Hook | Best For |
|---|---|---|---|---|
| Intermediate | 9–13 hours | Approx. 26–30 cm seated | 3.5 mm | Shelf display, spring decor, gift make |
Materials and Tools
Yarn
- Sage green — worsted — about 110 g — main body color
- Pale yellow — worsted — about 45 g — belly and wing membranes
- Pink — worsted — about 20 g — tulip buds and face details
- Dark pink — worsted — about 20 g — deeper tulip petals
- White — worsted — about 10 g — claws and small flower accents
- Olive green — worsted — about 10 g — stems and leaf details
- Black embroidery thread — small amount — nostrils if desired
Tools
- Hook 3.5 mm
- Safety eyes 12 mm
- Polyester stuffing
- Tapestry needle
- Stitch markers
- Pins
Abbreviations
MR / sc / inc / dec / sl st / ch / BLO / hdc / dc
Use invisible decrease on all visible shaping rounds. That keeps the head and body cleaner, especially across the pale green surface where decrease lines can show easily.
Pattern — Step by Step
Continuous spiral unless noted.
Head (Make 1)
Yarn: sage green
R1: 6 sc in MR (6)
R2: inc x6 (12)
R3: (sc, inc) x6 (18)
R4: (2 sc, inc) x6 (24)
R5: (3 sc, inc) x6 (30)
R6: (4 sc, inc) x6 (36)
R7–R12: sc around (36)
Place safety eyes between R8 and R9, 8 sts apart. Embroider nostrils centered 3 rounds below the eyes.
R13: (4 sc, dec) x6 (30)
R14: sc around (30)
R15: (3 sc, dec) x6 (24)
R16: (2 sc, dec) x6 (18)
Stuff firmly, especially at the cheeks and lower snout.
R17: (sc, dec) x6 (12)
R18: dec x6 (6)
Fasten off. Leave a 25 cm tail.
Snout (Make 1)
Yarn: sage green
Ch 6.
Rnd 1: starting in 2nd ch from hook, 4 sc, 3 sc in last ch; rotate, 3 sc, inc in last st (12)
Rnd 2: inc, 3 sc, 3 inc, 3 sc, 2 inc (18)
Rnd 3: sc around (18)
Rnd 4: (2 sc, dec) x4, 2 sc (14)
Lightly stuff. Fasten off. Leave a 20 cm tail.
Body (Make 1)
Yarn: sage green
R1: 6 sc in MR (6)
R2: inc x6 (12)
R3: (sc, inc) x6 (18)
R4: (2 sc, inc) x6 (24)
R5: (3 sc, inc) x6 (30)
R6: (4 sc, inc) x6 (36)
R7–R11: sc around (36)
R12: (4 sc, dec) x6 (30)
R13–R14: sc around (30)
R15: (3 sc, dec) x6 (24)
R16–R17: sc around (24)
R18: (2 sc, dec) x6 (18)
R19: sc around (18)
R20: (sc, dec) x6 (12)
Stuff the lower body firmly so the dragon can sit without collapsing forward.
Fasten off. Leave a 30 cm tail.
Belly Panel (Make 1)
Yarn: pale yellow
Ch 8.
Row 1: starting in 2nd ch from hook, 6 sc, 3 sc in last ch; rotate, 5 sc, inc in last st (16)
Row 2: inc, 5 sc, 3 inc, 5 sc, 2 inc (22)
Row 3: sc around (22)
Row 4: inc, 9 sc, 2 inc, 9 sc, inc (26)
Row 5–6: sc around (26)
Fasten off. Leave a 35 cm tail.
Front Legs (Make 2)
Yarn: sage green with white claws
R1: 6 sc in MR with white (6)
R2: inc x6 (12)
R3: BLO sc around, switch to sage green (12)
R4–R5: sc around (12)
R6: (4 sc, dec) x2 (10)
R7–R10: sc around (10)
Stuff the paw lightly. Fasten off. Leave a 20 cm tail.
Back Legs (Make 2)
Yarn: sage green with white claws
R1: 6 sc in MR with white (6)
R2: inc x6 (12)
R3: (sc, inc) x6 (18)
R4: BLO sc around, switch to sage green (18)
R5: sc around (18)
R6: (sc, dec) x6 (12)
R7–R8: sc around (12)
Stuff the foot and base well. Fasten off. Leave a 25 cm tail.
Ears (Make 2)
Yarn: sage green
R1: 6 sc in MR (6)
R2: (sc, inc) x3 (9)
R3: (2 sc, inc) x3 (12)
R4: sc around (12)
Flatten slightly. Fasten off. Leave a 15 cm tail.
Wings (Make 2)
Yarn: sage green frame, pale yellow membrane
With sage green, ch 7.
Row 1: starting in 2nd ch from hook, 6 sc (6)
Row 2: ch 1, turn, inc, 4 sc, inc (8)
Row 3: ch 1, turn, inc, 6 sc, inc (10)
Row 4: ch 1, turn, inc, 8 sc, inc (12)
Row 5: ch 1, turn, sc across (12)
Row 6: ch 1, turn, dec, 8 sc, dec (10)
Row 7: ch 1, turn, sc across (10)
Fasten off sage green. With pale yellow, surface stitch or sew 3 membrane lines from upper edge to lower edge. Leave a 20 cm tail for attachment.
Tail (Make 1)
Yarn: sage green
R1: 6 sc in MR (6)
R2: sc around (6)
R3: inc x6 (12)
R4–R5: sc around (12)
R6: (sc, inc) x6 (18)
R7–R11: sc around (18)
R12: (2 sc, inc) x6 (24)
R13–R18: sc around (24)
Stuff lightly so the tail can curve around the body. Fasten off. Leave a 30 cm tail.
Dorsal Bumps (Make 6)
Yarn: sage green
R1: 6 sc in MR (6)
R2: sc around (6)
Flatten. Fasten off. Leave a 10 cm tail.
Cheek Patches (Make 2)
Yarn: light pink
R1: 6 sc in MR (6)
R2: inc x6 (12)
Fasten off. Leave a 12 cm tail.
Small Flowers (Make 6)
Yarn: pink, white, or pale yellow
With center color, 5 sc in MR.
Change to petal color.
Petal round: (ch 2, 2 dc in next st, ch 2, sl st in same st) x5
Fasten off. Leave a short tail for sewing.
Tulip Buds (Make 5)
Yarn: 2 dark pink, 2 light pink, 1 medium pink
R1: 6 sc in MR (6)
R2: inc x6 (12)
R3–R5: sc around (12)
R6: (2 sc, dec) x3 (9)
Lightly stuff. Fasten off. Leave a 20 cm tail.
Tulip Petal Tops (Make 15)
Yarn: matching tulip colors — make 3 per bud
Ch 5.
Row 1: starting in 2nd ch from hook, sl st, sc, hdc, dc
Work opposite side: hdc, sc, sl st at base
Sew 3 petal tops around the opening of each bud so the tulip shape closes upward.
Tulip Stems (Make 5)
Yarn: olive green
Ch 8.
Row 1: starting in 2nd ch from hook, sl st in each ch across (7)
Fasten off. Leave a tail for sewing to each tulip bud.
Tail Bouquet Base (Make 1)
Yarn: sage green
R1: 6 sc in MR (6)
R2: inc x6 (12)
R3: sc around (12)
Stuff lightly. Fasten off. Leave a 20 cm tail.
Assembly
- Sew the snout to the lower front of the head, centered beneath the eyes.
- Attach the head to the top of the body with the face angled slightly downward.
- Sew the belly panel from the underside of the snout down the center front of the body.
- Attach the front legs one round below the neck join, keeping both paws even from the front view.
- Sew the back legs low and wide so the dragon sits securely.
- Attach the ears to the sides of the head, slightly behind the eye line.
- Sew the wings to the upper back, keeping the top corners level and the lower points angled outward.
- Attach the tail at the back center and curve it toward one side of the body.
- Sew the dorsal bumps from the head back to the upper tail, spacing them evenly.
- Add the cheek patches, then sew the tulip buds and stems across the head crown and onto the tail bouquet base. Finish by sewing the small flowers onto the body, arms, and head.
The finished piece should sit on the back legs and tail base without external support.
7 Technical Tips
- Pin the tulip buds before sewing. The main failure mode is uneven crown weight, which makes the head look tilted even when the neck is centered.
- Keep the snout lightly stuffed. Too much filling pushes the nostril area forward and narrows the eye space.
- Mark wing placement on both sides first. Even a 4 mm height difference shows immediately from the front.
- Stuff the lower body more firmly than the chest. A soft base makes the seated dragon slump backward once the head is attached.
- Sew the belly panel after pinning both ends. If the panel shifts during stitching, the center line drifts and the whole front view looks twisted.
- Space the floral appliqués with restraint. Too many flowers flatten the body outline and hide the shaping lines that make the dragon readable.
- Weave each tulip stem tail through at least 3–4 cm of interior stitches. Short anchors loosen quickly because the crown details get handled more than the body.
Conclusion
This tulip dragon amigurumi crochet pattern depends on proportion more than stitch variety. The rounded face, narrow wings, long belly panel, and clustered tulip buds work together to keep the floral theme clear without hiding the dragon shape. Follow the stitch counts closely, pin the crown before sewing, and check the toy from the front after every major attachment. Then photograph the finished piece in natural light and from a seated angle that shows the crown and tail bouquet together. Share it on Pinterest and Instagram with #TulipDragonPattern. Did you place your tail tulips as a compact bouquet, or spread them farther along the curve?









