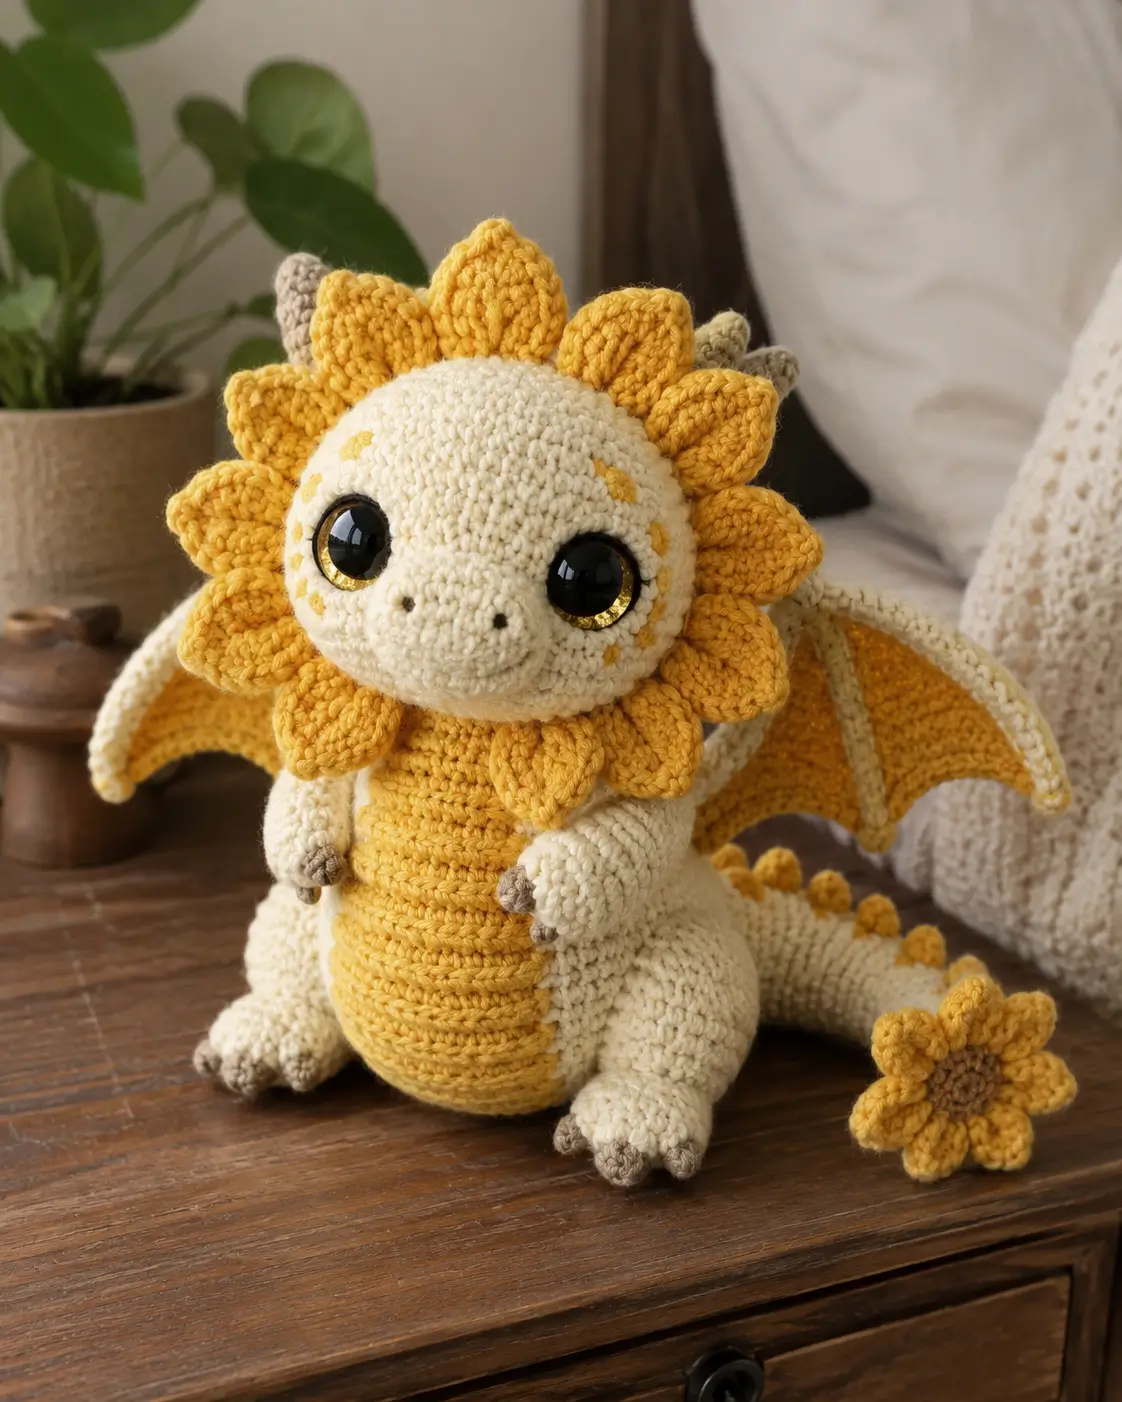
A sunflower dragon fails at the neck before it fails anywhere else. This sunflower dragon amigurumi crochet pattern uses worsted yarn, a 3.5 mm hook, simple spiral construction, and medium-size shaping to build a seated dragon with a petal mane, wings, and a separate sunflower accent. It suits an intermediate maker who wants a display plush with clear proportions and a face that reads correctly in photos.
The Design: What Makes Sunflower Dragon Different
The first structural decision is the petal collar. It has to sit behind the jawline rather than flat against the skull, or the face disappears inside the flower shape. The second is the belly panel. A sunflower dragon amigurumi looks more stable when the contrast panel is narrow at the neck and wider through the seated body, because the eye reads that as chest-to-belly flow rather than a tube. The third is wing scale. Small wings are more believable here than oversized bat wings, since the petals already occupy most of the silhouette.
You will also notice that the snout stays short. That keeps the dragon in the baby-dragon category instead of shifting toward lizard anatomy. Many makers crowd the petals too tightly and then push the eyes too low; the result is a flower dragon amigurumi with a flattened face. In better samples, the petals frame the head while the eyes still dominate the front view. Comparable published sunflower-dragon patterns range from tiny decorative builds to longer 30 cm versions, so proportion matters more than absolute size.
Project Info at a Glance
| Skill Level | Time | Finished Size | Hook | Best For |
|---|---|---|---|---|
| Intermediate | 8–12 hours | Approx. 24–30 cm seated/curved build | 3.5–4.0 mm | Shelf display, nursery decor, photo prop |
Published sunflower-dragon references show 4.0 mm hooks and about 30 cm length in one version, while a smaller decorative version uses a 2.5 mm hook and lands around 12 cm long / 15 cm tall. This pattern is drafted between those benchmarks to match the photographed plush more closely.
Materials and Tools
Yarn
- Cream — worsted — about 90 g — Paintbox Cotton Aran or similar
- Golden yellow — worsted — about 70 g — Yarn and Colors Epic or similar worsted cotton
- Mustard — worsted — about 35 g — contrast for belly, wing membranes, petals
- Taupe/Brown — worsted — about 10 g — claws, horns, sunflower center
- Black embroidery thread — small amount — nostrils
Comparable dragon references place regular-yarn builds around 100–200 yards total for smaller sunflower dragons, while larger dragons can consume about 1.5 skeins for the body alone.
Tools
- Hook 3.5 mm
- Safety eyes 12 mm
- Polyester stuffing
- Tapestry needle
- Stitch markers
- Pins
Regular-yarn dragon patterns commonly pair 2.5–4.0 mm hooks with 6–12 mm safety eyes, depending on final scale.
Abbreviations
MR / sc / inc / dec / sl st / ch / BLO / hdc / dc
Use invisible decrease for all shaping rounds on the visible parts. That keeps the cream body smooth and stops the petal-framed face from picking up dark shadows at the decrease points.
Pattern — Step by Step
Continuous spiral unless noted.
Head (Make 1)
Yarn: cream — Source: standard amigurumi math, image-based reconstruction
R1: 6 sc in MR (6)
R2: inc x6 (12)
R3: (sc, inc) x6 (18)
R4: (2 sc, inc) x6 (24)
R5: (3 sc, inc) x6 (30)
R6: (4 sc, inc) x6 (36)
R7–R12: sc around (36)
Place safety eyes between R8 and R9, 8 sts apart. Embroider two small nostrils centered 3 rounds below the eyes.
R13: (4 sc, dec) x6 (30)
R14: sc around (30)
R15: (3 sc, dec) x6 (24)
R16: (2 sc, dec) x6 (18)
Stuff firmly, especially through the lower snout area.
R17: (sc, dec) x6 (12)
R18: dec x6 (6)
Fasten off. Leave a 25 cm tail.
Body (Make 1)
Yarn: golden yellow — Source: standard amigurumi math, image-based reconstruction
R1: 6 sc in MR (6)
R2: inc x6 (12)
R3: (sc, inc) x6 (18)
R4: (2 sc, inc) x6 (24)
R5: (3 sc, inc) x6 (30)
R6: (4 sc, inc) x6 (36)
R7–R10: sc around (36)
R11: (4 sc, dec) x6 (30)
R12–R13: sc around (30)
R14: (3 sc, dec) x6 (24)
R15: sc around (24)
R16: (2 sc, dec) x6 (18)
R17: sc around (18)
R18: (sc, dec) x6 (12)
Stuff the lower body more firmly than the neck end so it sits upright.
R19: sc around (12)
Fasten off. Leave a 30 cm tail.
Belly Panel (Make 1)
Yarn: mustard — Source: image-based reconstruction
Ch 7.
Row 1: starting in 2nd ch from hook, 5 sc, 3 sc in last ch; rotate and work opposite side, 4 sc, inc in last st (14)
Row 2: inc, 4 sc, 3 inc, 4 sc, 2 inc (20)
Row 3: sc around (20)
Row 4: inc, 8 sc, 2 inc, 8 sc, inc (24)
Row 5: sc around (24)
Row 6: dec, 8 sc, 2 dec, 8 sc, dec (20)
Row 7: sc around (20)
Fasten off. Leave a 35 cm tail.
Front Legs (Make 2)
Yarn: cream with taupe claws — Source: standard amigurumi math
R1: 6 sc in MR with taupe (6)
R2: inc x6 (12)
R3: BLO sc around, switch to cream (12)
R4–R5: sc around (12)
R6: (4 sc, dec) x2 (10)
R7–R9: sc around (10)
Lightly stuff only the paw. Fasten off. Leave a 20 cm tail.
Back Legs (Make 2)
Yarn: cream with taupe claws — Source: standard amigurumi math
R1: 6 sc in MR with taupe (6)
R2: inc x6 (12)
R3: (sc, inc) x6 (18)
R4: BLO sc around, switch to cream (18)
R5: sc around (18)
R6: (sc, dec) x6 (12)
R7–R8: sc around (12)
Stuff the foot and lower leg only. Fasten off. Leave a 25 cm tail.
Horns (Make 2)
Yarn: taupe — Source: standard amigurumi math
R1: 6 sc in MR (6)
R2: sc around (6)
R3: (sc, inc) x3 (9)
R4–R5: sc around (9)
Do not overstuff. Fasten off. Leave a 15 cm tail.
Wings (Make 2)
Yarn: cream frame, mustard membrane — Source: image-based reconstruction informed by common separate-wing construction in dragon patterns
With cream, ch 7.
Row 1: starting in 2nd ch from hook, 6 sc (6)
Row 2: ch 1, turn, inc, 4 sc, inc (8)
Row 3: ch 1, turn, inc, 6 sc, inc (10)
Row 4: ch 1, turn, inc, 8 sc, inc (12)
Row 5: ch 1, turn, sc across (12)
Row 6: ch 1, turn, dec, 8 sc, dec (10)
Row 7: ch 1, turn, sc across (10)
Do not fasten off. Switch to mustard and work membrane lines: sl st into top corner, ch 5 to bottom edge, sl st 3 sts lower; repeat twice more across the wing. Fasten off. Leave a 20 cm tail.
Petals (Make 14)
Yarn: golden yellow — Source: image-based reconstruction
Ch 7.
Row 1: starting in 2nd ch from hook, sl st, sc, hdc, dc, hdc, sc (6)
Work along the opposite side of foundation: sc, hdc, dc, hdc, sc, sl st at base (12)
Fasten off. Leave a 12 cm tail for each petal.
Tail (Make 1)
Yarn: cream — Source: standard amigurumi math
R1: 6 sc in MR (6)
R2: sc around (6)
R3: inc x6 (12)
R4–R5: sc around (12)
R6: (sc, inc) x6 (18)
R7–R10: sc around (18)
R11: (2 sc, inc) x6 (24)
R12–R18: sc around (24)
Stuff lightly so the tail can curve. Fasten off. Leave a 30 cm tail.
Dorsal Bumps (Make 7)
Yarn: mustard — Source: standard amigurumi math
R1: 6 sc in MR (6)
R2: sc around (6)
Flatten. Fasten off. Leave a 10 cm tail.
Cheek Patches (Make 2)
Yarn: pale yellow or cream — Source: image-based reconstruction
R1: 6 sc in MR (6)
R2: inc x6 (12)
Fasten off. Leave a 12 cm tail.
Sunflower Accessory (Make 1)
Yarn: brown center, yellow petals — Source: image-based reconstruction
Center, with brown:
R1: 6 sc in MR (6)
R2: inc x6 (12)
R3: (sc, inc) x6 (18)
Do not fasten off. Switch to yellow.
Petal round: (ch 4, starting in 2nd ch from hook: sl st, sc, hdc; sl st in next st) x9 (18 base sts used)
Fasten off. Leave a 20 cm tail.
Assembly
- Sew the head to the narrow top of the body with the face angled slightly downward.
- Stitch the belly panel to the body front, starting under the chin and ending near the body base.
- Add the cheek patches below and slightly outside the eyes; embroider small yellow face freckles around them if desired.
- Sew the front legs to the body sides one round below the neck join.
- Sew the back legs low and wide so the dragon sits without tipping forward.
- Attach the tail at the back center and angle it to one side.
- Sew the seven dorsal bumps from the back of the head down the tail, spacing them about 1.5 cm apart.
- Attach the horns behind the petal line and slightly outward from the head center.
- Sew the wings between the shoulder line and mid-back, keeping both top corners level.
- Stitch the fourteen petals around the head base, overlapping each base by about 2 stitches for full coverage, then place the sunflower accessory beside the dragon or tack it to the tail tip.
The finished piece should sit on its back legs and tail base without a support stand.
7 Technical Tips
- Mark the first stitch of every round. The failure mode here is rotated anatomy; one missed marker moves the belly panel and petal ring off center by the time you reach assembly.
- Stuff the head in layers, not as one mass. A loose lower face collapses under large eyes, while overpacked cheeks push the eyes outward and distort the snout.
- Use invisible decreases on cream yarn only. Standard decreases create a darker notch line that becomes obvious around R13–R17 on the head.
- Install the eyes before final neck closure. Waiting until after assembly often leaves you short by 1–2 rounds of hand clearance, which is exactly where the washers become hard to seat.
- Pin all petals before sewing any of them down. The common failure is drift; by petal 10, the gap lands at the forehead instead of behind one horn.
- Keep wing top corners level within 3 mm. A bigger difference makes one wing read as folded and the other as dropped, even when both rows are identical.
- Weave tails back through at least 4 cm of interior stitches. Shorter tail burial can pull loose when the body is squeezed during display or photography.
Conclusion
This sunflower dragon amigurumi crochet pattern works because each major feature has a job. The petals widen the head, the short snout keeps the baby-dragon profile, and the small wings stop the silhouette from getting crowded. Follow the stitch counts exactly, pin the petals before sewing, and check wing height from the front before finishing the back. Then photograph the plush in profile and from a straight-on view, since those two angles show placement errors fastest. Share the finished piece on Pinterest and Instagram with #SunflowerDragonPattern. For this character in particular, did you place the horns fully behind the petals, or let them peek through the flower ring?









