Introduction
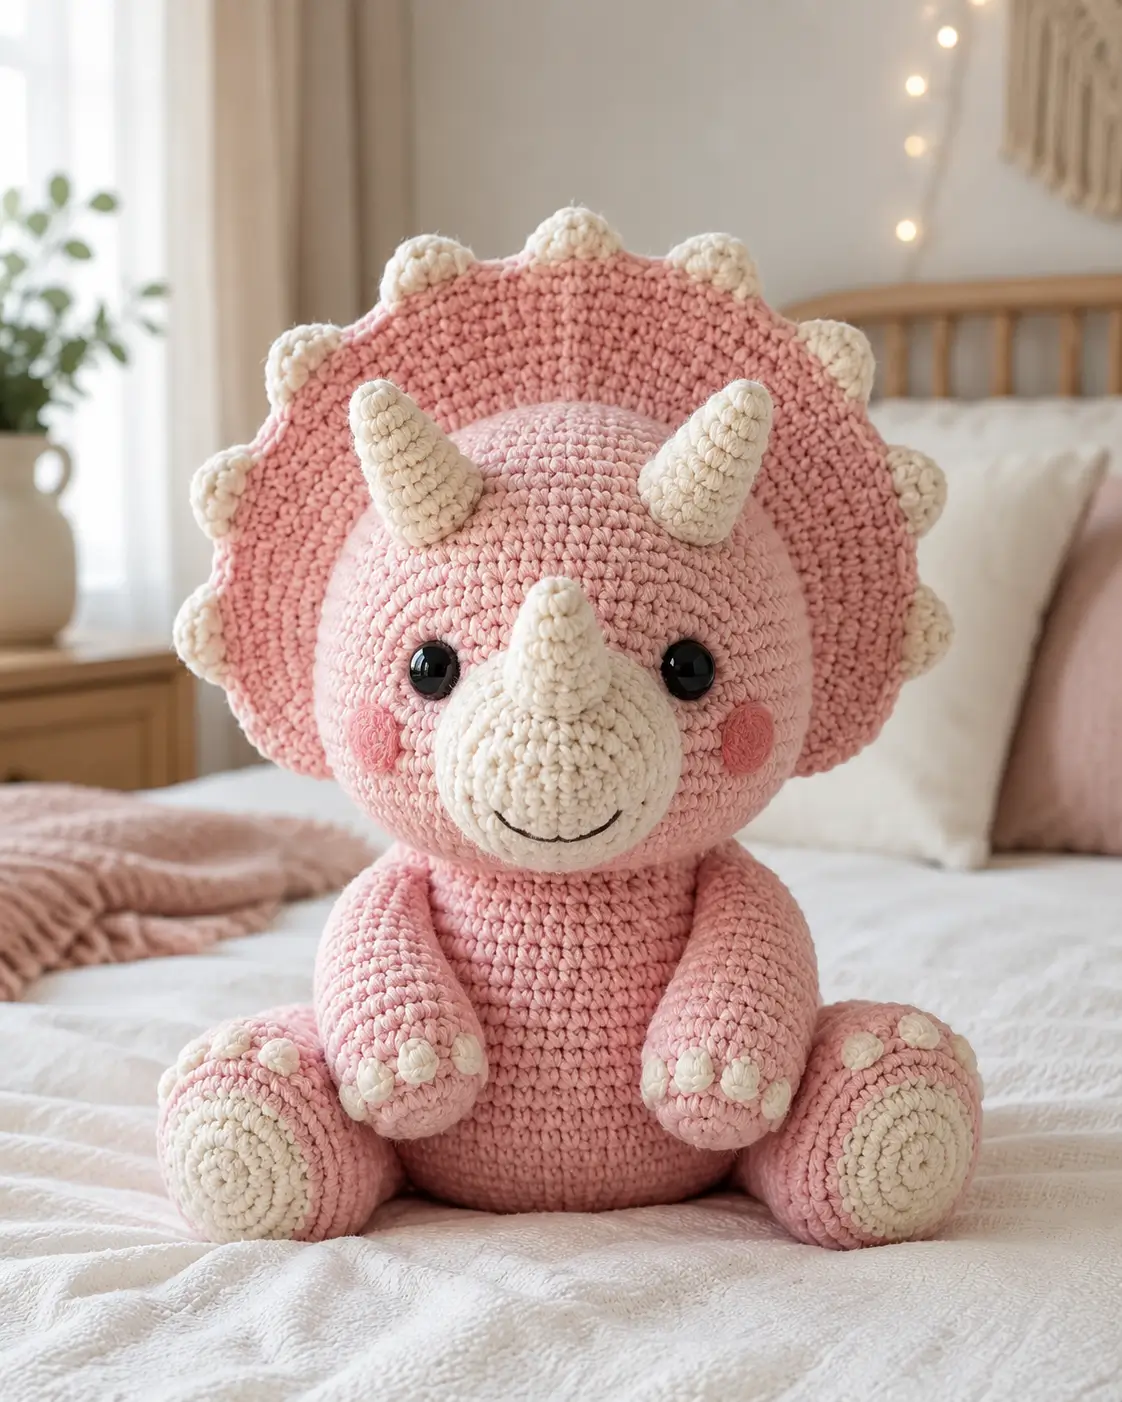
A triceratops looks wrong the second the frill sits too high behind the skull. This triceratops amigurumi crochet pattern is built around that silhouette, using bulky yarn, a 4 mm hook, and 16–18 mm eyes for a finished seated plush close to 26 cm. It suits an intermediate maker and works well as shelf decor or a nursery prop.
The Design: What Makes Triceratops Different
You are not shaping a generic dinosaur here. The first structural decision is the frill diameter. It has to read wider than the head, or the piece starts looking like a horned dragon instead of a ceratopsian. The second decision is muzzle projection. A triceratops needs a forward snout so the nose horn has a base that looks anchored, not pasted on. Third comes stance. This photo shows a seated plush with a low center of gravity, so the body must stay broad at the bottom and the legs need front-facing sole pads for visual weight.
Many free results for a triceratops crochet pattern or dinosaur amigurumi pattern aim for side-profile toys. That misses the front-view nursery style in the reference image. A common maker error is undersizing the frill and oversizing the forehead horns. That shifts the silhouette away from triceratops immediately.
Project Info at a Glance
| Skill Level | Time | Finished Size | Hook | Best For |
|---|---|---|---|---|
| Intermediate | 8–10 hrs | 26–30 cm seated | 4 mm | nursery shelf, gift plush, display toy |
Materials and Tools
Yarn
- Pastel pink — bulky (5) — about 175 g — heavy cotton or cotton-blend plush benchmark
- Cream/ivory — bulky (5) — about 15 g — for horns, muzzle, sole pads, toe pads
- Blush pink — small scrap — for cheek patches
Tools
- Hook 4 mm
- Safety eyes 16–18 mm
- Polyester stuffing
- Yarn needle
- Stitch markers
- Black embroidery thread for smile
The 26 cm bulky benchmark uses a 4 mm hook and 16–18 mm eyes; larger triceratops patterns also report high main-yarn usage compared with small worsted builds.
Abbreviations
MR / sc / inc / dec / sl st / ch / BLO / FO
Use invisible decrease for visible shaping zones on the head and body because standard single-crochet decreases leave a harder ridge across the forehead and neck line.
Pattern — Step by Step
Continuous spiral unless noted. This is an original photo-matched editorial draft built from standard amigurumi stitch math and the visible proportions in the reference image.
Head (Make 1)
Yarn: pastel pink — standard amigurumi math
R1: 6 sc in MR (6)
R2: inc ×6 (12)
R3: (sc 1, inc) ×6 (18)
R4: (sc 2, inc) ×6 (24)
R5: (sc 3, inc) ×6 (30)
R6: (sc 4, inc) ×6 (36)
R7: (sc 5, inc) ×6 (42)
R8–R16: sc around (42)
Place safety eyes between R11 and R12, about 8 sts apart. Begin firm stuffing after R13.
R17: (sc 5, dec) ×6 (36)
R18: (sc 4, dec) ×6 (30)
R19: (sc 3, dec) ×6 (24)
R20: (sc 2, dec) ×6 (18)
R21: (sc 1, dec) ×6 (12)
R22: dec ×6 (6)
Fasten off. Close opening. Leave 20 cm tail.
Body (Make 1)
Yarn: pastel pink — standard amigurumi math
R1: 6 sc in MR (6)
R2: inc ×6 (12)
R3: (sc 1, inc) ×6 (18)
R4: (sc 2, inc) ×6 (24)
R5: (sc 3, inc) ×6 (30)
R6: (sc 4, inc) ×6 (36)
R7: (sc 5, inc) ×6 (42)
R8–R12: sc around (42)
R13: (sc 5, dec) ×6 (36)
R14–R15: sc around (36)
R16: (sc 4, dec) ×6 (30)
R17: sc around (30)
R18: (sc 3, dec) ×6 (24)
Stuff the lower body very firmly. Keep the upper 2 cm slightly softer for sewing.
Fasten off. Leave 25 cm tail.
Arms / Front Legs (Make 2)
Yarn: pastel pink — standard amigurumi math
R1: 6 sc in MR (6)
R2: inc ×6 (12)
R3–R5: sc around (12)
R6: (sc 2, dec) ×3 (9)
R7–R14: sc around (9)
Stuff only the hand end. Keep the upper arm soft and flat for sewing.
Fasten off. Leave 18 cm tail.
Back Legs (Make 2)
Yarn: pastel pink — standard amigurumi math
R1: 6 sc in MR (6)
R2: inc ×6 (12)
R3: (sc 1, inc) ×6 (18)
R4: (sc 2, inc) ×6 (24)
R5–R6: sc around (24)
R7: (sc 2, dec) ×6 (18)
R8–R12: sc around (18)
Stuff foot area firmly. Keep top third lightly stuffed.
Fasten off. Leave 22 cm tail.
Frill (Make 1)
Yarn: pastel pink — original photo-matched shaping
Ch 31.
Row 1: sc in 2nd ch from hook and across (30)
Row 2: ch 1, turn, inc, sc 28, inc (32)
Row 3: ch 1, turn, inc, sc 30, inc (34)
Row 4: ch 1, turn, inc, sc 32, inc (36)
Row 5: ch 1, turn, inc, sc 34, inc (38)
Row 6: ch 1, turn, inc, sc 36, inc (40)
Border round: work evenly around outer curved edge. Make 10 bobble points spaced evenly: (sc 3, 5-dc bobble in next st, sc 3) repeat around curve as placement allows.
Fasten off. Leave 35 cm tail.
Top Horns (Make 2)
Yarn: cream — standard amigurumi math
R1: 4 sc in MR (4)
R2: (sc 1, inc) ×2 (6)
R3: sc around (6)
R4: (sc 2, inc) ×2 (8)
R5–R7: sc around (8)
Stuff lightly at base only.
Fasten off. Leave 15 cm tail.
Nose Horn (Make 1)
Yarn: cream — standard amigurumi math
R1: 4 sc in MR (4)
R2: (sc 1, inc) ×2 (6)
R3–R5: sc around (6)
Fasten off. Leave 15 cm tail.
Muzzle / Snout (Make 1)
Yarn: cream — standard amigurumi math
R1: 6 sc in MR (6)
R2: inc ×6 (12)
R3: (sc 1, inc) ×6 (18)
R4: (sc 2, inc) ×6 (24)
R5: sc around (24)
R6: (sc 3, inc) ×6 (30)
R7: sc around (30)
R8: (sc 3, dec) ×6 (24)
Stuff firmly before closing the final third during sewing. The muzzle should project well forward.
Fasten off. Leave 30 cm tail.
Cheek Patches (Make 2)
Yarn: blush pink — standard amigurumi math
R1: 6 sc in MR (6)
R2: inc ×6 (12)
Fasten off. Leave 12 cm tail.
Sole Pads (Make 2)
Yarn: cream — flat circle
R1: 6 sc in MR (6)
R2: inc ×6 (12)
R3: (sc 1, inc) ×6 (18)
R4: (sc 2, inc) ×6 (24)
Fasten off. Leave 20 cm tail.
Toe Pads for Arms (Make 6)
Yarn: cream — flat circle
R1: 6 sc in MR (6)
Fasten off. Leave 8 cm tail.
Toe Pads for Legs (Make 6)
Yarn: cream — flat circle
R1: 6 sc in MR (6)
Fasten off. Leave 8 cm tail.
Tail (Make 1)
Yarn: pastel pink — standard amigurumi math
R1: 4 sc in MR (4)
R2: sc around (4)
R3: (sc 1, inc) ×2 (6)
R4: sc around (6)
R5: (sc 2, inc) ×2 (8)
R6: sc around (8)
R7: (sc 3, inc) ×2 (10)
Stuff lightly. Keep the tail curved, not rigid.
Fasten off. Leave 18 cm tail.
Assembly
- Sew the head to the body, centering the neck opening against the top 24-st opening of the body.
- Attach the muzzle to the lower front of the head, centered under the eyes; stuff the muzzle fully before closing the seam.
- Sew the nose horn to the top center of the muzzle.
- Sew the two top horns above the eye line, angled slightly outward.
- Attach the frill behind the head so its lower edge sits low and its widest points extend beyond both horns.
- Stitch the cheek patches under the eyes and slightly outward from the muzzle edge.
- Sew the arms to the front body, low enough that the hand ends rest near the belly.
- Attach the back legs in a seated position, with the foot fronts facing forward.
- Sew the sole pads to the front of each back leg, then add three toe pads to each arm end and three to each leg top.
- Attach the tail at the back bottom as a small stabilizer, then embroider a shallow curved smile.
The finished plush should sit upright without a stand.
7 Technical Tips
- Mark every increase round. Losing one increase on the head changes the horn spacing and throws the frill out of center by more than a full stitch column.
- Pack the lower body harder than the upper body. A soft base causes the seated shape to flatten and pushes the legs outward after a few days on a shelf.
- Use invisible decrease on R17–R22 of the head. Standard decreases leave a segmented forehead that becomes obvious between the horns.
- Install the eyes before the muzzle is sewn on. After the snout is attached, backing washers become awkward to press in cleanly.
- Do not overstuff the arms. A rigid arm will stand away from the torso instead of resting inward as shown in the photo.
- Pin the frill at five points before sewing. Use top center, both side peaks, and two lower anchor points so the frill does not tilt left or right.
- Weave horn tails downward into the skull, not sideways. Sideways tension can twist the horns and make one point higher than the other by 3–5 mm.
Conclusion
The hardest part of this build is not the horns. It is proportion control. Keep the frill wider than the head, hold the muzzle forward, and weight the lower body so the seated pose stays clean. That approach gives the triceratops amigurumi crochet pattern the nursery-style silhouette visible in the reference photo instead of a generic horned dinosaur shape. Next, swatch your pink yarn with the 4 mm hook and check whether your fabric hides stuffing under tension. Share the finished plush on Pinterest and Instagram with #PinkTriceratopsPlush. One detail matters most here: did you place the frill low enough to frame the horns instead of sitting above them?









