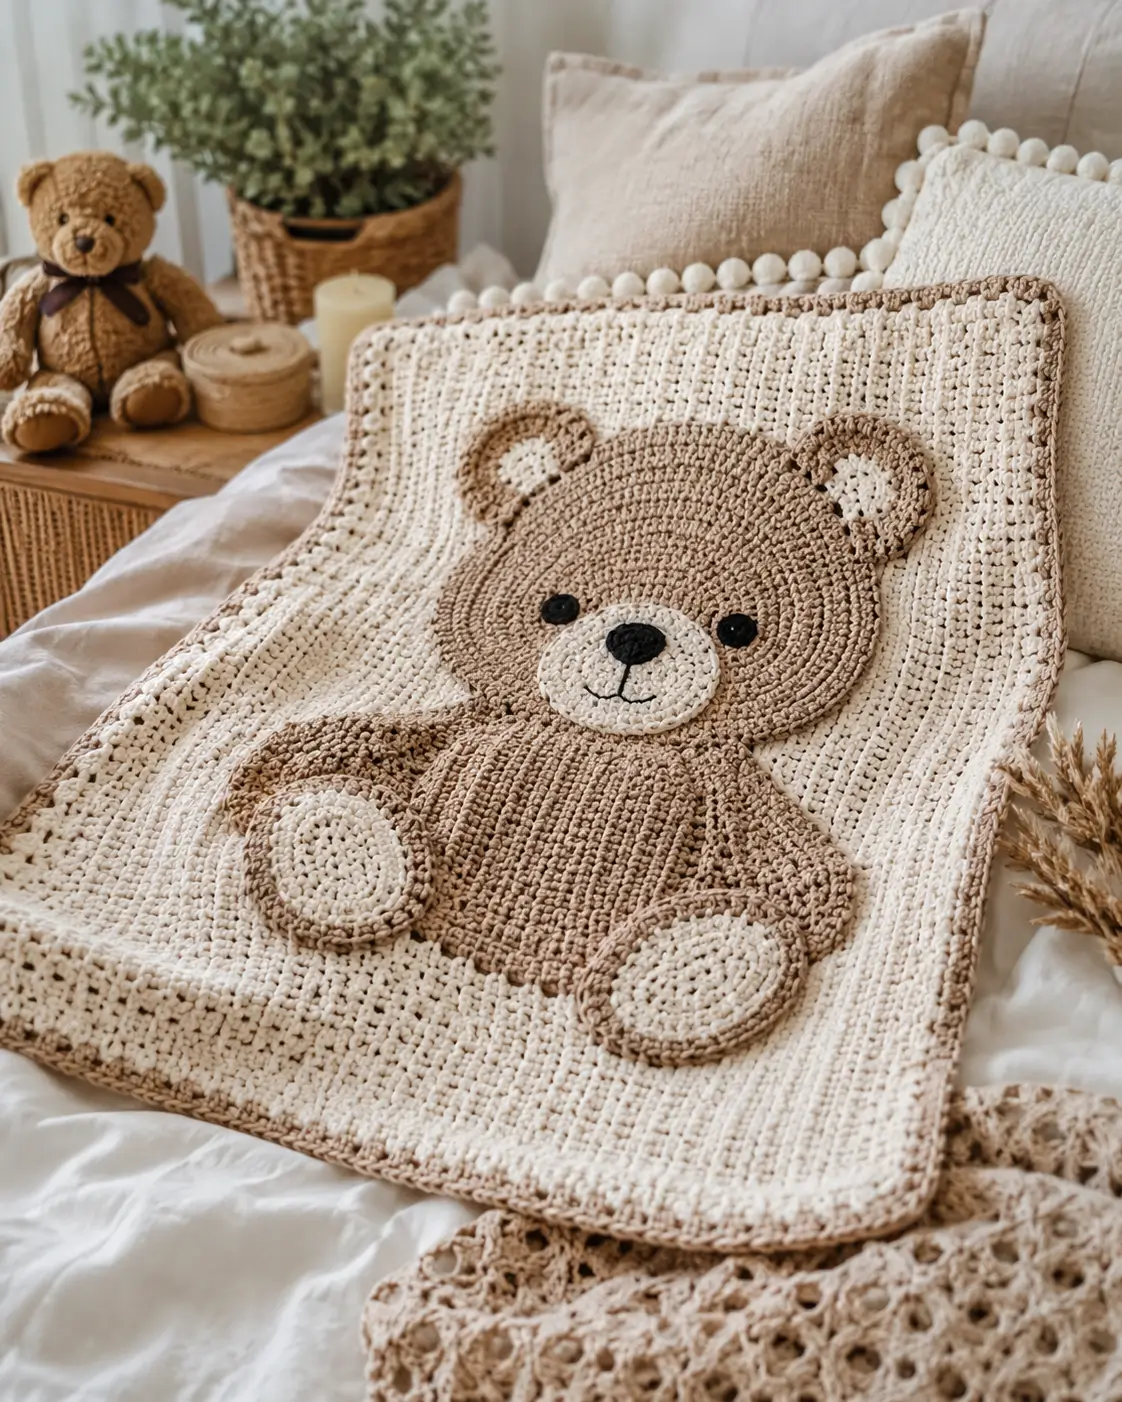
A teddy bear only reads as a bear once the muzzle sits lower than the eye line. This teddy bear crochet blanket pattern uses DK cotton, a 72 cm square blanket format, and a layered appliqué build suited to an advanced beginner or steady intermediate maker. The result works as a nursery throw, stroller layer, or photo prop with a face that stays baby-safe because it is stitched, not fitted with hard eyes.
The Design: What Makes Teddy Different
This version is built around proportion first. The head is oversized relative to the torso because a bear motif loses recognition fast when the face shrinks into the blanket field. Next comes layering. The muzzle and paw pads sit on top of the main bear shapes so the silhouette stays readable even in a low-contrast palette, which is a common requirement in neutral nursery work. A third decision is the flat-seated pose: it keeps the bear centered and stable across the blanket without long limbs pulling at the fabric.
One frequent error in a bear crochet baby blanket is placing the ears too high and too far apart. That shifts the look toward mouse rather than teddy. Another mistake is skipping the contrast muzzle, which weakens the face in a teddy bear applique crochet pattern.
Project Info at a Glance
| Skill Level | Time | Finished Size | Hook | Best For |
|---|---|---|---|---|
| Advanced beginner to intermediate | 10–14 hours | 72.25 x 72.25 cm | 4 mm blanket, 2.5–3.5 mm appliqué | Nursery blanket, stroller layer, gift |
Size and hook benchmarks are based on published bear blanket and lovey patterns in comparable formats.
Materials and Tools
Yarn
- Cream — DK cotton — 300 g — Paintbox Cotton DK or Bernat Softee Baby Cotton substitute for the blanket field
- Light taupe — DK cotton — 100–120 g — same yarn line for the bear appliqué
- Ivory — DK cotton — 40 g — muzzle and paw pads
- Black — small amount — embroidery for eyes, nose, and mouth
Tools
- Hook 4 mm for blanket
- Hook 2.5 mm or 3 mm for bear sections
- Stuffing for lightly padded parts
- Yarn needle
- Stitch markers
- Sharp scissors
- Safety eyes optional only for display version; 6 mm is common on similar lovey patterns, but the photo-style finish uses embroidery
Abbreviations
MR / sc / inc / dec / sl st / ch / BLO / FLO / FO
Invisible decrease joins the front loops of two stitches before completing the decrease, which reduces bulk on visible shaping lines.
Pattern — Step by Step
Continuous spiral unless noted. This is an original photo-based draft built with standard amigurumi math and layered appliqué construction. Verified size and material benchmarks come from published bear blanket and lovey patterns.
Blanket Base (Make 1)
Yarn: cream — size benchmark from published bear blanket patterns.
R1: Ch 73. Sc in 2nd ch from hook and across. Turn. (72)
R2-R68: Ch 1, sc BLO across. Turn. (72)
R69: Ch 1, sc evenly around all four sides, working 3 sc in each corner. Sl st to first sc.
R70: Ch 1, sc around. Sl st to first sc.
Block the square before adding the bear. Aim for roughly 72 cm across after light steaming.
Fasten off. Leave a 20 cm tail.
Head (Make 1)
Yarn: light taupe — Original draft from photo using standard amigurumi math; head scale benchmark aligns with published large bear-head counts.
R1: 6 sc in MR (6)
R2: inc x6 (12)
R3: (sc, inc) x6 (18)
R4: (2 sc, inc) x6 (24)
R5: (3 sc, inc) x6 (30)
R6: (4 sc, inc) x6 (36)
R7: (5 sc, inc) x6 (42)
R8-R11: sc around (42)
R12: (5 sc, dec) x6 (36)
R13: (4 sc, dec) x6 (30)
R14: (3 sc, dec) x6 (24)
Stuff lightly. This part should sit raised, not round like a full plush head.
Fasten off. Leave a 35 cm tail.
Snout / Muzzle (Make 1)
Yarn: ivory — Original draft from photo; oval appliqué sizing based on the visible face proportions.
R1: Ch 8. Starting in 2nd ch from hook, 6 sc, 3 sc in last ch, 5 sc on opposite side, inc in last st (16)
R2: inc, 5 sc, inc x3, 5 sc, inc x2 (22)
R3: (sc, inc), 5 sc, (sc, inc) x3, 5 sc, (sc, inc) x2 (28)
R4: sc around (28)
Do not overstuff. A thin layer or even no stuffing keeps the muzzle clean and flat.
Fasten off. Leave a 25 cm tail.
Ears (Make 2)
Yarn: light taupe — ear count benchmark follows the common 6/12/18 teddy-ear structure seen in published bear lovey patterns.
R1: 6 sc in MR (6)
R2: inc x6 (12)
R3: (sc, inc) x6 (18)
R4: sc around (18)
R5: (sc, dec) x6 (12)
R6: sc around (12)
Flatten slightly. Add a short line of ivory surface crochet inside each ear if you want the exact photo contrast.
Fasten off. Leave a 20 cm tail.
Body (Make 1)
Yarn: light taupe — Original draft from photo using oval amigurumi math for a seated torso panel.
R1: Ch 8. Starting in 2nd ch from hook, 6 sc, 3 sc in last ch, 5 sc on opposite side, inc in last st (16)
R2: inc, 5 sc, inc x3, 5 sc, inc x2 (22)
R3: (sc, inc), 5 sc, (sc, inc) x3, 5 sc, (sc, inc) x2 (28)
R4: (2 sc, inc), 5 sc, (2 sc, inc) x3, 5 sc, (2 sc, inc) x2 (34)
R5: (3 sc, inc), 5 sc, (3 sc, inc) x3, 5 sc, (3 sc, inc) x2 (40)
R6-R10: sc around (40)
R11: (3 sc, dec), 5 sc, (3 sc, dec) x3, 5 sc, (3 sc, dec) x2 (34)
R12: sc around (34)
Stuff lightly at the center only. Keep the edges soft so they stitch flat to the blanket.
Fasten off. Leave a 35 cm tail.
Arms / Front Legs (Make 2)
Yarn: light taupe — Original draft from photo; arm length adapted from common lovey proportions.
R1: 6 sc in MR (6)
R2: inc x6 (12)
R3: (sc, inc) x6 (18)
R4-R5: sc around (18)
R6: (sc, dec) x6 (12)
R7-R10: sc around (12)
Stuff only the paw end. Flatten the upper end before sewing to the body side.
Fasten off. Leave a 25 cm tail.
Back Legs (Make 2)
Yarn: light taupe — Original draft from photo using wide paw shaping for the seated lower legs.
R1: 6 sc in MR (6)
R2: inc x6 (12)
R3: (sc, inc) x6 (18)
R4: (2 sc, inc) x6 (24)
R5-R6: sc around (24)
R7: (2 sc, dec) x6 (18)
R8-R10: sc around (18)
Stuff the lower half. The top edge should flatten so the leg angles outward on the blanket.
Fasten off. Leave a 28 cm tail.
Paw Pads (Make 2)
Yarn: ivory — Original draft from photo.
R1: 6 sc in MR (6)
R2: inc x6 (12)
R3: (sc, inc) x6 (18)
R4: (2 sc, inc) x6 (24)
R5: sc around (24)
Fasten off. Leave a 20 cm tail.
Cheek Patches (Make 2)
Yarn: ivory or soft beige — Optional detail drafted for makers who want extra face contrast.
R1: 6 sc in MR (6)
R2: inc x6 (12)
R3: sc around (12)
Fasten off. Leave a 12 cm tail.
Nose Patch / Embroidery Guide (Make 1)
Yarn: black embroidery yarn — Photo-based detail.
R1: Satin-stitch or dense whip-stitch a small vertical oval about 2.5 cm wide at the top center of the muzzle.
R2: Run one straight embroidered line 2 cm downward from the nose base.
R3: Add one shallow curved stitch line to each side for the mouth.
For a nursery version, embroider both eyes as filled ovals or short satin-stitched dots rather than using plastic hardware.
Fasten off on the back of the muzzle.
Assembly
- Block the blanket square and mark the center line both vertically and horizontally.
- Pin the head in the upper third of the blanket.
- Place the body directly below it, overlapping the lower head edge by 2–3 cm.
- Sew the muzzle to the lower half of the head, then embroider the nose and mouth.
- Add the eyes level with the upper edge of the muzzle, spaced about 6–7 cm apart.
- Attach the ears between the 10 and 2 o’clock positions on the head, angling them slightly outward.
- Sew the arms to each side of the body so the paw ends point down toward the blanket corners.
- Attach the back legs low on the torso with the knees opening outward.
- Sew the paw pads centered on the lower legs, then add the optional cheek patches under the eyes if needed for contrast.
- Edge the whole blanket again with one final round of sc if the blanket pulled during appliqué attachment.
The completed piece should lie flat with only a shallow raised profile over the bear sections.
7 Technical Tips
- Marker drift: Flat appliqué rounds can skew faster than plush heads because the fabric is not forced into a sphere. Move the marker every round and confirm that each increase line stays mirrored left to right.
- Stuffing firmness: Overfilling the head makes the face bulge and the muzzle ridge collapse outward. Use just enough filling to lift the piece off the blanket by about 1 to 1.5 cm.
- Invisible decrease bulk: Standard decreases leave a visible notch on neutral cotton. Work invisible decreases on every shaping round that will stay visible from the front.
- Eye placement timing: Embroider or position the eyes only after the muzzle is stitched down. Bears look cross-eyed when the eyes go in first and the muzzle later changes the face center.
- Cotton tension: DK cotton shows every inconsistency, especially on large cream blanket rows. Check every tenth row against the opposite edge so the square does not creep into a trapezoid.
- Pinning geometry: The seated pose fails when the legs are pinned too low and too far apart. Keep the inner top corners of the legs roughly 4 cm apart on a 72 cm blanket.
- Tail weaving: Heavy appliqué pieces pull on hidden ends during washing. Weave every tail through at least 5 cm of back stitches, reverse direction once, and then trim.
Conclusion
The key to this teddy bear crochet blanket pattern is proportion control: large head, lower-set muzzle, compact torso, and paw pads that read from across the room. Build the blanket first, pin every bear section before sewing, and keep stuffing shallow so the fabric still folds and washes well. After assembly, photograph the blanket flat and again over a crib rail for Pinterest formatting, then post one close face shot for Instagram. Use #TeddyBearBlanketPattern so the project is searchable. One useful next test is color inversion: would this same bear still read clearly if the muzzle matched the blanket instead of the body?









