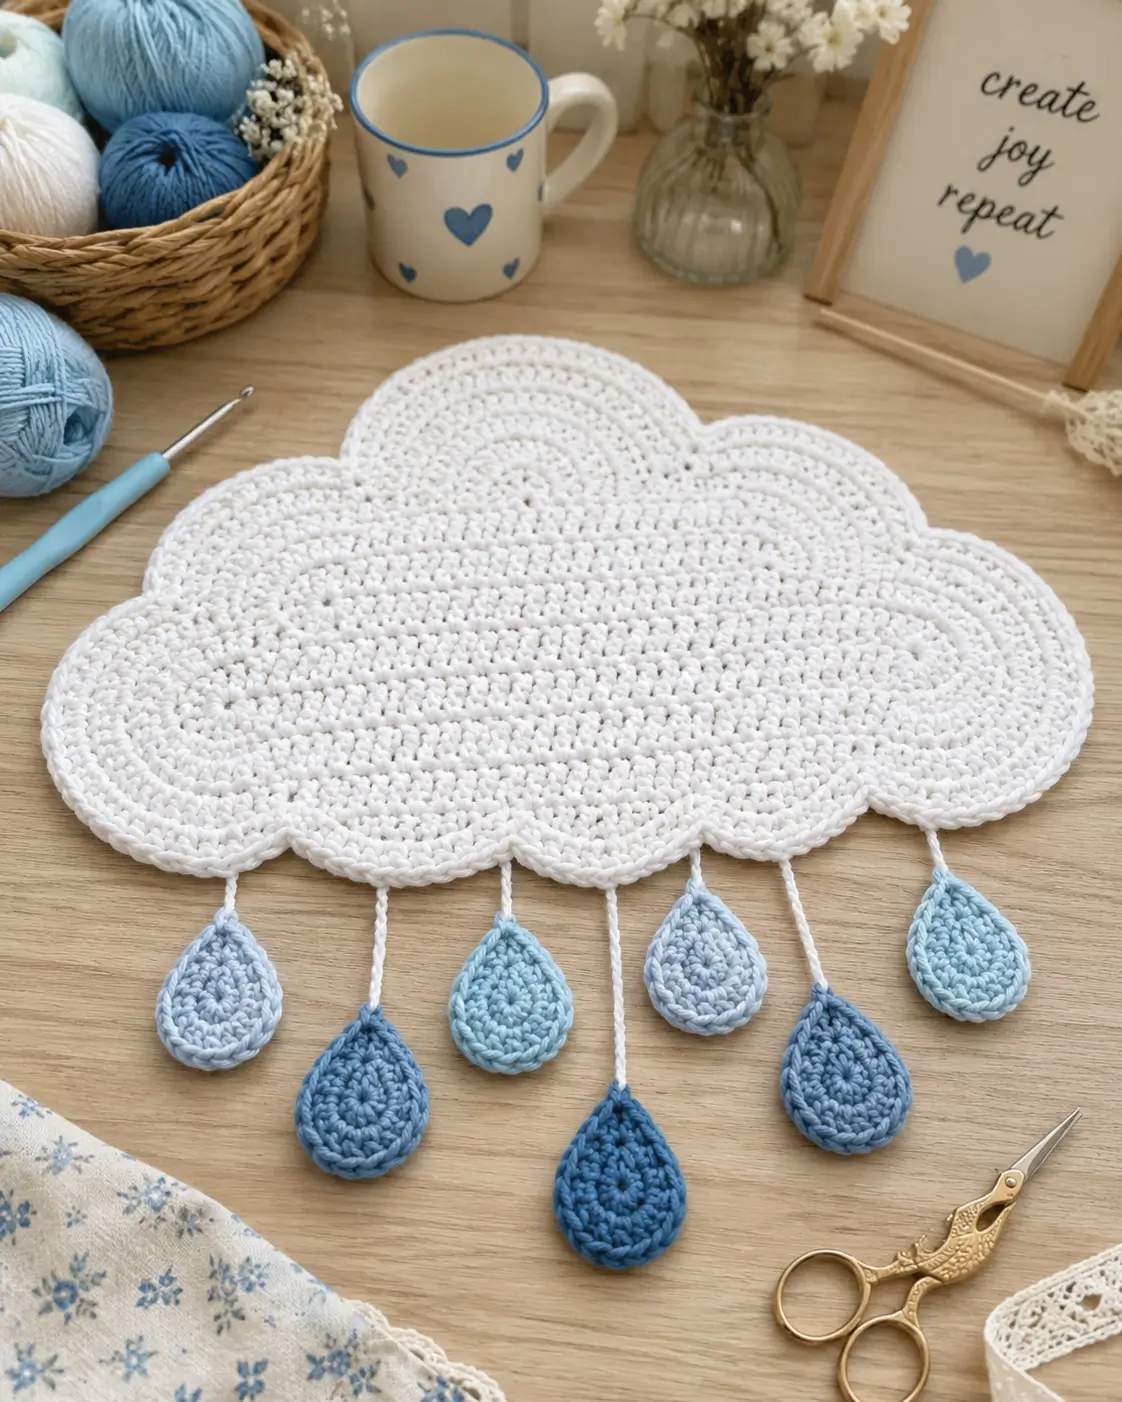
A rain cloud fails when the scallops collapse into one flat oval. This crochet rain cloud pattern fixes that with layered circles, a dense lower panel, DK cotton yarn, and a 3.0 mm hook sized between smaller DK cotton cloud patterns and larger worsted mobile builds. It suits an intermediate beginner and makes practical nursery wall decor or a weather-themed shelf piece.
The Design: What Makes This Rain Cloud Different
This piece is not a plush cloud. It is a flat decorative cloud with suspended drops, and that changes the engineering. First, the top edge needs separate rounded bumps so the silhouette reads as cloud rather than placemat. Second, the lower panel has to stay broad enough to carry six cords without puckering. Third, the raindrops need visible color contrast because the photographed sample uses three blue values, not one. Many tutorials for a flat crochet cloud pattern or crochet cloud with raindrops stop at appliqué scale, or move to stuffed mobile clouds. The photo sits between those formats. The usual mistake is overfilling the lower edge with shells, which rounds the bottom too much and weakens the rain-cloud profile.
Project Info at a Glance
| Skill Level | Time | Finished Size | Hook | Best For |
|---|---|---|---|---|
| Intermediate beginner | 4–6 hours | about 22 cm wide x 13 cm tall cloud, drops 4–5 cm | 3.0 mm | nursery decor, wall hanging, seasonal display |
Size and hook are photo-faithful working targets based on published cloud ranges, adjusted here for a flat cotton decor piece.
Materials and Tools
Yarn
- White — DK cotton — about 50 g — Paintbox Cotton DK or similar cotton DK
- Pale blue — DK cotton — about 10 g — leftover cotton
- Sky blue — DK cotton — about 10 g — leftover cotton
- Denim blue — DK cotton — about 10 g — leftover cotton
Tools
- Hook 3.0 mm
- Tapestry needle
- Stitch markers
- Scissors
- Blocking mat and pins for shaping the flat cloud
- Optional dowel or ring if turning the piece into hanging decor
Abbreviations
MR / sc / inc / dec / sl st / ch / BLO / st / rep
Invisible decrease matters on the raindrops because a centered front decrease keeps the tear shape narrow instead of producing a blunt point.
Pattern — Step by Step
Pattern drafted from the photo. Original stitch counts below were checked against standard round math. Joined rounds unless noted.
Center Cloud Bump (Make 1)
Yarn: white — Original photo-based pattern using standard circle math
R1: 6 sc in MR (6)
R2: inc x6 (12)
R3: (sc, inc) x6 (18)
R4: (2 sc, inc) x6 (24)
R5: (3 sc, inc) x6 (30)
R6: (4 sc, inc) x6 (36)
R7: sc in each st around (36)
Sl st to first st. Fasten off. Leave 20 cm tail.
Left Cloud Bump (Make 1)
Yarn: white — Original photo-based pattern using standard circle math
R1: 6 sc in MR (6)
R2: inc x6 (12)
R3: (sc, inc) x6 (18)
R4: (2 sc, inc) x6 (24)
R5: (3 sc, inc) x6 (30)
R6: sc in each st around (30)
Sl st to first st. Fasten off. Leave 20 cm tail.
Upper Right Cloud Bump (Make 1)
Yarn: white — Original photo-based pattern using standard circle math
R1: 6 sc in MR (6)
R2: inc x6 (12)
R3: (sc, inc) x6 (18)
R4: (2 sc, inc) x6 (24)
R5: (3 sc, inc) x6 (30)
R6: sc in each st around (30)
Sl st to first st. Fasten off. Leave 20 cm tail.
Lower Right Cloud Bump (Make 1)
Yarn: white — Original photo-based pattern using standard circle math
R1: 6 sc in MR (6)
R2: inc x6 (12)
R3: (sc, inc) x6 (18)
R4: (2 sc, inc) x6 (24)
R5: (3 sc, inc) x6 (30)
Sl st to first st. Fasten off. Leave 20 cm tail.
Lower Cloud Panel (Make 1)
Yarn: white — Original photo-based pattern for flat support panel
Ch 41.
Row 1: sc in 2nd ch from hook and in each ch across, turn (40)
Row 2: ch 1, sc in each st across, turn (40)
Row 3: ch 1, sc in each st across, turn (40)
Row 4: ch 1, sc in each st across, turn (40)
Row 5: ch 1, sc in each st across, turn (40)
Row 6: ch 1, sc in each st across, turn (40)
Row 7: ch 1, sc in each st across, turn (40)
Row 8: ch 1, sc in each st across, turn (40)
Row 9: ch 1, sc in each st across, turn (40)
Row 10: ch 1, sc in each st across, turn (40)
Row 11: ch 1, sc in each st across, turn (40)
Row 12: ch 1, sc in each st across, turn (40)
Fasten off. Leave 30 cm tail.
Joining Layout
Yarn: white — Original photo-based assembly map
Pin the lower panel horizontally. Position the center bump along the upper middle edge of the panel, overlapping 10 stitches. Place the left bump overlapping the center bump by about 8 stitches and the panel by 6 stitches. Place the upper right bump overlapping the center bump by about 8 stitches and the panel by 6 stitches. Place the lower right bump overlapping the upper right bump by about 8 stitches and the panel by 8 stitches.
Sew through back loops only where pieces overlap so the front keeps the rounded ridge lines. Do not pull the seams tight.
Cloud Outline Round (Make 1)
Yarn: white — Original photo-based border round
Join white yarn at lower left edge.
Rnd 1: Work sc evenly around the full joined cloud shape, placing 3 sc at each sharper outer curve and sc2tog once in each deep valley between bumps. Aim for an even edge count; exact count may vary by joining tension.
Rnd 2: (sc, hdc, 3 dc, hdc, sc) in next 6 sts, sl st in next st; rep across the lower edge only to create 6 small scallops. On the side and top curves, work plain sc evenly.
Sl st to first st. Fasten off. Weave in.
Blocking note: pin the top bumps outward and the lower shells downward before steam or wet blocking.
Hanging Cords (Make 6)
Yarn: white — Original photo-based pattern
Cord 1: Join at first lower valley, ch 11, fasten off.
Cord 2: Join 6 sts to the right, ch 14, fasten off.
Cord 3: Join 7 sts to the right, ch 11, fasten off.
Cord 4: Join 7 sts to the right, ch 14, fasten off.
Cord 5: Join 7 sts to the right, ch 11, fasten off.
Cord 6: Join 6 sts to the right, ch 13, fasten off.
The photo alternates short and long drops. Keep that rhythm.
Large Raindrop (Make 3)
Yarn: one pale blue, one sky blue, one denim blue — Original pattern using standard increase/decrease math
R1: 6 sc in MR (6)
R2: inc x6 (12)
R3: (sc, inc) x6 (18)
R4: sc in each st around (18)
R5: (sc, dec) x6 (12)
R6: sc in each st around (12)
R7: dec x6 (6)
Do not stuff. Flatten the piece, then work through both layers:
Row 8: ch 1, 3 sc across top edge (3)
Fasten off. Leave 20 cm tail.
Small Raindrop (Make 3)
Yarn: one pale blue, one pale blue-sky mix, one medium blue — Original pattern using standard increase/decrease math
R1: 6 sc in MR (6)
R2: inc x6 (12)
R3: sc in each st around (12)
R4: (sc, dec) x4 (8)
R5: sc in each st around (8)
R6: dec x4 (4)
Do not stuff. Flatten the piece, then work through both layers:
Row 7: ch 1, 2 sc across top edge (2)
Fasten off. Leave 20 cm tail.
Optional Surface Spiral for Raindrops
Yarn: same as drop color — Original styling detail from photo interpretation
With right side facing, surface sl st in a loose inward spiral across each drop. Start near the lower point and finish near center.
Fasten off. Weave ends into the back.
Assembly
- Block all four cloud bumps flat before joining.
- Sew the lower panel to the back lower edge of the center bump.
- Add the left bump, overlapping it into the center bump and panel.
- Add the upper right bump with the same overlap method.
- Add the lower right bump so the right side extends farther down, matching the photo profile.
- Work the cloud outline round and lower scallops after all joins are complete.
- Mark six evenly spaced attachment points along the lower edge valleys.
- Crochet or attach the six hanging cords in alternating lengths.
- Sew one raindrop to the end of each cord, placing the three larger drops at positions 2, 4, and 5 for a staggered look.
- Block once more with the raindrops hanging free and trim all tails.
The finished piece should lie flat, with the cords hanging straight and the cloud outline remaining wider than it is tall.
7 Technical Tips
- Use one stitch marker at each valley between cloud bumps. Without markers, the outline round drifts and the valleys fill in, which makes the cloud read as a flower.
- Keep the lower panel firm but not stiff. If row gauge loosens by even 2 to 3 stitches across 40 stitches, the bottom edge starts to wave before the scallops are added.
- Pin the four bumps first and sew second. A misplaced overlap of more than 1 cm on either side shifts the center of gravity and pulls one raindrop cord inward.
- Work the joining seam through back loops only. Full-loop stitching flattens the circle ridges and removes the layered look visible in the reference piece.
- Make the longer cords 14 chains and the shorter cords 11 to 13 chains. Random lengths look messy; fixed alternation reads intentional.
- Test one raindrop before making all six. If the drop curls, move down 0.25 mm in hook size or block harder before attaching it.
- Keep the large raindrops at an 18-stitch plateau. Going to 24 stitches makes the drops too round and they stop reading as rain.
- Close the top edge of each drop after flattening. Leaving the opening uncompressed gives a bulb shape instead of a teardrop.
- On the lower scallops, use 6 stitches per shell section. Larger shells chew up the flat base and lift the cords toward the front.
- Skip exactly one stitch between shell groups only on the bottom edge. Skipping on side curves produces notches in the cloud outline.
- Cotton DK works better than springy acrylic for this photo style. The stitch lines stay cleaner, and the raindrops hang with less twist.
- If substituting worsted yarn, keep the same stitch counts but increase hook only slightly. A jump from 3.0 mm to 4.0 mm changes drape fast.
- Weave tails back through at least 4 cm of stitching on the flat cloud. Short tail weaving shows on the front after blocking because the piece has no stuffing to lock threads in place.
- Steam lightly from above rather than pressing the iron down. Pressure crushes the scallops and erases the contour between bumps.
Conclusion
This build works because the silhouette stays disciplined: separate top bumps, a broad lower panel, fixed cord spacing, and raindrops that keep a pointed base. That is the difference between a generic cloud and a readable crochet rain cloud pattern. The next step is simple. Make one sample in white and three blues, block it, then decide whether to mount it as wall decor or stitch it onto a larger nursery panel. Share the result on Pinterest and Instagram with one overhead photo and one side profile so the layer depth is visible. Use #CrochetRainCloudPattern. Did you keep the far-right bump smaller than the center bump, or did you widen the whole cloud?









