Introduction
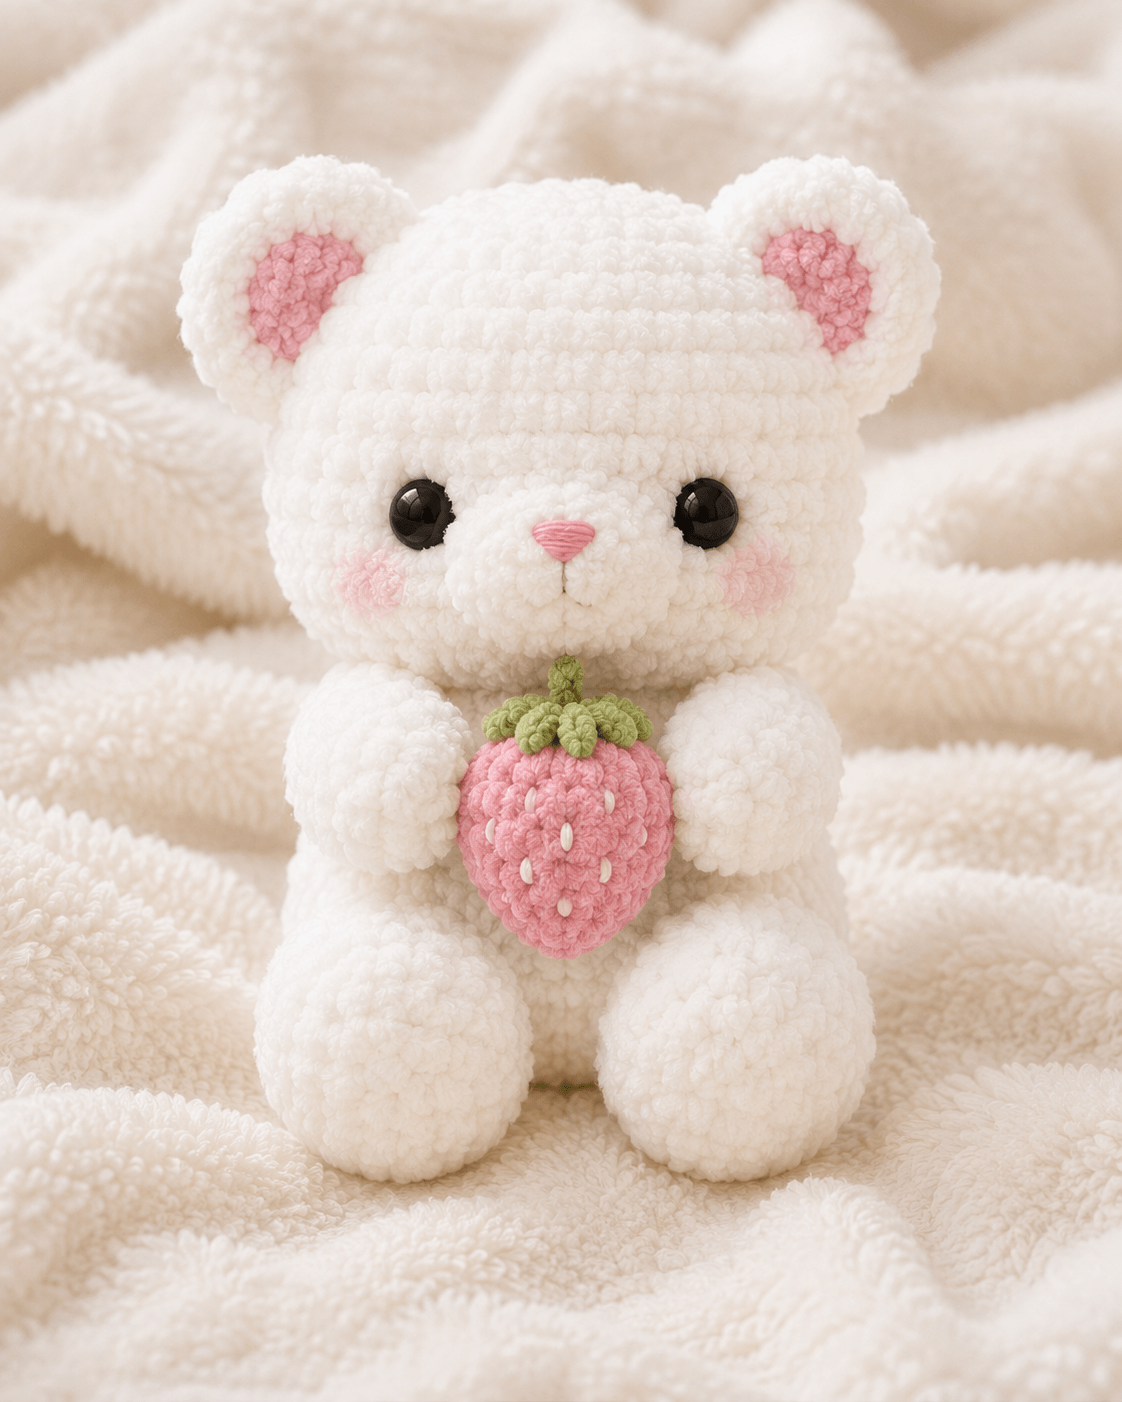
A bear cannot grip a strawberry with paws built like straight tubes. This teddy bear amigurumi crochet pattern uses curved arms, broad seated feet and a flattened berry so the accessory remains visible. You will need chunky plush yarn, a 4 mm hook and 18 mm safety eyes. The finished bear measures about 27 cm and suits an intermediate maker who needs a stable display toy with a removable prop.
The Design: What Makes Berry the Bear Different
Berry’s head stops at a 36-stitch plateau, producing a rounded face without the extreme width of many 42- or 48-stitch teddy heads. The muzzle is made separately and attached low, which gives room for widely spaced eyes and keeps the nose from disappearing into plush fibers. Two-layer ears create the pink centers visible in the reference image, while large back legs establish a stable three-point base with the body.
The arms use an offset decrease near the inner edge. That bend directs both paws toward the strawberry instead of leaving them parallel to the torso. A common error in a white teddy bear crochet pattern is positioning the muzzle before testing eye spacing; the face then becomes compressed. For this crochet bear holding strawberry, pin the muzzle only after both eyes have been provisionally placed.
Project Info at a Glance
| Skill Level | Time | Finished Size | Hook | Best For |
|---|---|---|---|---|
| Intermediate | 7–9 hours | Approximately 27 cm seated | 4 mm | Nursery display, photography prop or removable-accessory toy |
The size and hook selection follow comparable plush bear patterns made with chunky yarn. Working time is an estimate and will vary with crochet speed, yarn texture and assembly method.
Materials and Tools
Yarn
- Cream white — chunky chenille or plush yarn — approximately 150 g — Himalaya Dolphin Baby, Premier Parfait Chunky or a comparable yarn
- Strawberry pink — chunky chenille or plush yarn — approximately 25 g — matching yarn line
- Leaf green — chunky chenille or smooth worsted yarn — approximately 15 g
- Blush pink — smooth DK or worsted yarn — approximately 8 g — for inner ears and cheek patches
- Pale cream — cotton embroidery yarn — approximately 2 g — for strawberry seeds
- Pink embroidery floss — small quantity — for the nose
- Black embroidery floss — small quantity — for the mouth
Actual yarn use changes with tension, hook choice and skein yardage. Keep an additional ball of cream yarn available when working at a loose gauge.
Tools
- 4 mm crochet hook
- 18 mm safety eyes
- Polyester stuffing
- Yarn needle
- Locking stitch markers
- Dressmaking pins
- Scissors
- Row counter
- Optional 5–6 cm plastic canvas disc for a flatter sitting base
Safety eyes are not suitable for a toy intended for a child under three. Substitute firmly embroidered eyes for that use.
Abbreviations
- MR — magic ring
- sc — single crochet
- inc — two single crochet in one stitch
- dec — invisible decrease over the next two stitches
- sl st — slip stitch
- ch — chain
- BLO — back loop only
- FLO — front loop only
- hdc — half double crochet
- dc — double crochet
- st/sts — stitch or stitches
An invisible decrease is worked through the front loops of the next two stitches before completing one single crochet.
Pattern — Step by Step
Work in a continuous spiral unless a section states otherwise. Mark the first stitch of every round.
Head
Yarn: cream white
R1: 6 sc in MR (6)
R2: inc ×6 (12)
R3: (sc, inc) ×6 (18)
R4: (2 sc, inc) ×6 (24)
R5: (3 sc, inc) ×6 (30)
R6: (4 sc, inc) ×6 (36)
R7: sc around (36)
R8: (5 sc, inc) ×6 (42)
R9–R13: sc around (42)
R14: (5 sc, dec) ×6 (36)
R15–R18: sc around (36)
Place the eye posts between R13 and R14, approximately nine visible stitches apart. Do not attach the washers until the muzzle has been pinned below them.
R19: (4 sc, dec) ×6 (30)
R20: sc around (30)
R21: (3 sc, dec) ×6 (24)
R22: (2 sc, dec) ×6 (18)
Stuff the crown and side walls firmly. Add smaller pieces around the eye posts rather than pushing one large wad through the opening.
R23: (sc, dec) ×6 (12)
R24: dec ×6 (6)
Fasten off. Leave a 20 cm tail and close the final opening through the front loops.
Muzzle
Yarn: cream white
R1: 6 sc in MR (6)
R2: inc ×6 (12)
R3: (sc, inc) ×6 (18)
R4: BLO sc around (18)
R5: sc around (18)
Add a small amount of stuffing. Embroider a horizontal pink nose across the central three stitches, then make one vertical black stitch and two short mouth branches.
Fasten off. Leave a 30 cm sewing tail.
Body
Yarn: cream white
R1: 6 sc in MR (6)
R2: inc ×6 (12)
R3: (sc, inc) ×6 (18)
R4: (2 sc, inc) ×6 (24)
R5: (3 sc, inc) ×6 (30)
R6: (4 sc, inc) ×6 (36)
R7–R10: sc around (36)
R11: (4 sc, dec) ×6 (30)
R12–R14: sc around (30)
R15: (3 sc, dec) ×6 (24)
R16–R18: sc around (24)
R19: (2 sc, dec) ×6 (18)
Insert the optional plastic canvas disc above R6. Stuff the lower body firmly and the neck area more densely than the center.
R20: (sc, dec) ×6 (12)
R21: dec ×6 (6)
Fasten off. Leave a 35 cm tail for joining the body to the head.
Arms or Front Legs — Make 2
Yarn: cream white
R1: 6 sc in MR (6)
R2: inc ×6 (12)
R3: (sc, inc) ×6 (18)
R4–R6: sc around (18)
R7: (sc, dec) ×6 (12)
R8–R10: sc around (12)
R11: 3 sc, dec, 7 sc (11)
R12–R14: sc around (11)
Stuff the paw firmly. Leave the upper third lightly filled so the arm can curve around the strawberry.
Flatten the opening and work 5 sc through both layers (5).
Fasten off. Leave a 30 cm tail.
Back Legs — Make 2
Yarn: cream white
R1: 6 sc in MR (6)
R2: inc ×6 (12)
R3: (sc, inc) ×6 (18)
R4: (2 sc, inc) ×6 (24)
R5: (3 sc, inc) ×6 (30)
R6: (4 sc, inc) ×6 (36)
R7–R8: sc around (36)
R9: 12 sc, dec ×6, 12 sc (30)
R10: 9 sc, dec ×6, 9 sc (24)
R11: 6 sc, dec ×6, 6 sc (18)
R12–R15: sc around (18)
R16: (sc, dec) ×6 (12)
Stuff the toe until it holds an oval profile. Add less filling at the hip so each leg sits flush against the body.
R17: sc around (12)
Flatten and work 6 sc through both layers (6).
Fasten off. Leave a 35 cm tail.
Outer Ears — Make 2
Yarn: cream white
R1: 6 sc in MR (6)
R2: inc ×6 (12)
R3: (sc, inc) ×6 (18)
R4: (2 sc, inc) ×6 (24)
R5–R6: sc around (24)
R7: (2 sc, dec) ×6 (18)
Do not stuff. Flatten each ear into a shallow cup.
Fasten off. Leave a 30 cm tail.
Inner Ears — Make 2
Yarn: blush pink
R1: 6 sc in MR (6)
R2: inc ×6 (12)
R3: (sc, inc) ×6 (18)
Join with a sl st. Fasten off, leaving a 20 cm tail.
Sew each pink circle to the front of an outer ear, keeping one cream round visible around the edge.
Cheek Patches — Make 2
Yarn: blush pink
R1: 6 sc in MR (6)
R2: inc ×6 (12)
Join with a sl st. Fasten off, leaving a 20 cm tail.
Stretch each patch slightly sideways before pinning. The finished patch should measure approximately 2.5–3 cm across.
Strawberry
Yarn: strawberry pink
R1: 6 sc in MR (6)
R2: inc ×6 (12)
R3: (sc, inc) ×6 (18)
R4: (2 sc, inc) ×6 (24)
R5: (3 sc, inc) ×6 (30)
R6–R8: sc around (30)
R9: (3 sc, dec) ×6 (24)
R10: sc around (24)
R11: (2 sc, dec) ×6 (18)
R12: sc around (18)
Stuff the berry, keeping the front and back slightly flattened rather than spherical.
R13: (sc, dec) ×6 (12)
R14: dec ×6 (6)
Fasten off. Leave a 15 cm tail and close the opening.
With pale cream yarn, embroider 10–12 vertical seed stitches. Keep each seed one stitch high and distribute them in offset rows.
Strawberry Calyx
Yarn: leaf green
R1: 5 sc in MR (5)
R2: (sl st, ch 4, sl st in second ch from hook, sc, hdc, sl st in the same base stitch) ×5
Pull the ring closed.
Fasten off. Leave a 25 cm tail and sew the calyx over the berry opening.
Strawberry Stem
Yarn: leaf green
Ch 5. Starting in the second ch from the hook, sl st in each ch (4).
Fasten off. Leave a 15 cm tail and sew the stem to the center of the calyx.
Optional Strawberry Wrist Loop
Yarn: leaf green or clear elastic cord
Ch 18. Join with a sl st to form a loop.
Fasten off and sew the loop to the rear upper edge of the strawberry. Place it over one bear paw during display or remove it when the strawberry is used separately.
Assembly
- Center the closed body directly below the head. Sew around the neck twice, passing through a full head stitch and a full body stitch on every pass.
- Pin the muzzle between R14 and R19 of the head. The upper edge should sit one round below the eye posts. Add stuffing before closing the final 2 cm.
- Lock the safety-eye washers after confirming that the muzzle does not cover the lower eye edges. Embroider the nose and mouth before adding the cheek patches.
- Pin each cheek patch with its inner edge approximately one stitch beyond the muzzle seam. Sew through the back loops to keep the outer edge flat.
- Fold the lower quarter of each ear inward to create a shallow cup. Attach the ears across approximately R5–R10 of the head, checking both height and forward angle from the front.
- Place the back legs against the lower sides of the body with the toes pointing slightly outward. Sew each flattened hip across R7–R11 of the body and reinforce the lower edge.
- Position the arms across R12–R16 of the body. Angle the paws inward until they touch the strawberry without covering its central seeds.
- Center the strawberry against the front of the body. Pass the optional loop around one paw or tack the berry to both paws with removable strands.
- Test the seated balance on a level surface. Add a few small pieces of stuffing through an unfinished seam when the bear falls backward or lists to one side.
- Weave every tail through at least four direction changes inside the nearest stuffed section, trim it and massage the yarn surface over the entry point.
The completed bear should sit independently with the strawberry centered below the muzzle.
7 Technical Tips
- Marker migration: A marker that shifts one stitch per round can rotate the face and limb coordinates. Recount at R6, R12 and R18 of the head rather than relying only on visual alignment.
- Understuffed neck: A neck compressed below approximately 4 cm in diameter will allow the bear’s head to tip forward. Pack small pieces around the final body rounds until the head remains upright before the seam is closed.
- Visible decrease gaps: Standard two-stitch decreases can leave holes large enough to expose white stuffing between plush fibers. Work every shaping decrease through the two front loops and keep the hook parallel to the fabric.
- Late eye placement: Attaching the eye washers before pinning the 18-stitch muzzle can leave fewer than two clear rounds between the features. Test the muzzle between R14 and R19 before the washers are locked.
- Chenille tension loss: Plush yarn can hide a dropped loop until the next decrease round. Check that each 36-stitch plateau round still contains 36 stitches before moving to a shaping round.
- Unpinned limb drift: Sewing a leg without at least four pins can rotate the toe more than 2 cm from its planned line. Pin the top, bottom, inner edge and outer edge before the first sewing pass.
- Loose tail weaving: A tail passed in one direction can work back through slippery chenille. Change direction four times inside the stuffed section and leave at least 8 cm available before trimming.
Conclusion
Block the strawberry calyx before final attachment, then photograph the bear from eye level so the muzzle, cheek patches and inward-facing paws remain visible. Check the finished toy against three measurements: approximately 27 cm seated height, 18 mm eyes and a body that rests evenly between both large feet. The next practical step is to crochet one arm first and test its angle against the completed strawberry before making the second arm. Save the teddy bear amigurumi crochet pattern to Pinterest, then share the finished bear on Instagram with #BerryTeddyBear. Did you keep the strawberry removable, or stitch it permanently between the bear’s paws?









