Introduction
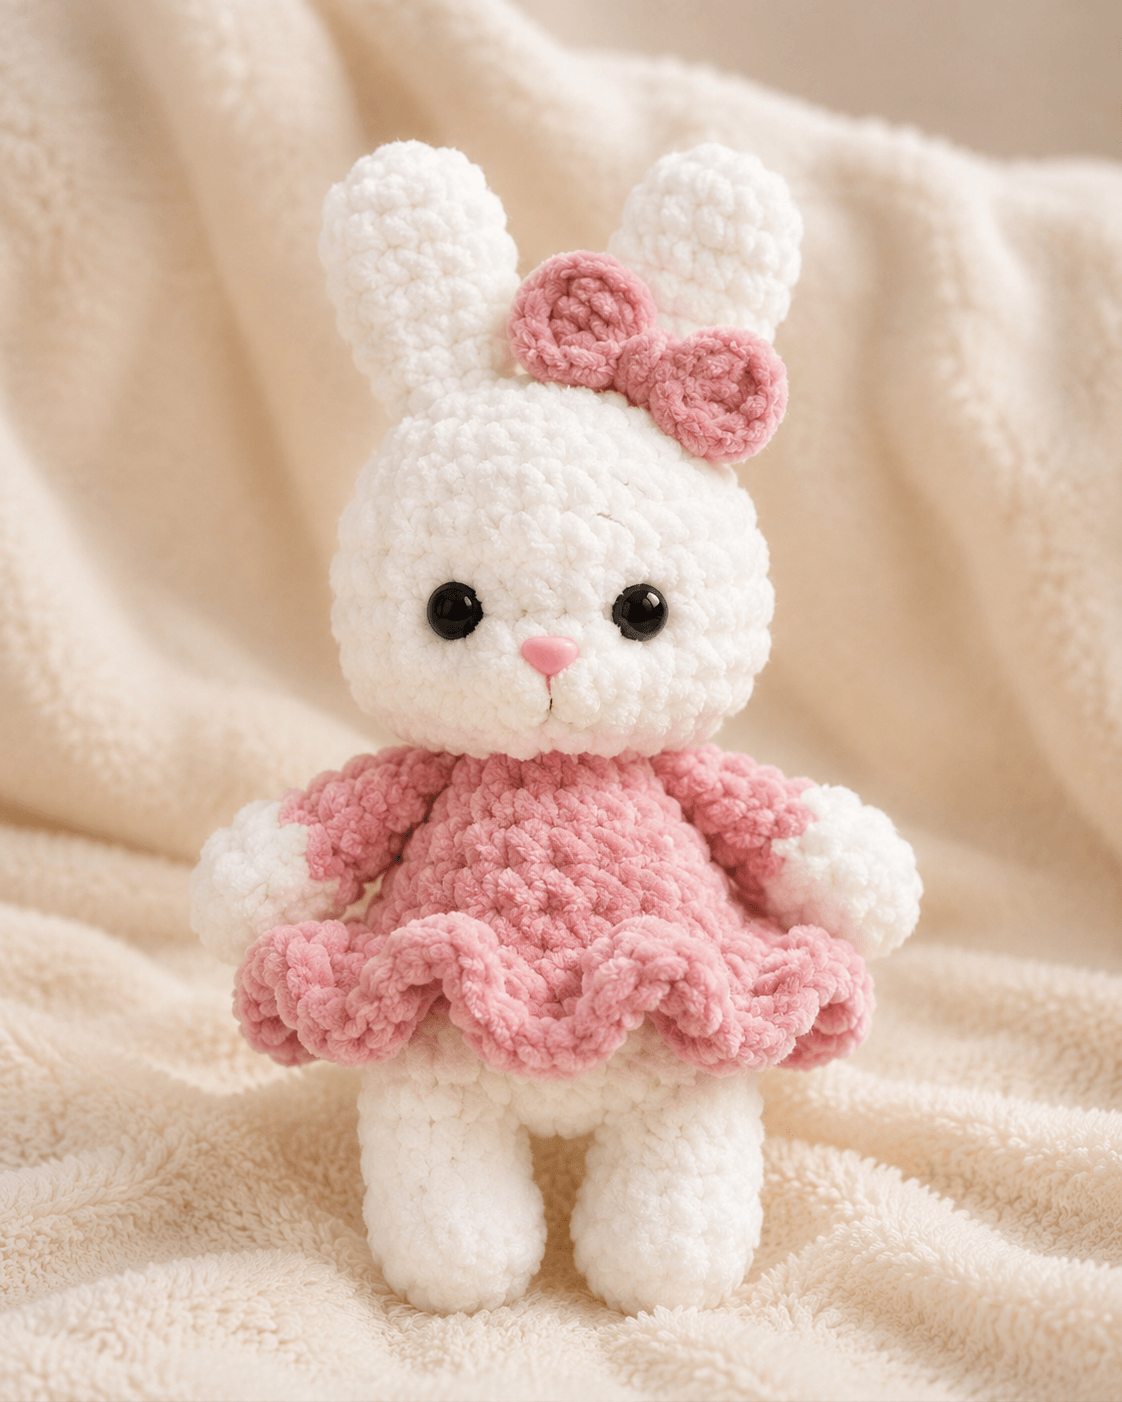
A bow placed between rabbit ears must sit below their widest points or it forces both ears outward. This bunny amigurumi crochet pattern with dress uses super-bulky chenille, a 5 mm hook and 12–14 mm safety eyes to make a figure about 30 cm tall. The intermediate project combines a stable rabbit body with a fitted bodice, puff sleeves and a structured ruffle skirt suitable for display or pattern-development practice.
The Design: What Makes This Dress Bunny Different
The head reaches a 36-stitch plateau, producing the broad forehead and compact cheeks visible in the reference image without making the neck seam too wide. Both ears remain narrow at the base so the bow can sit between them rather than covering their attachment lines. The dress is built directly onto the body. That decision keeps the bodice close to the stuffing and prevents a separate chenille garment from rotating under the weight of the skirt. Three gathered ruffle sections distribute the flare around the full circumference instead of concentrating it at the front. A common mistake in a crochet bunny in pink dress is beginning the skirt too low; the bodice then appears elongated and the legs look shortened. This velvet bunny crochet pattern begins the skirt near the widest body round, allowing the hem to clear the upper legs.
Project Info at a Glance
| Skill Level | Time | Finished Size | Hook | Best For |
|---|---|---|---|---|
| Intermediate | 8–10 hours | Approximately 30 cm | 5 mm | Chenille shaping, garment construction and ruffle control |
Materials and Tools
Yarn
- White — super-bulky chenille yarn — approximately 90 g — Hobbii Honey Bunny, Himalaya Dolphin Baby or a comparable plush yarn.
- Dusty pink — super-bulky chenille yarn — approximately 100 g — use the same yarn line and thickness as the white.
- Pale pink — smooth DK cotton — less than 2 g for optional nose embroidery.
- Brown or black — embroidery thread — less than 1 g for the mouth line.
Tools
- 5 mm crochet hook.
- 12–14 mm safety eyes, one pair.
- Pink safety nose, approximately 12 mm, or pink embroidery thread.
- Polyester stuffing, approximately 80–100 g.
- Large-eye yarn needle.
- Locking stitch markers.
- Dressmaking pins.
- Scissors.
Abbreviations
- MR — magic ring
- sc — single crochet
- hdc — half double crochet
- dc — double crochet
- inc — two single crochets in one stitch
- dec — single-crochet decrease
- sl st — slip stitch
- ch — chain
- BLO — back loop only
- FLO — front loop only
For an invisible decrease, insert the hook through the front loops of the next two stitches, yarn over, pull through both loops, then complete one single crochet.
Pattern — Step by Step
Work in a continuous spiral unless joined rounds or rows are specified. Move the stitch marker after every completed round.
Head
Yarn: white — standard six-point amigurumi shaping.
R1: 6 sc in MR (6)
R2: inc ×6 (12)
R3: (1 sc, inc) ×6 (18)
R4: (2 sc, inc) ×6 (24)
R5: (3 sc, inc) ×6 (30)
R6: (4 sc, inc) ×6 (36)
R7–R13: sc around (36)
R14: (4 sc, dec) ×6 (30)
R15: (3 sc, dec) ×6 (24)
R16: (2 sc, dec) ×6 (18)
Insert the eyes between R10 and R11 with seven visible stitches between their inner edges. Install the pink safety nose between R12 and R13. Stuff the head firmly, placing small pieces around the eye washers rather than one large central piece.
R17: (1 sc, dec) ×6 (12)
R18: dec ×6 (6)
Fasten off. Leave a 25 cm tail and close the opening through the front loops.
Muzzle Patches (Make 2)
Yarn: white — flat-circle construction.
R1: 6 sc in MR (6)
R2: inc ×6 (12)
Fasten off. Leave a 15 cm tail. Pin the circles side by side below the nose, allowing their inner edges to touch, then sew only around the outer edges.
Cheek Patches (Make 2)
Yarn: pale pink DK cotton — optional flat circles.
R1: 6 sc in MR (6)
R2: inc ×6 (12)
Fasten off. Leave a 12 cm tail. Sew one patch below each eye when a visible blush detail is required; omit them to match the predominantly white face in the photograph.
Body and Dress Bodice
Begin with white and change to dusty pink.
R1: 6 sc in MR with white (6)
R2: inc ×6 (12)
R3: (1 sc, inc) ×6 (18)
R4: (2 sc, inc) ×6 (24)
R5: (3 sc, inc) ×6 (30)
R6: (4 sc, inc) ×6 (36)
R7–R9: sc around (36)
R10: change to dusty pink, BLO sc around (36)
R11–R13: sc around (36)
R14: (4 sc, dec) ×6 (30)
R15–R16: sc around (30)
R17: (3 sc, dec) ×6 (24)
R18: sc around (24)
Stuff the lower body firmly. Keep the final four rounds slightly softer so the head can sit against a level neck surface.
R19: (2 sc, dec) ×6 (18)
R20: (1 sc, dec) ×6 (12)
Fasten off. Leave a 30 cm tail for attaching the head.
Front Legs and Puff-Sleeve Arms (Make 2)
Begin with white and change to dusty pink.
R1: 6 sc in MR with white (6)
R2: inc ×6 (12)
R3–R4: sc around (12)
R5: (2 sc, dec) ×3 (9)
R6: change to dusty pink, BLO sc around (9)
R7: inc ×9 (18)
R8–R9: sc around (18)
R10: dec ×9 (9)
R11–R12: sc around (9)
R13: (1 sc, dec) ×3 (6)
Stuff each paw firmly. Add only a small amount inside the sleeve so the gathered shape remains visible. Flatten the final round.
Fasten off. Leave a 25 cm sewing tail.
Back Legs (Make 2)
Yarn: white.
R1: 6 sc in MR (6)
R2: inc ×6 (12)
R3: (1 sc, inc) ×6 (18)
R4–R8: sc around (18)
R9: (1 sc, dec) ×6 (12)
R10–R13: sc around (12)
R14: dec ×6 (6)
Stuff firmly through R10. Leave the upper three rounds less dense so the legs can be positioned below the skirt without producing a hard horizontal ridge.
Fasten off. Leave a 30 cm tail.
Upright Ears (Make 2)
Yarn: white.
R1: 6 sc in MR (6)
R2: inc ×6 (12)
R3: (1 sc, inc) ×6 (18)
R4–R8: sc around (18)
R9: (1 sc, dec) ×6 (12)
R10–R13: sc around (12)
R14: (2 sc, dec) ×3 (9)
R15: sc around (9)
Stuff the upper half lightly. Leave the base unstuffed, flatten it and fold the two outer edges slightly toward the centre before pinning.
Fasten off. Leave a 30 cm tail.
Dress Skirt
Yarn: dusty pink. Attach yarn to the unused front loops of body R10 and work in joined rounds.
R1: ch 1, inc in each FLO around, join with sl st (72)
R2: ch 1, sc around, join (72)
R3: ch 1, (5 sc, inc) ×12, join (84)
R4: ch 1, sc around, join (84)
R5: ch 1, (6 sc, inc) ×12, join (96)
Do not fasten off before completing the lower ruffle.
Lower Ruffle
Continue from dress-skirt R5.
R6: ch 2, 2 dc in each stitch around, join (192)
R7: ch 1, sc around, join (192)
Fasten off. Weave the tail along the underside of the ruffle for at least 6 cm.
Middle Ruffle
Yarn: dusty pink. Attach to the back loops left behind on dress-skirt R3.
R1: ch 2, 2 hdc in each loop around, join (168)
R2: ch 1, sc around, join (168)
Fasten off. Leave a 12 cm tail and secure it on the inside of the skirt.
Upper Ruffle
Yarn: dusty pink. Attach around body R11, directly above the skirt foundation.
R1: ch 2, 2 hdc in each stitch around, join (72)
R2: ch 1, sc around, join (72)
Fasten off. Arrange the three ruffle levels so their edges remain separated rather than stacking into one thick band.
Head Bow Loops (Make 2)
Yarn: dusty pink. Work in rows.
Row 1: ch 9, sc in second ch from hook and across (8)
Row 2: ch 1, turn, inc, 6 sc, inc (10)
Row 3–Row 5: ch 1, turn, sc across (10)
Row 6: ch 1, turn, dec, 6 sc, dec (8)
Row 7: ch 1, turn, sc across (8)
Fasten off. Leave a 20 cm tail on each loop. Fold each rectangle so its first and last rows meet, then sew those edges together to form a rounded loop.
Bow Centre Band
Yarn: dusty pink. Work in rows.
Row 1: ch 5, sc in second ch from hook and across (4)
Row 2–Row 6: ch 1, turn, sc across (4)
Fasten off. Leave a 25 cm tail. Place both loops side by side, wrap the band around their joined centres and stitch the band closed at the back.
Tail
Yarn: white.
R1: 6 sc in MR (6)
R2: inc ×6 (12)
R3: (1 sc, inc) ×6 (18)
R4: sc around (18)
R5: (1 sc, dec) ×6 (12)
R6: dec ×6 (6)
Stuff lightly. The tail should compress against the back of the skirt rather than pushing the dress outward.
Fasten off. Leave a 20 cm tail.
Assembly
- Sew the head to the body through the 12-stitch neck opening, adding a final layer of stuffing before closing the last 3 cm.
- Pin the ears between head rounds 3 and 6 with approximately three stitches between their inner base edges.
- Sew each ear base across twice, then add one hidden anchoring stitch from the back of each ear into the head.
- Position the muzzle circles beneath the nose, sew their outer edges and embroider a 7 mm vertical mouth line between them.
- Attach the arms at body rounds 16–18, keeping both white paws directed slightly inward.
- Sew the legs beneath body rounds 5–8 with a two-stitch gap between their inner edges.
- Separate the upper, middle and lower ruffles by pulling each edge outward and checking that the stitch joins sit at the back.
- Attach the tail to the back of the white lower body, positioning its centre approximately 2 cm below the skirt foundation.
- Pin the bow between the ears with its lower edge touching the head and its loops angled slightly forward, then sew through the centre band.
- Weave all structural tails through at least 6 cm of dense fabric and trim them only after checking the figure from the front, back and both sides.
The completed bunny should measure approximately 30 cm from the soles of the feet to the tips of the ears.
7 Technical Tips
- Lost round start: Chenille fibres can conceal the first stitch and create a diagonal seam. Place one locking marker in the first stitch and a second marker at the halfway point of every 36-stitch round.
- Collapsing neck: A soft upper body allows the heavy head to tilt forward. Pack the final 3 cm of the torso to about 80 percent of the head’s firmness before sewing.
- Visible decrease holes: Standard two-stitch decreases expose gaps in plush yarn. Work every head, body and leg decrease through the front loops only.
- Late eye installation: Washer access becomes restricted after the head decreases to 24 stitches. Install both eyes after R16 at the latest and confirm a seven-stitch inner gap before pressing the washers into place.
- Ruffle twisting: A shifted join makes one side of the skirt longer than the other. Mark the back-centre stitch before each joined round and place every slip-stitch join in that marked position.
- Uneven ear angle: Sewing the first ear completely before pinning the second can leave different base heights. Pin both bases across the same three head rounds and measure the gap between their inner edges before stitching.
- Loose bow attachment: Sewing only through the surface fibres allows the bow to rotate. Pass the needle through the bow centre band and at least two complete head stitches on each anchoring pass.
Conclusion
Check the skirt join, ear spacing and bow angle before weaving the final construction tails. The next practical step is to crochet a 12-stitch chenille sample with the selected 5 mm hook; visible stuffing gaps indicate that a 4.5 mm hook is required. Photograph the finished figure from the front and at a three-quarter angle for Pinterest, then share the result on Instagram with #RuffleDressBunny. This bunny amigurumi crochet pattern with dress can also be tested in one solid garment color before adding contrasting trim. Which feature will you change first: the number of ruffle layers, the bow width or the spacing between the upright ears?









