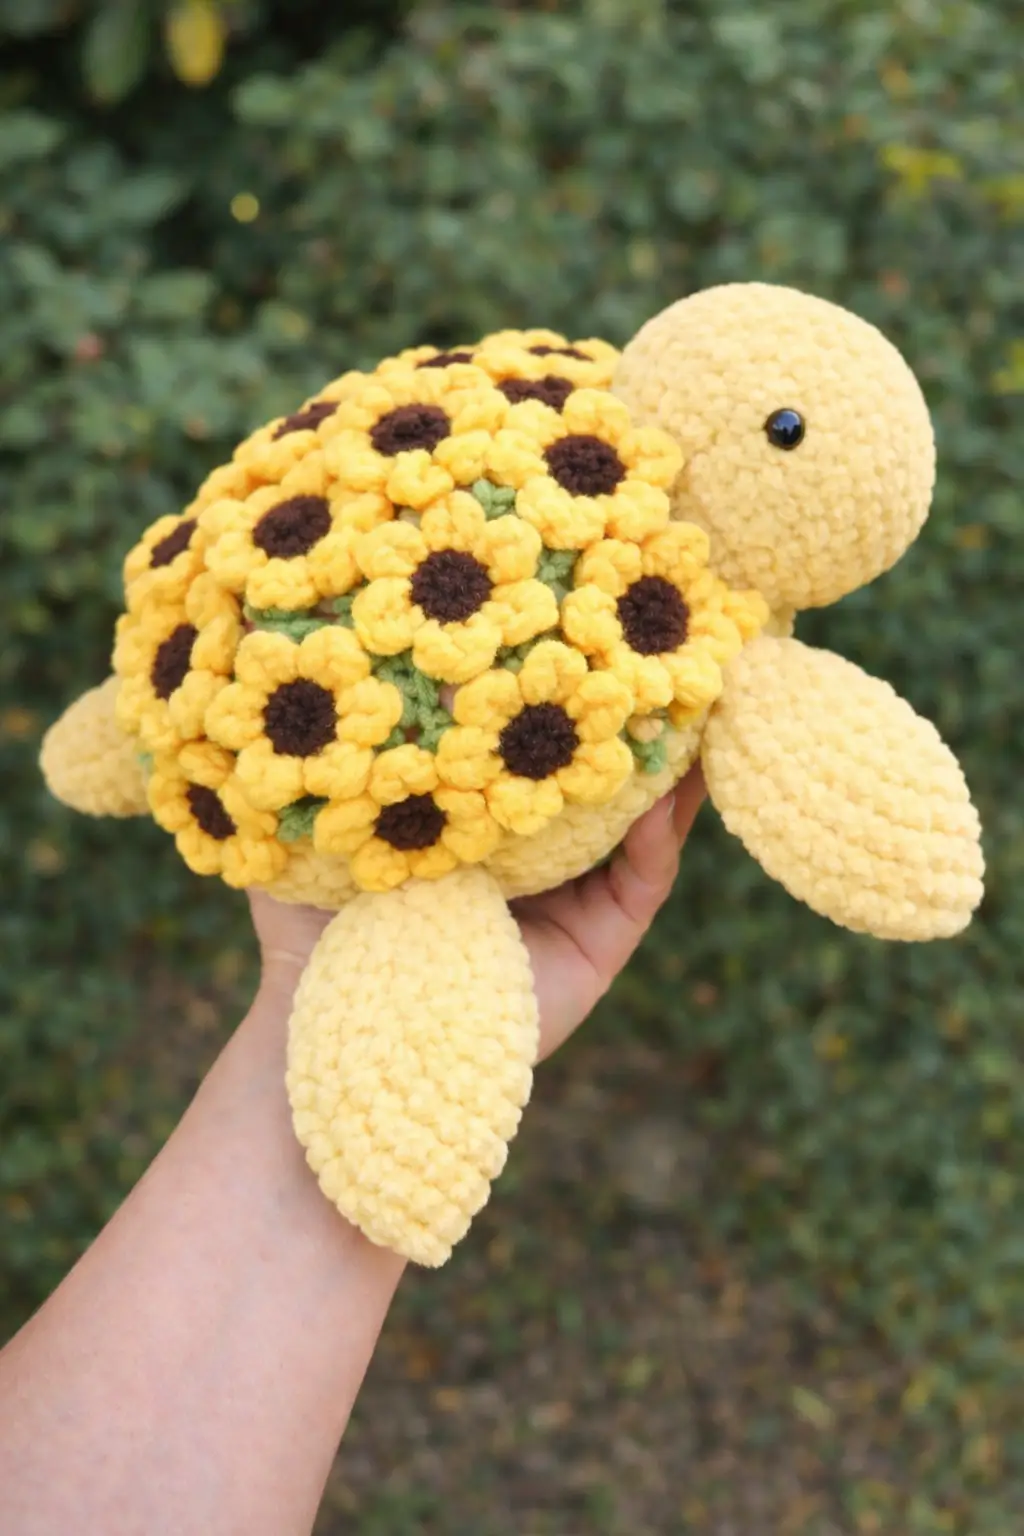
A turtle shell covered in raised sunflower disks changes the balance point before the first stitch is finished. This sunflower turtle amigurumi crochet pattern is built for chunky plush yarn, a 4.5 mm hook, a finished width near 20 cm, and an intermediate maker who wants stable shaping, clean assembly, and a practical gift or display piece that reads clearly in photos.
The Design: What Makes Sunflower Turtle Different
The shell drives the entire build. Standard turtle plush patterns usually rely on one smooth dome or one central flower panel, but this version needs repeated raised motifs across the full back to match the photo. That changes thickness, weight distribution, and sewing order. Front flippers also need more length than back flippers so the turtle reads as a sea turtle instead of a land tortoise. Head size matters too; too small, and the floral shell looks oversized. Too large, and the sunflower detail disappears from view. A common mistake with any sunflower turtle crochet pattern is attaching flowers after full stuffing, which makes the shell buckle. Another is using flat petals on plush yarn, which vanishes into the pile. For a convincing flower turtle amigurumi, the shell should stay broad and low rather than tall and narrow. Published sunflower turtle patterns also show wide variation in scale and construction, which leaves room for a more photo-matched plush build.
Project Info at a Glance
| Skill Level | Time | Finished Size | Hook | Best For |
|---|---|---|---|---|
| Intermediate | 6–8 hours | approx. 20–24 cm wide | 4.5 mm | Plush gift, shelf decor, market make |
Materials and Tools
Yarn
- Pale yellow — super bulky / plush chenille — 100–120 g — Premier Parfait Chunky or similar
- Sunflower yellow — super bulky / plush chenille — 20–30 g — matching chenille
- Dark brown — super bulky / plush chenille — 20–30 g — matching chenille
- Leaf green — super bulky / plush chenille — 15–20 g — matching chenille
Tools
- Hook 4.5 mm
- 12 mm safety eyes
- Polyfill stuffing
- Yarn needle
- Stitch markers
- Pins
- Small scissors
Abbreviations
MR / sc / inc / dec / sl st / ch / BLO / dc / tr / FO = fasten off.
Invisible decrease keeps the head and shell edges cleaner because the front loops stay less broken than with a standard two-stitch decrease.
Pattern — Step by Step
Continuous spiral unless noted.
Head (Make 1)
Yarn: pale yellow
R1: 6 sc in MR (6)
R2: inc x6 (12)
R3: (sc, inc) x6 (18)
R4: (2 sc, inc) x6 (24)
R5: (3 sc, inc) x6 (30)
R6: (4 sc, inc) x6 (36)
R7–10: sc around (36)
R11: (4 sc, dec) x6 (30)
R12: sc around (30)
R13: (3 sc, dec) x6 (24)
Insert safety eyes between R8 and R9, about 8 stitches apart. Stuff firmly but keep the neck side slightly flatter.
R14: (2 sc, dec) x6 (18)
R15: (sc, dec) x6 (12)
R16: dec x6 (6)
Fasten off. Leave 25 cm tail.
Body Base (Make 1)
Yarn: pale yellow
R1: 6 sc in MR (6)
R2: inc x6 (12)
R3: (sc, inc) x6 (18)
R4: (2 sc, inc) x6 (24)
R5: (3 sc, inc) x6 (30)
R6: (4 sc, inc) x6 (36)
R7–9: sc around (36)
R10: sc in BLO around (36)
R11: sc around (36)
R12: (4 sc, dec) x6 (30)
R13: (3 sc, dec) x6 (24)
Stuff the front half more firmly than the back half. This helps the turtle sit low rather than round.
R14: (2 sc, dec) x6 (18)
R15: (sc, dec) x6 (12)
R16: dec x6 (6)
Fasten off. Leave 25 cm tail.
Upper Shell Dome (Make 1)
Yarn: leaf green
R1: 6 sc in MR (6)
R2: inc x6 (12)
R3: (sc, inc) x6 (18)
R4: (2 sc, inc) x6 (24)
R5: (3 sc, inc) x6 (30)
R6: (4 sc, inc) x6 (36)
R7: (5 sc, inc) x6 (42)
R8–10: sc around (42)
R11: sc in BLO around (42)
R12: sc around (42)
R13: (5 sc, dec) x6 (36)
R14: (4 sc, dec) x6 (30)
Lightly stuff only the center. Keep edges soft so appliqués can be stitched on without ridges.
Fasten off. Leave 35 cm tail.
Front Flippers (Make 2)
Yarn: pale yellow
R1: 6 sc in MR (6)
R2: inc x6 (12)
R3: (sc, inc) x6 (18)
R4: (2 sc, inc) x6 (24)
R5–8: sc around (24)
R9: (2 sc, dec) x6 (18)
R10–13: sc around (18)
R14: (sc, dec) x6 (12)
R15–17: sc around (12)
Flatten.
R18: sc through both sides across (6)
Fasten off. Leave 30 cm tail.
Back Flippers (Make 2)
Yarn: pale yellow
R1: 6 sc in MR (6)
R2: inc x6 (12)
R3: (sc, inc) x6 (18)
R4–6: sc around (18)
R7: (sc, dec) x6 (12)
R8–10: sc around (12)
Flatten.
R11: sc through both sides across (6)
Fasten off. Leave 25 cm tail.
Sunflower Centers (Make 11)
Yarn: dark brown
R1: 6 sc in MR (6)
R2: inc x6 (12)
R3: (sc, inc) x6 (18)
Fasten off. Leave 20 cm tail.
Sunflower Petal Rings (Make 11)
Yarn: sunflower yellow
Attach yarn to any stitch of a brown center.
Rnd 1: (sl st, ch 2, 2 dc, ch 2, sl st) in next st, repeat around to make 12 petals total.
Fasten off. Leave 20 cm tail.
Leaf Base Discs (Make 11)
Yarn: leaf green
R1: 6 sc in MR (6)
R2: inc x6 (12)
R3: (sc, inc) x6 (18)
Fasten off. Leave 18 cm tail.
Cheek Patches (Make 2)
Yarn: pale yellow or slightly lighter cream
R1: 6 sc in MR (6)
R2: inc x6 (12)
Fasten off. Leave 15 cm tail.
Neck Join Patch (Make 1)
Yarn: pale yellow
Ch 5.
R1: Starting in 2nd ch from hook, 3 sc, 3 sc in last ch, work on opposite side 2 sc, inc in last ch (10)
R2: inc, 2 sc, 3 inc, 2 sc, 2 inc (16)
Fasten off. Leave 20 cm tail.
Optional Under-shell Trim (Make 1)
Yarn: pale yellow
Join to BLO ridge of body base.
Rnd 1: sc evenly around (36)
Fasten off. Weave in.
Assembly
- Sew the head to the front third of the body base, using the neck join patch underneath to widen the contact area.
- Sew the upper shell dome to the body base around the BLO ridge, leaving a low dome rather than a tall stuffed half-sphere.
- Position the eyes before final head closure if you have not already added them.
- Stitch the cheek patches low on the head, one round below the eye line, keeping them subtle.
- Sew the front flippers at the side seams just behind the head, angled slightly forward.
- Sew the back flippers near the rear quarter of the body, pointing slightly outward.
- Layer each leaf base disc under one sunflower and stitch the brown center through all layers first.
- Arrange the sunflowers over the shell in staggered rows: three across the widest center, then three, then three, then two near the front and back gaps as needed.
- Tack each sunflower at several petal points so the shell stays readable and does not twist.
- Check the base on a flat surface, add or remove a little stuffing through any seam gap, then close and weave in all tails.
The plush is complete when the shell sits broad, the head projects forward, and all four flippers touch the surface evenly.
7 Technical Tips
- Mark round 1 on every plush piece. Chenille hides stitch tops fast, and one missed increase in the head will throw off the eye spacing by 2–3 stitches.
- Keep head stuffing firmer than shell stuffing. A soft head collapses backward once the sunflower shell weight pulls behind it.
- Use invisible decreases on visible curves. Standard decreases leave a ridge on pale yarn that shows most on the head and front flippers.
- Insert eyes before the final two decrease rounds. On a 36-stitch head, placing them after R13 is slower and stretches the fabric around the posts.
- Pin every flower before sewing. Even a 5 mm shift in one appliqué can force the next row off-center and create gaps in the shell coverage.
- Do not overpack the shell dome. Raised flowers already add bulk; extra fill makes the turtle look tall instead of wide.
- Weave tails through at least three direction changes. Plush yarn slips more than cotton, and short straight weaves can work loose after handling.
Conclusion
This sunflower turtle amigurumi crochet pattern works because the shell is treated as a field of separate motifs, not a single decorative panel. That shift fixes proportion, improves photo accuracy, and gives the plush the broad profile visible in the reference image. Your next step is simple: build the head and body first, then dry-pin all sunflower appliqués before sewing any of them permanently. Share the finished turtle on Pinterest and Instagram with #SunflowerTurtlePattern so the shell layout is easy for others to study. One question remains worth testing on this specific turtle: do you prefer tighter flower spacing near the neck, or a cleaner gap that keeps the head outline sharper?









