Introduction
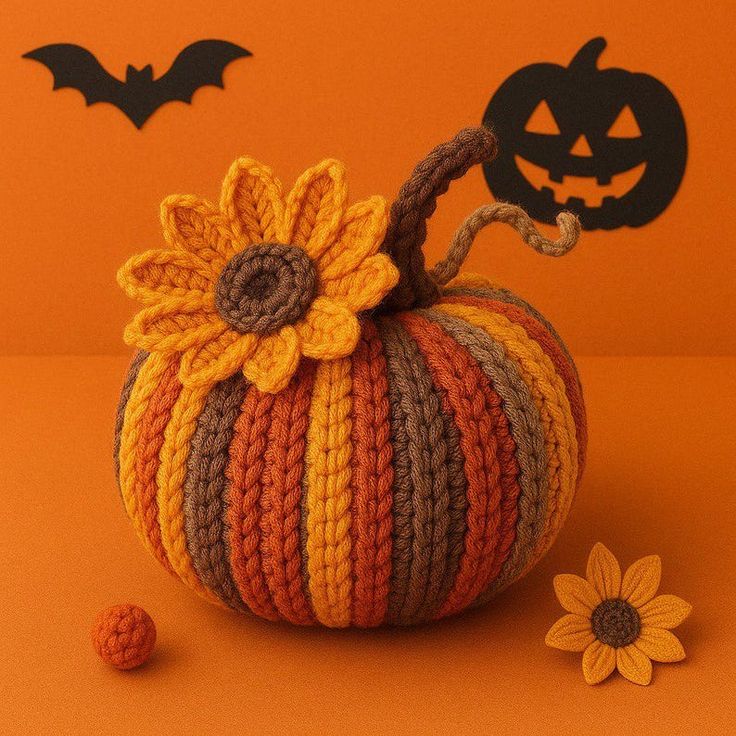
A sunflower attached beside the stem forces one pumpkin lobe to carry extra visual weight, so the eight ribs must stay evenly spaced beneath it. This sunflower ribbed crochet pumpkin pattern uses worsted yarn and a 5 mm hook to make an approximately 20–23 cm pumpkin. Orange, mustard and brown ribbed sections form the body, while a curved stem, spiral vine and dimensional sunflower finish the crown.
The Design: What Makes This Pumpkin Different
The pumpkin is constructed from vertical textured sections rather than a smooth sphere because the reference shows narrow raised ribs running continuously from base to crown. Burnt orange, golden mustard and brown alternate around the body, producing color separation without horizontal striping. Eight deeper channels are added after stuffing so the individual color ribs remain visible while the overall form still reads as a segmented pumpkin. The sunflower sits beside the stem rather than directly in front of it, which leaves the curved brown stem readable from the front. A small vine introduces one additional line above the pumpkin without competing with the flower. This striped crochet pumpkin also requires controlled circumference. One common mistake is making the rectangle too short; after seaming and stuffing, the pumpkin becomes tall and narrow instead of broad and rounded.
Project Info at a Glance
| Skill Level | Time | Finished Size | Hook | Best For |
|---|---|---|---|---|
| Intermediate | 7–9 hours | Approx. 20–23 cm wide × 22–25 cm high including stem | 5.0 mm | Fall shelves, table displays and Thanksgiving decor |
Materials and Tools
Yarn
- Burnt orange — worsted / Aran #4 — approximately 65–80 g — used for three body panels.
- Golden mustard — worsted / Aran #4 — approximately 55–70 g — used for three body panels and sunflower petals.
- Dark brown — worsted / Aran #4 — approximately 45–55 g — used for two body panels, stem and sunflower center.
- Muted green — worsted / Aran #4 — approximately 5–10 g — used for small crown accents if desired.
Use yarns with similar twist and elasticity. Different fibers can produce panels with identical stitch counts but noticeably different widths after stuffing.
Tools
- 5.0 mm crochet hook
- Polyester stuffing, approximately 170–210 g
- Long tapestry needle
- Standard yarn needle
- Eight locking stitch markers
- Dressmaking pins
- Scissors
- Measuring tape
Abbreviations
- MR — magic ring
- ch — chain
- sc — single crochet
- hdc — half double crochet
- dc — double crochet
- tr — treble crochet
- sl st — slip stitch
- BLO — back loop only
- inc — two stitches in one stitch
- dec — decrease
Back-loop half double crochet leaves the unused front loop on the surface, creating the raised vertical ribs visible throughout the pumpkin body.
Pattern — Step by Step
The pumpkin body is assembled from eight ribbed strips. Finish all panels to the same measured length before joining them.
Orange Ribbed Panels (Make 3)
Yarn: burnt orange — based on standard BLO ribbed pumpkin construction.
Ch 24.
Row 1: Hdc in second ch from hook and across. Turn. (23)
Row 2: Ch 1, hdc BLO across. Turn. (23)
Repeat Row 2 until the panel measures approximately 6–6.5 cm across the row-end edge.
The foundation-to-working-edge measurement should remain approximately 17–18 cm.
Fasten off. Leave a 35 cm sewing tail.
Mustard Ribbed Panels (Make 3)
Yarn: golden mustard.
Ch 24.
Row 1: Hdc in second ch from hook and across. Turn. (23)
Row 2 onward: Ch 1, hdc BLO across. Turn. (23)
Continue until each mustard panel matches the width of the orange panels within approximately 3–5 mm.
Fasten off. Leave a 35 cm tail.
Brown Ribbed Panels (Make 2)
Yarn: dark brown.
Ch 24.
Row 1: Hdc in second ch from hook and across. Turn. (23)
Row 2 onward: Ch 1, hdc BLO across. Turn. (23)
Continue until the panel measures the same width as the other sections.
Matching actual measurements matters more than matching row numbers if the three colors differ slightly in elasticity.
Fasten off. Leave a 35 cm tail.
Arrange the Eight Panels
Lay the panels in the following sequence:
Orange
Mustard
Brown
Orange
Mustard
Brown
Orange
Mustard
Move one brown panel if necessary so the darkest ribs do not sit directly behind the sunflower attachment.
The front should show several contrasting colors rather than one large block of the same shade.
Join the Body Panels
Place the first orange and mustard panels right sides together.
Mattress stitch their long edges using a matching or dark neutral yarn.
Repeat across all eight sections.
Join Panel 8 to Panel 1 to create a tube.
Keep every foundation edge at the same end. Reversing one panel changes the rib direction near the crown.
Gather the Bottom
Cut approximately 100 cm of brown or orange yarn.
Thread a long needle and run the strand in and out through the complete lower row-end edge.
Catch one point approximately every 8–10 mm.
Pull until the opening reduces to approximately 1–2 cm.
Pass across the center several times and knot securely.
Do not form a large fabric knot. A shallow lower center produces better contact with the table.
Stuff the Pumpkin
Add stuffing around the outer circumference first.
Push filling behind all eight panels so the colored sections project evenly.
Continue filling until firm thumb pressure creates approximately 10–15 mm of temporary indentation.
Keep the central axis slightly softer because the pumpkin still needs vertical compression and rib shaping.
Gather the Crown
Run a second long strand around the upper opening.
Pull until the opening measures approximately 3–4 cm.
Add final stuffing around the outer upper edge.
Reduce the opening to approximately 1.5 cm.
Secure the gathering strand without burying the tail.
Vertical Compression
Pass the crown tail through the exact pumpkin center and exit through the bottom.
Return through the same path.
Pull until the pumpkin loses approximately 1–1.5 cm of height.
The eight panel seams should begin recessing naturally as the circumference spreads outward.
Secure temporarily.
Deepen the Eight Lobes
Yarn: dark brown or matching panel colors.
Cut approximately 150 cm of yarn.
Enter at the lower center and carry the strand along one joined seam to the crown.
Pass through the stuffed body and return to the lower center.
Pull until the seam sits approximately 8–12 mm below the neighboring raised ribs.
Work the seam directly opposite next.
Continue in four opposite pairs until all eight seams are shaped.
Working opposite channels keeps stuffing centered and prevents one side from becoming larger than the other.
Knot securely and bury all structural tails.
Brown Curved Stem
Yarn: dark brown.
R1: 6 sc in MR (6)
R2–R7: sc around (6)
R8: (2 sc, inc) ×2 (8)
R9–R12: sc around (8)
R13: (3 sc, inc) ×2 (10)
R14–R15: sc around (10)
R16: (4 sc, inc) ×2 (12)
Stuff the lower six rounds lightly. Leave the upper tube almost empty so it can bend in a broad arc.
Fasten off. Leave a 35 cm attachment tail.
Stem Base
Yarn: dark brown.
R1: 6 sc in MR (6)
R2: inc ×6 (12)
R3: (sc, inc) ×6 (18)
Fasten off. Leave a 25 cm sewing tail.
Curled Vine
Yarn: dark brown.
Ch 24.
Starting in the second chain from the hook, work 2 sc in every chain across.
The increased stitches should force the cord into a loose spiral.
Fasten off. Leave a 15 cm attachment tail.
Sunflower Center
Yarn: dark brown.
R1: 6 sc in MR (6)
R2: inc ×6 (12)
R3: (sc, inc) ×6 (18)
R4: (2 sc, inc) ×6 (24)
Keep the circle flat. The center should measure approximately 4–5 cm across.
Fasten off. Leave a 25 cm sewing tail.
Sunflower Petals (Make 10)
Yarn: golden mustard.
Ch 8.
Starting in second chain from hook:
sl st,
sc,
hdc,
dc,
tr,
dc,
5 sc in final chain.
Continue down the opposite side:
dc,
tr,
dc,
hdc,
sc,
sl st.
Pinch the upper point lightly so each petal finishes narrow rather than round.
Fasten off. Leave a 20 cm sewing tail.
Assemble the Sunflower
Arrange five petals behind the brown center first, spacing them evenly.
Add the remaining five petals in the gaps between the first tier.
Sew only the lower 10–15 mm of each petal to the rear of the center.
The upper petal sections should remain free so the flower projects away from the pumpkin.
Optional Green Crown Accent
Yarn: muted green.
Ch 8.
Starting in second chain from hook:
sl st, sc, hdc, dc, hdc, sc, sl st.
Fasten off.
Make one or two small pieces and place them behind the stem only if additional green detail is wanted to match the small crown accents visible in the reference.
Assembly
- Complete all eight ribbed body panels and match their lengths within approximately 3–5 mm before joining.
- Join the sections into one tube, gather the lower opening and distribute stuffing around the outer circumference before filling the center.
- Gather the crown and compress the pumpkin vertically by approximately 1–1.5 cm.
- Deepen all eight panel seams in four opposite pairs until each channel sits approximately 8–12 mm below the adjacent ribs.
- Sew the 18-stitch stem base over the crown opening and attach the brown stem through its 12-stitch lower edge.
- Curve the upper stem forward and slightly to one side, adding one concealed holding stitch on the inside of the bend when required.
- Attach the curled vine behind the stem, fixing only its first 10–15 mm so the remaining spiral stays free.
- Assemble the sunflower completely before pinning it beside the stem, then place its center approximately 3–4 cm from the crown midpoint.
- Sew the sunflower through its brown center and lower petal bases, leaving most of the pointed petals unsupported.
- Place the pumpkin on a level surface, correct any lobe wider than its opposite by more than approximately 10 mm, then weave all structural tails through at least 4 cm of dense crochet.
The completed pumpkin should have eight clearly separated autumn-colored ribs, a stable broad base, one tall curved brown stem and a dimensional sunflower positioned beside the crown.
7 Technical Tips
- Panel lengths not matching: A difference greater than approximately 5 mm causes one crown section to gather higher than the others. Measure every panel flat before joining and add full rib rows rather than stretching a short section.
- Color ribs losing definition: Heavy stuffing can flatten the BLO texture until neighboring panels look like one smooth surface. Stop filling while thumb pressure still creates approximately 10–15 mm of temporary compression.
- One lobe becoming oversized: Tightening all eight shaping seams clockwise moves stuffing toward the last unfinished section. Work each groove followed by the seam directly opposite it.
- Sunflower sagging: Attaching the flower through only one center stitch allows its weight to rotate forward. Sew across a 25–30 mm area of the brown center and tack the lowest two petal bases to the crown.
- Stem forming a sharp kink: Firmly stuffing all 16 rounds makes the tube bend at one isolated point. Leave the upper half nearly empty and distribute the curve over approximately 5–7 cm.
- Sunflower petals flattening: Sewing each mustard petal around its complete perimeter removes the dimensional overlap. Attach only the lower 10–15 mm and keep the pointed upper sections free.
- Vine hanging straight: One sc in every chain creates a cord rather than a curl. Work two single crochets into every foundation chain and attach only the first 10–15 mm beside the stem.
Conclusion
Check the eight colored ribs before adding the sunflower because the flower will conceal several upper seam endpoints. The next practical step is to rotate the stuffed pumpkin on a level table and compare lobe width, crown height and base contact from every side. Correct the shaping first, then attach the stem, vine and flower. Share the finished sunflower ribbed crochet pumpkin pattern project on Pinterest with a front-facing fall image, then post a close view of the flower and raised rib texture on Instagram using #SunflowerRibbedCrochetPumpkin. For this pumpkin specifically, would you keep the sunflower mustard yellow or use a deeper burnt-gold petal color?









