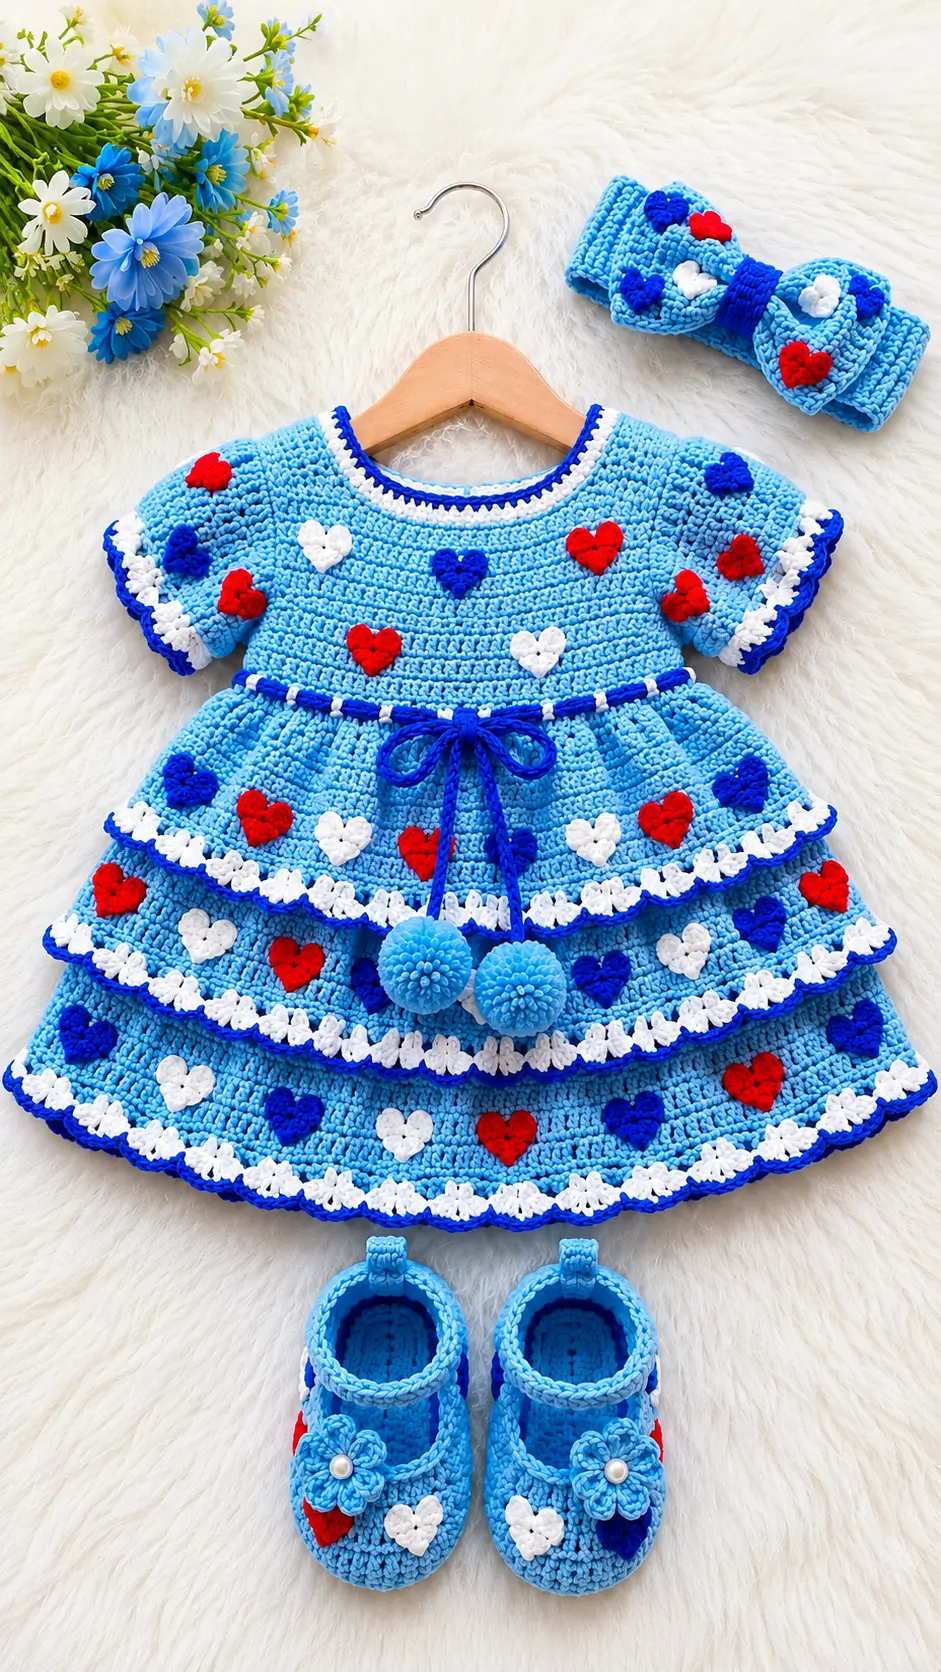
Blue Crochet Baby Dress Pattern with Hearts, Bow and Booties
Introduction
Three stacked skirt tiers change the load path of this dress before the first heart is sewn on. This blue crochet baby dress pattern uses DK yarn, a 3.5 mm hook, a 3–6 month reference size, and intermediate garment skills. The matching bow headband and Mary Jane booties repeat the red, white, and royal-blue motifs. Make the set when you need one coordinated photo outfit rather than three unrelated crochet pieces.
The Design: What Makes the Blue Heart Dress Different
Three construction choices separate this set from a basic yoke dress. First, the skirt is built over a narrow support layer, then three ruffles are attached to reserved front loops; that keeps each tier visible without forcing all of the flare into the waist. Second, the sleeves repeat the same white shell and royal-blue edge used on the skirt, so the upper section remains visually tied to the hem.
Third, heart appliqués are distributed asymmetrically but balanced by color. A crochet baby dress set pattern often treats accessories as separate projects; this reconstruction repeats the same motif scale on the bow and booties. The common error in a tiered crochet baby dress is attaching one ruffle too high, causing the tiers to stack rather than overlap. This blue crochet baby dress pattern reserves attachment rounds before any ruffle is added.
Project Info at a Glance
| Skill Level | Finished Size | Hook | Yarn | Best For |
|---|---|---|---|---|
| Easy / Intermediate | 3–6 month reference, approximately 38 cm long | 3.5 mm | DK / #3 | Coordinated baby dress set |
Gauge matters more than the age label. The reconstruction targets approximately 20 dc = 10 cm across the bodice after light blocking. Measure the finished chest before adding the lower tiers.
Materials and Tools
Yarn
- Light sky blue — DK/#3 — approximately 200 g working allowance
- White — DK/#3 — approximately 35 g working allowance
- Royal blue — DK/#3 — approximately 30 g working allowance
- Bright red — DK/#3 — approximately 25 g working allowance
Use yarns with similar fiber content and thickness so the borders and appliqués sit evenly against the main fabric.
Tools
- 3.5 mm crochet hook
- Tapestry needle
- Locking stitch markers
- Scissors
- Tape measure
- 3 cm pom-pom maker or cardboard template
- Rustproof pins
- Optional blocking mat
- Matching sewing thread for appliqué reinforcement
The photographed shoes appear to use pearl-like centers. For clothing intended to be worn by an infant, replace loose beads with embroidered yarn centers or another permanently secured textile detail.
Abbreviations
- MR — magic ring
- ch — chain
- sc — single crochet
- hdc — half double crochet
- dc — double crochet
- tr — treble crochet
- inc — 2 stitches in the same stitch
- dec — decrease
- sl st — slip stitch
- BLO — back loop only
- FLO — front loop only
- st/sts — stitch/stitches
- rnd — round
Invisible decrease: insert the hook through the front loops of the next two stitches, yarn over, then complete one sc through both loops.
Pattern — Step by Step
This is garment construction, so rows and joined rounds replace the continuous spiral used for amigurumi. Continuous spirals would twist the back opening, waist eyelets, sleeve borders, and tier attachment points.
The reconstruction is written for a 3–6 month reference size with approximately 48 cm finished chest circumference. Compare measurements with the intended wearer rather than relying only on the age label.
Dress Yoke
Yarn: light sky blue
Ch 67.
Row 1: Dc in 4th ch from hook and in each ch across. (64)
Row 2: Ch 3, turn. (Dc in next 7 sts, inc) ×8. (72)
Row 3: Ch 3, turn. (Dc in next 8 sts, inc) ×8. (80)
Row 4: Ch 3, turn. (Dc in next 9 sts, inc) ×8. (88)
Row 5: Ch 3, turn. (Dc in next 10 sts, inc) ×8. (96)
Row 6: Ch 3, turn. (Dc in next 11 sts, inc) ×8. (104)
Row 7: Ch 3, turn. (Dc in next 12 sts, inc) ×8. (112)
Row 8: Ch 3, turn. (Dc in next 13 sts, inc) ×8. (120)
Do not fasten off. The open edges form a short dressing opening at the back neck.
Bodice and Armhole Split
Yarn: light sky blue
Rnd 9: Ch 3. Dc in next 21 sts, skip next 18 sts, ch 6, dc in next 42 sts, skip next 18 sts, ch 6, dc in final 21 sts. Join to first dc. (96 positions)
The skipped sections become the sleeves. Each six-chain underarm replaces an 18-stitch yoke section while reducing the circumference to the body measurement.
Rnd 10: Dc in every dc and underarm ch. Join. (96)
Rnd 11: Dc around. (96)
Rnd 12: Dc around. (96)
Rnd 13: Dc around. (96)
Rnd 14: Dc around. (96)
Rnd 15: Dc around. (96)
Waist Eyelet Band
Rnd 16: Sc around. (96)
Rnd 17: (Dc in next st, ch 1, skip next st) ×48. (48 dc + 48 ch spaces; 96 positions)
Rnd 18: Sc in each dc and each ch-1 space. (96)
Do not fasten off.
The eyelet round carries the royal-blue drawstring. Keeping the stitch total at 96 prevents the waist from flaring before the skirt begins.
Skirt Support Layer
Rnd 1: (Dc in next 3 sts, inc) ×24. (120)
Rnd 2: Dc around. (120)
Rnd 3: Dc BLO around. (120)
Rnd 4: Dc around. (120)
Rnd 5: Dc around. (120)
Rnd 6: Dc around. (120)
Rnd 7: Dc around. (120)
Rnd 8: Dc BLO around. (120)
Rnd 9: Dc around. (120)
Rnd 10: Dc around. (120)
Rnd 11: Dc around. (120)
Rnd 12: Dc around. (120)
Rnd 13: Dc BLO around. (120)
Rnd 14: Dc around. (120)
Rnd 15: Dc around. (120)
Rnd 16: Dc around. (120)
Rnd 17: Dc around. (120)
Rnd 18: Dc around. (120)
Fasten off.
The unused front loops on Rnds 3, 8, and 13 are the three ruffle attachment lines. Mark all three before adding any tier.
Upper Skirt Ruffle
Yarn: light sky blue
Join blue to a front loop from support Rnd 3.
Rnd 1: (Dc in next loop, 2 dc in next loop) ×60. (180)
Rnd 2: Dc around. (180)
Rnd 3: Dc around. (180)
Rnd 4: Dc around. (180)
Rnd 5: Dc around. (180)
Change to white.
Rnd 6: (Sc in next st, skip 1, 5 dc in next st, skip 1) ×45.
Change to royal blue.
Rnd 7: Sl st around the white border.
Fasten off.
Middle Skirt Ruffle
Yarn: light sky blue
Join yarn to the unused front loops of support Rnd 8.
Rnd 1: (Dc in next loop, 2 dc in next loop) ×60. (180)
Rnd 2: Dc around. (180)
Rnd 3: Dc around. (180)
Rnd 4: Dc around. (180)
Rnd 5: Dc around. (180)
Rnd 6: Dc around. (180)
Change to white.
Rnd 7: (Sc in next st, skip 1, 5 dc in next st, skip 1) ×45.
Change to royal blue.
Rnd 8: Sl st around the entire white edge.
Fasten off.
Lower Skirt Ruffle
Yarn: light sky blue
Join yarn to the unused front loops of support Rnd 13.
Rnd 1: (Dc in next loop, 2 dc in next loop) ×60. (180)
Rnd 2: Dc around. (180)
Rnd 3: Dc around. (180)
Rnd 4: Dc around. (180)
Rnd 5: Dc around. (180)
Rnd 6: Dc around. (180)
Rnd 7: Dc around. (180)
Rnd 8: Dc around. (180)
Change to white.
Rnd 9: (Sc in next st, skip 1, 5 dc in next st, skip 1) ×45.
Change to royal blue.
Rnd 10: Sl st around.
Fasten off.
The increasing ruffle depth from top to bottom reproduces the visual drop shown in the photo without changing the 120-stitch support skirt.
Short Sleeves — Make 2
Yarn: light sky blue
Join yarn at the center of one six-chain underarm.
Rnd 1: Dc across the 6 underarm chains and across the 18 skipped yoke stitches. Join. (24)
Rnd 2: Dc around. (24)
Rnd 3: (Dc in next st, inc) ×12. (36)
Rnd 4: Dc around. (36)
Change to white.
Rnd 5: (Sc in next st, skip 1, 5 dc in next st, skip 1) ×9.
Change to royal blue.
Rnd 6: Sl st across the white edge.
Fasten off. Weave the sleeve tail toward the underarm rather than along the visible white trim.
Repeat for the second sleeve.
Neckline Trim
Join white to the starting edge of the yoke.
Rnd 1: Work 64 sc evenly around the neckline. (64)
Change to royal blue.
Rnd 2: Sl st in each sc. (64)
Fasten off.
At the back opening, add one crocheted loop from ch 6 and sl st to its base. Sew a flat textile toggle or another securely attached closure on the opposite edge if the garment requires one.
Heart Appliqués
Make approximately 24–30 total in red, white, and royal blue.
The exact photograph contains many hearts rather than a strict repeating sequence. Make enough to test the layout before sewing.
Rnd 1: In MR work ch 3, 3 tr, 3 dc, ch 1, 1 tr, ch 1, 3 dc, 3 tr, ch 3, sl st into ring.
Pull the MR closed. Fasten off with a 15 cm sewing tail.
For smaller shoe and bow hearts, use a 2.75–3 mm hook with the same yarn. For larger skirt hearts, retain the 3.5 mm hook.
- Bodice: 6–8 hearts
- Upper ruffle: 6–7 hearts
- Middle ruffle: 6–7 hearts
- Lower ruffle: 8–10 hearts
- Bow: 3–4 hearts
- Booties: 1–2 hearts each
Pin all motifs before sewing. Color spacing matters more than exact count.
Waist Drawstring
Yarn: royal blue
Ch 150.
Row 1: Sl st in second ch from hook and each chain across. (149)
Fasten off.
Thread the drawstring through the waist eyelets with both ends exiting at center front.
Make two 3 cm pom-poms in light blue and attach one to each drawstring end. Stitch repeatedly through the pom-pom core rather than tying only around the outer strands.
Bow Headband
Headband
Yarn: light sky blue
Ch 82 and join without twisting.
Rnd 1: Hdc around. (82)
Rnd 2: Hdc around. (82)
Rnd 3: Hdc around. (82)
Rnd 4: Hdc around. (82)
Fasten off.
At the target gauge this is intended to sit near a 40–41 cm relaxed circumference. Measure the band before adding the bow because infant head measurements vary.
Bow Panel
Ch 31.
Row 1: Hdc in second ch from hook and across. (30)
Rows 2–8: Ch 1, turn, hdc across. (30)
Fasten off with a 25 cm tail.
Fold the panel so its short ends meet at the back. Stitch the seam, flatten the rectangle, then pinch the center into three folds.
Bow Center Band
Ch 9.
Row 1: Sc in second ch and across. (8)
Fasten off with a 20 cm tail.
Wrap the strip tightly around the pinched bow center and sew at the back. Stitch the bow to the headband across at least 3 cm of its center so it cannot rotate.
Add three or four mini heart motifs in red, white, and royal blue.
Mary Jane Booties — Make 2
Yarn: light sky blue
Begin each sole at the heel side of the foundation chain.
Ch 12.
Rnd 1: 2 hdc in second ch from hook, hdc in next 9 ch, 5 hdc in final ch, turn to work down opposite side of foundation chain, hdc in next 9, 3 hdc in first foundation ch. Join. (28)
Rnd 2: Inc in next 2 sts, hdc in next 9, inc in next 5, hdc in next 9, inc in final 3. (38)
Rnd 3: Hdc around. (38)
Rnd 4: Sc BLO around. (38)
Rnd 5: Sc around. (38)
Position the start of the following rounds at the heel.
Rnd 6: Sc in next 10, invisible dec ×6 across the toe, sc in final 16. (32)
Rnd 7: Sc in next 8, invisible dec ×5, sc in final 14. (27)
Rnd 8: Sc in next 7, invisible dec ×4, sc in final 12. (23)
Rnd 9: Sc around. (23)
Change to royal blue.
Rnd 10: Sl st around the opening. (23)
Fasten off.
The decrease section forms the rounded closed toe visible in the photograph.
Bootie Strap — Make 2
Join light blue at the outer side of one bootie.
Ch 14.
Row 1: Hdc in second ch from hook and across. (13)
Fasten off with a 20 cm tail. Sew the loose strap end securely to the opposite side of the bootie rather than using a detachable button.
Repeat on the second shoe in mirrored placement.
Six-Petal Shoe Flowers — Make 2
Yarn: light sky blue
Rnd 1: 12 sc in MR. (12)
Rnd 2: Sl st in next st, then in the following st work ch 2, 3 dc, ch 2, sl st. Repeat around until six petals are formed.
Fasten off with a 20 cm tail.
Sew one flower to each strap. Instead of the pearl-like object visible in the photo, embroider the center with several compact white yarn stitches.
Add one red, white, or royal-blue mini heart near the toe or outer side of each shoe.
Assembly
- Lay the finished yoke flat and confirm that both armhole sections contain the same 18 skipped stitches.
- Measure the joined bodice at the chest before continuing; the reconstruction targets roughly 48 cm circumference.
- Finish both sleeves and compare their 36-stitch blue ruffle rounds before adding contrasting borders.
- Work the 120-stitch support skirt and place markers in the reserved front loops of Rnds 3, 8, and 13.
- Attach the upper, middle, and lower ruffles in that order so later tiers do not obstruct the earlier attachment lines.
- Add all white shell borders and royal-blue slip-stitch outlines before sewing any heart appliqués.
- Pin the hearts across the bodice and skirt, keeping red, white, and royal blue from forming unintended vertical columns.
- Thread the waist cord, secure the two 3 cm pom-poms through their cores, and trim their surfaces evenly.
- Stitch the bow to the headband through several rows of the band, then attach its heart motifs.
- Finish both booties, straps, flowers, and textile centers; weave every tail on the wrong side and inspect all attached motifs.
The completed set consists of one tiered dress, one bow headband, and two matching booties.
7 Technical Tips
- Marker drift: Put a locking marker into the first stitch of every skirt support round. A one-stitch drift at Rnd 8 or Rnd 13 makes the ruffle attachment line creep diagonally around the dress.
- Ruffle bulk: Each 120-stitch attachment line increases to 180 stitches, a 1.5:1 ruffle ratio. Increasing to 240 by mistake produces a much denser hem and adds unnecessary weight at the waist.
- Invisible decreases: Use the front-loop invisible decrease for bootie Rnds 6–8. A standard sc2tog leaves a visible horizontal ridge across the toe.
- Heart placement: Pin every appliqué before sewing and leave at least 2 cm between neighboring heart edges on the bodice. Sewing motifs immediately can create an uneven concentration on one side.
- Yarn substitution: The photographed fabric reads as smooth DK rather than velvet or chenille. If a thicker yarn is substituted, measure the 48 cm target chest rather than relying only on the written stitch count.
- Pinning distortion: Pin skirt hearts through the ruffle and only the layer immediately beneath it. Catching several tiers in one sewing pass compresses the overlap and creates vertical puckers.
- Tail weaving: Weave appliqué tails at least 3 cm through stitches on the wrong side, change direction, then travel another 2 cm. A single straight weave can loosen during repeated garment movement.
Conclusion
Block the finished dress flat, then check chest circumference, total length, sleeve symmetry, and all three ruffle drops before trimming the final yarn tails. The next practical step is to photograph the set laid flat so the heart spacing and tier alignment can be checked from directly above. Save that image to Pinterest and post the finished set on Instagram with #BlueHeartBabyDress, noting any gauge or size changes that affected your version. This blue crochet baby dress pattern is built around a 3–6 month reference, so record your final measurements if you plan to scale it. Would you keep all three skirt tiers, or reduce the construction to two for a lighter hem?









