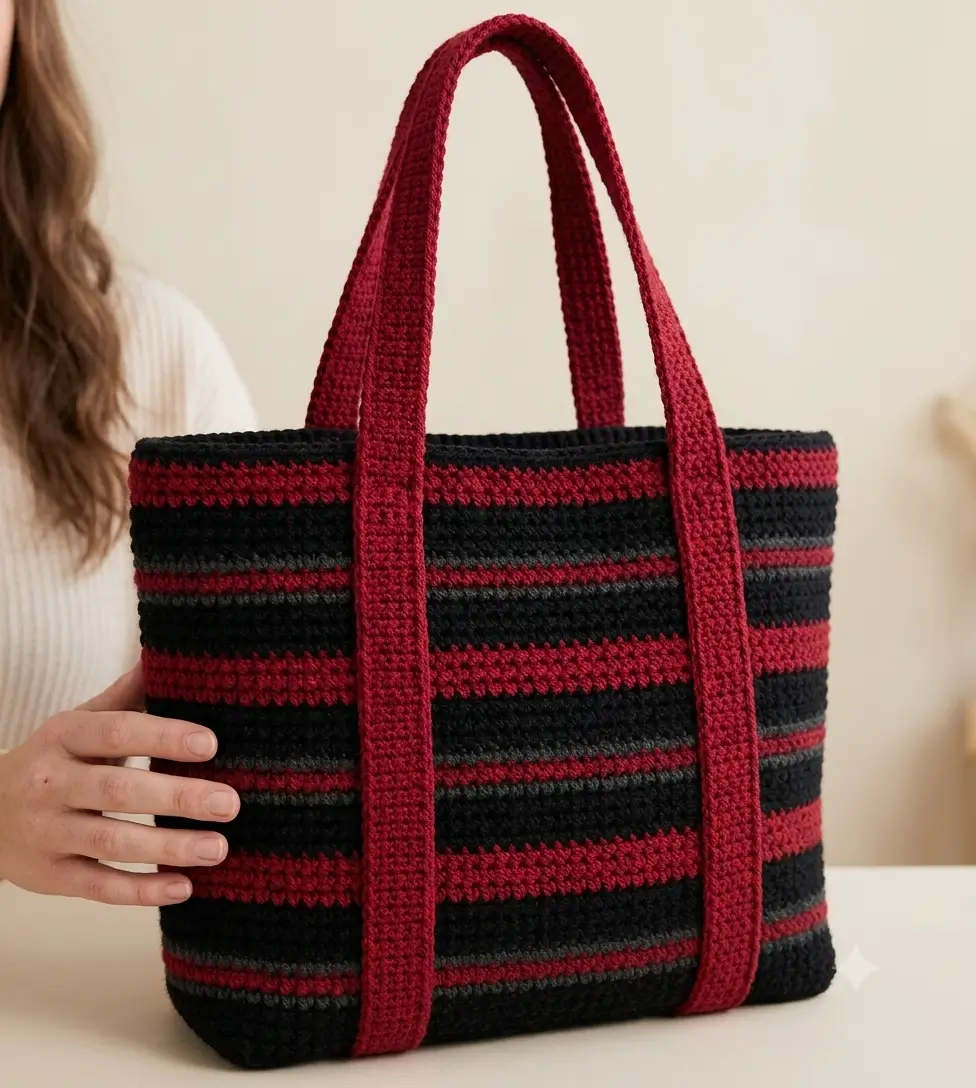
The red handles on this tote do more than carry it: they run almost to the bottom edge and act as external reinforcement. This striped crochet tote bag pattern reconstructs that feature with worsted cotton, a 5 mm hook, and a finished target near 34 × 29 cm. The project suits an intermediate beginner comfortable with color changes and produces a practical shoulder bag with a dense, load-bearing body.
The Design: What Makes This Striped Tote Different
Three structural choices separate this bag from a basic market tote. First, the rectangular base gives the lower edge enough depth to stand rather than collapsing into a flat envelope. Second, dense single crochet controls stretching; the photograph shows very little open space between stitches. Third, each burgundy handle continues far down the exterior, transferring load through the body instead of concentrating stress at four points along the rim.
That last detail matters. A crochet tote bag pattern with straps stitched only to the upper edge can distort when loaded. Here, the long attachment zone distributes tension vertically.
The most common mistake with a striped crochet bag is changing colors inconsistently at the round join. Each transition should occur at the same side edge so the visible front remains uninterrupted.
Project Info at a Glance
| Skill Level | Time | Finished Size | Hook | Best For |
|---|---|---|---|---|
| Intermediate beginner | 9–12 hours | Approx. 34 × 29 × 8 cm | 5 mm | Everyday shoulder tote |
The finished measurements are based on the proportions of the reference tote and a dense worsted-weight construction. Small differences in gauge can change the final width and height.
Materials and Tools
Yarn
Use smooth cotton or a firm cotton blend rather than a highly elastic fiber. Worsted/#4 yarn provides enough structure for the dense fabric shown in the reference.
- Black: worsted/#4 cotton — approximately 200–220 g
- Burgundy/deep red: worsted/#4 cotton — approximately 140–160 g
- Charcoal gray: worsted/#4 cotton — approximately 25–35 g
Tools
- 5 mm crochet hook
- 4 locking stitch markers
- Blunt tapestry needle
- Scissors
- Tape measure
- Pins or removable markers for handle placement
- Optional cotton fabric for lining
Abbreviations
- ch — chain
- sc — single crochet
- sl st — slip stitch
- st/sts — stitch/stitches
- BLO — back loop only
- RS — right side
- WS — wrong side
The invisible decrease used in shaped amigurumi is not required here because the tote body maintains a fixed circumference after the base is established.
Gauge
Target approximately 14 sc × 16 rows = 10 cm in dense single crochet.
More important than matching row gauge exactly is producing fabric that resists opening when stretched horizontally.
Make a 12 cm swatch before starting. If 14 stitches measure substantially more than 10 cm, change to a 4.5 mm hook. If the swatch is too narrow and rigid, test a 5.5 mm hook.
Pattern — Step by Step
The body is worked from a rectangular base and then upward in joined rounds so the stripe transitions can be controlled at one side.
Rectangular Base
Yarn: black.
Ch 41.
Row 1: Sc in second ch from hook and across. (40)
Rows 2–12: Ch 1, turn, sc across. (40)
Do not fasten off.
The base should measure approximately 28–29 cm long and 8 cm deep after light blocking. Small gauge differences are acceptable, but both long edges must contain the same number of usable stitch positions.
Setup Round
Continue in black.
Round 1: Ch 1. Sc 40 across the long edge, place 8 sc evenly across the short edge, sc 40 across the opposite long edge, then place 8 sc evenly across the final short edge. Join with sl st. (96)
Place the primary stitch marker at the join.
Lower Black Band
Rounds 2–7: Ch 1, sc in every st around, sl st to first sc. (96)
Keep the join positioned along one side edge.
Lower Burgundy Band
Change to burgundy on the final yarn-over of Round 7.
Rounds 8–10: Sc around. (96)
The color change should be completed before the first burgundy stitch rather than after the round has already closed.
Black Band
Change to black.
Rounds 11–16: Sc around. (96)
Gray Separator Stripe
Change to charcoal gray.
Rounds 17–18: Sc around. (96)
Burgundy Narrow Stripe
Change to burgundy.
Rounds 19–20: Sc around. (96)
Gray Separator Stripe
Change to charcoal.
Rounds 21–22: Sc around. (96)
Black Central Band
Change to black.
Rounds 23–28: Sc around. (96)
Do not carry burgundy behind all six rounds. Cut it with a 12 cm tail and weave it into the matching band later.
Wide Burgundy Band
Change to burgundy.
Rounds 29–32: Sc around. (96)
This four-round band should read more strongly than the narrow two-round separator stripes.
Upper Black Band
Change to black.
Rounds 33–38: Sc around. (96)
Gray Stripe
Change to charcoal.
Rounds 39–40: Sc around. (96)
Burgundy Stripe
Change to burgundy.
Rounds 41–42: Sc around. (96)
Gray Stripe
Change to charcoal.
Rounds 43–44: Sc around. (96)
Upper Black Band
Change to black.
Rounds 45–50: Sc around. (96)
Wide Burgundy Upper Band
Change to burgundy.
Rounds 51–54: Sc around. (96)
Black Rim
Change to black.
Rounds 55–57: Sc around. (96)
Round 58: Sl st loosely in every stitch around. (96)
Fasten off and leave a 15 cm tail.
The final slip-stitch round reduces flare at the opening. Work it loosely; an overly tight rim will pull the upper corners inward.
Long Shoulder Handles — Make 2
Yarn: burgundy.
The handles are intentionally wide because they form the strong vertical burgundy bands visible on the front and back of the tote.
Ch 8.
Row 1: Sc in second ch from hook and across. (7)
Rows 2–150: Ch 1, turn, sc across. (7)
Measure after approximately Row 130. Continue until the strip measures about 82–88 cm unstretched.
Fasten off with a 35 cm sewing tail.
Make the second handle to exactly the same measured length rather than relying only on row count. Differences in tension accumulate significantly over 150 rows.
Optional Handle Edge Reinforcement
Join burgundy at one lower corner.
Edge 1: Sl st evenly along the full long edge.
Fasten off.
Repeat along the opposite long edge.
This treatment limits lateral spreading and gives the strap edges a more defined appearance.
Handle Placement
Flatten the tote with its side joins centered at the folds.
Mark the center of the front panel. Position the inner edges of the two vertical strap sections approximately 11–12 cm apart. Repeat the placement on the back.
Each handle should begin roughly 1.5–2 cm above the bottom edge, run vertically toward the opening, continue into the shoulder loop, then descend along the same position on the opposite face.
Pin the entire attachment area before sewing.
The long exterior attachment zones are important. They distribute carrying tension across a much larger section of the tote than handles attached only along the upper rim.
Sewing the Handles
Use burgundy yarn and a tapestry needle.
Sew up one edge of the strap from approximately 2 cm above the base to the upper rim. Work through the strap and bag fabric without catching the opposite side of the tote.
Cross the strap width at the top attachment point.
Sew down the opposite edge.
Add a second horizontal reinforcement line approximately 2 cm below the rim. Repeat at the lower attachment point.
Use the same method for all four vertical handle sections.
Avoid stretching the handle while pinning or sewing. If one strap is installed under tension and the other is relaxed, the tote will twist when suspended.
Optional Lining
A lining is not visible in the reference, so it is not required for visual accuracy. It is useful when the bag will carry keys, pens, books, or other objects that concentrate pressure on individual crochet stitches.
Cut two cotton rectangles approximately 1.5 cm wider than the flattened bag on each side. Add seam allowance, sew the side and bottom seams, then box the lower corners to correspond with the 8 cm crochet base.
Insert the lining with the wrong sides together.
Turn its upper raw edge under and hand-sew it approximately 1 cm below the black rim. Keep lining stitches independent of the exterior handle stitches.
Assembly
- Block the rectangular base lightly before evaluating its dimensions.
- Work the 96-stitch body upward and keep every color transition at the same side edge.
- Finish the opening with the black rim and loose slip-stitch round.
- Weave stripe tails horizontally into yarn of the same color.
- Crochet two burgundy handles to equal measured lengths.
- Flatten the bag and mark its exact front and back centers.
- Pin both handle sections symmetrically, starting 1.5–2 cm above the base.
- Sew both long edges of every vertical handle section to the body.
- Add horizontal reinforcement stitches at the upper and lower ends of each attachment zone.
- Remove markers, check the opening for distortion, and block according to the yarn manufacturer’s instructions.
The completed tote should have a rectangular profile, dense striped fabric, and two burgundy straps visually connecting the lower body to the shoulder loops.
7 Technical Tips for a Stronger Crochet Tote
- Mark the round join every time. Losing the first stitch by even one position shifts the color-change seam diagonally across the side instead of keeping it vertical.
- Maintain a dense gauge. At approximately 14 sc per 10 cm, the fabric should resist localized stretching without becoming excessively rigid.
- Do not over-tighten the slip-stitch rim. If the 96-stitch opening contracts by more than about 2 cm compared with the round beneath it, redo the edging with looser tension.
- Measure both handles under zero tension. A difference of even 1.5 cm can make one side of the loaded bag hang lower.
- Pin every 5–7 cm along each handle attachment. Sparse pinning allows the strap to creep upward during sewing and produces unequal vertical bands.
- Keep color changes at the side fold. A join that moves three or four stitches onto the front panel becomes conspicuous because the horizontal stripes should remain visually uninterrupted.
- Weave each stripe tail for at least 5 cm through matching stitches. Short vertical tails can migrate into a contrasting band, particularly where narrow gray and burgundy stripes meet black.
Why Cotton Works for This Tote
Fiber choice affects the final silhouette. The reference shows a bag with relatively straight sides and substantial handles rather than a loose mesh body.
Worsted cotton or a firm cotton blend provides a useful baseline for this construction. Cotton has less spring than many acrylic yarns, which helps the rectangular body retain its intended shape.
Acrylic can be substituted, but a springy acrylic may stretch more in the handles. If acrylic is used, consider adding cotton webbing or woven tape behind the shoulder section.
The dense stitch structure matters just as much as fiber. Large hooks create faster fabric but also larger spaces between stitches. For this particular sturdy crochet tote, compact single crochet better matches the photographed surface.
Adjusting the Size
To make the bag wider, add stitches to the starting chain in pairs and retain the same base depth. Every additional four starting stitches adds eight stitches to the final body circumference because both long sides become wider.
For extra depth, add rows to the rectangular base before working the setup round. Place the same number of stitches along both short ends.
Height is simpler. Add or remove full rounds within the broad black sections rather than changing the narrow separator stripes. That preserves the stripe hierarchy of the original design.
Handle length should be adjusted last. For a shorter hand-carry tote, remove enough rows to reduce the free shoulder loop while retaining the long vertical attachment sections. Do not shorten the structural attachment area merely to reduce handle height.
Conclusion
The defining structural detail of this striped crochet tote bag pattern is the handle placement: the burgundy straps extend down the exterior instead of depending on four small attachment points at the opening. Keep the body at 96 stitches, maintain the narrow gray separators, and measure both handles before sewing them in place. Your next step is to crochet and measure a 12 cm gauge swatch in black worsted cotton before starting the base. Save the finished tote to Pinterest and share your version on Instagram with #BurgundyStripeTote. Which stripe would you change first: the narrow charcoal separators or the wide burgundy bands?









