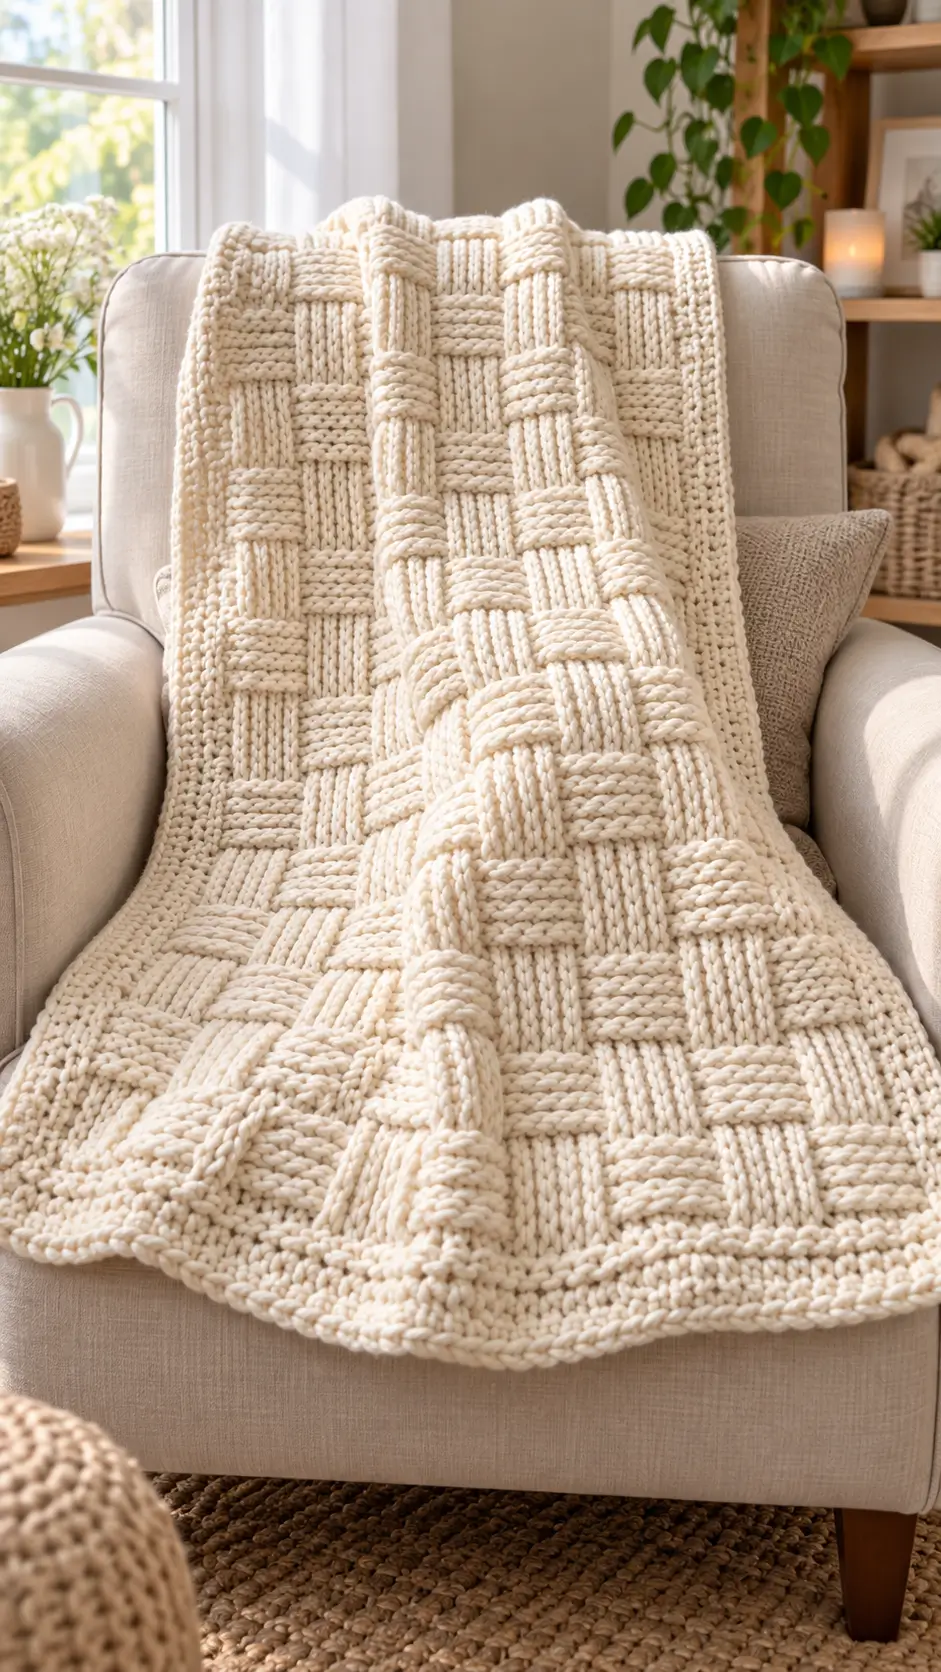
Chunky Basketweave Knit Blanket Pattern: Textured Cream Throw
Basketweave only looks woven; every raised cream block in this blanket is produced by changing the orientation of knit and purl texture. This chunky basketweave knit blanket uses jumbo yarn, large needles, and repeating blocks to create a substantial throw measuring approximately 127 × 152.5 cm. The construction suits an advanced beginner who can knit and purl confidently, while the modular repeat makes both width and length adjustable.
The Design: What Makes This Basketweave Blanket Different
The photographed blanket depends on scale. Instead of small basketweave squares, the design uses oversized blocks so individual columns remain clearly visible through the thick cream yarn. This gives the finished fabric its distinctive woven appearance without cables or separately knitted strips.
Block proportion is the first structural decision. Each basket should appear approximately square after the fabric relaxes, which means the number of rows does not necessarily equal the number of stitches. Gauge controls that relationship.
Alternating stockinette-facing and reverse-stockinette-facing sections creates the raised and recessed effect. A substantial textured border also stabilizes the perimeter. One common mistake when knitting a basketweave blanket is choosing block dimensions before making a gauge swatch. Intended squares can quickly become narrow rectangles when stitch gauge and row gauge differ.
Project Info at a Glance
| Skill Level | Time | Finished Size | Needles | Best For |
|---|---|---|---|---|
| Advanced beginner | Multi-session project | Approx. 127 × 152.5 cm | 25 mm reference | Sofa throw or bed layer |
The finished measurement and needle size are based on comparable published jumbo basketweave blanket specifications. Final dimensions depend on yarn, gauge, block size, and individual knitting tension.
Materials and Tools
Yarn
- Cream or natural jumbo yarn — approximately 2,000 g as a reference quantity for a large throw.
A smooth jumbo yarn works particularly well because the vertical knit stitches and horizontal purl ridges remain visible. Very fuzzy yarn can obscure the basketweave structure.
Another option is to hold two strands of chunky yarn together. This produces substantial fabric while giving you a wider choice of yarn brands and fibers. Always make a gauge swatch with the exact yarn combination you intend to use before calculating the final quantity.
Tools
- 25 mm circular knitting needles with a long cable
- Jumbo cream yarn
- Large-eye yarn needle
- Locking stitch markers
- Scissors
- Flexible measuring tape
- Row counter
Circular needles are recommended even though the blanket is worked flat. The cable carries the weight of the growing fabric and is easier to handle than very long straight needles.
Abbreviations
- K — knit
- P — purl
- st — stitch
- sts — stitches
- RS — right side
- WS — wrong side
- rep — repeat
- CO — cast on
- BO — bind off
No increases or decreases are required inside the main basketweave field. The relief comes from changing groups of knit stitches to purl stitches at regular intervals.
Understanding the Basketweave Construction
The photographed blanket should be treated as a design reference rather than an exact published pattern. The most reliable way to reproduce its appearance is to calculate the block repeat from your own gauge.
A simple large-scale basketweave repeat can begin with groups such as:
K8, P8
The following block section reverses the arrangement:
P8, K8
These two arrangements exchange the raised and recessed sections. Once repeated vertically and horizontally, the fabric creates the illusion that broad knitted strips pass over and under one another.
Eight stitches are only a starting point. Six, eight, ten, or twelve stitches can form each block depending on yarn thickness and the scale required.
Why the Gauge Swatch Matters
Stitch gauge and row gauge are rarely identical. This matters more in basketweave knitting than in many simple blanket patterns because the blocks need balanced proportions.
Suppose eight stitches measure 18 cm across, while eight rows measure only 13 cm vertically. Working eight stitches by eight rows would produce a rectangle rather than a square.
Instead, continue knitting the block until its height approaches 18 cm.
This measurement determines how many rows should be worked before reversing the knit and purl sections. Record the result because every basketweave section should use the same row count.
Chunky Basketweave Knit Blanket Pattern
Construction: Worked flat in one piece.
Color: Cream or natural.
Target finished size: Approximately 127 × 152.5 cm.
Needles: 25 mm circular needles as a starting reference. Change needle size if required to produce the desired fabric.
Gauge Swatch
Cast on enough stitches to create at least three complete basketweave blocks plus several edge stitches.
Work alternating knit and purl blocks until the swatch is large enough to measure without including distorted edge stitches.
Measure the following:
- Stitches per 10 cm
- Rows per 10 cm
- Width of one complete basketweave block
- Height of one complete basketweave block
Adjust the number of rows in each block section until its height is close to its width.
Calculate the Cast-On
Calculate the number of stitches required for the desired blanket width using your measured gauge.
Use this formula:
Stitches per centimetre × desired width in centimetres = approximate stitch count.
Adjust the central stitch count so it contains complete basketweave blocks. Then add the required border stitches.
For example, if each basketweave block contains 8 stitches, the central panel should contain a multiple of 16 stitches when the design alternates K8 and P8 across each row.
Lower Border
Cast on the calculated number of stitches.
Work approximately 7–10 cm in a non-curling border stitch. Seed stitch works particularly well with basketweave because it creates a stable perimeter without competing strongly with the central texture.
For seed stitch:
Row 1: K1, P1 across.
Row 2: Purl the knit stitches and knit the purl stitches as they face you.
Repeat these rows until the lower border reaches the required depth.
Basketweave Section A
Keep the side border stitches in the established border pattern throughout the blanket.
Across the central field:
Row 1 (RS): *K8, P8; repeat from * across the central basketweave field.
Row 2 (WS): Work the stitches as required to maintain the established knit and purl blocks.
Rows 3 onward: Continue in the established pattern.
Work until the physical height of the blocks approximately matches their measured width.
If an 8-stitch block measures 17 cm wide, for example, continue Section A until it measures close to 17 cm high.
Basketweave Section B
Reverse the orientation of every block.
Next RS row: *P8, K8; repeat from * across the central field.
Maintain the side borders exactly as established.
Continue Section B for the same number of rows used for Section A.
The raised knit block should now sit above a recessed purl block. The neighboring column does the opposite. This alternating arrangement creates the woven appearance.
Main Blanket Repeat
Repeat Basketweave Section A followed by Basketweave Section B.
Continue maintaining the side borders without interruption.
Lay the blanket flat periodically and measure it without stretching. Jumbo yarn creates a heavy fabric, so measuring while the project hangs from the needles can produce an inaccurate length.
Continue until the main field and lower border measure approximately 7–10 cm less than the required finished length.
For a target length of 152.5 cm, stop the basketweave field early enough to add an upper border matching the lower border.
Always finish after a complete basketweave section. Stopping halfway through a block will interrupt the woven geometry.
Upper Border
Stop the basketweave repeat after completing the final full section.
Work the same border stitch used at the lower edge.
Continue until the upper border matches the physical depth of the lower border.
If the lower border measures 8 cm, make the upper border approximately 8 cm as well.
Bind off with relaxed tension. A tight bind-off can pull the upper edge inward and produce a trapezoid-shaped blanket.
How to Adjust the Blanket Width
The modular construction makes this chunky basketweave knit blanket easy to resize.
First measure the width of one block from your swatch. Multiply that measurement by the number of blocks required across the central panel, then add both side borders.
For example, if one block measures 15 cm and the central field contains eight blocks:
15 cm × 8 = 120 cm
Add a 5 cm border on each side:
120 cm + 5 cm + 5 cm = 130 cm finished width.
To make the blanket wider, add complete basketweave blocks rather than arbitrary individual stitches. This keeps the pattern symmetrical.
How to Adjust the Blanket Length
Length is controlled by repeating complete vertical basketweave sections.
Continue alternating Section A and Section B until the project approaches the required length. Reserve enough space for the final border.
If each block section measures 15 cm vertically, one complete A/B cycle adds approximately 30 cm.
For precise sizing, measure the actual fabric rather than calculating length entirely from row count. Heavy yarn can change slightly as the blanket grows.
Why Knit and Purl Create a Woven Effect
Stockinette has two visually different surfaces. Knit stitches form recognizable vertical V shapes on the right side. The reverse surface displays horizontal purl bumps.
Basketweave knitting places these contrasting textures next to each other in large blocks.
A knit-facing section looks smoother and more vertical. Its neighboring purl-facing section displays stronger horizontal ridges. When those surfaces reverse after several rows, the eye interprets the grid as strips crossing over and under one another.
No separate strips are actually woven.
This is why yarn selection has such a strong effect on the finished appearance. Smooth, thick yarn makes the orientation of each stitch easy to see. Highly fuzzy yarn can soften the distinction and make the basket pattern less defined.
Basketweave Knitting Versus Crochet Basketweave
Basketweave knitting and basketweave crochet produce similar geometric effects, but their construction is different.
Crochet basketweave commonly uses front-post and back-post double crochet stitches. These stitches wrap around the posts of previous stitches to create deep relief.
The knitted version uses groups of ordinary knit and purl stitches instead.
For the blanket shown in the reference image, the visible vertical V-shaped stitches and horizontal purl sections indicate a knitted construction rather than a traditional post-stitch crochet basketweave.
This distinction also changes yarn consumption, drape, tools, gauge, and written instructions. Use knitting needles rather than a crochet hook when recreating this particular look.
Finishing the Blanket
Cut the working yarn after binding off, leaving a generous tail.
Thread the tail through a large-eye yarn needle. Weave it through several neighboring stitches on the wrong side of the blanket.
Reverse direction before trimming the excess. Jumbo yarn can work loose more easily when a tail is woven in only one direction.
Avoid concentrating several thick tails in one small area because this can produce a visible lump.
Lay the finished blanket flat and check all four edges. Correct any loose tails before washing or blocking.
7 Technical Tips for a Cleaner Basketweave Blanket
- Mark every block boundary. A single misplaced knit-to-purl transition shifts the basket pattern by one stitch. Place stitch markers between blocks until the repeat becomes easy to identify visually.
- Measure block height rather than assuming equal stitch and row counts. Eight stitches do not automatically form a square with eight rows. If an 8-stitch block measures 18 cm wide, work enough rows to approach 18 cm in height.
- Check the blanket width after every two complete sections. Gradually tightening tension can make the upper part several centimetres narrower than the cast-on edge. Compare measurements while the fabric is lying flat.
- Keep the border at least several centimetres deep. An undersized border may allow the heavy central fabric to pull or curl at the perimeter. A 7–10 cm border gives a large throw a more stable frame.
- Do not pull jumbo stitches excessively tight. Excess tension compresses the purl blocks and makes large needles difficult to insert. If the fabric becomes rigid, test a larger needle before continuing the full blanket.
- Lay the blanket flat before measuring. The weight of jumbo yarn can stretch a hanging project and give a false length measurement. Measure on a flat surface without pulling either end.
- Weave each thick tail in two directions. A short, single-direction tail can migrate out of the fabric during use. Pass through several stitches, reverse direction, then trim the remaining yarn.
Choosing the Right Cream Yarn
The oversized appearance in the reference blanket requires substantial yarn. Jumbo weight is the closest single-strand option for reproducing the scale of the visible stitches.
A cream, ivory, oatmeal, or natural shade also emphasizes the pattern because shadows created by the raised blocks remain visible without competing color changes.
Look for a yarn with clear stitch definition. A smooth or lightly twisted construction will display both the knit V stitches and the horizontal purl ridges.
If jumbo yarn is unavailable, two strands of chunky yarn can be held together. Make a new gauge swatch when using this method because two strands of chunky yarn are not automatically equivalent to one specific jumbo yarn.
Preventing Uneven Basketweave Blocks
Most visible problems begin with changing tension rather than with the basketweave sequence itself.
Large needles exaggerate differences in stitch size. If the knitter gradually tightens the working yarn, blocks near the top can become smaller than those near the cast-on edge.
Measure one representative block after each complete A/B cycle. Compare its width with the original gauge swatch.
Also count the stitches in each block before beginning a reversal row. A misplaced transition can remain hidden inside bulky fabric until several rows have been completed.
Markers provide a simple checkpoint. Each marker should continue to sit exactly between two basketweave blocks throughout the central panel.
Final Size Check
Lay the completed blanket on a large flat surface.
Measure from the outside edges of the border rather than from the central basketweave panel. Check the width at the top, middle, and bottom.
Those three measurements should be reasonably close. A significant difference indicates that tension changed during knitting or that the bind-off was worked too tightly.
Next, measure the total length through the center of the blanket.
A finished size around 127 × 152.5 cm creates a substantial throw, but the modular pattern can be expanded or reduced by working complete blocks and complete vertical sections.
Conclusion
A successful chunky basketweave knit blanket depends on measured block geometry rather than copying an arbitrary stitch count. Swatch the selected jumbo yarn first, calculate complete blocks for the required width, and match each block’s row height to its knitted width. Keep the perimeter in a non-curling texture and check dimensions after every two complete basketweave sections. The next practical step is to knit a three-block swatch and record its centimetre measurements before purchasing the full yarn quantity. Save the finished blanket to Pinterest or share it on Instagram with #ChunkyBasketweaveBlanket. Would you keep the oversized rectangular baskets shown in the reference photo or reduce them to smaller square blocks?









