Introduction
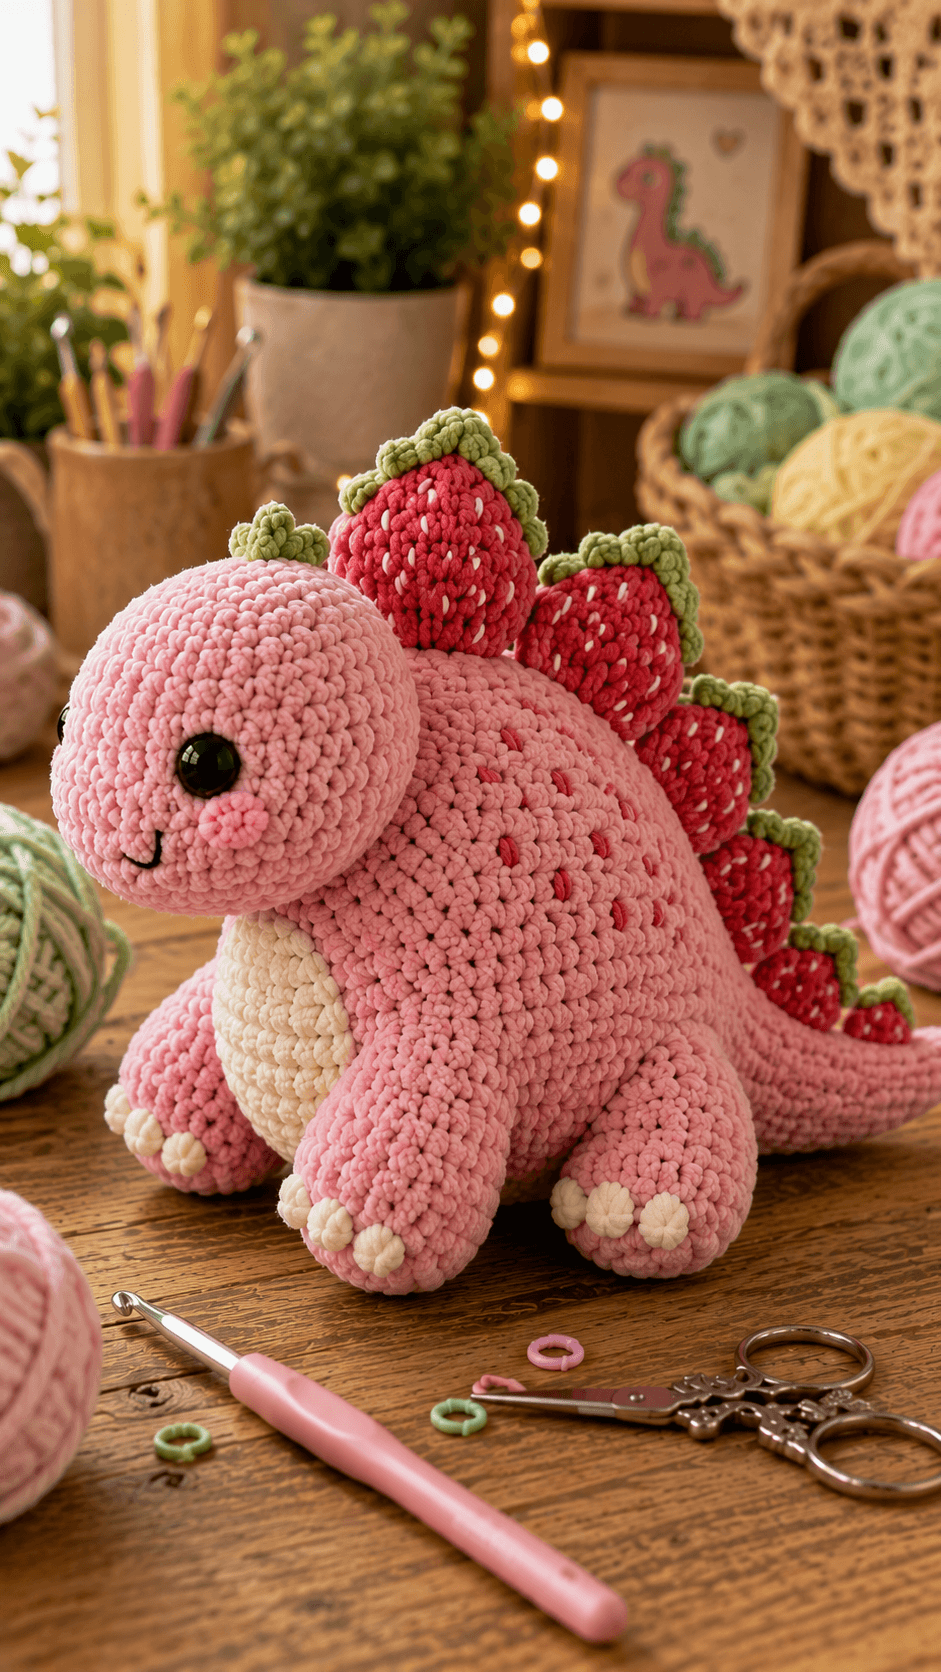
A stegosaurus plate normally rises like a thin shield; on this dinosaur every plate has to read as a stuffed strawberry instead. This strawberry stegosaurus amigurumi crochet pattern uses chunky chenille, a 5 mm hook and 12 mm eyes for a dinosaur approximately 30–35 cm long. Four legs, a cream belly, tapered tail and seven strawberry plates create the intermediate multi-piece construction.
The Design: What Makes This Strawberry Stegosaurus Different
The body reaches a 42-stitch plateau because the dinosaur needs enough width to support four substantial legs and a row of stuffed fruit plates. A smaller 36-stitch head keeps the face juvenile instead of making the front end as heavy as the torso. The tail narrows through four circumferences and extends beyond the final strawberry, preserving the long stegosaurus profile. Most important, the dorsal plates are built as strawberries in three graduated sizes. Red stuffed forms replace conventional flat blades, green caps create the leafy tops and short white embroidered stitches imitate seeds. This pink stegosaurus amigurumi also uses a cream chest panel and matching toe details to break up the large pink body. A frequent assembly mistake is spacing the strawberries evenly without accounting for size; the largest fruit belongs over the shoulder and mid-back, while smaller plates taper toward the tail.
Project Information at a Glance
| Skill Level | Time | Finished Size | Hook | Best For |
|---|---|---|---|---|
| Intermediate | 14–18 hours | Approx. 30–35 cm long | 5.0 mm | Dinosaur collections, fruit-themed plush and display pieces |
Materials and Tools
Yarn
- Dusty strawberry pink — super-bulky/chunky chenille — approximately 180–220 g — head, body, legs and tail
- Strawberry red — matching chenille — approximately 70–90 g — seven dorsal strawberries
- Sage green — chunky chenille — approximately 30–40 g — leafy strawberry caps
- Warm cream — chunky chenille — approximately 45–60 g — belly patch and toe details
- Bright pink — yarn scrap — cheeks
- White smooth yarn — small amount — strawberry seed embroidery
- Black embroidery yarn — small amount — smile
Tools
- 5.0 mm crochet hook
- Two 12 mm black safety eyes
- Polyester toy stuffing
- Large-eye yarn needle
- Locking stitch markers
- Dressmaking pins
- Scissors
A published chenille stegosaurus version uses super-bulky yarn with a 5 mm hook, while the same construction becomes roughly 9 cm when worked in sport cotton with a 2.5 mm hook. The material change alone can therefore alter finished size substantially.
Abbreviations
- MR — magic ring
- sc — single crochet
- inc — two single crochet stitches in one stitch
- dec — decrease over two stitches
- sl st — slip stitch
- ch — chain
- hdc — half double crochet
- dc — double crochet
- BLO — back loop only
- FLO — front loop only
An invisible decrease is worked through the front loops of the next two stitches before completing those loops together as one single crochet.
Pattern — Step by Step
Work all stuffed pieces in continuous spirals unless stated otherwise. Mark the first stitch of every round and verify the number in brackets before starting the next round.
Head
Yarn: dusty strawberry pink.
R1: 6 sc in MR (6)
R2: inc ×6 (12)
R3: (sc, inc) ×6 (18)
R4: (2 sc, inc) ×6 (24)
R5: (3 sc, inc) ×6 (30)
R6: (4 sc, inc) ×6 (36)
R7–R12: sc around (36)
R13: (4 sc, dec) ×6 (30)
Insert the 12 mm safety eyes between R9 and R10 with approximately seven visible stitches between their stems. Lock both washers before continuing.
R14: (3 sc, dec) ×6 (24)
R15: (2 sc, dec) ×6 (18)
R16: (sc, dec) ×6 (12)
R17: dec ×6 (6)
Stuff firmly after R13, concentrating filling around the forehead and sides. Keep the lower front slightly softer for face shaping.
Fasten off and leave a 35 cm sewing tail.
Body
Yarn: dusty strawberry pink. Large 42-stitch plateau.
R1: 6 sc in MR (6)
R2: inc ×6 (12)
R3: (sc, inc) ×6 (18)
R4: (2 sc, inc) ×6 (24)
R5: (3 sc, inc) ×6 (30)
R6: (4 sc, inc) ×6 (36)
R7: (5 sc, inc) ×6 (42)
R8–R14: sc around (42)
R15: (5 sc, dec) ×6 (36)
R16–R17: sc around (36)
R18: (4 sc, dec) ×6 (30)
R19: (3 sc, dec) ×6 (24)
R20: (2 sc, dec) ×6 (18)
Stuff firmly through R17. Maintain more density in the lower half because the four legs and strawberry plates add weight around the torso.
R21: (sc, dec) ×6 (12)
R22: dec ×6 (6)
Fasten off and leave a 45 cm structural tail.
Front Legs — Make Two
Yarn: dusty strawberry pink.
R1: 6 sc in MR (6)
R2: inc ×6 (12)
R3: (sc, inc) ×6 (18)
R4: (2 sc, inc) ×6 (24)
R5–R7: sc around (24)
R8: (2 sc, dec) ×6 (18)
R9–R11: sc around (18)
R12: (sc, dec) ×6 (12)
R13–R14: sc around (12)
R15: dec ×6 (6)
Stuff the paw section firmly and the upper third moderately. Flatten the upper attachment edge slightly.
Fasten off and leave a 35 cm tail.
Back Legs — Make Two
Yarn: dusty strawberry pink.
R1: 6 sc in MR (6)
R2: inc ×6 (12)
R3: (sc, inc) ×6 (18)
R4: (2 sc, inc) ×6 (24)
R5–R8: sc around (24)
R9: (2 sc, dec) ×6 (18)
R10–R12: sc around (18)
R13: (sc, dec) ×6 (12)
R14: dec ×6 (6)
Stuff firmly. Compress the lower section into a broad oval so the hind feet appear heavier than the front pair.
Fasten off and leave a 35 cm sewing tail.
Cream Toe Claws — Make Twelve
Yarn: warm cream. Make three for each foot.
R1: 6 sc in MR (6)
R2: sc around (6)
Fasten off without stuffing and leave a 10 cm tail.
Flatten each tiny piece and sew it against the front edge of a foot. Three cream toes should remain individually visible on each leg.
Cream Belly Patch
Yarn: warm cream. Work in rows.
Row 1: ch 3, 2 sc in second ch from hook (2)
Row 2: ch 1, turn, inc ×2 (4)
Row 3: ch 1, turn, inc, 2 sc, inc (6)
Row 4: ch 1, turn, inc, 4 sc, inc (8)
Row 5: ch 1, turn, inc, 6 sc, inc (10)
Row 6–Row 10: ch 1, turn, sc across (10)
Row 11: ch 1, turn, dec, 6 sc, dec (8)
Row 12: ch 1, turn, dec, 4 sc, dec (6)
Row 13: ch 1, turn, dec, 2 sc, dec (4)
Fasten off with a 30 cm tail.
Stretch the panel gently into a vertical oval before attachment.
Tail
Yarn: dusty strawberry pink.
R1: 6 sc in MR (6)
R2: inc ×6 (12)
R3: (sc, inc) ×6 (18)
R4: (2 sc, inc) ×6 (24)
R5–R7: sc around (24)
R8: (2 sc, dec) ×6 (18)
R9–R13: sc around (18)
R14: (sc, dec) ×6 (12)
R15–R20: sc around (12)
R21: dec ×6 (6)
R22–R27: sc around (6)
Stuff firmly at the 24-stitch base, moderately through the 18-stitch section and very lightly from R14 onward. The final six-stitch tip should remain flexible.
Fasten off and leave a 40 cm tail.
Cheek Patches — Make Two
Yarn: bright pink.
R1: 6 sc in MR (6)
Fasten off with a 12 cm tail. Stretch into a low oval during sewing.
Smile
Yarn: black embroidery yarn.
Embroider a small curved smile beneath and slightly inward from the visible eye line. Keep the curve approximately 1.5–2 cm wide.
Large Strawberry Plates — Make Two
Yarn: strawberry red.
R1: 6 sc in MR (6)
R2: inc ×6 (12)
R3: (sc, inc) ×6 (18)
R4–R7: sc around (18)
R8: (sc, dec) ×6 (12)
R9: sc around (12)
R10: dec ×6 (6)
Stuff firmly through the rounded centre. Shape the lower six-stitch section into a short point rather than a sphere.
Fasten off and leave a 30 cm sewing tail.
Medium Strawberry Plates — Make Three
Yarn: strawberry red.
R1: 6 sc in MR (6)
R2: inc ×6 (12)
R3: (sc, inc) ×6 (18)
R4–R5: sc around (18)
R6: (sc, dec) ×6 (12)
R7: dec ×6 (6)
Stuff firmly and leave a 25 cm sewing tail.
Small Strawberry Plates — Make Two
Yarn: strawberry red.
R1: 6 sc in MR (6)
R2: inc ×6 (12)
R3–R4: sc around (12)
R5: dec ×6 (6)
Stuff lightly and leave a 20 cm tail.
Large Green Strawberry Caps — Make Two
Yarn: sage green.
R1: 6 sc in MR (6)
R2: inc ×6 (12)
Work six leafy points around the outer edge:
*sl st in next st, ch 4, starting in second ch from hook: sl st, sc, hdc; sl st into next base st.*
Repeat six times.
Fasten off and leave a 20 cm tail.
Medium Green Strawberry Caps — Make Three
Yarn: sage green.
R1: 6 sc in MR (6)
For each of six stitches:
ch 3, starting in second ch from hook: sl st, sc; sl st into the next base stitch.
Fasten off and leave a 15 cm tail.
Small Green Strawberry Caps — Make Two
Yarn: sage green.
R1: 6 sc in MR (6)
Work three short leafy points:
*ch 3, sl st in second ch, sc in next ch, sl st into next 2 base stitches.*
Repeat three times.
Fasten off with a 15 cm tail.
Strawberry Seeds
Yarn: smooth white yarn.
Embroider short vertical stitches approximately 5–8 mm long across the red surface of each plate.
Use approximately:
- Large strawberry — 10–12 seeds each
- Medium strawberry — 7–9 seeds each
- Small strawberry — 4–6 seeds each
Stagger the seed positions rather than creating straight rows.
Assembly
- Sew the head to the front upper body first. Angle it slightly forward so the rounded snout projects beyond the chest without pointing downward.
- Position the cream belly patch vertically across the front body and sew around its complete perimeter before the front legs restrict access.
- Attach the pink cheek patches below the eyes and embroider the small black smile. Keep both cheek centres approximately level.
- Sew the two front legs beneath the shoulder area, then attach the broader rear legs lower and farther back. Test all four contact points on a flat table before tightening the seams.
- Attach three cream toe claws to the front of every foot. Keep the toe pieces close enough to form a cluster without overlapping.
- Sew the tail to the rear body with the thick 24-stitch section at the base. Angle it backward and slightly upward before letting the flexible tip descend toward the table.
- Complete all seven strawberries by sewing the appropriate green cap to the broad rounded end and embroidering the white seed stitches before mounting them on the dinosaur.
- Pin the two largest strawberries along the upper shoulder and mid-back, then add the three medium pieces behind them and the two smallest strawberries toward the tail.
- Sew every strawberry to the dinosaur through a broad base seam, adding one hidden side anchor where necessary so the stuffed fruit does not rotate.
- Place the completed stegosaurus on a level surface, correct any leg height, tail rotation or leaning strawberry plate, then weave all structural tails through at least three stitch directions.
The finished dinosaur should sit securely on four legs with the head forward, cream belly visible and seven red strawberry plates decreasing gradually in size toward the tail.
7 Technical Tips
- Strawberry rotation: A stuffed plate sewn through fewer than four body stitches can turn sideways. Spread each large strawberry seam across approximately 5–7 body stitches and add one hidden side anchor.
- Body sag: Seven stuffed plates place significant weight across the 42-stitch torso. Fill the lower body until firm finger pressure compresses it by no more than approximately 5–8 mm.
- Decrease holes: Plush chenille can expose stuffing along head, body and strawberry reductions. Work every decrease through the front loops of the next two stitches.
- Uneven legs: A height difference of roughly 5 mm can make the dinosaur rock diagonally. Pin all four legs before permanently sewing any one leg completely.
- Tail droop: Firm stuffing through the final 12- and 6-stitch sections creates a rigid tail. Reduce the filling after R14 and leave the narrow tip almost empty.
- Seed distortion: White embroidery pulled too tightly dents the red fruit surface. Each 5–8 mm seed should rest on the chenille rather than cinching it inward.
- Toe crowding: Three cream claws sewn on top of each other create one white lump. Leave approximately one pink stitch of visible foot surface between neighboring toe centres.
Shaping the Large Stegosaurus Body
The body is the load-bearing part of this strawberry stegosaurus amigurumi crochet pattern. A current 2024 stegosaurus pattern reaches a 42-stitch plateau, which also suits the larger proportions visible in the supplied image.
Seven plain rounds at 42 stitches provide room for the belly patch, four limb seams and multiple dorsal attachments. Reducing too early would narrow the back before the largest strawberry plates are positioned.
Stuff the lower half first and test the torso on the table before closing it. A firm lower centre keeps the dinosaur upright even after the fruit plates add weight above the spine.
Building the Rounded Head
The head stops at 36 stitches rather than matching the 42-stitch torso. That difference creates the smaller stegosaurus head expected from the silhouette while retaining enough width for large glossy eyes and cheeks.
Keep the front profile smooth. The reference does not use a separate muzzle, nostril piece or horn.
Install both eyes before the first decrease. Once the opening drops below 24 stitches, reaching the washers becomes difficult through chunky chenille.
Making the Strawberry Plates
Conventional stegosaurus patterns often grade their plates through several sizes instead of repeating one identical piece. Lucy Kate Crochet, for example, uses tiny, small, medium, large and long dorsal elements.
The same principle is used here, but every plate becomes a stuffed fruit. Two large strawberries establish height around the shoulder and mid-back. Three medium pieces continue along the torso, then two small strawberries taper into the tail line.
Do not make the rear fruit the same size as the shoulder fruit. Graduated scale is what preserves the dinosaur silhouette beneath the novelty strawberry theme.
Shaping Each Strawberry
The red fruit begins like a round amigurumi piece but narrows toward a six-stitch point. Push stuffing into the upper rounded section while keeping the final reduction area comparatively firm and narrow.
Before closing, roll the red piece between the palms. The broad end should remain rounded while the lower end forms a short taper.
Attach the green cap to the broad end rather than the point. This orientation lets the fruit appear upright as a strawberry while the pointed red end meets the dinosaur’s back.
Adding the Green Leafy Caps
The green sections create the strongest fruit cue after the red color. Their projecting chain-built points need to remain visible beyond the top circumference of each strawberry.
Place the green piece over the broad red end and secure its central ring first. Add small stitches at the bases of selected leaf tips rather than sewing every edge flat.
For the rear small strawberries, use fewer and shorter leafy points. Large green caps on tiny tail fruit would make the dorsal row look heavier toward the rear instead of tapering.
Embroidering Strawberry Seeds
Short white stitches create the seed pattern visible in the photograph. Add them before sewing each strawberry to the dinosaur so every side remains accessible.
Stagger the stitches diagonally. Regular horizontal rows make the fruit look patterned rather than organic.
The largest strawberry can carry roughly twice as many visible seeds as the smallest. Maintain that density difference so the small tail plates do not become covered in white yarn.
Constructing the Cream Belly
The cream patch begins narrow, expands to ten stitches and then narrows again. That creates a long oval without needing to crochet a circular disk and distort it during sewing.
Position the top edge below the neck and allow the lower edge to disappear partially between the front and rear legs.
Sew the patch before attaching the limbs. Working around a cream panel after four chunky legs are installed creates unnecessary distortion near the lower edge.
Building the Four Legs
The front and rear legs share a 24-stitch maximum, but the rear pair stays wide for one additional round. This produces subtly heavier hindquarters.
Stuff each lower foot firmly. Reduce density toward the upper seam so the leg can conform to the body curve.
All four feet need to contact the table. Do not assume identical round counts will create identical physical height; chenille tension can change between pieces.
Adding the Cream Toes
The reference uses three pale toe details on each visible foot. Twelve tiny six-stitch pieces reproduce that structure without embroidering broad white lines across the pink legs.
Flatten every toe before sewing. Place three around the forward-facing arc of the paw and keep their attachment seams hidden on the underside.
If the toe pieces become too bulky in your yarn, substitute three short cream embroidered loops per foot while retaining the same positions.
Constructing the Tail
The tail begins with a 24-stitch base and narrows through 18, 12 and finally 6 stitches. That staged taper avoids an abrupt cone.
The base needs enough stuffing to stay aligned with the body, but the narrow tip should remain flexible. A slight curve toward the table matches the supplied posture.
Attach the two smallest strawberry plates before the tail becomes too narrow. The final section should remain mostly pink so the pointed dinosaur tail is still recognizable.
Working with Chunky Chenille
DIY Fluffies demonstrates how dramatically yarn changes stegosaurus scale: the same design measures about 9 cm in sport cotton and roughly 22 cm in super-bulky chenille. A 5 mm hook is used for that chenille version.
Mark the first stitch through both top loops. Plush fibers can obscure the round transition, particularly during the seven 42-stitch body rounds.
Count every plateau round. An accidental 41- or 43-stitch body may not be obvious until the legs or belly panel are aligned.
Choosing Safety Eyes
Published stegosaurus patterns use smaller eyes such as 6, 8 and 10 mm when worked in sport or worsted yarn. The supplied dinosaur is substantially chunkier, so 12 mm is an appropriate photo-matched starting point.
Test both eyes against the completed 36-stitch head before installing the washers. If the chenille is especially thick, 14 mm may match the apparent scale better.
For a toy intended for a recipient for whom plastic eyes are unsuitable, embroider the eye shapes instead.
Adjusting Finished Size
To make a smaller strawberry stegosaurus, retain the stitch counts and switch to worsted yarn with approximately a 3.5–4 mm hook. Shrinking by yarn substitution keeps all seven strawberries proportional to the dinosaur.
For a larger version, use thicker blanket yarn and a matching hook before expanding beyond the 42-stitch body maximum. Increasing only the torso would require wider limbs, a larger belly panel and substantially larger fruit plates.
Finish one medium strawberry first when resizing. Its height should remain clearly smaller than the head but large enough to read as a separate dorsal plate.
Planning the Strawberry Row
Pin all seven fruits before sewing any of them. Begin with the largest plate immediately behind the head, then distribute the second large and three medium strawberries over the widest torso area.
The final two small pieces belong along the narrowing back and tail. Keep visible pink gaps between neighboring red fruits.
View the arrangement from the side as well as above. Each strawberry needs its own silhouette; overlapping fruits can make the entire dorsal row look like one red ridge.
Competition and Design Gap
Stegosaurus crochet is a crowded market category. Etsy currently lists hundreds of relevant results, with several conventional, no-sew and novelty designs showing thousands of marketplace engagements.
Strawberry dinosaurs are also established. A current Etsy listing specifically combines Strawberry Stegosaurus and Flower Blossom Stegosaurus versions.
The supplied reference differentiates the concept through highly dimensional strawberry plates, white seed embroidery, leafy green crowns, a cream belly and large plush proportions. Those features need to remain visually separate in both the pattern instructions and finished photography.
Finishing Checks
Set the completed dinosaur on a hard surface first. All four legs should make contact without the belly pressing directly against the table.
View the head from the front. Both eyes need comparable height, the pink cheeks should remain balanced and the smile must stay small relative to the face.
Inspect the dorsal row last. Seven strawberries should remain individually readable, the largest fruit should sit toward the front half and the final pieces should decrease toward the tail.
Conclusion
Measure the finished dinosaur from the nose to tail tip, then record the height of the largest strawberry plate separately. Those two measurements make another version easier to reproduce when changing chenille brands. Photograph the finished piece from a low three-quarter angle to check all four legs, the cream belly and the graduated fruit row. Save this strawberry stegosaurus amigurumi crochet pattern to Pinterest and share the completed plush on Instagram with #StrawberryStegosaurus. Reshape every green cap before the final photograph. For another version, would you keep all seven plates as red strawberries or alternate strawberries with pink blossoms?
Sources
- DIY Fluffies — Brodie the Stegosaurus: sport-weight 9 cm and super-bulky chenille 22 cm versions; 5 mm hook for chenille.
- The Kindness Company — Stacey the Stegosaurus: 2024 free pattern with 42-stitch body plateau, four legs and video tutorial.
- Storyland Amis — Free Stegosaurus Dinosaur Amigurumi: worsted yarn, 4 mm hook, 10 mm eyes and approximately 18 × 13 cm finished dimensions.
- Lucy Kate Crochet — Colorful Crochet Stegosaurus: multiple graduated dorsal plate sizes.
- Ravelry — Stegosaurus Dinosaur Amigurumi: worsted/DK yarn quantities and 10 mm eye reference.
- Etsy — current Strawberry Stegosaurus and Stegosaurus Crochet marketplaces for competition research.









