Introduction
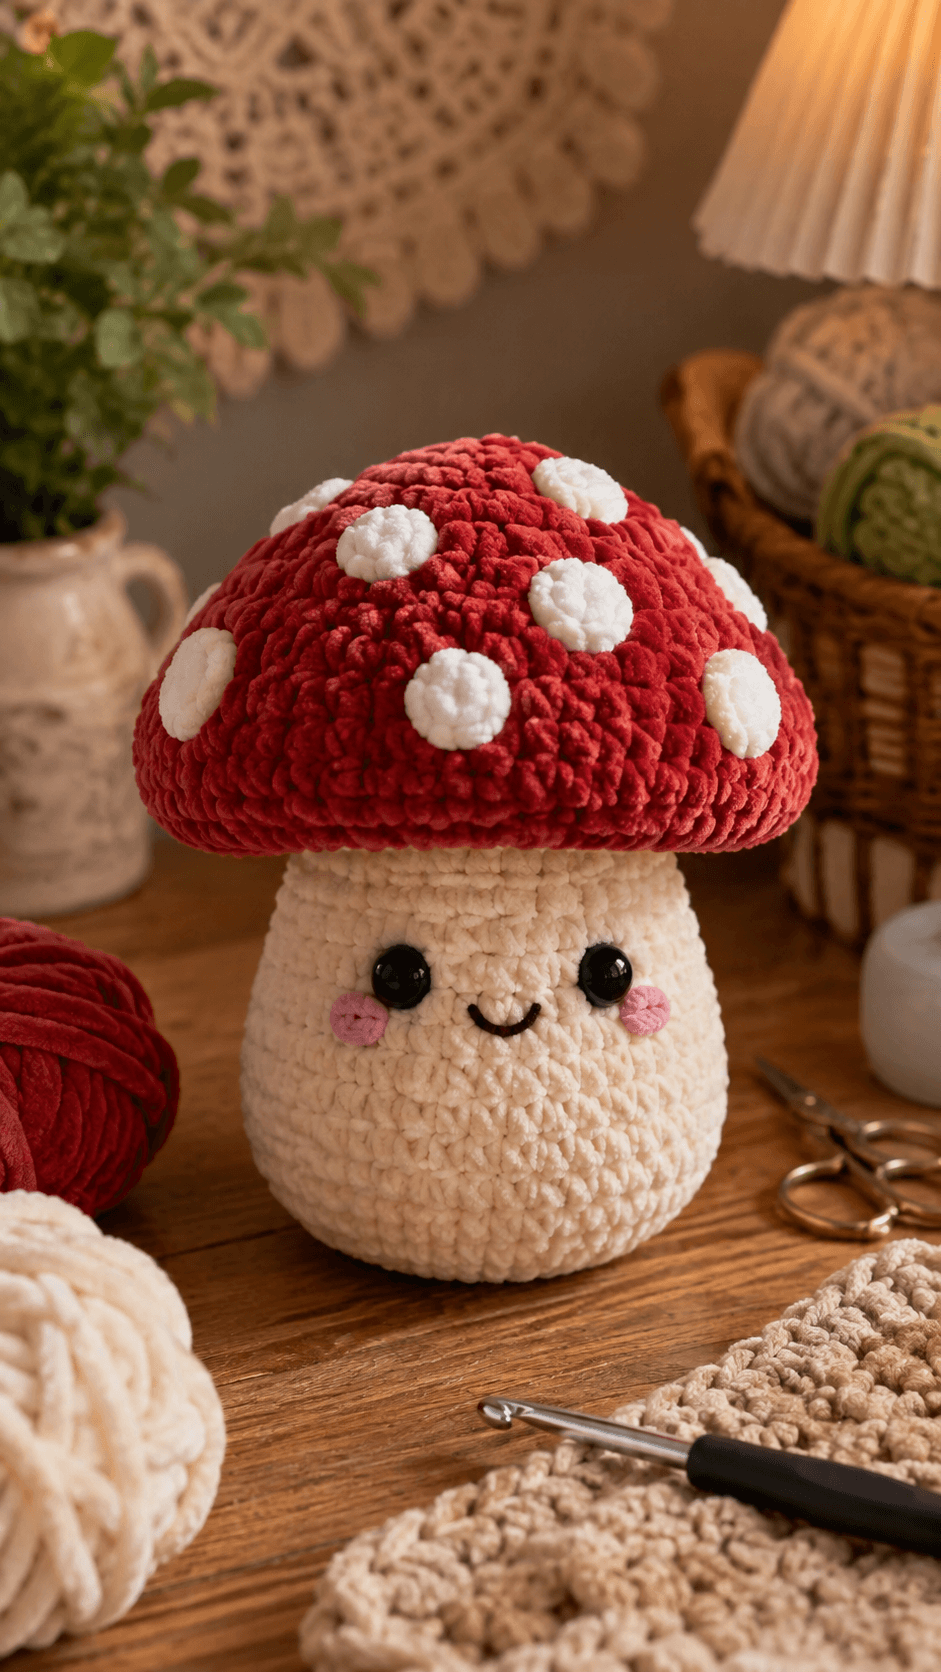
A fly-agaric mushroom needs its cap wider than its stem before the first white spot is attached. This mushroom amigurumi crochet pattern uses chunky chenille, a 4.5 mm hook and 10–12 mm eyes to produce a character approximately 24–28 cm tall. A 48-stitch red dome, nine raised white spots, a cream stem, pink cheeks and a compact embroidered smile create the complete intermediate project.
The Design: What Makes This Spotted Mushroom Different
The cap carries most of the width, reaching 48 stitches before contracting to a 36-stitch lower rim. That difference creates the broad toadstool overhang visible around the stem. The cream body also reaches 36 stitches near its lower half, but it narrows toward the neck so the cap looks substantially larger. Nine white spots are made separately in two diameters and attached across the dome rather than embroidered. This produces the raised texture visible in the reference. The face stays low on the cream stem: two black eyes, a small curved mouth and horizontal pink cheeks sit below the red overhang. This spotted mushroom crochet pattern depends on cap proportion more than complex shaping. One frequent maker error is overstuffing the cap; a hard sphere loses the shallow mushroom profile and raises the outer rim too far above the eyes.
Project Information at a Glance
| Skill Level | Time | Finished Size | Hook | Best For |
|---|---|---|---|---|
| Intermediate | 7–10 hours | Approx. 24–28 cm tall | 4.5 mm | Cottagecore display, woodland decor and plush collections |
Published mushroom sizes vary substantially with yarn. One current free pattern reports approximately 8 inches in Parfait Chunky and 10 inches in blanket yarn, while another intermediate mushroom design is about 20 cm tall. :contentReference[oaicite:17]{index=17}
Materials and Tools
Yarn
- Warm cream — chunky/plush chenille — approximately 90–120 g — stem/body
- Deep red — chunky/plush chenille — approximately 90–120 g — mushroom cap
- White — chunky or smooth plush yarn — approximately 15–25 g — cap spots
- Blush pink — yarn scrap — cheeks
- Black smooth embroidery yarn — small amount — mouth
Tools
- 4.5 mm crochet hook
- Two 10–12 mm black safety eyes
- Polyester toy stuffing
- Large-eye yarn needle
- Locking stitch marker
- Dressmaking pins
- Scissors
Existing mushroom patterns use eyes from about 10 mm through 15 mm as yarn thickness increases. Virkadia specifies 10 mm for its medium-yarn version and 14 mm for its chunky version, while The Friendly Red Fox lists 12 or 15 mm. :contentReference[oaicite:18]{index=18}
Abbreviations
- MR — magic ring
- sc — single crochet
- inc — two single crochet stitches in one stitch
- dec — decrease over two stitches
- sl st — slip stitch
- ch — chain
- hdc — half double crochet
- dc — double crochet
- BLO — back loop only
- FLO — front loop only
An invisible decrease is worked through the front loops of the next two stitches before completing them together as one single crochet.
Pattern — Step by Step
Work the stuffed sections in continuous spiral rounds unless stated otherwise. Keep a marker in the first stitch and confirm each bracketed total before beginning the next round.
Cream Stem and Body
Yarn: warm cream.
R1: 6 sc in MR (6)
R2: inc × 6 (12)
R3: (sc, inc) × 6 (18)
R4: (2 sc, inc) × 6 (24)
R5: (3 sc, inc) × 6 (30)
R6: (4 sc, inc) × 6 (36)
R7–R13: sc around (36)
R14: (4 sc, dec) × 6 (30)
R15–R18: sc around (30)
Insert the 10–12 mm safety eyes between R11 and R12, approximately seven visible stitches apart. The cap will later sit above this line, so leave a broad cream forehead.
R19: (3 sc, inc) × 6 (36)
R20–R21: sc around (36)
Stuff the lower body firmly. Add less stuffing through R16–R21 so the upper stem can compress slightly beneath the cap.
Fasten off with a 45 cm tail. Do not close the 36-stitch opening.
Red Mushroom Cap
Yarn: deep red.
R1: 6 sc in MR (6)
R2: inc × 6 (12)
R3: (sc, inc) × 6 (18)
R4: (2 sc, inc) × 6 (24)
R5: (3 sc, inc) × 6 (30)
R6: (4 sc, inc) × 6 (36)
R7: (5 sc, inc) × 6 (42)
R8: (6 sc, inc) × 6 (48)
R9–R12: sc around (48)
R13: (6 sc, dec) × 6 (42)
R14: sc around (42)
R15: (5 sc, dec) × 6 (36)
Add stuffing after R13. Spread a shallow layer across the crown rather than building a dense ball in the centre. The finished dome should be broad and low.
Do not fasten off.
Join Cap to Stem
Place the open 36-stitch top of the cream stem inside the 36-stitch red cap opening.
Work through one red cap stitch and one cream stem stitch at the same time:
R16: sc around through both layers (36)
Fasten off and weave the red tail into the underside seam.
Before closing the final 8–10 stitches of the join, add a last thin layer of stuffing around the outer cap edge. Do not pack the rim firmly.
Large White Spots — Make Four
Yarn: white.
R1: 6 sc in MR (6)
R2: inc × 6 (12)
Slip stitch to the first stitch and fasten off with a 20 cm sewing tail.
Do not stuff. Leave the centre slightly raised by keeping the magic ring moderately tight.
Small White Spots — Make Five
Yarn: white.
R1: 6 sc in MR (6)
Slip stitch to the first stitch and fasten off with a 15 cm tail.
Published mushroom patterns commonly use separate six-stitch and larger circular spots sewn onto the cap, closely matching the raised-dot construction required here. :contentReference[oaicite:19]{index=19}
Cheek Patches — Make Two
Yarn: blush pink.
R1: 6 sc in MR (6)
Fasten off with a 12 cm tail. Compress each small circle horizontally during sewing.
Smile
Yarn: smooth black embroidery yarn.
Mark the centre of the face midway between the safety eyes.
Embroider a shallow U-shaped smile approximately 2–2.5 cm wide. Keep the lowest point about one round below the eye centres.
Optional Flat Cap Underside
This section is optional if the red-to-cream join already creates a clean horizontal underside.
Using cream yarn:
R1: 6 sc in MR (6)
R2: inc × 6 (12)
R3: (sc, inc) × 6 (18)
R4: (2 sc, inc) × 6 (24)
R5: (3 sc, inc) × 6 (30)
R6: (4 sc, inc) × 6 (36)
Fasten off and sew the flat circle beneath the cap around the stem opening.
Use this only if the cap underside remains visibly hollow. The supplied image primarily shows a red lower edge meeting the cream stem.
Assembly
- Finish stuffing the cream body before joining the red cap. Check that the lower body stands independently on a flat surface without rocking.
- Insert the safety eyes between R11 and R12 of the stem, approximately seven visible stitches apart, then lock both washers before completing the cap assembly.
- Join the 36-stitch cap opening to the 36-stitch stem opening and distribute the cap stuffing into a low dome before the final section of the seam is closed.
- Pin the four large white spots across the crown and upper side areas. Avoid placing two large circles directly beside each other.
- Add the five small white spots between the larger motifs. Keep at least one visible red stitch between most neighboring spots.
- Sew each spot around its outer edge while leaving its centre slightly raised. Do not pull the sewing yarn tightly enough to sink the circle into the red cap.
- Attach both pink cheek patches outside and below the safety eyes, keeping their horizontal centre lines level.
- Embroider the small curved black smile between the eyes and beneath their centre line. Keep the mouth narrower than the distance between the eye stems.
- Set the mushroom on a level surface and rotate the cap visually until its widest rim appears horizontal from the front. Redistribute stuffing through the fabric if one side sits higher.
- Inspect the cap spots, eye alignment, cheek height and base stability, then weave every structural tail through at least three different stitch directions.
The completed mushroom should stand independently with a low red dome, broad overhanging rim, nine individually readable white spots and the full face visible on the cream stem.
7 Technical Tips
- Cap becoming spherical: Dense stuffing in the centre turns the 48-stitch dome into a ball. Keep the filling depth near the outer rim roughly 2–3 cm and distribute most volume across the upper crown.
- Stem collapse: A soft 36-stitch lower body can buckle beneath the wide cap. Pack the bottom two-thirds firmly enough that finger pressure compresses it by no more than about 5 mm.
- Visible decrease gaps: Plush yarn can expose stuffing around R13–R15 of the cap. Work each reduction through the front loops of the following two stitches.
- Spot crowding: White circles touching each other merge into one irregular patch. Leave at least one complete red stitch between most neighboring spots.
- Eye obstruction: A low cap rim can shadow the face if the eyes are installed too high. Keep approximately 3–4 cream rounds visible between the eye line and cap seam.
- Cap tilt: Joining several red stitches to one cream stitch on one side shortens the rim unevenly. Match all 36 stitches one-for-one around the seam.
- Cheek mismatch: A height difference of one full round is visible on the plain cream stem. Mark both cheek centres before sewing either six-stitch circle.
Shaping the Mushroom Cap
The cap controls the silhouette of this mushroom amigurumi crochet pattern. Published mushroom construction demonstrates the same general approach: expand from six stitches through successively larger rounds, hold the maximum circumference and then reduce before joining to the stem. A 1-Up mushroom pattern, for example, expands through 6, 12, 18, 24, 30, 36 and 42 stitches. :contentReference[oaicite:20]{index=20}
This project adds another increase stage to reach 48 because the photographed cap has substantial overhang. The stem remains 36 stitches at the join, creating twelve stitches of difference at maximum width.
The important variable is stuffing. A low dome needs distributed filling rather than one dense central mass. Shape the crown repeatedly while closing the seam.
Building the Cream Stem
The stem is broader at the base than at the facial area. Starting with six stitches and growing to 36 produces enough lower width for the mushroom to stand without feet.
The body then narrows to 30 stitches across the upper facial section before expanding back to 36 at the cap join. That slight waist gives the cap more visual separation from the body.
Place the mushroom on a table after every major stuffing addition. The bottom should remain flat enough that the finished character does not depend on the cap for balance.
Making Raised White Spots
Separate crochet circles match the photographed cap better than embroidered dots. Published mushroom designs also use small six-stitch circles and larger multi-round spots sewn onto the cap. :contentReference[oaicite:21]{index=21}
Four large and five small motifs provide nine spots for the photo-matched version. Exact placement matters more than perfect numerical symmetry.
Pin every spot before sewing the first one. View the mushroom from the front and both sides; several spots should remain visible from each angle without creating a straight horizontal row.
Distributing the White Spots
Place one larger white circle near the top quadrant but not directly at the magic-ring centre. Shift the remaining large motifs toward different sides of the dome.
Use smaller circles to break up large uninterrupted red spaces. The supplied image has several small and medium spots rather than one dominant central marking.
Keep the front rim relatively clear. Spots positioned directly against the bottom edge can distort the cap outline and compete with the face underneath.
Controlling the Cap Overhang
The finished stem opening and cap opening both use 36 stitches, so they can join one-for-one. This is structurally useful; recent mushroom guidance likewise recommends bringing the cap and base to matching stitch counts at the joining stage. :contentReference[oaicite:22]{index=22}
The wider 48-stitch middle remains free outside the seam and forms the overhang. Do not sew that outer edge directly to the cream body.
From the front, red should extend clearly beyond both sides of the stem. If the cap seems too narrow, reshape the stuffing outward before altering the stitch count.
Positioning the Face
The eyes belong well below the cap. A wide red brim naturally casts a visual shadow over the upper stem, so raising the eyes too close to the join can partially hide them.
Keep the mouth compact. The image uses a small black U shape centred between the cheeks, leaving large areas of cream fabric visible.
The blush patches sit outside the eyes rather than directly underneath them. Stretch the six-stitch circles slightly sideways as they are attached.
Choosing Eye Size
Current mushroom patterns show how eye diameter changes with yarn scale. Virkadia uses 10 mm eyes with medium #4 yarn and 14 mm for its super-bulky adaptation; The Friendly Red Fox lists 12 or 15 mm for its chunky mushroom. :contentReference[oaicite:23]{index=23}
For the supplied proportions, test 10 and 12 mm against the completed cream stem before locking the washers. The smaller size gives more open facial space; 12 mm produces the stronger glossy-eye look visible in the photograph.
If the mushroom is intended for a recipient for whom plastic hardware is inappropriate, embroider the eyes instead.
Working with Chunky Chenille
The photo shows a plush fabric with highly visible rounded stitches, making chunky chenille a practical match. Current plush mushroom patterns use fibers such as Premier Parfait Chunky, Sweet Snuggles Lite and blanket yarn. :contentReference[oaicite:24]{index=24}
Place the round marker through both top loops of the first stitch. Chenille fibers can obscure stitch anatomy, particularly across the four plain 48-stitch cap rounds.
If the magic ring sheds when pulled tight, start with two chains and work the first six single crochets into the second chain from the hook.
Adjusting Finished Size
Published mushroom sizes demonstrate how strongly yarn weight changes the final object. The Friendly Red Fox reports approximately 8, 9 and 10 inches from three different plush yarns using the same general design. :contentReference[oaicite:25]{index=25}
For a smaller version, keep all stitch totals and use worsted yarn with approximately a 3–3.5 mm hook. Reduce the safety-eye size after measuring the completed stem.
For a larger plush, switch to thicker blanket yarn before adding another increase round. Expanding only the cap beyond 48 stitches can make the mushroom top-heavy unless the stem base is enlarged as well.
Planning Yarn Quantities
One current chunky mushroom pattern uses about 50 g of cream and 20 g of cap color for a smaller design, plus a separate amount for white spots. :contentReference[oaicite:26]{index=26}
The photo-matched version is larger and uses a substantially wider cap, so the listed 90–120 g allocations for both cream and red should be treated as purchasing estimates rather than exact consumption.
Make the cream stem first if yarn quantity is limited. Weigh the completed stuffed piece, then check remaining yarn before beginning the 48-stitch red cap.
Keeping the Mushroom Upright
The stem has no feet, so the base shape determines stability. Flatten R1–R6 gently against a table as the lower body is stuffed.
Concentrate filling around the outside wall before packing the centre. This keeps the bottom broad rather than creating a rounded central bulge.
After the cap is attached, test the mushroom from several rotations. If one side leans, first redistribute cap stuffing instead of adding weight to the stem.
Finishing Checks
Set the finished mushroom on a hard, level surface and check the stem first. The cream body should remain vertical without leaning beneath the cap.
View the red crown directly from the front. Its rim should appear broadly horizontal, with approximately equal overhang on the left and right.
Inspect the decorative details last. Nine spots should remain individually readable, both eyes should sit below the cap shadow, the pink cheeks should remain level and the smile should stay centred.
Conclusion
Measure the finished mushroom from the base to the cap crown and record the cap diameter separately; that second measurement is the better reference when changing yarn brands. Photograph the project straight from the front to check rim level, spot distribution and eye spacing. Save this mushroom amigurumi crochet pattern to Pinterest and share the finished piece on Instagram with #SpottedToadstoolPlush. Reshape the low red dome and lift each white spot before taking the final photograph. For another version, would you keep the classic deep-red cap shown here or switch the cap to dusty pink with cream spots?
Sources
- The Friendly Red Fox — Free Crochet Mushroom Pattern: approximately 8–10 inch plush versions, 3.75 mm hook, chunky/blanket yarn, 12 or 15 mm eyes and published yarn quantities. :contentReference[oaicite:27]{index=27}
- Virkadia — Mushroom Cutie: 4.5-inch medium-yarn version, 6-inch chunky variation, 5 mm hook, and 10/14 mm eye references. :contentReference[oaicite:28]{index=28}
- Geeky Hooker — 1-Up Mushroom: cap expansion through 42 stitches and separate white spot construction. :contentReference[oaicite:29]{index=29}
- Little Love Everyday — Amigurumi Mushroom: separate six-stitch and larger white spot motifs. :contentReference[oaicite:30]{index=30}
- Etsy — current Mushroom Amigurumi marketplace showing active competition in sprites, mushroom characters and plush toadstools. :contentReference[oaicite:31]{index=31}









