Introduction
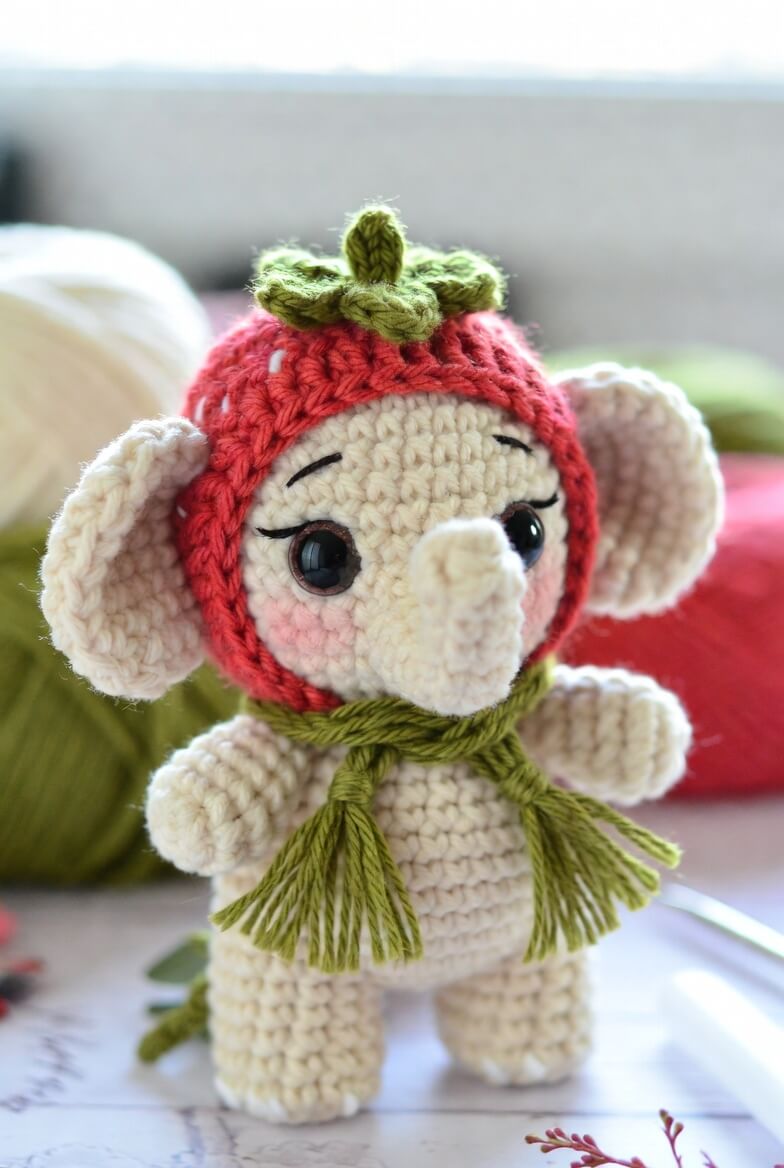
An elephant’s ears need to clear the sides of a strawberry hood without stretching its face opening. This strawberry hood elephant amigurumi pattern uses worsted yarn, a 3.5 mm hook and 14 mm safety eyes to make an approximately 22 cm standing figure. The intermediate project includes a curved trunk, layered ears, leafy strawberry crown and tasseled scarf. Wide feet give the finished elephant a stable display base.
The Design: What Makes Berry the Elephant Different
Berry’s hood covers the crown and back of the head while leaving both ears outside the red fabric. That construction preserves the elephant silhouette and prevents the opening from pulling across the eyes. A 42-stitch head supplies enough width for the large facial features, but the body stops at 36 stitches to create a compact standing shape. The trunk begins as a narrow tube and gains width near its attachment point, matching the tapered form visible in the photograph. Each ear uses two flat layers so the rim remains firm after sewing. A common error in a strawberry elephant crochet pattern is placing the ear seams beneath the hood. The extra thickness produces a raised ridge and tilts the hood forward. This elephant in fruit costume places the hood edge between the ears and face instead.
Project Info at a Glance
| Skill Level | Time | Finished Size | Hook | Best For |
|---|---|---|---|---|
| Intermediate | 10–13 hours | Approximately 22 cm | 3.5 mm | Standing display and character collections |
The finished measurement is based on a published 20 cm DK elephant and adjusted for worsted yarn, a larger head and the strawberry crown.
Materials and Tools
Yarn
- Warm cream — worsted/category 4 — approximately 95 g — YarnArt Jeans Plus, Paintbox Yarns Cotton Aran or a similar cotton blend.
- Strawberry red — worsted/category 4 — approximately 30 g — use a smooth yarn that shows the hood shaping clearly.
- Olive green — worsted/category 4 — approximately 15 g — required for the leaves, stem, scarf and tail accent.
- Pale pink — DK or worsted yarn — approximately 3 g — required for the inner ears and cheek patches.
- Black embroidery thread — a small amount — required for the eyebrows and eyelashes.
Tools
- 3.5 mm crochet hook
- Two 14 mm safety eyes
- Polyester stuffing, approximately 60–75 g
- Blunt yarn needle
- Locking stitch markers
- Straight pins
- Scissors
- Optional fabric-safe pink tint for shaded cheeks
Plastic safety eyes can separate under force and are not suitable for children under three. Embroidered eyes are the appropriate replacement for a young child’s toy.
Abbreviations
- MR — magic ring
- sc — single crochet
- inc — two single crochet in one stitch
- dec — single crochet two stitches together
- sl st — slip stitch
- ch — chain
- hdc — half double crochet
- dc — double crochet
- BLO — back loop only
- FLO — front loop only
For an invisible decrease, insert the hook beneath the front loops of the next two stitches and complete one single crochet through both loops.
Pattern — Step by Step
Work stuffed components in a continuous spiral unless a section states otherwise. Mark the first stitch and recount every increase or decrease round before continuing.
Head
Yarn: warm cream — standard six-stitch amigurumi expansion.
R1: 6 sc in MR (6)
R2: inc ×6 (12)
R3: (sc, inc) ×6 (18)
R4: (2 sc, inc) ×6 (24)
R5: (3 sc, inc) ×6 (30)
R6: (4 sc, inc) ×6 (36)
R7: (5 sc, inc) ×6 (42)
R8–R13: sc around (42)
R14: (5 sc, dec) ×6 (36)
R15: sc around (36)
R16: (4 sc, dec) ×6 (30)
Insert the eyes between R10 and R11 with seven visible stitches between their inner edges. Attach both washers before the opening becomes smaller.
R17: (3 sc, dec) ×6 (24)
R18: (2 sc, dec) ×6 (18)
R19: (sc, dec) ×6 (12)
R20: dec ×6 (6)
Stuff the forehead firmly and leave a shallow area beneath the eyes for the trunk seam.
Fasten off. Leave a 30 cm tail and close the opening.
Body
Yarn: warm cream — 36-stitch medium plateau.
R1: 6 sc in MR (6)
R2: inc ×6 (12)
R3: (sc, inc) ×6 (18)
R4: (2 sc, inc) ×6 (24)
R5: (3 sc, inc) ×6 (30)
R6: (4 sc, inc) ×6 (36)
R7–R13: sc around (36)
R14: (4 sc, dec) ×6 (30)
R15–R17: sc around (30)
R18: (3 sc, dec) ×6 (24)
R19: sc around (24)
R20: (2 sc, dec) ×6 (18)
R21: (sc, dec) ×6 (12)
R22: dec ×6 (6)
Fill the lower body firmly. Keep the top three rounds slightly softer so the neck seam can be compressed evenly.
Fasten off. Leave a 30 cm tail for joining the head.
Trunk
Yarn: warm cream — tapered tubular construction.
R1: 6 sc in MR (6)
R2–R4: sc around (6)
R5: (2 sc, inc) ×2 (8)
R6–R9: sc around (8)
R10: (3 sc, inc) ×2 (10)
R11–R13: sc around (10)
R14: (4 sc, inc) ×2 (12)
R15–R16: sc around (12)
Stuff the upper half moderately and use less fiber toward the narrow tip. Curve the trunk upward before attachment.
Fasten off. Leave a 30 cm sewing tail.
Outer Ears (Make 2)
Yarn: warm cream — worked as flat circles.
R1: 6 sc in MR (6)
R2: inc ×6 (12)
R3: (sc, inc) ×6 (18)
R4: (2 sc, inc) ×6 (24)
R5: (3 sc, inc) ×6 (30)
R6: (4 sc, inc) ×6 (36)
R7: sc around (36)
Join with a sl st. Fasten off and leave a 30 cm tail.
Inner Ears (Make 2)
Yarn: pale pink — worked flat.
R1: 6 sc in MR (6)
R2: inc ×6 (12)
R3: (sc, inc) ×6 (18)
R4: (2 sc, inc) ×6 (24)
R5: (3 sc, inc) ×6 (30)
Join with a sl st. Fasten off and leave a 25 cm tail. Sew each inner circle to an outer ear with one cream round visible around the edge.
Arms (Make 2)
Yarn: warm cream.
R1: 6 sc in MR (6)
R2: inc ×6 (12)
R3: (sc, inc) ×6 (18)
R4–R5: sc around (18)
R6: (sc, dec) ×6 (12)
R7–R10: sc around (12)
R11: dec ×6 (6)
Stuff the hands firmly and leave the upper arms lightly filled. Flatten each opening before sewing.
Fasten off. Leave a 25 cm tail.
Legs (Make 2)
Yarn: warm cream — broad standing feet.
R1: 6 sc in MR (6)
R2: inc ×6 (12)
R3: (sc, inc) ×6 (18)
R4: (2 sc, inc) ×6 (24)
R5: BLO sc around (24)
R6–R8: sc around (24)
R9: (2 sc, dec) ×6 (18)
R10–R12: sc around (18)
R13: (sc, dec) ×6 (12)
R14: dec ×6 (6)
Fill the feet firmly and the upper legs moderately. Shape a flat sole against the work surface while stuffing.
Fasten off. Leave a 30 cm sewing tail.
Cheek Patches (Make 2)
Yarn: pale pink — flat circles.
R1: 6 sc in MR (6)
R2: inc ×6 (12)
Join with a sl st. Fasten off and leave a 15 cm tail. Do not stuff.
Tail
Yarn: warm cream and olive green.
R1: 6 sc in MR (6)
R2–R10: sc around (6)
Change to olive green.
R11: inc ×6 (12)
R12: sc around (12)
R13: dec ×6 (6)
Add only a narrow strand of stuffing to the cream section.
Fasten off. Leave a 20 cm tail.
Strawberry Hood
Yarn: strawberry red — worked from the crown downward in joined rounds.
R1: 6 sc in MR; join (6)
R2: inc ×6; join (12)
R3: (sc, inc) ×6; join (18)
R4: (2 sc, inc) ×6; join (24)
R5: (3 sc, inc) ×6; join (30)
R6: (4 sc, inc) ×6; join (36)
R7: (5 sc, inc) ×6; join (42)
R8: (6 sc, inc) ×6; join (48)
R9: (7 sc, inc) ×6; join (54)
R10–R12: sc around; join (54)
Begin the face opening.
Row 13: ch 1, turn, sc across 42 stitches (42)
Row 14: ch 1, turn, dec, 38 sc, dec (40)
Row 15: ch 1, turn, dec, 36 sc, dec (38)
Row 16: ch 1, turn, sc across (38)
Test the hood on the completed head. The front edges should finish between the eyes and ear seams without covering either eye.
Work sc evenly around the face opening. Fasten off and leave a 30 cm tail for tacking the hood.
Strawberry Sepals (Make 5)
Yarn: olive green — worked flat.
Row 1: ch 8, sc in second ch from hook and across (7)
Row 2: ch 1, turn, dec, 3 sc, dec (5)
Row 3: ch 1, turn, dec, sc, dec (3)
Row 4: ch 1, turn, dec, sc (2)
Row 5: ch 1, turn, dec (1)
Fasten off. Leave a 20 cm tail. Arrange the five leaves around the hood crown with their broad ends meeting near the center.
Strawberry Stem
Yarn: olive green.
R1: 6 sc in MR (6)
R2–R6: sc around (6)
R7: dec ×3 (3)
Stuff with a narrow strand of fiber and flatten the base.
Fasten off. Leave a 15 cm tail.
Strawberry Seeds
Yarn: cream embroidery yarn.
Work twelve short vertical stitches around the red hood. Each seed should span one round and remain at least three stitches from the face-opening border.
Scarf
Yarn: olive green — worked in rows.
Row 1: ch 62, hdc in the third ch from the hook and across (60)
Row 2: ch 2, turn, hdc across (60)
Row 3: ch 1, turn, sl st loosely across (60)
Wrap the scarf once around the neck and cross both ends at the front. The ends should extend to approximately the middle of the body.
Fasten off. Leave a 20 cm tail at each end.
Scarf Tassels
Cut twenty-four olive strands measuring 16 cm. Divide them into two equal groups. Fold each group in half, pull the folded center through one scarf end and draw the loose ends through the loop. Trim each tassel to 6 cm.
Assembly
- Pin the head centrally over the body and sew around the neck twice with cream yarn.
- Position the trunk one round below the eyes and stitch around its full base. Add two concealed stitches beneath the curve.
- Attach the layered ears across R8–R15 of the head, keeping both lower edges level.
- Sew the cheek patches beside the trunk, then embroider two eyebrows and three eyelashes above each eye.
- Pin both legs beneath the body with approximately six stitches between their inner edges. Test the standing position before sewing.
- Attach the arms across the upper body and angle the hands slightly forward.
- Sew the tail to the lower back and place its green tip toward the elephant’s left side.
- Fit the red hood between the face and ear seams. Tack it behind each ear and at the back of the neck.
- Attach the five sepals to the crown, then sew the stem upright at their shared center.
- Wrap the scarf around the neck, cross its ends at the front and secure the back center with two hidden stitches.
The completed elephant should stand on both feet without using its trunk, tail or scarf as support.
7 Technical Tips
- Marker displacement: Losing the round start can shift the eye line by four or more stitches. Use a locking marker and recount every 42-stitch head round.
- Forehead flattening: A stuffing gap wider than 2 cm above either washer can create a hollow area. Add small fiber pieces around the eye posts before filling the center.
- Decrease ridges: Standard decreases produce horizontal bars beneath the face. Work every head and body decrease through the front loops only.
- Late eye fitting: After R17, the opening drops to 24 stitches and washer access becomes restricted. Install both eyes immediately after R16.
- Twisted trunk: One seam pass allows the trunk to rotate under its own weight. Sew around the base twice and add two stitches under the upward curve.
- Uneven ear height: A difference of one round makes the hood opening appear crooked. Mark the upper and lower attachment points on both sides before pinning.
- Loose tassels: Tassel loops shorter than 1 cm can pull through the scarf edge. Tighten each folded knot separately and trim only after the scarf is attached.
Conclusion
Check the elephant from the front, side and back before trimming the final yarn tails. Both ears should remain outside the hood, the trunk must curve upward without hiding an eye, and the five leaves should meet beneath the stem. Record the final hood opening, eye spacing and scarf length before repeating the project because worsted yarn thickness varies among brands. The next step is to block the leaves lightly and photograph the strawberry hood elephant amigurumi pattern against a plain background. Save the project to Pinterest and share the finished figure on Instagram with #BerryHoodElephant. Did your strawberry leaves sit flatter with five separate panels or a continuous green crown?









