Introduction
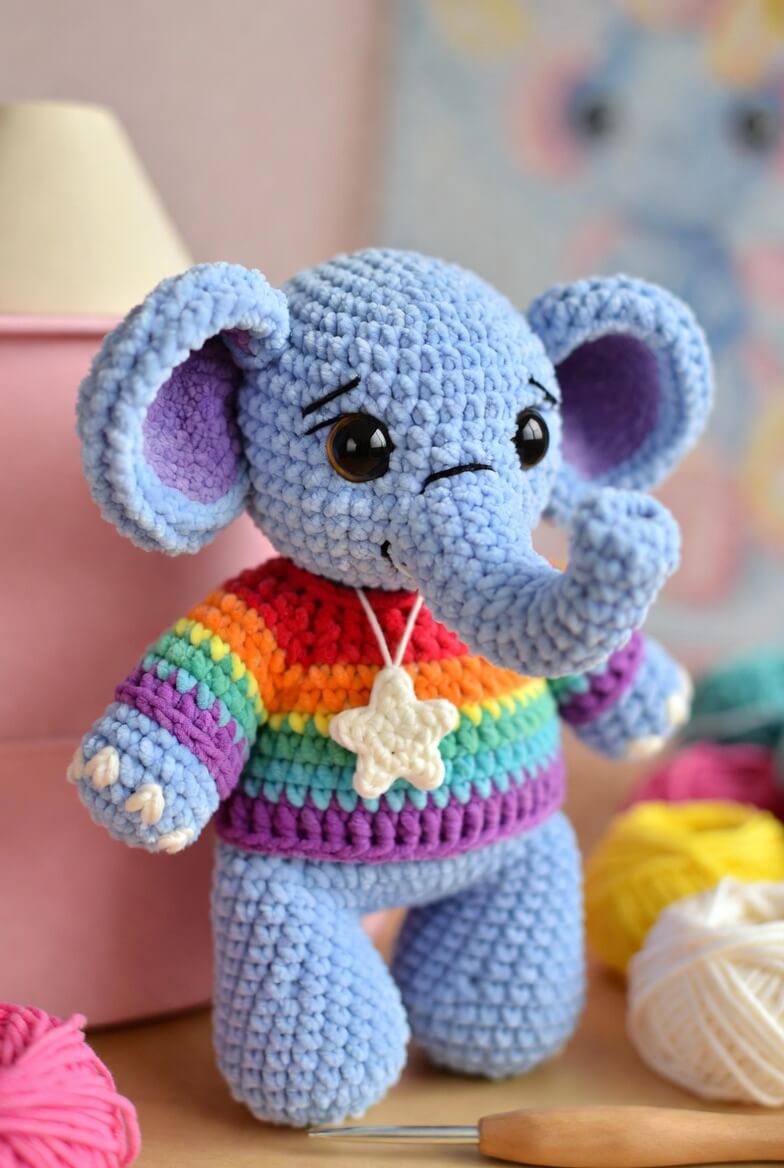
An elephant’s trunk must curve upward without twisting the eyes away from the center line. This elephant amigurumi crochet pattern makes a 36 cm standing elephant with broad lined ears, a rainbow sweater and a cream star pendant. Use worsted chenille, a 4 mm hook and 16 mm safety eyes. Intermediate construction skills are required. The wide legs form a stable base for upright display.
The Design: What Makes Prism the Elephant Different
Prism uses a 42-stitch head plateau because the large ears, safety eyes and attached trunk compete for space across the front half of the head. Seven increase rounds create enough width without producing a flat crown. The trunk keeps a constant 12-stitch circumference through most of its length; mixed-height stitches curve the tip without wire. Broad legs support the top-heavy head, while lightly filled arms remain flexible enough to frame the sweater. The rainbow garment is worked separately, allowing each stripe to remain level around the body. One common error in a chunky elephant crochet pattern is placing the ears directly opposite the eyes. That position increases the apparent head width and pushes the ear seams forward. This blue elephant amigurumi places each ear behind the eye line, leaving room for eyelashes and the raised trunk.
Project Info at a Glance
| Skill Level | Time | Finished Size | Hook | Best For |
|---|---|---|---|---|
| Intermediate | 10–12 hours | Approximately 36 cm standing | 4 mm | Standing displays, nursery shelves and color-themed collections |
Materials and Tools
Yarn
- Powder blue — worsted chenille or velvet — approximately 150–180 g — use for the elephant.
- Lavender — worsted chenille — approximately 15 g — use for the inner ears and sweater cuffs.
- Red — worsted yarn — approximately 10 g — use for the upper sweater stripe.
- Orange — worsted yarn — approximately 10 g — use for the second sweater stripe.
- Yellow — worsted yarn — approximately 7 g — use for the narrow center stripe.
- Mint green — worsted yarn — approximately 10 g — use for the fourth stripe.
- Turquoise — worsted yarn — approximately 10 g — use for the lower stripe.
- Purple — worsted yarn — approximately 15 g — use for the hem and sleeve cuffs.
- Cream — smooth DK or worsted yarn — approximately 12 g — use for the pendant and toenails.
- Blush pink — smooth yarn — under 4 g — use for the cheek patches.
- Black — embroidery thread — use for eyebrows, eyelashes and mouth.
Tools
- 4 mm crochet hook
- 16 mm safety eyes
- Polyester stuffing
- Blunt tapestry needle
- Locking stitch markers
- Long sewing pins
- Scissors
Use one yarn category for all sweater colors so the stripe widths remain consistent. Smooth worsted yarn may replace chenille, but it will produce a smaller and more sharply defined elephant.
Abbreviations
- MR — magic ring
- sc — single crochet
- inc — two single crochet stitches in one stitch
- dec — single crochet two stitches together
- sl st — slip stitch
- ch — chain
- hdc — half double crochet
- dc — double crochet
- BLO — back loop only
- FLO — front loop only
For an invisible decrease, pass the hook through the front loops of the next two stitches and complete those loops as one single crochet.
Pattern — Step by Step
Work amigurumi sections in a continuous spiral unless joined rounds or turned rows are specified. Mark the first stitch after every round. This large elephant uses a 42-stitch plateau.
Head
Yarn: powder blue — Source basis: standard amigurumi mathematics.
R1: 6 sc in MR (6)
R2: inc ×6 (12)
R3: (sc, inc) ×6 (18)
R4: (2 sc, inc) ×6 (24)
R5: (3 sc, inc) ×6 (30)
R6: (4 sc, inc) ×6 (36)
R7: (5 sc, inc) ×6 (42)
R8–R15: sc around (42)
R16: (5 sc, dec) ×6 (36)
Insert the 16 mm eyes between R12 and R13 with eight visible stitches between the posts. Check that the face center lies midway between the eyes before fitting the washers.
R17: (4 sc, dec) ×6 (30)
R18: (3 sc, dec) ×6 (24)
R19: (2 sc, dec) ×6 (18)
Stuff the crown firmly. Add small sections of filling around the eye posts to prevent recessed sockets.
R20: (sc, dec) ×6 (12)
R21: dec ×6 (6)
Fasten off. Leave a 30 cm sewing tail and close the final opening through the front loops.
Body
Yarn: powder blue — Source basis: standard amigurumi mathematics.
R1: 6 sc in MR (6)
R2: inc ×6 (12)
R3: (sc, inc) ×6 (18)
R4: (2 sc, inc) ×6 (24)
R5: (3 sc, inc) ×6 (30)
R6: (4 sc, inc) ×6 (36)
R7: (5 sc, inc) ×6 (42)
R8–R13: sc around (42)
R14: (5 sc, dec) ×6 (36)
R15–R17: sc around (36)
R18: (4 sc, dec) ×6 (30)
R19–R20: sc around (30)
R21: (3 sc, dec) ×6 (24)
R22: sc around (24)
R23: (2 sc, dec) ×6 (18)
Pack the lower body firmly to support the standing pose. Leave the upper two rounds moderately filled for the neck seam.
R24: (sc, dec) ×6 (12)
R25: dec ×6 (6)
Fasten off. Leave a 35 cm tail for attaching the body to the head.
Arms (Make 2)
Yarn: powder blue — Source basis: standard amigurumi mathematics.
R1: 6 sc in MR (6)
R2: inc ×6 (12)
R3: (sc, inc) ×6 (18)
R4–R6: sc around (18)
R7: (sc, dec) ×6 (12)
R8–R14: sc around (12)
R15: dec ×6 (6)
Stuff R1–R9. Leave the upper section flexible so the left arm can hang and the right arm can angle toward the trunk.
Fasten off. Leave a 30 cm sewing tail.
Legs (Make 2)
Yarn: powder blue — Source basis: standard amigurumi mathematics.
R1: 6 sc in MR (6)
R2: inc ×6 (12)
R3: (sc, inc) ×6 (18)
R4: (2 sc, inc) ×6 (24)
R5–R8: sc around (24)
R9: (2 sc, dec) ×6 (18)
R10–R16: sc around (18)
R17: (sc, dec) ×6 (12)
R18: dec ×6 (6)
Stuff the first ten rounds firmly. Continue with moderate filling so both legs remain cylindrical without becoming rigid.
Fasten off. Leave a 35 cm sewing tail.
Outer Ears (Make 2)
Yarn: powder blue — work in joined rounds.
R1: 6 sc in MR, join (6)
R2: inc ×6, join (12)
R3: (sc, inc) ×6, join (18)
R4: (2 sc, inc) ×6, join (24)
R5: (3 sc, inc) ×6, join (30)
R6: (4 sc, inc) ×6, join (36)
R7: (5 sc, inc) ×6, join (42)
R8: sc around, join (42)
Do not stuff. Fold the final circle lightly before positioning it against the head.
Fasten off. Leave a 40 cm sewing tail.
Inner-Ear Panels (Make 2)
Yarn: lavender — work in joined rounds.
R1: 6 sc in MR, join (6)
R2: inc ×6, join (12)
R3: (sc, inc) ×6, join (18)
R4: (2 sc, inc) ×6, join (24)
R5: (3 sc, inc) ×6, join (30)
Fasten off. Leave a 30 cm tail. Center each lavender panel on one blue ear and sew it down before attaching the ear to the head.
Curved Trunk
Yarn: powder blue — maintain a 12-stitch tube.
R1: 6 sc in MR (6)
R2: inc ×6 (12)
R3–R8: sc around (12)
R9: 3 sc, 3 hdc, 3 sc, 3 sl st (12)
R10–R13: sc around (12)
R14: 2 sc, 4 hdc, 2 sc, 4 sl st (12)
R15–R18: sc around (12)
R19: 3 sl st, 3 sc, 3 hdc, 3 sc (12)
R20–R21: sc around (12)
Stuff the base firmly and the final eight rounds lightly. Rotate the mixed-height sections toward the inside of the bend so the tip rises.
Fasten off. Leave a 35 cm tail for sewing the trunk between and below the eyes.
Cheek Patches (Make 2)
Yarn: blush pink — Source basis: standard flat-circle mathematics.
R1: 6 sc in MR (6)
R2: inc ×6 (12)
Join with a sl st. Fasten off and leave a 15 cm sewing tail.
Tail
Yarn: powder blue.
R1: 6 sc in MR (6)
R2–R7: sc around (6)
Do not stuff. Add three short blue yarn strands to the closed end and trim the tassel to 2 cm.
Fasten off. Leave a 20 cm sewing tail.
Toenails (Make 6)
Yarn: cream.
Ch 3. Sl st in the second chain from the hook, sc in the final chain (2).
Fasten off. Leave a 10 cm tail. Three nails will be sewn across the front of each foot.
Rainbow Sweater Body
Use the 4 mm hook. Work in joined rounds and change color at the join.
With purple, ch 43 and join without twisting.
R1–R3: BLO sc around, join (42)
Change to turquoise.
R4–R5: sc around, join (42)
Change to mint green.
R6–R7: sc around, join (42)
Change to yellow.
R8: sc around, join (42)
Change to orange.
R9–R11: sc around, join (42)
Change to red.
R12: (5 sc, dec) ×6, join (36)
R13–R15: sc around, join (36)
R16: (4 sc, dec) ×6, join (30)
R17: sc around, join (30)
Test the neck opening before attaching the head. The purple hem should sit level above the widest body round.
Fasten off. Weave the tail into the inside of the garment.
Sweater Sleeves (Make 2)
Work in joined rounds, beginning at the upper red edge.
With red, ch 19 and join without twisting.
R1–R2: sc around, join (18)
Change to orange.
R3–R4: sc around, join (18)
Change to yellow.
R5: sc around, join (18)
Change to mint green.
R6–R7: sc around, join (18)
Change to turquoise.
R8–R9: sc around, join (18)
Change to lavender.
R10: (sc, dec) ×6, join (12)
R11–R13: BLO sc around, join (12)
Fold the final three rounds outward to form a cuff. Slide each sleeve over an arm before attaching that arm to the body.
Fasten off. Leave a 25 cm tail for joining the sleeve top to the sweater shoulder.
Star Pendant Panels (Make 2)
Yarn: cream — use smooth yarn for defined points.
R1: 10 sc in MR, join with sl st (10)
R2: repeat five times: ch 4, sl st in second ch from hook, sc in next ch, hdc in next ch, skip one stitch of R1, sl st in next stitch
Make two matching stars. Place the wrong sides together and sew around four points, add a thin layer of stuffing, then close the final point.
Fasten off. Leave a 25 cm tail.
Pendant Cord
Yarn: cream.
Ch 55. Sl st through the top point of the star, then continue with 55 more chains.
Fasten off. Knot the two ends behind the elephant’s neck after assembly.
Assembly
- Pull the completed sweater over the body and position the purple hem above body Round 7.
- Center the head over the body, then sew twice around the neck seam through matching stitches.
- Pin the trunk between the eyes with its base spanning head R12–R16 and its curved tip pointing upward.
- Sew the cheek patches beside the trunk, then embroider one eyebrow and two upper lashes around each eye.
- Place each lined ear behind the eye line between head R7 and R14, keeping both lower edges level.
- Slide one sweater sleeve onto each arm and attach the arms beside body R16 with the right arm angled toward the trunk.
- Sew the legs beneath the body between R4 and R9, spacing them so both feet rest flat and the sweater remains centered.
- Attach three cream toenails across each foot and sew the tail to the center back below the sweater hem.
- Place the pendant cord around the neck and tack the star to the center of the red sweater stripe.
- Weave each structural tail through at least 5 cm of stuffing, reverse its direction once and trim after the yarn retracts.
The completed elephant should stand without support while its trunk tip remains above the lower eye line.
7 Technical Tips
- Round-start drift: Chenille can conceal the first stitch and rotate the trunk away from the eye center. Keep a locking marker through both loops and recount every 42-stitch plateau round.
- Compressed forehead: Sparse filling above 16 mm eyes creates two deep hollows. Add stuffing in pieces no larger than 3 cm until the crown retains a rounded profile.
- Decrease holes: Conventional decreases expose stuffing through plush yarn. Work each decrease through the front loops and keep the completed loop close to the 4 mm hook shaft.
- Blocked eye access: Installing the eye washers after head Round 17 leaves a narrow 30-stitch opening. Fit both eyes after Round 16 and compare their height before securing either washer.
- Rotated trunk: Mixed-height trunk stitches placed on alternating sides create an S-shaped tube. Mark the inside curve and keep every hdc group within the same four-stitch sector.
- Sloping sweater stripes: Spiral color changes produce a visible diagonal seam. Join every garment round, change color during the final pull-through and place all joins beneath the left arm.
- Uneven standing base: A 5 mm difference in leg height makes the body lean. Pin both legs, place the elephant on a level surface and complete neither seam until both feet carry weight.
Conclusion
Check the trunk angle, sweater joins and foot contact before trimming the final sewing tails. The next concrete step is to crochet one 42-stitch outer ear and hold it against the completed head; chenille thickness can change its diameter by several centimeters. Save this elephant amigurumi crochet pattern to Pinterest, then share front, side and back photographs on Instagram with #PrismRainbowElephant. Those views show the ear alignment, sleeve placement and trunk curve more accurately than one frontal image. For this elephant specifically, should the trunk tip remain beside the right eye or curve farther outward above the raised arm?









