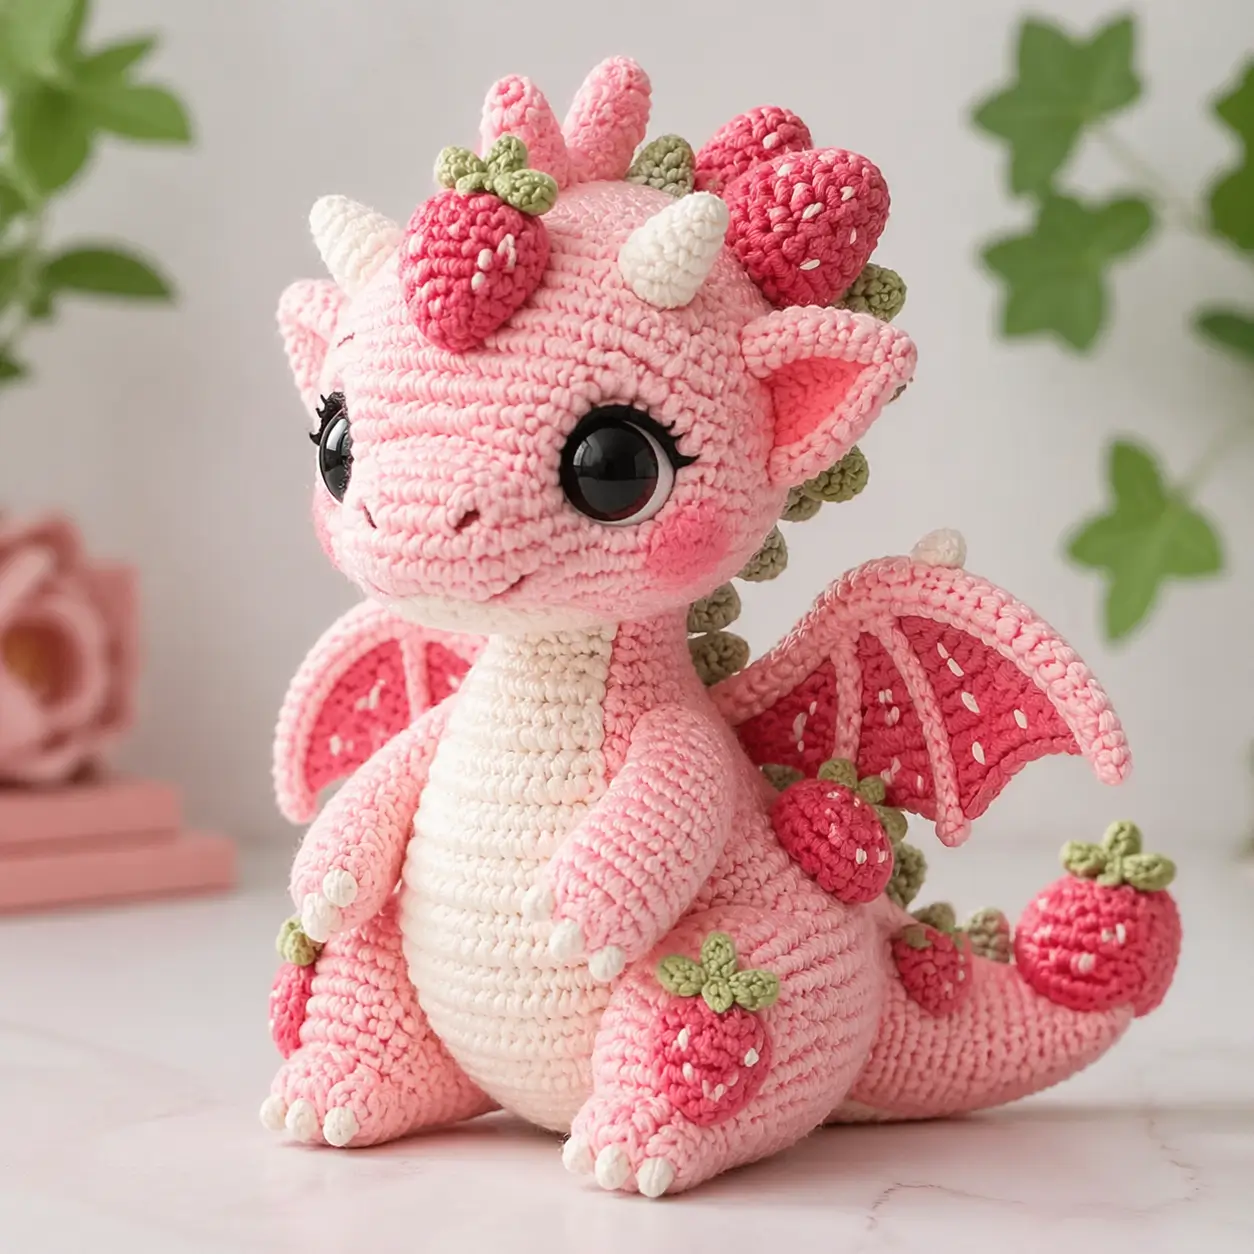
A strawberry dragon looks wrong the moment its horn line stops reading as fruit. This strawberry dragon crochet pattern uses bulky yarn, a 4 mm hook, and intermediate shaping to build a 25 cm sitting plush with wing panels, berry accents, and a braced tail. You make it for a shelf display, themed gift, or market sample that can sit upright without added support.
The Design: What Makes Strawberry Dragon Different
You are not building a generic pink dragon and adding random berries at the end. The form has to read in three places at once: crown, wing, and tail. First, the horns and forehead berries need a shared silhouette so the fruit theme is visible from the front. Second, the wings need short upper arms and broad membranes, because a fruit dragon crochet design loses the strawberry cue when the panels get too narrow. Third, the tail has to sit low and long enough to act as a rear brace. The piece becomes unstable when the tail is attached too high or stuffed too hard. One common mistake in a strawberry dragon amigurumi is keeping all the berry detail near the head, which leaves the body reading as a standard baby dragon.
Project Info at a Glance
| Skill Level | Time | Finished Size | Hook | Best For |
|---|---|---|---|---|
| Intermediate | Not publicly standardized | 25 cm | 4 mm | Shelf plush, themed gifts, market samples |
Materials and Tools
Yarn
- Light pink — bulky / category 5 — public per-color gram count not exposed — brand suggestion: soft cotton-blend or plush acrylic
- White — bulky / category 5 — accent quantity not publicly split — brand suggestion: matching base yarn
- Dark pink/red — bulky / category 5 — for strawberries and wing membrane
- Light sage green — bulky / category 5 — for leaves and dorsal spikes
- Light blush pink — small amount for cheek patches
Tools
- Hook 4 mm
- 16 mm safety eyes
- Polyfill stuffing
- Yarn needle
- Stitch markers
- Pins
- White yarn for seed embroidery
Abbreviations
MR / sc / inc / dec / sl st / ch / BLO / hdc / FO / rnd / rep
Use invisible decrease through the front loops when shaping the head, body, and snout so the decrease line stays flatter.
Pattern — Step by Step
Continuous spiral unless noted.
Head
Yarn: light pink
R1: 6 sc in MR (6)
R2: inc ×6 (12)
R3: (sc, inc) ×6 (18)
R4: (2 sc, inc) ×6 (24)
R5: (3 sc, inc) ×6 (30)
R6: (4 sc, inc) ×6 (36)
R7: 36 sc (36)
R8: 36 sc (36)
R9: 36 sc (36)
R10: 36 sc (36)
R11: 36 sc (36)
R12: 36 sc (36)
R13: (4 sc, dec) ×6 (30)
R14: 30 sc (30)
R15: (3 sc, dec) ×6 (24)
Insert eyes between R9 and R10, 8 stitches apart. Stuff the cheeks before closing.
R16: (2 sc, dec) ×6 (18)
R17: (sc, dec) ×6 (12)
R18: dec ×6 (6)
Fasten off. Leave 20 cm tail.
Snout
Yarn: light pink
R1: 6 sc in MR (6)
R2: inc ×6 (12)
R3: (sc, inc) ×6 (18)
R4: 18 sc (18)
R5: 18 sc (18)
R6: (sc, dec) ×6 (12)
R7: 12 sc (12)
Lightly stuff. Embroider nostrils after assembly.
Fasten off. Leave 20 cm tail.
Body
Yarn: light pink
R1: 6 sc in MR (6)
R2: inc ×6 (12)
R3: (sc, inc) ×6 (18)
R4: (2 sc, inc) ×6 (24)
R5: (3 sc, inc) ×6 (30)
R6: (4 sc, inc) ×6 (36)
R7: 36 sc (36)
R8: 36 sc (36)
R9: 36 sc (36)
R10: 36 sc (36)
R11: 36 sc (36)
R12: (4 sc, dec) ×6 (30)
R13: 30 sc (30)
R14: 30 sc (30)
R15: (3 sc, dec) ×6 (24)
R16: 24 sc (24)
R17: 24 sc (24)
R18: (2 sc, dec) ×6 (18)
R19: 18 sc (18)
Start stuffing the lower body firmly, but keep the neck opening soft enough for sewing.
R20: (sc, dec) ×6 (12)
R21: dec ×6 (6)
Fasten off. Leave 25 cm tail.
Belly Panel
Yarn: white
Ch 6.
R1: 5 sc, ch 1, turn (5)
R2: inc, 3 sc, inc (7)
R3: 7 sc (7)
R4: inc, 5 sc, inc (9)
R5: 9 sc (9)
R6: inc, 7 sc, inc (11)
R7: 11 sc (11)
R8: dec, 7 sc, dec (9)
R9: 9 sc (9)
R10: dec, 5 sc, dec (7)
Fasten off. Leave 25 cm tail.
Front Arms (Make 2)
Yarn: light pink
R1: 6 sc in MR (6)
R2: inc ×6 (12)
R3: 12 sc (12)
R4: 12 sc (12)
R5: (sc, dec) ×4 (8)
R6: 8 sc (8)
R7: 8 sc (8)
R8: 8 sc (8)
R9: 8 sc (8)
R10: 8 sc (8)
R11: 8 sc (8)
R12: 8 sc (8)
Stuff the hand area only. Embroider three white claws on each paw later.
Fasten off. Leave 20 cm tail.
Back Legs (Make 2)
Yarn: light pink
R1: 6 sc in MR (6)
R2: inc ×6 (12)
R3: (sc, inc) ×6 (18)
R4: BLO 18 sc (18)
R5: 18 sc (18)
R6: 18 sc (18)
R7: (sc, dec) ×6 (12)
R8: 12 sc (12)
R9: 12 sc (12)
R10: 12 sc (12)
R11: 12 sc (12)
R12: 12 sc (12)
R13: 12 sc (12)
Stuff the foot and lower leg. Embroider three white claws on each foot.
Fasten off. Leave 25 cm tail.
Ears (Make 2)
Yarn: light pink
Ch 2.
R1: 3 sc in 2nd ch from hook, ch 1, turn (3)
R2: inc, sc, inc (5)
R3: 5 sc (5)
R4: inc, 3 sc, inc (7)
R5: 7 sc (7)
R6: dec, 3 sc, dec (5)
R7: 5 sc (5)
Fold the base slightly before sewing so the ear opens forward.
Fasten off. Leave 15 cm tail.
Horns (Make 2)
Yarn: white
R1: 6 sc in MR (6)
R2: 6 sc (6)
R3: inc ×6 (12)
R4: 12 sc (12)
R5: 12 sc (12)
R6: dec ×6 (6)
Lightly stuff only the lower half.
Fasten off. Leave 15 cm tail.
Crown Spikes (Make 3)
Yarn: light pink
Ch 5.
R1: sl st in 2nd ch from hook, sc, hdc, sc (4)
Fasten off. Leave 12 cm tail.
Wings (Make 2)
Yarn: light pink outer edge, dark pink membrane
Using dark pink, ch 13.
R1: sc in 2nd ch from hook and across (12)
R2: ch 1, turn, dec, 8 sc, dec (10)
R3: 10 sc (10)
R4: ch 1, turn, dec, 6 sc, dec (8)
R5: 8 sc (8)
R6: ch 1, turn, dec, 4 sc, dec (6)
R7: 6 sc (6)
Do not fasten off. Switch to light pink.
Edging: sc evenly around the top and outer edge.
Membranes: ch 5, sl st into lower side point; ch 5, sl st into next lower side point; ch 5, sl st into base corner.
Embroider 3–4 white seed dashes on each wing panel after assembly.
Fasten off. Leave 20 cm tail.
Tail
Yarn: light pink
R1: 6 sc in MR (6)
R2: inc ×6 (12)
R3: 12 sc (12)
R4: 12 sc (12)
R5: inc ×6 distributed evenly (18)
R6: 18 sc (18)
R7: 18 sc (18)
R8: 18 sc (18)
R9: inc ×6 distributed evenly (24)
R10: 24 sc (24)
R11: 24 sc (24)
R12: 24 sc (24)
R13: inc ×6 distributed evenly (30)
R14: 30 sc (30)
R15: 30 sc (30)
Stuff lightly from the tip through R9. Keep the base softer for sewing and posing.
Fasten off. Leave 25 cm tail.
Dorsal Spikes (Make 7)
Yarn: sage green
Ch 5.
R1: sl st in 2nd ch from hook, sc, hdc, sc (4)
Fasten off. Leave 10 cm tail.
Cheek Patches (Make 2)
Yarn: blush pink
R1: 6 sc in MR (6)
R2: inc ×6 (12)
R3: 12 sc (12)
Fasten off. Leave 12 cm tail.
Strawberries (Make 6)
Yarn: dark pink/red
R1: 6 sc in MR (6)
R2: inc ×6 (12)
R3: (sc, inc) ×6 (18)
R4: 18 sc (18)
R5: 18 sc (18)
R6: (sc, dec) ×6 (12)
R7: 12 sc (12)
Lightly stuff. Embroider white seed dashes before closing.
R8: dec ×6 (6)
Fasten off. Leave 20 cm tail.
Strawberry Leaf Caps (Make 6)
Yarn: sage green
R1: 6 sc in MR (6)
R2: [sl st, ch 3, sl st in 2nd ch from hook, sc in next ch, sl st in same base stitch] ×6
Fasten off. Leave 12 cm tail.
Assembly
- Sew the snout to the lower front of the head, centered between rounds 8 and 13.
- Attach the cheek patches one stitch below the outer corners of the eyes.
- Sew the ears to the head sides, with the opening facing forward and the top edges slightly angled out.
- Place the horns in front of the ears, then sew the three crown spikes between and just behind them.
- Join the head to the body with the chin tipped slightly forward so the plush reads as seated, not upright.
- Sew the belly panel from the base of the snout down the front body centerline.
- Attach the front arms at upper body level, about 7 stitches apart, with the paws turned inward.
- Sew the back legs under the lower body so the feet project forward and create a wide sitting base.
- Attach the wings to the upper back, sew the tail low on the rear body, and add the dorsal spikes from neck to tail base.
- Sew two strawberries beside the horn line, one to each front leg, one near the lower body, and one at the tail tip; then embroider nostrils, wing seeds, and all claws.
The finished plush sits without extra support when the tail touches the surface behind the body.
7 Technical Tips
- Marker drift: The head will twist visually if the round start moves more than one stitch by R10. Move the marker every round and compare the eye line before inserting posts.
- Stuffing firmness: Overpacked cheeks push the eyes outward and flatten the snout seam. Keep the head firm at the crown and softer across the lower front third.
- Invisible decrease ridge: Standard decreases leave a visible seam on pale yarn, especially around R13–R17 of the head. Work all closing rounds with invisible decrease so the jaw line stays smoother.
- Eye placement timing: Install the eyes before the head drops below 24 stitches. On this size, place them between R9 and R10 with 8 stitches between the posts.
- Wing tension: Tight membranes curl upward and lose the strawberry-slice shape. Match the chain arches on both wings and keep each arch at 5 chains.
- Pinning order: The dragon reads off-balance when wings and tail are placed before the legs are fixed. Pin legs first, then tail, then wings, and check the sitting angle from the side.
- Tail weaving: A weak tail seam opens when the plush is used as a sitting display piece. Run the tail yarn through the body twice, then weave in at least 5 cm in two directions.
Conclusion
The structural work on this build is simple to read once the silhouette is locked: berry line at the crown, broad panels at the wings, and a tail that braces the seat. Your next step is to sew the head before attaching any berries, then check the front profile and side balance in one pass. Pin the finished side view and the wing seed detail for Pinterest, then post a front shot and a sitting-angle shot on Instagram with #StrawberryDragonPattern. That gives other makers the two views they actually need. For your next revision, will you keep the forehead berries beside the horns or move them higher into the crest of this strawberry dragon crochet pattern?









