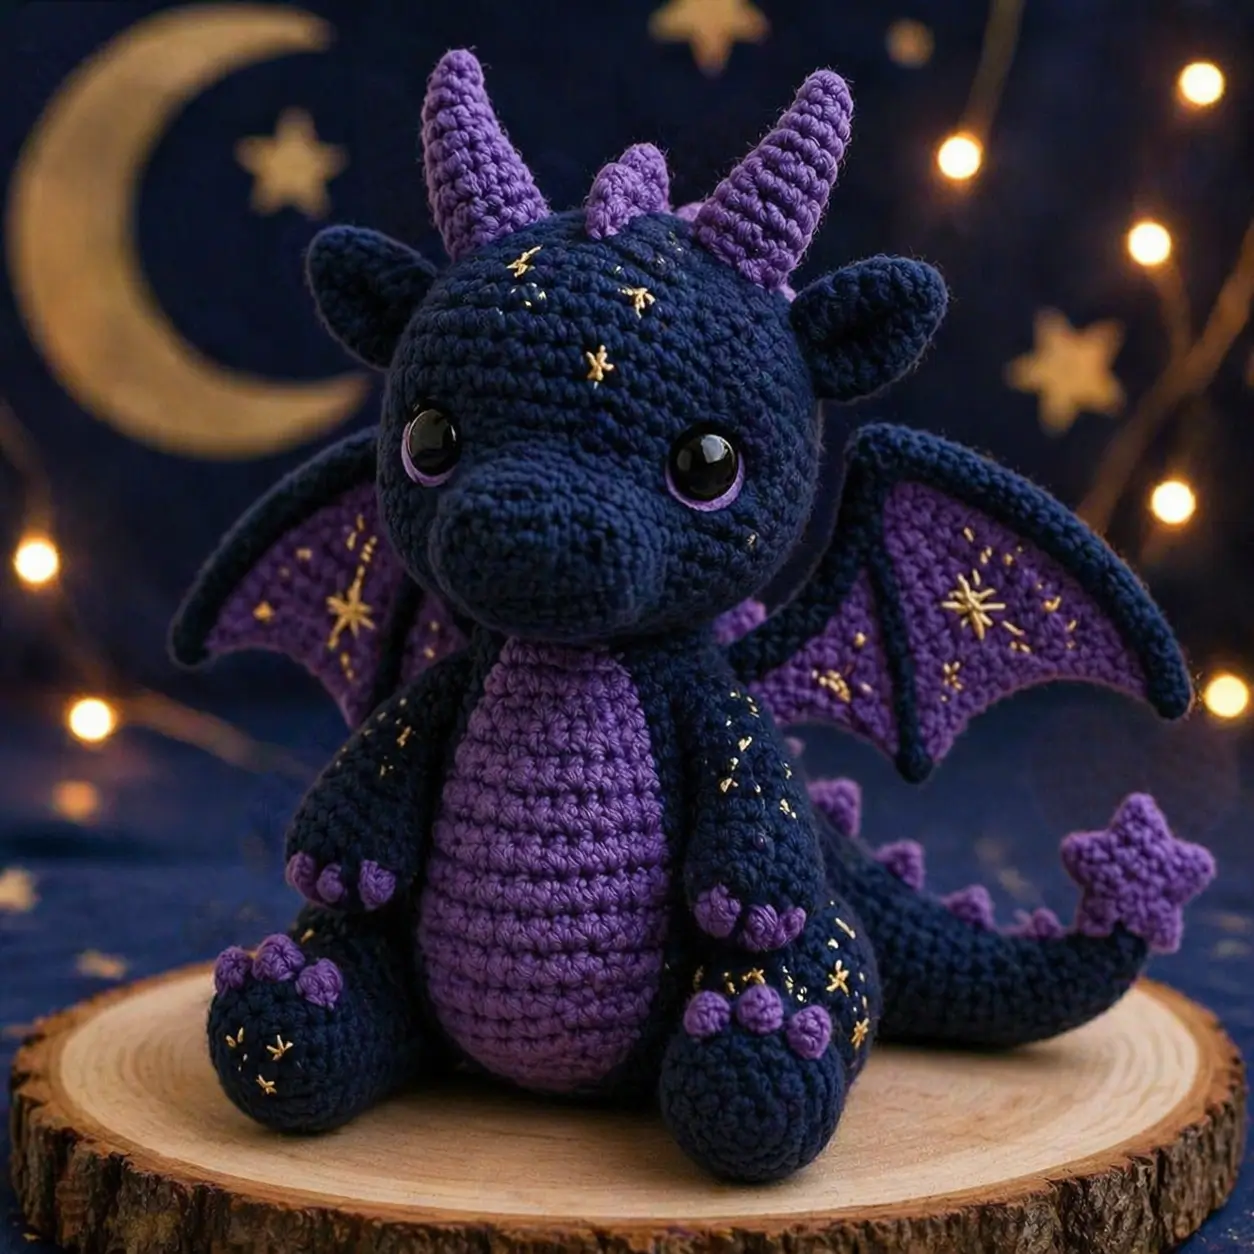
A dragon stops reading as a dragon the moment the wings drop below the horn line. This dragon amigurumi crochet pattern uses worsted yarn, a 4 mm hook, and 12 mm eyes to build a seated celestial dragon about 25 cm tall. Skill level is intermediate. Make it for shelf display, themed photography, or a fantasy gift that can sit flat without extra support.
The Design: What Makes This Dragon Different
You need three shapes to land this silhouette: a separate oval snout, high-set bat wings, and a tail that acts like a rear brace. Skip the separate muzzle and the profile turns reptile-flat. Drop the wings too low and the head reads heavy. The maker also has to keep the forehead ornaments short, because long center spikes crowd the horn line and pull attention away from the eyes. A common mistake in a sitting dragon amigurumi is using oversized legs and underfilled shoulders; the body then tilts backward and the neck seam looks buried. This build avoids that by keeping a medium 36-stitch shaping system, a sewn belly patch, and compact limb volumes. That structure separates it from many generic crochet dragon pattern layouts and fits the celestial dragon amigurumi look in the photo.
Project Info at a Glance
| Skill Level | Time | Finished Size | Hook | Best For |
|---|---|---|---|---|
| Intermediate | 6–8 hrs | 25 cm | 4.0 mm | Shelf display, themed gifts, photo props |
Materials and Tools
Yarn
- Deep navy — worsted — 60 g — Loops & Threads Impeccable or similar
- Violet purple — worsted — 25 g — Loops & Threads Impeccable or similar
- Metallic gold embroidery floss — light amount — standard craft thread
Tools
- Hook 4.0 mm
- 12 mm safety eyes
- Polyester stuffing
- Tapestry needle
- Stitch markers
- Pins
- Small embroidery needle
Public dragon patterns and kits show workable yarn benchmarks in the 50–56 g main-color range with roughly 12–25 g accent use, depending on height and yarn thickness.
Abbreviations
- MR = magic ring
- sc = single crochet
- inc = increase
- dec = invisible decrease
- sl st = slip stitch
- ch = chain
- BLO = back loop only
Use invisible decrease on shaping rounds for the head, body, limbs, and tail; it keeps dark yarn cleaner than a standard single-crochet-two-together.
Pattern — Step by Step
Continuous spiral unless noted.
Head (Make 1)
Yarn: deep navy
R1: 6 sc in MR [6]
R2: inc ×6 [12]
R3: (sc, inc) ×6 [18]
R4: (2 sc, inc) ×6 [24]
R5: (3 sc, inc) ×6 [30]
R6: (4 sc, inc) ×6 [36]
R7–R12: sc around [36]
R13: (4 sc, dec) ×6 [30]
R14: (3 sc, dec) ×6 [24]
R15: (2 sc, dec) ×6 [18]
R16: (sc, dec) ×6 [12]
R17: dec ×6 [6]
After R12, place the eyes between R9 and R10, 10 stitches apart. Slide each eye through a violet cheek patch before fixing the washer.
Stuff firmly before R17.
Fasten off. Leave 20 cm tail.
Snout (Make 1)
Yarn: deep navy
Ch 6.
R1: Starting in 2nd ch from hook, sc 4, 3 sc in last ch, sc 3 on opposite side, inc in last ch [12]
R2: inc, sc 3, inc ×3, sc 3, inc ×2 [18]
R3: (sc, inc), sc 3, (sc, inc) ×3, sc 3, (sc, inc) ×2 [24]
R4–R5: sc around [24]
R6: (2 sc, dec) ×6 [18]
R7: sc around [18]
Stuff lightly. Keep the front rounded, not packed hard.
Fasten off. Leave 25 cm tail.
Body (Make 1)
Yarn: deep navy
R1: 6 sc in MR [6]
R2: inc ×6 [12]
R3: (sc, inc) ×6 [18]
R4: (2 sc, inc) ×6 [24]
R5: (3 sc, inc) ×6 [30]
R6: (4 sc, inc) ×6 [36]
R7–R10: sc around [36]
R11: (4 sc, dec) ×6 [30]
R12–R13: sc around [30]
R14: (3 sc, dec) ×6 [24]
R15–R16: sc around [24]
R17: (2 sc, dec) ×6 [18]
R18: (sc, dec) ×6 [12]
R19: dec ×6 [6]
Stuff firmly, but leave the lower front slightly flatter so the doll sits cleanly.
Fasten off. Leave 20 cm tail.
Belly Patch (Make 1)
Yarn: violet purple
Ch 9.
R1: Starting in 2nd ch from hook, sc 7, 3 sc in last ch, sc 6 on opposite side, inc in last ch [18]
R2: inc, sc 6, inc ×3, sc 6, inc ×2 [24]
R3: (sc, inc), sc 6, (sc, inc) ×3, sc 6, (sc, inc) ×2 [30]
R4–R8: sc around [30]
R9: (3 sc, dec) ×6 [24]
R10–R11: sc around [24]
Fasten off. Leave 30 cm tail.
Front Legs (Make 2)
Yarn: deep navy
R1: 6 sc in MR [6]
R2: inc ×6 [12]
R3–R6: sc around [12]
R7: dec ×6 [6]
R8–R11: sc around [6]
Stuff the paw only. Leave the upper tube soft for sewing.
Fasten off. Leave 20 cm tail.
Back Legs (Make 2)
Yarn: deep navy
R1: 6 sc in MR [6]
R2: inc ×6 [12]
R3: (sc, inc) ×6 [18]
R4–R6: sc around [18]
R7: dec ×6 [12]
R8–R10: sc around [12]
Stuff the foot firmly and the upper leg lightly.
Fasten off. Leave 25 cm tail.
Toe Nubs (Make 12)
Yarn: violet purple
R1: 6 sc in MR [6]
Fasten off. Leave 8 cm tail.
Ears (Make 2)
Yarn: deep navy
R1: 6 sc in MR [6]
R2: inc ×6 [12]
R3: sc around [12]
R4: dec ×6 [6]
Do not stuff. Flatten slightly and pinch the base before sewing.
Fasten off. Leave 18 cm tail.
Horns (Make 2)
Yarn: violet purple
R1: 6 sc in MR [6]
R2: sc around [6]
R3: inc ×6 [12]
R4–R5: sc around [12]
Stuff lightly. Keep the tip compact.
Fasten off. Leave 18 cm tail.
Forehead Spikes (Make 2)
Yarn: violet purple
R1: 6 sc in MR [6]
R2: sc around [6]
R3: inc ×6 [12]
R4: sc around [12]
Fasten off. Leave 15 cm tail.
Tail (Make 1)
Yarn: deep navy
R1: 6 sc in MR [6]
R2: inc ×6 [12]
R3: (sc, inc) ×6 [18]
R4–R8: sc around [18]
R9: dec ×6 [12]
R10–R14: sc around [12]
R15: dec ×6 [6]
R16–R20: sc around [6]
Stuff only through R12. Leave the tip flexible so the tail can curve around the body.
Fasten off. Leave 25 cm tail.
Dorsal Spikes (Make 5)
Yarn: violet purple
Ch 4.
Row 1: sc 3 [3]
Row 2: ch 1, turn, dec, sc [2]
Row 3: ch 1, turn, dec [1]
Fasten off. Leave 12 cm tail.
Wings (Make 2)
Yarn: violet purple with deep navy border
With violet, ch 14.
Row 1: sc in 2nd ch from hook and across [13]
Row 2: ch 1, turn, dec, sc 9, dec [11]
Row 3: ch 1, turn, sc across [11]
Row 4: ch 1, turn, dec, sc 7, dec [9]
Row 5: ch 1, turn, sc across [9]
Row 6: ch 1, turn, dec, sc 5, dec [7]
Row 7: ch 1, turn, sc across [7]
Row 8: ch 1, turn, dec, sc 3, dec [5]
Fasten off violet.
Border in navy: Join yarn at top corner and sc evenly down one side, across the lower edge, and back up the other side. Work 3 sc in each lower corner and top tip to round the outline.
Do not stuff. Pin both wings before sewing so the top edge sits high behind the head.
Fasten off. Leave 25 cm tail.
Cheek Patches (Make 2)
Yarn: violet purple
R1: 6 sc in MR [6]
R2: inc ×6 [12]
Fasten off. Leave 15 cm tail.
Star Embroidery (Accessory)
Yarn: metallic gold embroidery floss
Add small cross stars and a few longer 6-point stars on the wings, forehead, limbs, and tail. Keep the stitches short so they do not snag.
Work the embroidery last, after final assembly, so the star placement follows the finished pose.
Assembly
- Sew the snout to the lower front of the head, centered under the eyes.
- Join the head to the body with the snout pointing slightly downward, not straight forward.
- Sew the belly patch to the center front of the body.
- Attach the front legs high on the body sides and the back legs lower and slightly forward in a seated angle.
- Sew three toe nubs to each foot and hand.
- Attach the ears level with the upper eye line, then sew the two large horns on top of the head.
- Place the two forehead spikes between the horns.
- Sew the tail to the lower back, then curve it around one side for balance.
- Attach the wings to the upper back so the top edge lines up close to the horn base, then sew the five dorsal spikes from neck to tail.
- Embroider the gold stars, weave in all tails, and shape the body by hand.
The finished dragon should sit without tipping once the back legs and curved tail share the rear load.
7 Technical Tips
- Marker drift on 36-stitch rounds: Mark round start and also mark stitch 18 on the opposite side. One missed increase on dark yarn will twist the face line before you notice it.
- Stuffing firmness in the body: Press the lower body after R16; it should compress slightly, not collapse. An overpacked body pushes the legs outward and lifts the front edge off the table.
- Invisible decrease tension: Pull the decrease just tight enough to close the top loops, then stop. Over-tight dec rounds on navy yarn create vertical dents that show under angled light.
- Eye placement timing: Install the eyes after the last full 36-stitch head round. One row lower makes the snout look longer and shifts the expression toward dinosaur rather than dragon.
- Wing pinning height: Pin the top wing corner level with the horn base before sewing. A drop of even 2 cm changes the silhouette more than a wider wing does.
- Tail stuffing control: Stuff through round 12 only and leave the rest soft. A rigid tail pushes the dragon forward instead of acting as a curved rear brace.
- Tail weaving and spike seams: Split each tail end in two directions inside the body before trimming. Single-path weaving near spikes or wings can work loose after repeated handling.
Conclusion
This build keeps the seated profile readable by controlling three things: wing height, muzzle volume, and tail balance. The next step is simple. Cut the yarn, make the head first, and test the eye placement before committing to the body. Photograph the finished piece from the front for Pinterest and from a three-quarter angle for Instagram so the horn line and wing set are visible. Use #CelestialNightDragon. This dragon amigurumi crochet pattern also leaves room for variation, especially in the star embroidery. Would you place more gold stars on the wings, or keep the forehead darker so the horns stand out?









