Introduction
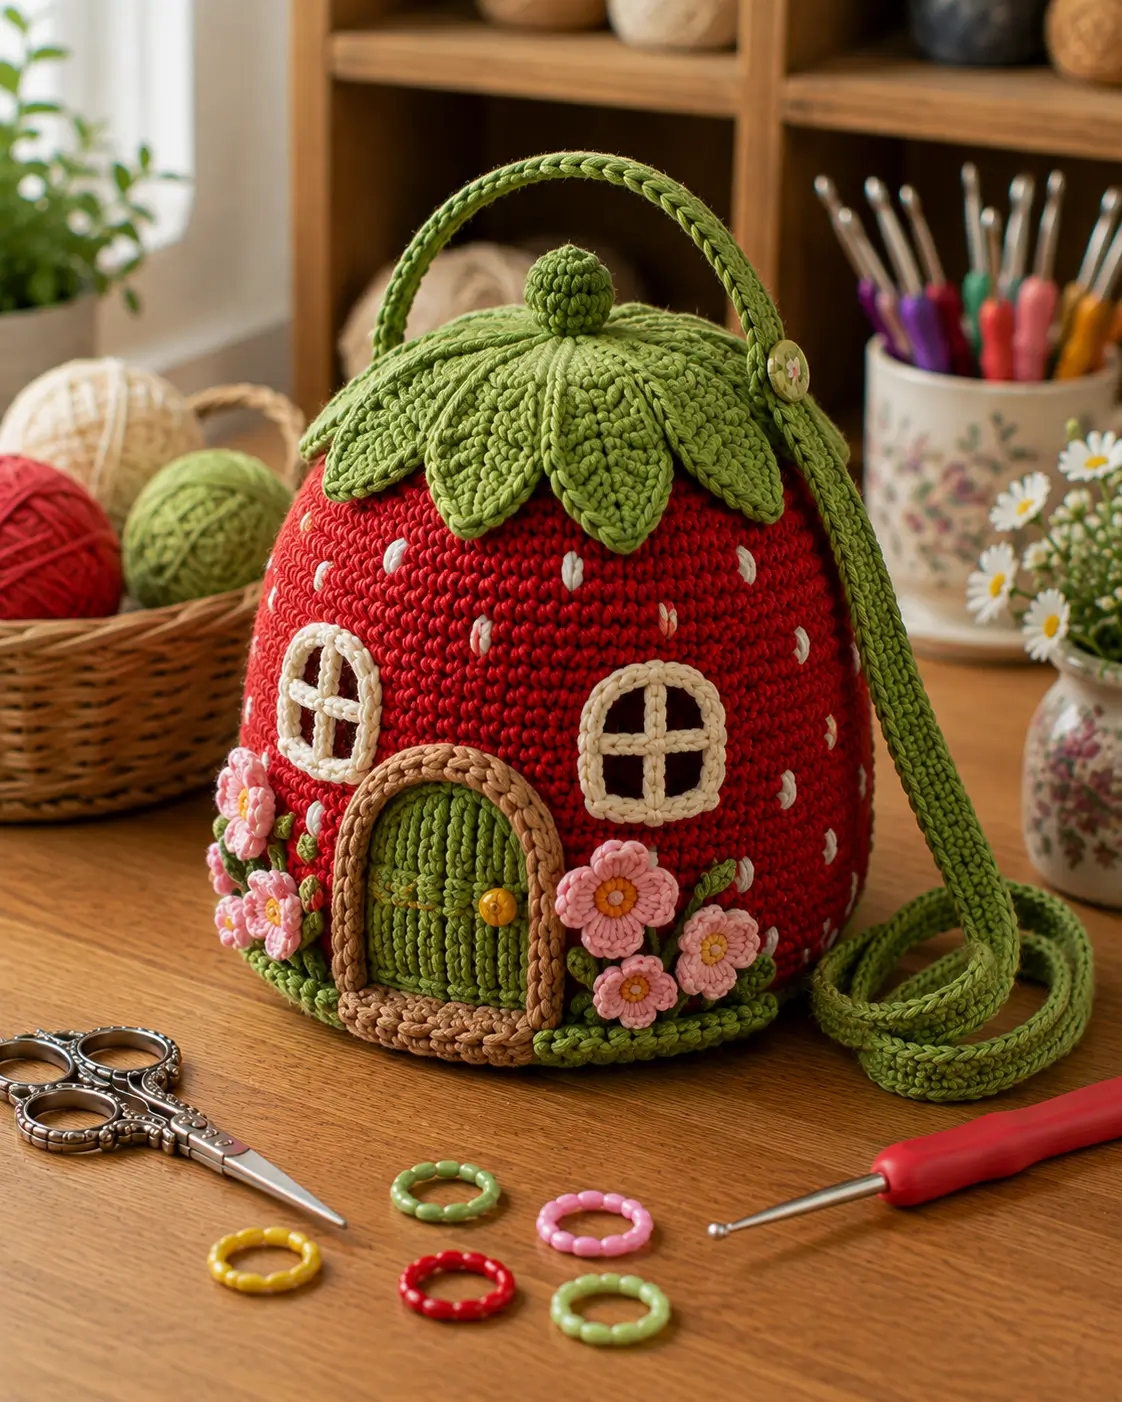
A strawberry wall carrying two windows and an arched front door needs more structure than an ordinary fruit-shaped purse. This strawberry cottage crochet bag pattern uses firm worsted cotton with 3.5 mm and 3 mm hooks to make an approximately 30 × 32 cm crossbody bag. A red berry body, seven-leaf roof, floral garden and reinforced strap make this an intermediate accessory project.
The Design: What Makes This Strawberry Cottage Different
The strawberry body supplies both the bag shape and the cottage walls, so the red panels must remain firm after the door, windows and flowers are added. Seven pointed green leaves overlap the upper edge and function as a roof while still preserving the fruit silhouette. The façade is intentionally asymmetric: two windows sit at different heights around one arched green door, while pink flowers create most of the lower visual weight. White embroidered seed marks keep the house readable as a strawberry rather than a generic red cottage. A common mistake in a strawberry house crochet bag is attaching the shoulder strap only through the decorative roof. Strap load must pass into the structural body or repeated use will stretch the green leaf edge and distort the opening.
Project Info at a Glance
| Skill Level | Time | Finished Size | Hooks | Best For |
|---|---|---|---|---|
| Intermediate | 16–22 hours | Approx. 30 × 32 × 9 cm | 3.5 mm body / 3.0 mm details | Crossbody bag, cottagecore accessory and decorative purse |
Materials and Tools
Yarn
- Strawberry red — firm worsted cotton #4 — approximately 280–330 g — main front, back and gusset.
- Leaf green — firm worsted cotton #4 — approximately 190–230 g — roof leaves, strap, door, foliage and top knob.
- Warm cream — worsted cotton #4 — approximately 45–60 g — windows, crossbars and strawberry seeds.
- Tan / light brown — worsted cotton #4 — approximately 50–65 g — arched door frame, threshold and trim.
- Soft pink — worsted cotton #4 — approximately 30–35 g — dimensional flowers.
- Golden yellow — worsted cotton #4 — approximately 5–10 g — flower centers and door knob.
A non-stretch cotton or cotton-rich yarn works better than a soft acrylic for the main bag because the façade carries multiple sewn decorations.
Tools
- 3.5 mm crochet hook for structural pieces
- 3.0 mm crochet hook for flowers, windows and small leaves
- Yarn needle
- Stitch markers
- Dressmaking pins
- Scissors
- Measuring tape
- Optional cotton lining fabric
- Optional firm felt or plastic canvas for base reinforcement
- 1 decorative button for the visible strap attachment
- 1 small yellow button or crocheted circle for the door knob
Abbreviations
- MR — magic ring
- ch — chain
- sc — single crochet
- hdc — half double crochet
- dc — double crochet
- inc — increase
- dec — decrease
- sl st — slip stitch
- BLO — back loop only
An invisible decrease is worked through the front loops of two neighboring stitches before one single crochet is completed through both loops.
Pattern — Step by Step
The bag uses separate front and back strawberry panels connected by a gusset. Complete and block the red structure before sewing on the cottage details.
Front Strawberry Panel
Yarn: strawberry red — original reconstruction based on standard six-stitch circular expansion and controlled top shaping.
R1: 6 sc in MR (6)
R2: inc ×6 (12)
R3: (sc, inc) ×6 (18)
R4: (2 sc, inc) ×6 (24)
R5: (3 sc, inc) ×6 (30)
R6: (4 sc, inc) ×6 (36)
R7: (5 sc, inc) ×6 (42)
R8: (6 sc, inc) ×6 (48)
R9: (7 sc, inc) ×6 (54)
R10: sc around (54)
R11: sc around (54)
R12: sc around (54)
R13: sc around (54)
R14: sc around (54)
R15: sc around (54)
R16: (7 sc, dec) ×6 (48)
R17: sc around (48)
R18: sc around (48)
R19: (6 sc, dec) ×6 (42)
R20: sc around (42)
R21: sc around (42)
R22: (5 sc, dec) ×6 (36)
Fasten off.
Block into a broad strawberry silhouette approximately 29–30 cm wide and 30–31 cm high. Keep the lower half rounded and the upper edge slightly narrower.
Back Strawberry Panel
Yarn: strawberry red.
Repeat R1–R22 of the front panel.
Fasten off.
Block both panels to identical dimensions before constructing the gusset.
Gusset
Yarn: strawberry red.
Ch 11.
Row 1: starting in the second chain, 10 sc. (10)
Rows 2–92: ch 1, turn, sc across. (10)
Fasten off with a long sewing tail.
Target width approximately 8–9 cm. Adjust total rows until the strip runs around both sides and the bottom of one blocked strawberry panel while leaving the top opening free.
Attach the Gusset
Mark the center of the gusset and the bottom center of the front panel.
Pin those points together.
Continue pinning upward on both sides.
Sew or single-crochet the gusset to the front panel without stretching either piece.
Repeat with the back panel.
Keep approximately 18–20 cm of the upper edge open for bag access.
Reinforce the Opening
Join green yarn at one side of the opening.
Sc evenly around the complete top opening.
Work a second round of sc through the back loop only.
Fasten off.
This two-round band supports the roof and shoulder strap.
Large Roof Leaf — Make 7
Yarn: leaf green — original pointed leaf reconstruction.
Ch 18.
Starting in the second chain work:
sl st, sc, hdc, 3 dc, 5 tr, 3 dc, hdc, sc, sl st.
Work 3 sc in the final chain.
Rotate and return along the opposite side in mirrored stitch order.
Fasten off with approximately 30 cm of yarn.
Target approximately 14–16 cm long.
Add Leaf Veins
Use a darker green or the same green doubled.
Surface slip stitch from the leaf base toward the point.
Stop approximately 10 mm before the tip.
Keep the vein tension loose enough that the leaf remains flat.
Arrange the Leaf Roof
Place seven leaves around the top opening.
The central front leaf should point downward above the middle of the door.
Overlap neighboring leaf bases by approximately 10–15 mm.
Sew the upper third of each leaf firmly into the reinforced opening band.
Leave the lower half free so the leaf points remain dimensional.
Top Strawberry Knob
Yarn: leaf green.
R1: 6 sc in MR (6)
R2: inc ×6 (12)
R3: (sc, inc) ×6 (18)
R4: sc around (18)
R5: sc around (18)
R6: (sc, dec) ×6 (12)
R7: dec ×6 (6)
Add a small amount of yarn scrap or fiberfill.
Close and sew at the roof center.
Green Arched Door
Yarn: leaf green.
Ch 19.
Row 1: starting in second chain, 18 sc. (18)
Rows 2–13: ch 1, turn, sc across. (18)
Row 14: ch 1, turn, dec, 14 sc, dec. (16)
Row 15: dec, 12 sc, dec. (14)
Row 16: dec, 10 sc, dec. (12)
Row 17: dec, 8 sc, dec. (10)
Row 18: dec, 6 sc, dec. (8)
Fasten off.
Use surface slip stitches vertically along the door to create plank texture.
Tan Door Frame
Yarn: tan / light brown.
Ch approximately 56 or enough to follow one side of the door, over the arch and down the other side.
Starting in the second chain, sc back across.
Fasten off with a long tail.
Pin around the door perimeter and sew in place.
Door Threshold
Ch 21 with tan.
Row 1: 20 sc.
Rows 2–4: ch 1, turn, 20 sc.
Fasten off.
Sew beneath the green door.
Door Knob
Use a small yellow button or crochet a 6-sc MR with mustard yarn.
Attach it to the viewer’s right side of the door about one-third of the distance from the vertical center.
Cream Window Frame — Make 2
Yarn: warm cream.
Ch 26 and join without twisting.
Sc around the chain loop.
Join and fasten off.
Shape each ring into a rounded square approximately 6–7 cm across.
Window Crossbars — Make 4
Ch 8.
Sl st back through seven chains.
Fasten off.
Use one vertical and one horizontal bar per window.
Sew the bars to the inner window frame before attaching the complete window to the strawberry wall.
Place the Windows
Position one window above and left of the door.
Place the second above and right, slightly higher if you want the asymmetry visible in the reference.
Keep at least 30 mm between the window frames and the door trim.
Sew only through the cream frame rather than across the open interior.
Strawberry Seeds
Yarn: warm cream.
Embroider approximately 18–24 seeds across the visible red front and side areas.
Each seed should be a short vertical or slightly angled stitch approximately 8–10 mm long.
Keep seeds away from the door, windows and flower clusters.
Vary the angle slightly rather than placing them in rigid columns.
Five-Petal Pink Flower — Make 7 to 9
Yarn: soft pink.
Work 10 sc in MR and join.
For each petal repeat:
sl st in next stitch, 3 dc in next stitch.
Repeat five times around.
Join and fasten off.
Flower Center
Use mustard yarn.
Work 6 sc in MR.
Join and fasten off.
Sew one yellow center to each pink flower.
Small Green Flower Leaf — Make 10 to 14
Yarn: leaf green.
Ch 6.
Starting in the second chain:
sl st, sc, hdc, dc, sc.
Work 3 sc in the final chain.
Return along the opposite side:
sc, dc, hdc, sc, sl st.
Fasten off.
Arrange the Flower Garden
Place a larger cluster to the left of the door and a smaller cluster to the right.
Overlap several flower edges by approximately 5 mm.
Add small green leaves behind the flowers.
Sew each flower through its center and one concealed petal point so the outer petals retain some lift.
Green Ground Vine
Yarn: leaf green.
Ch enough to reach around the lower front edge, approximately 70–80 chains.
Sl st back through every chain.
Pin the cord along the bottom of the door and flower garden.
Sew it at approximately 20–25 mm intervals.
Crossbody Strap
Yarn: leaf green.
Ch 191 or enough to measure approximately 110 cm without stretching.
Row 1: starting in the second chain, sc across.
Row 2: ch 1, turn, BLO sc across.
Row 3: ch 1, turn, sc across.
Fasten off with long sewing tails.
Finished strap target: approximately 2–2.5 cm wide × 105–115 cm long.
Reinforce the Strap
Surface slip stitch along both long strap edges.
This reduces lengthwise stretch and produces the corded outline visible in the image.
Measure again after finishing because the edging may shorten the strap by several centimeters.
Attach the Strap
Insert each strap end beneath the reinforced top band by approximately 4–5 cm.
Sew a rectangle around the embedded end.
Add an X-shaped reinforcing seam through the middle.
Repeat on the opposite side.
The visible decorative button can be sewn over one attachment, but the button should not carry the bag load.
Optional Lining
Trace the assembled bag onto cotton fabric before final strap attachment.
Cut front and back lining pieces plus a narrow side strip with a 1 cm seam allowance.
Sew the lining separately.
Insert it into the crochet shell.
Hand-stitch the upper lining edge approximately 8–10 mm below the green opening band.
Add firm felt or plastic canvas to the bottom when the bag will carry heavier objects.
Assembly
- Make the red front and back strawberry panels, block them to matching dimensions and connect them with the 10-stitch gusset.
- Work two green reinforcement rounds around the opening before adding any roof leaves or strap hardware.
- Crochet seven pointed roof leaves, add their central veins and sew only their upper sections around the top opening.
- Attach the stuffed green top knob at the center of the leaf roof.
- Sew the green arched door, tan frame, tan threshold and yellow knob onto the lower front of the red strawberry wall.
- Assemble the two cream windows with crossbars and sew them above the door while keeping at least 30 mm of clear red fabric around the trims.
- Embroider approximately 18–24 cream strawberry seeds across the remaining visible red areas.
- Attach the pink flower clusters, small green leaves and lower green vine around the base of the cottage façade.
- Sew the reinforced strap ends 4–5 cm into the upper structural band and add the decorative side button only after the load-bearing seam is complete.
- Add the optional lining, check the top opening for distortion and weave all remaining tails through at least 4 cm of matching crochet.
The completed bag should stand with a rounded strawberry profile while the roof leaves remain dimensional, the façade stays flat and the shoulder strap transfers load into the reinforced opening.
7 Technical Tips
- Top opening stretches into an oval: The strap is attached only through the decorative leaf roof. Sew each strap end at least 4–5 cm into the reinforced green opening band and use a rectangle-plus-X seam.
- Door buckles away from the strawberry wall: Its green panel is stiffer than the red body. Pin the door at six or more points and keep perimeter sewing stitches approximately 10–12 mm apart.
- Window frames become distorted: The cream loop is being sewn under tension. Shape each frame to about 6–7 cm before pinning and attach it without shortening its circumference.
- Leaf roof collapses over the windows: Too much of each leaf has been left unsupported. Sew the upper third securely and keep the free lower section to roughly 8–10 cm.
- Flower cluster pulls the red wall inward: Too many petals are fully sewn down. Attach each flower through the center plus one petal point and leave the remaining edges free.
- Crossbody strap grows during use: Three plain rows of single crochet can stretch lengthwise. Add surface slip stitches to both long edges and remeasure against the 105–115 cm target before attachment.
- Bag base rounds instead of standing: The gusset lacks lower reinforcement. Add firm felt or plastic canvas roughly 8 cm wide inside the bottom section before sewing in the lining.
Why the Strawberry Body Needs a Gusset
A flat fruit appliqué can be made from two simple circles, but a functioning cottage purse needs interior depth. The gusset separates the front from the back by approximately 8–9 cm, creating room for a phone, wallet and small accessories.
That depth also protects the façade.
Without a gusset, filled contents push directly against the door and windows from inside the bag. A structured side strip moves some of that pressure outward instead.
The strawberry cottage crochet bag pattern therefore treats the red fruit as a three-dimensional container rather than a decorative pillow shape.
Why the Roof Leaves Stay Partly Free
Sewing every leaf completely flat would simplify construction but remove the strongest dimensional detail.
Only the upper third needs to carry structural attachment.
The remaining pointed section can overlap its neighbors and lift slightly from the red wall.
This arrangement also hides the transition between the green opening band and the red strawberry body.
Keep the central leaf directly above the door so the roof has a clear visual center.
Controlling the Cottage Façade
Install the largest architectural feature first.
That means the door precedes the windows, seeds and flowers.
Once the arched door is centered, window placement can be measured from it.
The flowers then fill the lower negative spaces rather than dictating the entire composition.
Seeds are added last because they should occupy only the red areas that remain visible.
This order prevents decorative pieces from crowding one another.
Changing the Bag Size
For a smaller strawberry fairy house bag, stop the main red panel at a 42-stitch maximum instead of 54 stitches.
Reduce the gusset to approximately 7 cm wide and shorten the roof leaves to about 11–12 cm.
For a larger tote, expand the front and back panels to 60 stitches and increase the gusset to approximately 11 cm.
Resize the door and windows proportionally rather than keeping the original façade pieces.
Changing the Strawberry Colors
Classic red produces the clearest strawberry identification.
Dusty pink creates a softer cottagecore version.
Cream with pink seeds makes a pale fantasy strawberry, while burgundy gives the house a darker woodland appearance.
Keep the roof green unless a deliberately stylized palette is wanted because the leaf crown is the second major cue identifying the fruit.
Changing the Flower Garden
The supplied image uses pink flowers with yellow centers.
White daisies with yellow centers can create stronger contrast against the red wall.
Lavender flowers work well with sage leaves.
A mixed garden can use several colors, but repeat each flower color at least twice so isolated shades do not appear accidental.
Keep the flower cluster below the window line so the cottage architecture remains readable.
Controlling Seed Placement
Seeds work best as secondary details.
Mark the windows, door and flower area first.
Then add short cream stitches in the remaining red spaces.
Maintain approximately 25–35 mm between neighboring seeds.
Angle several marks slightly left or right.
A rigid vertical grid makes the strawberry wall look printed rather than organic.
Strap Load and Bag Structure
The shoulder strap is the most stressed component in the project.
Decorative buttons should cover the attachment, not replace it.
Embed the strap end several centimeters into the structural band and sew through multiple rows.
For a bag that will carry heavier objects, add a strip of cotton webbing inside the crochet strap or beneath the lining.
This reinforcement prevents the roof line from stretching under repeated loading.
Final Shaping
Fill the finished bag temporarily with folded towels before judging its shape.
Check that the base sits level and the side gusset does not twist.
Lift each roof leaf by hand and adjust the flower petals.
Confirm that both window crossbars remain square.
Hang the bag from its strap for several minutes and inspect the opening for visible elongation before burying the final strap tails.
Conclusion
Build the red bag shell before working the cottage decorations because every door, window and flower measurement depends on the finished strawberry dimensions. Your next step is to make one 54-stitch front panel, block it to roughly 30 cm wide and test the 8–9 cm gusset before duplicating the back. Keep the roof leaves partly free and anchor the strap through the structural band. Share the finished strawberry cottage crochet bag pattern project on Pinterest with the complete façade visible, then post the flower-and-door detail on Instagram using #StrawberryCottageBag. For this cottage specifically, would you keep the pink flower garden or change the flowers to white daisies?









