Introduction
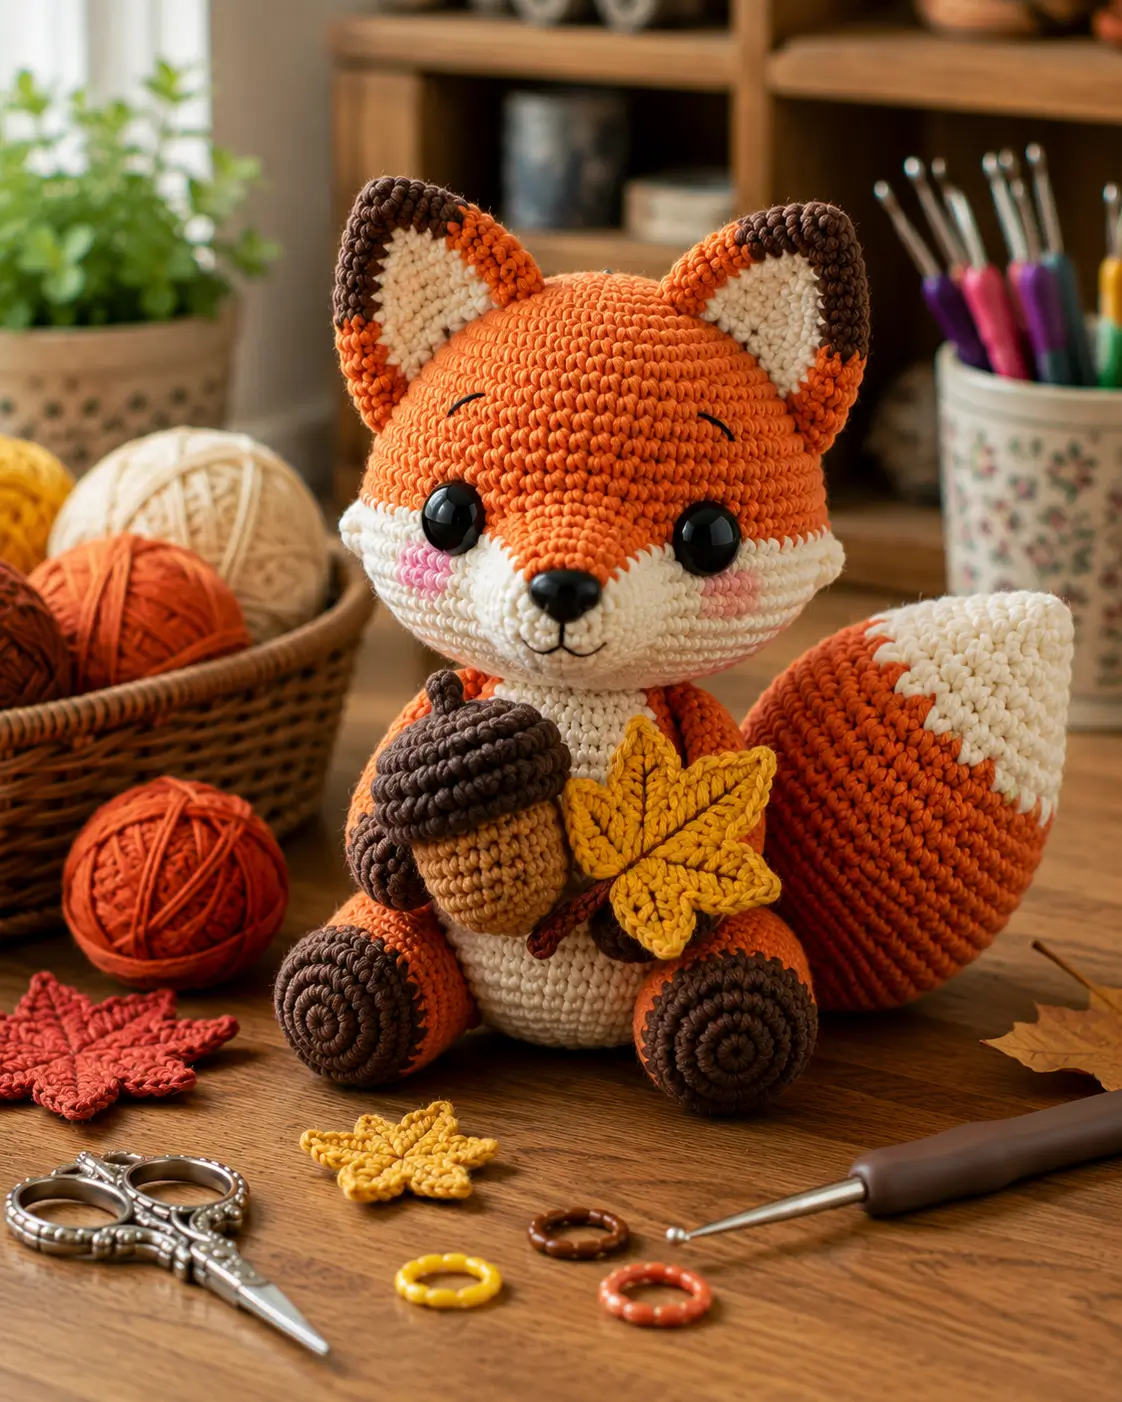
A fox tail this wide can pull the entire seated figure backward before the maple leaf is even attached. This autumn fox amigurumi crochet pattern uses worsted yarn, a 3.5 mm hook and 15 mm eyes to make an approximately 27–30 cm character. Orange fur, cream markings, brown paws, an acorn and a mustard leaf create an intermediate woodland project designed to sit without external support.
The Design: What Makes This Autumn Fox Different
The head reaches a 42-stitch plateau because the large eyes, broad cream cheeks and tapered fox muzzle need more width than the 36-stitch torso. The rear legs expand to 30 stitches and sit well forward, counterbalancing the oversized bushy tail behind the body. That tail changes from cream at the tip to orange through the center, then uses darker rust near the base to reproduce the strong color blocking visible in the reference. The fox with acorn crochet pattern also places both front legs around separate autumn accessories rather than leaving the paws at the sides. A common fox-amigurumi mistake is sewing the ears before positioning the cream muzzle. The face may then appear too narrow because the ear angle exaggerates head width before the central facial pieces establish the actual symmetry.
Project Info at a Glance
| Skill Level | Time | Finished Size | Hook | Best For |
|---|---|---|---|---|
| Intermediate | 13–17 hours | Approx. 27–30 cm sitting height | 3.5 mm | Woodland displays, fall décor and character collections |
Materials and Tools
Yarn
- Pumpkin orange — worsted / Aran #4 — approximately 150–180 g — head, body, ears, legs and tail.
- Warm cream — worsted / Aran #4 — approximately 60–80 g — muzzle, cheeks, belly, inner ears and tail tip.
- Chocolate brown — worsted / Aran #4 — approximately 55–70 g — paw pads, ear tips, acorn cap and leaf vein.
- Camel / tan — worsted / Aran #4 — approximately 20–25 g — acorn body.
- Mustard yellow — worsted / Aran #4 — approximately 15–20 g — maple leaf.
- Dusty pink — worsted / Aran #4 — approximately 3–5 g — cheek patches.
- Black embroidery yarn — small quantity — nose, mouth and eyebrows.
Tools
- 3.5 mm crochet hook
- 15 mm safety eyes
- 16–18 mm safety nose or embroidered black nose
- Polyester fiberfill
- Long tapestry needle
- Standard yarn needle
- Stitch markers
- Dressmaking pins
- Scissors
- Measuring tape
Use embroidered eyes instead of plastic hardware when detachable hard components are not appropriate for the intended recipient.
Abbreviations
- MR — magic ring
- sc — single crochet
- inc — increase
- dec — decrease
- sl st — slip stitch
- ch — chain
- hdc — half double crochet
- dc — double crochet
- tr — treble crochet
- BLO — back loop only
An invisible decrease is worked through the front loops of the next two stitches before completing one single crochet through both loops.
Pattern — Step by Step
Work stuffed round pieces in continuous spirals unless stated otherwise. Place a marker in the first stitch of every round and move it upward after each completed round.
Head
Yarn: pumpkin orange — Source: standard six-stitch amigurumi math; size benchmark informed by published worsted/Aran fox patterns.
R1: 6 sc in MR (6)
R2: inc ×6 (12)
R3: (sc, inc) ×6 (18)
R4: (2 sc, inc) ×6 (24)
R5: (3 sc, inc) ×6 (30)
R6: (4 sc, inc) ×6 (36)
R7: (5 sc, inc) ×6 (42)
R8: sc around (42)
R9: sc around (42)
R10: sc around (42)
R11: sc around (42)
R12: sc around (42)
R13: sc around (42)
R14: sc around (42)
R15: sc around (42)
R16: sc around (42)
R17: sc around (42)
R18: (5 sc, dec) ×6 (36)
R19: sc around (36)
R20: (4 sc, dec) ×6 (30)
R21: (3 sc, dec) ×6 (24)
R22: (2 sc, dec) ×6 (18)
R23: (sc, dec) ×6 (12)
R24: dec ×6 (6)
Place 15 mm eyes between R13 and R14, approximately 9 stitches apart. Pin the muzzle temporarily before fixing the washers so the eye spacing can be judged against the finished facial width.
Stuff the forehead and sides firmly. Add slightly less fiberfill behind the lower face so the muzzle can sit flush.
Fasten off and close the remaining six stitches.
Cream Muzzle
Yarn: warm cream — Source: original reconstruction using standard oval amigurumi geometry.
Ch 7.
R1: starting in second chain, 5 sc, 3 sc in final chain, rotate, 4 sc, inc in final stitch (14)
R2: inc, 4 sc, inc ×3 across the rounded end, 4 sc, inc ×2 (20)
R3: sc around (20)
R4: sc around (20)
Fasten off with a 35 cm tail.
Add only a small amount of stuffing so the muzzle projects approximately 15–18 mm.
Nose
Center a 16–18 mm black safety nose or embroider a dense triangular nose on the upper front of the muzzle.
Add one vertical black stitch approximately 10 mm long beneath the nose.
Split the lower end into two short curved mouth lines.
Cream Cheek Patches — Make 2
Yarn: warm cream — Source: standard flat-circle math.
R1: 6 sc in MR (6)
R2: inc ×6 (12)
R3: (sc, inc) ×6 (18)
Fasten off with a 20 cm tail.
Flatten each circle into a shallow oval while sewing it beside the muzzle.
Pink Cheek Patches — Make 2
Yarn: dusty pink — Source: standard flat-circle math.
R1: 6 sc in MR (6)
Join with sl st.
Fasten off with a 15 cm tail.
Sew one beneath each eye near the cream cheek boundary.
Outer Ears — Make 2
Yarn: pumpkin orange and chocolate brown — Source: original triangular reconstruction.
Ch 9 with chocolate brown.
Row 1: starting in second chain, 8 sc. (8)
Row 2: ch 1, turn, dec, 4 sc, dec. (6)
Change to orange.
Row 3: ch 1, turn, sc across. (6)
Row 4: ch 1, turn, dec, 2 sc, dec. (4)
Row 5: ch 1, turn, sc across. (4)
Row 6: ch 1, turn, dec ×2. (2)
Row 7: ch 1, turn, dec. (1)
Fasten off with a 35 cm sewing tail.
Cream Inner Ears — Make 2
Yarn: warm cream.
Ch 7.
Row 1: starting in second chain, 6 sc. (6)
Row 2: ch 1, turn, dec, 2 sc, dec. (4)
Row 3: ch 1, turn, sc across. (4)
Row 4: ch 1, turn, dec ×2. (2)
Row 5: ch 1, turn, dec. (1)
Fasten off.
Sew the cream triangle onto the orange ear, leaving approximately one full outer row visible.
Attach the Face
Center the muzzle directly below the midpoint between the eyes.
Pin both cream cheek patches before sewing any of the three cream pieces permanently.
The cheek edges should overlap the muzzle by approximately 5–8 mm.
Add black eyebrows approximately 18–22 mm above each eye.
Body
Yarn: warm cream for lower belly, pumpkin orange for upper body — Source: standard six-stitch amigurumi math.
R1: with cream, 6 sc in MR (6)
R2: inc ×6 (12)
R3: (sc, inc) ×6 (18)
R4: (2 sc, inc) ×6 (24)
R5: (3 sc, inc) ×6 (30)
R6: (4 sc, inc) ×6 (36)
R7: sc around (36)
R8: sc around (36)
R9: sc around (36)
R10: sc around (36)
R11: change to orange, sc around (36)
R12: sc around (36)
R13: (4 sc, dec) ×6 (30)
R14: sc around (30)
R15: (3 sc, dec) ×6 (24)
R16: sc around (24)
R17: (2 sc, dec) ×6 (18)
R18: sc around (18)
R19: (sc, dec) ×6 (12)
R20: sc around (12)
R21: dec ×6 (6)
Stuff the lower body firmly because it acts as the central support against the tail weight.
Fasten off and close.
Front Legs — Make 2
Yarn: chocolate brown changing to pumpkin orange — Source: standard amigurumi math.
R1: with brown, 6 sc in MR (6)
R2: inc ×6 (12)
R3: (sc, inc) ×6 (18)
R4: sc around (18)
R5: sc around (18)
R6: change to orange, sc around (18)
R7: sc around (18)
R8: sc around (18)
R9: (sc, dec) ×6 (12)
R10: sc around (12)
R11: sc around (12)
R12: sc around (12)
R13: sc around (12)
Stuff the paw end firmly and the upper third lightly.
Fasten off with a 35 cm sewing tail.
Back Legs — Make 2
Yarn: chocolate brown changing to pumpkin orange — Source: standard six-stitch amigurumi math.
R1: with brown, 6 sc in MR (6)
R2: inc ×6 (12)
R3: (sc, inc) ×6 (18)
R4: (2 sc, inc) ×6 (24)
R5: (3 sc, inc) ×6 (30)
R6: sc around (30)
R7: sc around (30)
R8: change to orange, (3 sc, dec) ×6 (24)
R9: sc around (24)
R10: (2 sc, dec) ×6 (18)
R11: sc around (18)
R12: (sc, dec) ×6 (12)
Stuff firmly through the foot and lower leg.
Leave the top 2 cm softer for attachment.
Fasten off with a 40 cm tail.
Brown Back-Paw Pads — Make 2
Yarn: chocolate brown.
R1: 6 sc in MR (6)
R2: inc ×6 (12)
R3: (sc, inc) ×6 (18)
Fasten off with a 25 cm tail.
Sew one circle to the forward-facing end of each back foot.
Bushy Tail
Yarn: warm cream, rust orange and pumpkin orange — Source: original reconstruction using standard six-stitch amigurumi expansion.
R1: with cream, 6 sc in MR (6)
R2: inc ×6 (12)
R3: sc around (12)
R4: (sc, inc) ×6 (18)
R5: sc around (18)
R6: change to pumpkin orange, (2 sc, inc) ×6 (24)
R7: sc around (24)
R8: (3 sc, inc) ×6 (30)
R9: sc around (30)
R10: (4 sc, inc) ×6 (36)
R11: sc around (36)
R12: sc around (36)
R13: change to rust orange, sc around (36)
R14: sc around (36)
R15: sc around (36)
R16: (4 sc, dec) ×6 (30)
R17: sc around (30)
R18: (3 sc, dec) ×6 (24)
R19: sc around (24)
R20: (2 sc, dec) ×6 (18)
R21: sc around (18)
R22: (sc, dec) ×6 (12)
R23: sc around (12)
R24: dec ×6 (6)
Stuff the cream tip lightly, the broad center moderately and the narrow base firmly enough to hold its attachment angle.
Fasten off with a 50 cm sewing tail.
Shape the Tail
Bend the broad tail into a gentle upward curve.
Use a long internal orange shaping strand from the lower base to approximately R12.
Pull until the cream tip rises approximately 5–7 cm above the seated surface.
Do not make a sharp bend.
Acorn Body
Yarn: camel / tan — Source: standard amigurumi math.
R1: 6 sc in MR (6)
R2: inc ×6 (12)
R3: (sc, inc) ×6 (18)
R4: (2 sc, inc) ×6 (24)
R5: sc around (24)
R6: sc around (24)
R7: sc around (24)
R8: (2 sc, dec) ×6 (18)
R9: sc around (18)
R10: (sc, dec) ×6 (12)
R11: dec ×6 (6)
Stuff firmly.
Fasten off and close.
Acorn Cap
Yarn: chocolate brown — Source: standard flat-circle expansion adapted as a shallow cap.
R1: 6 sc in MR (6)
R2: inc ×6 (12)
R3: (sc, inc) ×6 (18)
R4: (2 sc, inc) ×6 (24)
R5: BLO sc around (24)
R6: sc around (24)
Fasten off with a 30 cm tail.
Fit the cap over the wide end of the tan acorn and sew around R6.
Acorn Stem
Ch 6 with chocolate brown.
Sl st back through five chains.
Fasten off and sew to the center of the cap.
Mustard Maple Leaf
Yarn: mustard yellow — Source: original five-lobed flat crochet reconstruction.
Work 10 sc in MR and join.
Center lobe: ch 10; starting in second chain work sl st, sc, hdc, dc, tr, dc, hdc, sc, sl st. Work 3 sc at tip and return in mirrored order.
Upper side lobes: make 2. Ch 8; starting in second chain work sl st, sc, hdc, dc, tr, hdc, sc. Work 3 sc at tip and return in mirrored order.
Lower side lobes: make 2. Ch 6; starting in second chain work sl st, sc, hdc, dc, sc. Work 3 sc at tip and return in mirrored order.
Stem: ch 8 and sl st back through seven chains.
Fasten off.
Target approximately 9–11 cm across.
Maple Leaf Vein
Use chocolate brown yarn.
Backstitch from the leaf stem into the central lobe.
Add four short branch lines toward the side lobes.
Keep surface stitches approximately 6–8 mm long.
Position the Acorn and Leaf
Place the acorn against the fox’s left side.
Angle its cap slightly toward the center of the body.
Overlap the mustard leaf partly across the acorn and cream belly.
The leaf should remain visible between the two front legs.
Assembly
- Sew the cream muzzle and two cream cheek patches to the head, then add the nose, mouth, pink cheeks and black eyebrows around the installed eyes.
- Attach both layered ears to the upper head with their tips angled outward by approximately 15–20 degrees.
- Sew the head to the 36-stitch body through a neck area approximately 4–5 cm wide, reinforcing the rear half of the seam.
- Attach the two 30-stitch back legs low and slightly forward so both brown pads face the viewer and form a stable sitting base.
- Sew the two front legs to the upper sides of the torso, leaving enough central space for the acorn and maple leaf.
- Attach the bushy tail behind the fox on the viewer’s right, sewing through a base area approximately 3–4 cm wide rather than one narrow point.
- Set the fox on a hard surface and correct the rear-leg position if the tail causes the body to tip backward.
- Sew the acorn against the front of the cream belly and anchor it with two concealed attachment zones so it cannot rotate.
- Layer the mustard maple leaf partly over the acorn, tack the leaf through its center vein and position the front paws against both accessories.
- Inspect the face, ears, legs, tail and accessories from front and side views, then weave every remaining tail through at least 4 cm of matching crochet.
The completed fox should sit without support while the tail rises behind one side and the acorn and maple leaf remain visible between the front paws.
7 Technical Tips
- Fox tips backward: The tail base or rear legs are too far behind the body center. Move both rear legs forward by approximately 10–15 mm before strengthening the tail seam.
- Muzzle appears crooked: Its center does not line up with the midpoint between the eyes. Mark that vertical axis and keep the nose within approximately 3 mm of it before completing the cream cheek seams.
- Tail loses its upward curve: The broad middle section contains too much stuffing or lacks an internal shaping strand. Keep the tip lighter and lift it approximately 5–7 cm above the seated surface with one concealed pull stitch.
- Ear angles do not match: One base is positioned higher on the 42-stitch head. Measure from each eye to the nearest ear base and keep the two measurements within approximately 5 mm.
- Back paws rotate sideways: The 30-stitch legs were sewn before testing the seated base. Pin both brown pads forward and confirm three-point contact between the body and two feet before final attachment.
- Acorn rotates between the paws: One central sewing point acts like a hinge. Use two concealed attachment areas separated by approximately 20–25 mm across the acorn back.
- Maple leaf curls into a cup: The brown vein stitches are pulling the mustard fabric inward. Keep each surface stitch approximately 6–8 mm long and tack only the leaf center plus selected points.
Why the Head Uses a 42-Stitch Plateau
The fox’s facial structure is dominated by the head rather than the torso. Large eyes, broad cream cheek patches and the central muzzle all need enough horizontal room to remain separate.
A 36-stitch head would make the same 15 mm eyes occupy much more of the face.
Expanding to 42 stitches produces one additional six-stitch growth round while preserving standard amigurumi geometry.
The body stays at 36 stitches, so the character still has the oversized-head proportions visible in the reference.
Balancing the Oversized Tail
The tail is almost as visually large as the body, which changes the engineering of the toy.
Its cream end should remain lightly filled.
More fiberfill belongs in the orange center, while the narrow base needs enough density to resist collapsing at the seam.
Attach the base across several body stitches.
Then test the seated fox before attaching the acorn.
If the figure falls backward, reposition the rear legs rather than adding a large amount of extra stuffing to the belly.
Changing the Fox Size
For a smaller woodland fox amigurumi, use DK yarn with a 2.75–3 mm hook and stop the head at 36 stitches.
Reduce the body to a 30-stitch plateau, back legs to 24 stitches and tail to a 30-stitch maximum.
For a larger version, use a thicker worsted yarn while keeping the 42-stitch head structure.
Measure the eyes again after changing scale; hardware that suits a 30 cm toy may look disproportionately large on a 22 cm version.
Changing the Tail Colors
The reference uses a cream tip and orange/rust body.
A white tip creates stronger contrast.
Deep brown can replace rust at the base to connect the tail visually with the paws and ear tips.
Keep at least one pale tail section because a fully orange tail loses the strongest fox-specific marking.
Changing the Autumn Accessories
The acorn and maple leaf define the seasonal theme without clothing the fox.
The acorn can be changed from camel to medium brown while retaining a darker cap.
For the leaf, rust red or olive green can replace mustard.
Do not enlarge both accessories at once.
The front legs need visible separation, and oversized pieces can cover the cream belly and lower muzzle.
Controlling the Fox Face
Pin the muzzle, cheeks and ears before permanently sewing any one of them.
The eye line should remain level.
Keep the pink cheeks below the pupils and outside the muzzle edge.
Eyebrows should follow the upper eye line without touching the orange forehead center.
Small changes of only a few millimeters are highly visible on a symmetrical animal face.
Finishing the Autumn Fox
After assembly, set the figure on a rigid surface rather than a cushion.
Check that the brown paw pads face forward and both front paws touch or visually frame the accessories.
Rotate the tail until its cream tip remains visible from the front three-quarter view.
Lift the maple-leaf points by hand.
Finally, inspect the seam beneath the head and the tail base for movement before burying the last yarn tails.
Conclusion
Balance the tail before fixing the autumn accessories because its weight determines the final rear-leg position. Your next step is to complete the 42-stitch head, 36-stitch body and one back leg, then test the planned proportions before batching the remaining pieces. Keep the tail tip lightly filled and anchor the acorn at two points. Share the finished autumn fox amigurumi crochet pattern project on Pinterest with the full striped tail visible, then post the acorn-and-leaf detail on Instagram using #AutumnAcornFox. For this fox specifically, would you keep the mustard maple leaf or change it to rust red?









