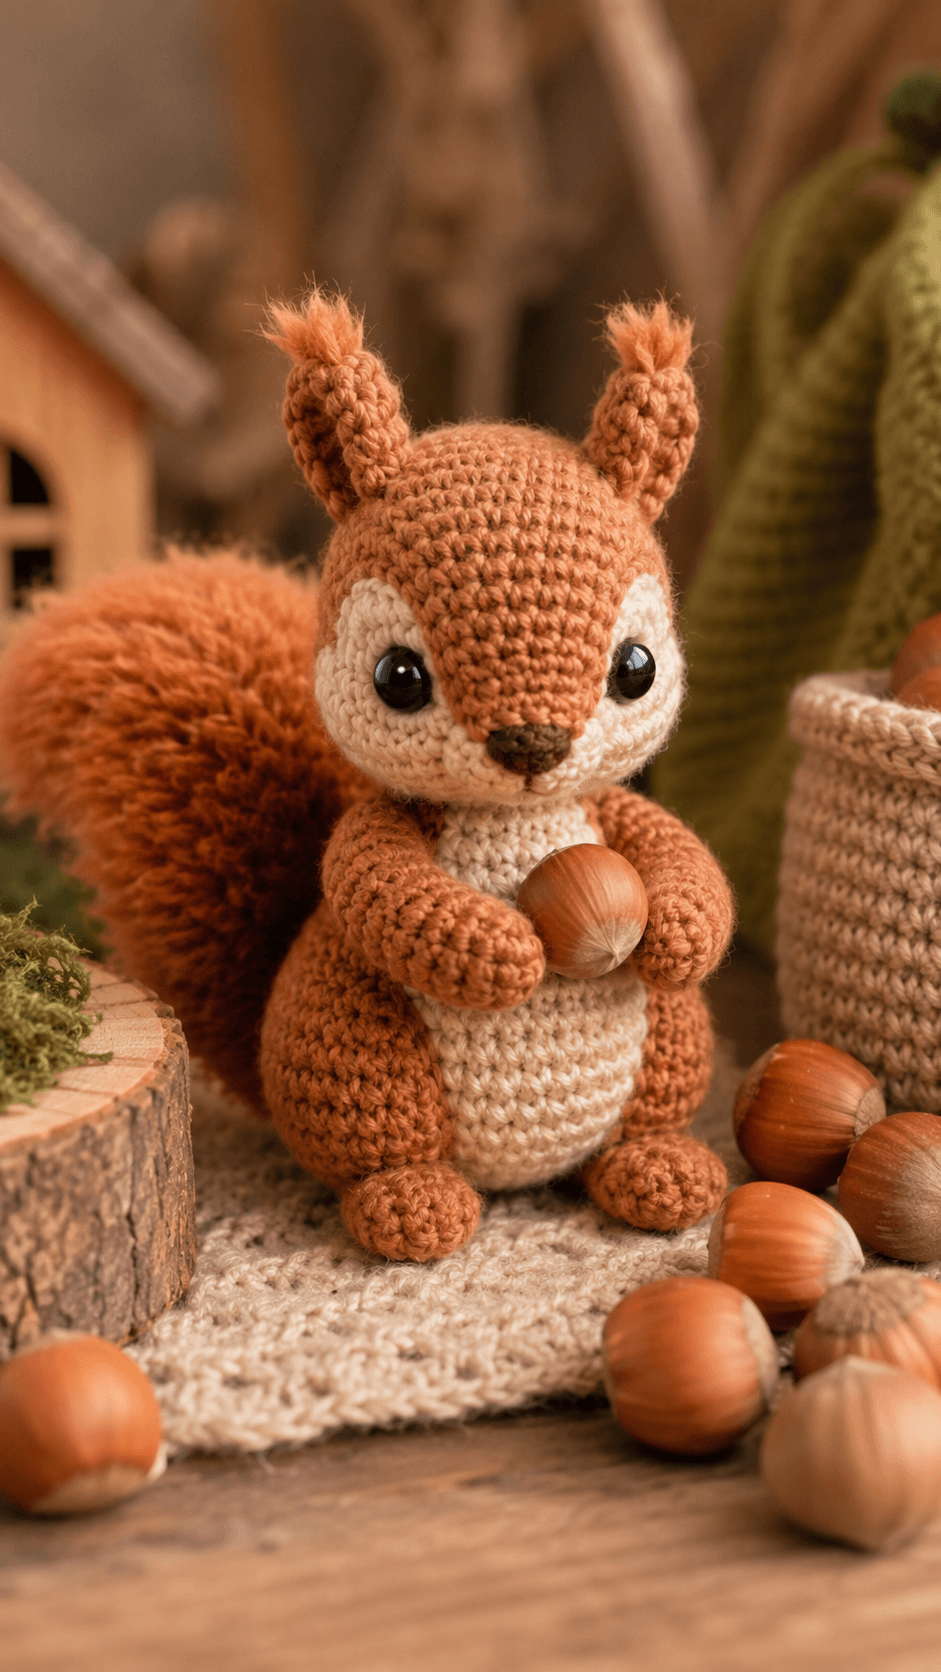
A squirrel amigurumi only works when the tail has more volume than the torso without overpowering the head. That proportion defines this squirrel amigurumi pattern. The sample shown here uses warm rust yarn, a cream belly and face patch, upright ears with tufted tips, glossy safety eyes, and a large fluffy tail while the paws hold a small nut. It suits intermediate crocheters who can manage compact shaping, clean color placement, and balanced assembly on a small standing figure.
The Design: What Makes This Squirrel Different
This squirrel depends on silhouette first. The head is rounded and slightly oversized, but the muzzle narrows downward enough to create a woodland animal profile instead of a generic plush toy shape. That matters because squirrels rely on face taper and cheek contrast more than long snouts or large ears.
The second design choice is the tail scale. The tail is large, soft, and positioned high behind the body, which gives the figure its species identity immediately. In a squirrel amigurumi, a tail that is too short or too flat makes the whole piece read more like a chipmunk or teddy bear.
The third choice is the paw placement. The front paws sit close together around a nut, which keeps the body centered and adds a clear focal detail. One common mistake with a crochet squirrel is attaching the arms too low. That makes the chest look long and weakens the upright seated posture.
Project Info at a Glance
| Skill Level | Time | Finished Size | Hook | Best For |
|---|---|---|---|---|
| Intermediate | 5–8 hours | Approx. 16–22 cm / 6–9 in tall | 2.5–3.25 mm | Woodland decor, nursery shelves, handmade gifts, fall displays |
Materials and Tools
Yarn
- Rust or squirrel-brown yarn — DK or light worsted — approx. 70–100 g
- Cream yarn — small amount for belly and face patches
- Dark brown yarn — small amount for nose and nut detail
- Faux fur or brushed yarn — optional for the tail
Tools
- Crochet hook 2.5 mm to 3.25 mm
- Tapestry needle
- Stitch markers
- Scissors
- Polyfill stuffing
- Safety eyes 8–12 mm
- Pet brush, optional, for a fluffier tail finish
Abbreviations
- MR = magic ring
- sc = single crochet
- inc = increase
- dec = decrease
- sl st = slip stitch
- ch = chain
- BLO = back loop only
- FLO = front loop only
For amigurumi shaping, invisible decrease gives a cleaner surface than standard decrease. It matters most around the face and head closure.
Construction Overview
This squirrel is built from separate parts and assembled after stuffing. The head and body are worked as individual rounded forms. The cream belly panel and cream cheek patches are added to break up the rust body color. Small arms, feet, ears, and a large tail complete the figure, while the paws can be positioned around a crocheted or real decorative nut for the finished woodland look.
Head
The head should be the dominant form after the tail. It needs a smooth round crown, gentle face taper, and enough space for large eyes and cream cheek panels.
- Start with an MR and work 6 sc into the ring.
- Increase evenly until the head reaches a medium amigurumi plateau, usually 36 stitches.
- Work several even rounds to build height.
- Insert the safety eyes before the final decrease rounds.
- Add stuffing firmly, especially through the forehead and cheeks.
- Decrease evenly to close.
Keep the lower face slightly firmer than the crown. That helps the muzzle area hold its taper once the cheek patches are attached.
Body
The body is compact and pear-shaped rather than cylindrical. It should support a seated posture and leave enough front space for the cream belly panel.
- Begin with an MR and work the first round in sc.
- Increase to a slightly smaller plateau than the head.
- Work even rounds through the middle.
- Decrease lightly toward the neck area so the head sits naturally on top.
- Stuff the base firmly to help the squirrel stand in a seated pose.
Belly Patch
The cream belly patch keeps the front from looking too dark and helps separate the arms and nut from the torso. A tapered oval works best for the sample shape.
- Crochet a small cream oval or shield-shaped panel.
- Keep the lower edge rounded and the upper edge narrower.
- Sew it to the center front of the body before attaching the arms.
Cheek or Face Patches
The squirrel in the sample has pale side patches that soften the face and frame the eyes. These should be attached symmetrically on both sides of the muzzle area.
- Make two cream curved patches.
- Position them below and slightly outside the eyes.
- Sew them down smoothly so they do not wrinkle around the eye area.
Ears
The ears are short, upright, and slightly pointed with soft tufted tips. Their height matters because squirrels need visible ears, but the tail must still dominate the outline.
- Work two small tapered ear pieces in rust yarn.
- Flatten the base for easier sewing.
- Add a tuft of brushed yarn or loose strands at each tip if desired.
- Attach them evenly at the top sides of the head.
Arms
The front arms should be short and slightly curved inward. They are mainly for pose and should direct attention toward the nut.
- Make two narrow tubes in rust yarn.
- Stuff lightly or leave unstuffed for easier shaping.
- Flatten the upper opening and sew to the chest area.
- Angle both paws inward toward the body center.
Legs and Feet
The squirrel sits low, so the feet can be small rounded pieces attached near the lower front edge. They should support the seated silhouette without extending far outward.
- Work two tiny rounded feet or short leg pieces.
- Stuff lightly.
- Sew them near the bottom front of the body.
Tail
The tail is the defining feature. It should be large, full, and curved upward behind the body. The sample uses a fluffy texture, which can be made with plush yarn, brushed yarn, or a separate furry tail cover.
- Work the tail as a long curved panel or stuffed crescent in rust yarn.
- Build more width through the middle than at the base tip.
- Stuff lightly if using standard yarn, or leave flatter if using a fluffy yarn.
- Brush the surface if a fur-like finish is wanted.
- Attach the tail high on the back so it curves around the body silhouette.
The tail should rise from behind the shoulders rather than from the very base. That keeps the squirrel upright and prevents the back from looking too long.
Nose and Face Details
The nose is small and dark, with minimal embroidery below it. The eyes already carry most of the expression, so the nose should stay compact.
- Embroider a small brown or black nose at the muzzle tip.
- Add a short vertical line below it.
- Keep the mouth detail minimal or omit it entirely for a cleaner toy look.
Nut Accessory
The nut is optional, but it completes the squirrel theme immediately. A tiny crocheted oval in tan or brown works well if you do not want to use a real decorative nut.
- Make a small oval or acorn-shaped piece in brown yarn.
- Stuff lightly if needed.
- Sew or position it between the front paws.
Assembly
- Finish the head and body first.
- Sew the belly patch to the body front.
- Attach the cheek patches to the head.
- Join the head to the body securely.
- Add the ears to the head top.
- Attach the legs near the body base.
- Sew the arms to the upper chest and angle them inward.
- Attach the tail high on the back.
- Embroider the nose and any mouth detail.
- Add the nut between the paws.
Color Placement Notes
Keep the main body, tail, ears, and limbs in warm rust or red-brown, with cream on the belly and side face patches. That arrangement matches the sample and keeps the woodland squirrel look clear. A deeper chocolate shade can work, but the contrast between the body and cream front should remain visible.
Common Failure Points
- Tail overpowering the toy: The tail is too wide for the body size. Reduce the middle width or attach it farther back.
- Squirrel reading like a teddy bear: The face lacks taper or the cheek patches are missing. Narrow the muzzle area and keep the cream facial contrast.
- Arms sitting too low: The paws were attached below the chest midpoint. Raise them so the nut sits higher on the torso.
- Ears disappearing against the tail: The ears are too short. Add more height or small tufted tips.
- Figure tipping forward: The body base is underfilled or the tail is attached too low. Firm the lower body and raise the tail anchor point.
Where This Squirrel Works Best
This style works well on nursery shelves, seasonal mantels, woodland-themed displays, and gift sets paired with foxes, hedgehogs, or rabbits. It performs best as a display amigurumi rather than a heavily handled toy because the tail and paw pose are part of the visual appeal. In fall decor, the nut accessory also helps the squirrel read clearly from a distance.
Conclusion
A squirrel amigurumi succeeds when the tail stays full, the face keeps its taper, and the paws sit high enough to support the nut detail. Focus on proportion, tail placement, and clean cream contrast across the belly and cheeks. For the closest match to the sample, use warm rust yarn, a fluffy curved tail, upright tufted ears, and a compact seated body. Once assembled, the piece reads immediately as a squirrel while still fitting the soft proportions of amigurumi design.









